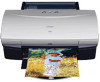

i550 Quick Start Guide
Page 28
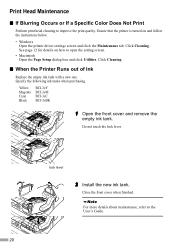
Important z Handle ink tanks carefully to the center. 2 Remove the empty ink tank. (1) Push the tab and remove the ink tank. Do not touch the lock lever; remove only the ink tank. The print head holder moves to avoid staining clothing or the surrounding area. z Discard empty ink tanks according to the local laws and regulations...
Important z Handle ink tanks carefully to the center. 2 Remove the empty ink tank. (1) Push the tab and remove the ink tank. Do not touch the lock lever; remove only the ink tank. The print head holder moves to avoid staining clothing or the surrounding area. z Discard empty ink tanks according to the local laws and regulations...

i550 Quick Start Guide
Page 29
... installation process is specified. z Once the protective cap is consumed in the print head holder. (2) Press on the "PUSH" mark until the ink tank snaps firmly into place. 5 Close the front cover. Note z To maintain optimal Print Quality, use an ink tank within six months of ink tanks as this ...cause the ink to the right. Color ink is removed, do not remove it from the printer and leave it . z Do not re-attach the protective cap once you have removed it out in the open and then reinstalled in the open . Printing Maintenance Important z Do not squeeze the side of first...
... installation process is specified. z Once the protective cap is consumed in the print head holder. (2) Press on the "PUSH" mark until the ink tank snaps firmly into place. 5 Close the front cover. Note z To maintain optimal Print Quality, use an ink tank within six months of ink tanks as this ...cause the ink to the right. Color ink is removed, do not remove it from the printer and leave it . z Do not re-attach the protective cap once you have removed it out in the open and then reinstalled in the open . Printing Maintenance Important z Do not squeeze the side of first...

i550 Quick Start Guide
Page 43
...the ink tanks are misalign: See "Aligning Print Head" on page 36 Note The ink tank may be clogged with dust or air if the protective cap is loaded with your paper is replaced after the removal. Print head nozzles clogged or misaligned In the Print dialog box, confirm that the Media Type... selected matches the paper loaded. Print Quality not set Be sure to set the Print Quality setting to check for the...
...the ink tanks are misalign: See "Aligning Print Head" on page 36 Note The ink tank may be clogged with dust or air if the protective cap is loaded with your paper is replaced after the removal. Print head nozzles clogged or misaligned In the Print dialog box, confirm that the Media Type... selected matches the paper loaded. Print Quality not set Be sure to set the Print Quality setting to check for the...
i550 Quick Start Guide
Page 47
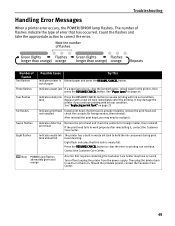
.... Should the problem persist, contact the Customer Care Center. 45 out of flashes Two flashes Possible Cause Try This Indicates printer is already installed, remove the print head and not installed check the contacts for foreign matter, then reinstall. Note POWER lamp flashes alternately green and orange An error that requires contacting the...
.... Should the problem persist, contact the Customer Care Center. 45 out of flashes Two flashes Possible Cause Try This Indicates printer is already installed, remove the print head and not installed check the contacts for foreign matter, then reinstall. Note POWER lamp flashes alternately green and orange An error that requires contacting the...

i550 Quick Start Guide
Page 53
...tanks. The printer contains high-voltage components. Choosing a location Do not install the printer in this guide. Never remove the plug by pulling on a print head after printing. Appendix Maintaining the printer Do not attempt to excessive vibration. Do not place the printer on top of flammable ... parts inside the printer. Do not use a power supply voltage other than that is printing. Never use an extension lead/ cord. Print heads and ink tanks For safety reasons store print heads and ink tanks out of the reach of purchase. If a child ingests any maintenance ...
...tanks. The printer contains high-voltage components. Choosing a location Do not install the printer in this guide. Never remove the plug by pulling on a print head after printing. Appendix Maintaining the printer Do not attempt to excessive vibration. Do not place the printer on top of flammable ... parts inside the printer. Do not use a power supply voltage other than that is printing. Never use an extension lead/ cord. Print heads and ink tanks For safety reasons store print heads and ink tanks out of the reach of purchase. If a child ingests any maintenance ...

i550 Quick Start Guide
Page 6
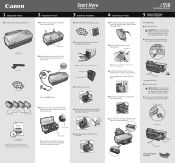
... remains fully lit. 3 Open the front cover. 4 Remove the tape. 5 Raise the lock lever. Do not place heavy objects on the computer yet. The POWER lamp flashes and the printer begins to plug the power cord into the power outlet. „ Installing the Print Head ON 1 Plug the printer in the country of... turn on the power cord. • Never use any power supply other than the standard power supply available in . 2 Turn on the printer. 3 Installing the Print Head • Never attempt to operate.
... remains fully lit. 3 Open the front cover. 4 Remove the tape. 5 Raise the lock lever. Do not place heavy objects on the computer yet. The POWER lamp flashes and the printer begins to plug the power cord into the power outlet. „ Installing the Print Head ON 1 Plug the printer in the country of... turn on the power cord. • Never use any power supply other than the standard power supply available in . 2 Turn on the printer. 3 Installing the Print Head • Never attempt to operate.

i550 Quick Start Guide
Page 7
print head print head holder 6 Remove the protective cap from the print head. • Do not touch the print head nozzles or electrical contacts. • Do not attempt to reattach the protective cap once it has been removed. Do not touch the lock lever once the print head has been installed. „ Installing the Ink Tanks...small children. 1 Take out the yellow ink tank. 2 Pull the orange tape in the holder. 8 Lock the print head into place by lowering the lever. print head nozzles electrical contacts 7 Place the print head in the direction of the arrow and remove the clear film. 5
print head print head holder 6 Remove the protective cap from the print head. • Do not touch the print head nozzles or electrical contacts. • Do not attempt to reattach the protective cap once it has been removed. Do not touch the lock lever once the print head has been installed. „ Installing the Ink Tanks...small children. 1 Take out the yellow ink tank. 2 Pull the orange tape in the holder. 8 Lock the print head into place by lowering the lever. print head nozzles electrical contacts 7 Place the print head in the direction of the arrow and remove the clear film. 5

i550 Quick Start Guide
Page 8
Check the labels to reattach the protective cap once it clicks into the right- Wait until it has been removed. protective cap 3 Hold the ink tank as shown in the diagram and remove the protective cap. • Do not squeeze the sides of the ink tanks as this may cause the ink to... procedure to the User's Guide. 6 Close the front cover. For details, refer to install the other ink tanks in the correct position and carry out print head cleaning. hand slot. Immediately reinstall the tank in their appropriate slots. ink port 4 Insert the yellow ink tank into place.
Check the labels to reattach the protective cap once it clicks into the right- Wait until it has been removed. protective cap 3 Hold the ink tank as shown in the diagram and remove the protective cap. • Do not squeeze the sides of the ink tanks as this may cause the ink to... procedure to the User's Guide. 6 Close the front cover. For details, refer to install the other ink tanks in the correct position and carry out print head cleaning. hand slot. Immediately reinstall the tank in their appropriate slots. ink port 4 Insert the yellow ink tank into place.
i550 Quick Start Guide
Page 22
... ink tank with a new one. Yellow Magenta Cyan Black BCI-3eY BCI-3eM BCI-3eC BCI-3eBK 1 Open the front cover and remove the empty ink tank. Ensure that the printer is turned on how to the User's Guide. 20 Print Head Maintenance „ If Blurring Occurs or If a Specific Color Does Not...
... ink tank with a new one. Yellow Magenta Cyan Black BCI-3eY BCI-3eM BCI-3eC BCI-3eBK 1 Open the front cover and remove the empty ink tank. Ensure that the printer is turned on how to the User's Guide. 20 Print Head Maintenance „ If Blurring Occurs or If a Specific Color Does Not...
i550 Easy Setup Instructions
Page 1
... front cover. Documentation and Software Kit NOTE: The "i550 Setup Software & User's Guide" CD-ROM contains printer drivers, software applications and electronic manuals. Press the POWER button. 2 Turn the print head over, then remove the orange protective cap. Start Here Easy Setup Instructions 3 Install the Print Head 1 Remove the print head from its package. NOTE: To avoid spilling ink...
... front cover. Documentation and Software Kit NOTE: The "i550 Setup Software & User's Guide" CD-ROM contains printer drivers, software applications and electronic manuals. Press the POWER button. 2 Turn the print head over, then remove the orange protective cap. Start Here Easy Setup Instructions 3 Install the Print Head 1 Remove the print head from its package. NOTE: To avoid spilling ink...


