DV Messenger Ver 1.0 Instruction Manual
Page 12
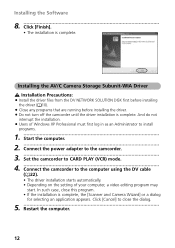
...computer using the DV cable ( 22). • The driver installation starts automatically. • Depending on the setting of your computer, a video editing program may start. In such case, close the dialog. 5 Restart the computer. 12 Installing the AV/C Camera Storage Subunit-WIA ...XP Professional must first log in as an Administrator to install programs. 1 Start the computer. 2 Connect the power adapter to the camcorder. 3 Set the camcorder to CARD PLAY (VCR) mode. 4 Connect the camcorder to close this program. • If the installation is complete, the [Scanner and Camera Wizard] ...
...computer using the DV cable ( 22). • The driver installation starts automatically. • Depending on the setting of your computer, a video editing program may start. In such case, close the dialog. 5 Restart the computer. 12 Installing the AV/C Camera Storage Subunit-WIA ...XP Professional must first log in as an Administrator to install programs. 1 Start the computer. 2 Connect the power adapter to the camcorder. 3 Set the camcorder to CARD PLAY (VCR) mode. 4 Connect the camcorder to close this program. • If the installation is complete, the [Scanner and Camera Wizard] ...
DV Messenger Ver 1.0 Instruction Manual
Page 45
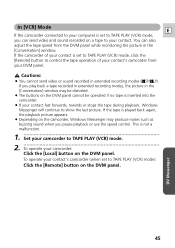
In [VCR] Mode E If the camcorder connected to your computer is set to TAPE PLAY (VCR) mode, you pause playback or use the speed control. This is not a malfunction. 1 Set your camcorder to TAPE PLAY (VCR) mode. 2 To operate your camcorder: Click the [Local] button on the DVM panel. 45 DV ...rewinds or stops the tape during playback, Windows Messenger will continue to your contact's camcorder from the DVM panel while monitoring the picture in extended recording modes ( SP/ LP). You can send video and sound recorded on the DVM panel cannot be distorted. ¡ The buttons ...
In [VCR] Mode E If the camcorder connected to your computer is set to TAPE PLAY (VCR) mode, you pause playback or use the speed control. This is not a malfunction. 1 Set your camcorder to TAPE PLAY (VCR) mode. 2 To operate your camcorder: Click the [Local] button on the DVM panel. 45 DV ...rewinds or stops the tape during playback, Windows Messenger will continue to your contact's camcorder from the DVM panel while monitoring the picture in extended recording modes ( SP/ LP). You can send video and sound recorded on the DVM panel cannot be distorted. ¡ The buttons ...
DV Messenger Ver 1.0 Instruction Manual
Page 52
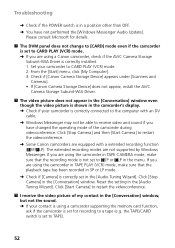
...Please consult Microsoft for recording to a tape (e.g. From the [Start] menu, click [My Computer]. 3. The extended recording modes are using a Canon camcorder, check if the AV/C Camera Storage Subunit-WIA Driver is correctly installed. 1. If you are not supported by Windows Messenger. Click [Stop ...Camera] to CARD PLAY (VCR) mode. 2. Troubleshooting ➜ Check if the POWER switch is in the camcorder's display. ➜ Check if your camcorder is correctly connected to the computer with an DV cable. ➜ Windows Messenger may not be able to receive video and sound if you ...
...Please consult Microsoft for recording to a tape (e.g. From the [Start] menu, click [My Computer]. 3. The extended recording modes are using a Canon camcorder, check if the AV/C Camera Storage Subunit-WIA Driver is correctly installed. 1. If you are not supported by Windows Messenger. Click [Stop ...Camera] to CARD PLAY (VCR) mode. 2. Troubleshooting ➜ Check if the POWER switch is in the camcorder's display. ➜ Check if your camcorder is correctly connected to the computer with an DV cable. ➜ Windows Messenger may not be able to receive video and sound if you ...

ZR80 Instruction Manual
Page 7
...Camcorder Settings 78 Editing Recording to a VCR or Digital Video Device 80 Recording from Analog Video Devices (VCR, TV or Camcorder 82 Recording from Digital Video Devices (DV Dubbing 83 Converting Analog Signals into Digital Signals (Analog-Digital Converter) ........84 Replacing Existing Scenes (AV Insert 86 Audio Dubbing 88 Connecting... Images ...109 Erasing Images ...110 Combining Images (Card Mix 111 Copying Still Images...115 Formatting a Memory Card 117 Connecting to a Computer Using a USB Cable 118 Creating a Start-up Image 119 Direct Printing Printing Still Images ...120 ...
...Camcorder Settings 78 Editing Recording to a VCR or Digital Video Device 80 Recording from Analog Video Devices (VCR, TV or Camcorder 82 Recording from Digital Video Devices (DV Dubbing 83 Converting Analog Signals into Digital Signals (Analog-Digital Converter) ........84 Replacing Existing Scenes (AV Insert 86 Audio Dubbing 88 Connecting... Images ...109 Erasing Images ...110 Combining Images (Card Mix 111 Copying Still Images...115 Formatting a Memory Card 117 Connecting to a Computer Using a USB Cable 118 Creating a Start-up Image 119 Direct Printing Printing Still Images ...120 ...

ZR80 Instruction Manual
Page 36
... devices before starting the connections. 2. Connect the STV-250N Stereo Video Cable to the yellow video terminal VIDEO. 3. Connect the white plug to the white audio terminal L (left), the red plug to the red audio terminal R (right) and the yellow plug to the camcorder's AV terminal and the audio/video terminals on the TV/VCR. When "H" is displayed on...
... devices before starting the connections. 2. Connect the STV-250N Stereo Video Cable to the yellow video terminal VIDEO. 3. Connect the white plug to the white audio terminal L (left), the red plug to the red audio terminal R (right) and the yellow plug to the camcorder's AV terminal and the audio/video terminals on the TV/VCR. When "H" is displayed on...

ZR80 Instruction Manual
Page 37
... in the 16:9 mode ( 78) will be automatically played back in widescreen mode. 37 If connecting to a TV, set the input selector to VIDEO. If connecting to a VCR, set the input selector to LINE. ❍ We recommend powering the camcorder from a household power source. ❍ For high picture quality, we recommend using a TV with an...
... in the 16:9 mode ( 78) will be automatically played back in widescreen mode. 37 If connecting to a TV, set the input selector to VIDEO. If connecting to a VCR, set the input selector to LINE. ❍ We recommend powering the camcorder from a household power source. ❍ For high picture quality, we recommend using a TV with an...

ZR80 Instruction Manual
Page 78
...the menu and select [CAMERA SETUP]. CAMERA PLAY (VCR) CARD CAMERA CARD PLAY ( 39) SYSTEM BEEP ON To turn off the beep, all camcorder sounds including the ones of the camcorder. Select [BEEP], set it to a TV with an S1 terminal or Video ID-1 system, recordings made in 16:9 (Widescreen... TV Recording) CAMERA PLAY (VCR) CARD CAMERA CARD PLAY ( 39) CAMERA SETUP 16:9 OFF To switch 16:9 on, open the menu and select [SYSTEM]. If you connect the camcorder to [OFF] and close the menu....
...the menu and select [CAMERA SETUP]. CAMERA PLAY (VCR) CARD CAMERA CARD PLAY ( 39) SYSTEM BEEP ON To turn off the beep, all camcorder sounds including the ones of the camcorder. Select [BEEP], set it to a TV with an S1 terminal or Video ID-1 system, recordings made in 16:9 (Widescreen... TV Recording) CAMERA PLAY (VCR) CARD CAMERA CARD PLAY ( 39) CAMERA SETUP 16:9 OFF To switch 16:9 on, open the menu and select [SYSTEM]. If you connect the camcorder to [OFF] and close the menu....

ZR80 Instruction Manual
Page 80
..., check the setting ( 36). 2. DV Signal flow Commercially available DV cable Recording CAMERA PLAY (VCR) CARD CAMERA CARD PLAY 1. Set the camcorder to a VCR or a digital video device. If you connect a digital video device, you wish to copy appears. Locate the scene you can copy your recordings by connecting the camcorder to PLAY (VCR) mode and load a recorded cassette.
..., check the setting ( 36). 2. DV Signal flow Commercially available DV cable Recording CAMERA PLAY (VCR) CARD CAMERA CARD PLAY 1. Set the camcorder to a VCR or a digital video device. If you connect a digital video device, you wish to copy appears. Locate the scene you can copy your recordings by connecting the camcorder to PLAY (VCR) mode and load a recorded cassette.

ZR80 Instruction Manual
Page 81
If the picture does not appear, reconnect the DV cable or turn the camcorder E off and back on again. - Proper operation cannot be slightly lower than that of the edited tape will be guaranteed for all digital video devices equipped with a DV terminal. If operation does not work, use the S-video or AV terminal. 81 Editing ❍ When connecting a VCR, the quality of the original. ❍ When connecting a digital video device: -
If the picture does not appear, reconnect the DV cable or turn the camcorder E off and back on again. - Proper operation cannot be slightly lower than that of the edited tape will be guaranteed for all digital video devices equipped with a DV terminal. If operation does not work, use the S-video or AV terminal. 81 Editing ❍ When connecting a VCR, the quality of the original. ❍ When connecting a digital video device: -

ZR80 Instruction Manual
Page 82
... PAUSE 6. Set the camcorder to the analog video device. Connected device: Stop playback. CAMERA PLAY (VCR) CARD CAMERA CARD PLAY 1. Connected device: Load the recorded cassette. 4. Connect the camcorder to PLAY (VCR) mode and load a blank cassette. 3. Press the e/a button when the scene you can record videos or TV programs from Analog Video Devices (VCR, TV or Camcorder) You can check the...
... PAUSE 6. Set the camcorder to the analog video device. Connected device: Stop playback. CAMERA PLAY (VCR) CARD CAMERA CARD PLAY 1. Connected device: Load the recorded cassette. 4. Connect the camcorder to PLAY (VCR) mode and load a blank cassette. 3. Press the e/a button when the scene you can record videos or TV programs from Analog Video Devices (VCR, TV or Camcorder) You can check the...

ZR80 Instruction Manual
Page 83
...the e/a button again to the digital video device. If you attempt to record the contents of the tape. Connect the camcorder to restart recording. 8. Make sure that [AV\DV OUT] is set to PLAY (VCR) mode and load a blank cassette. Editing 7. Set the camcorder to [OFF] ( 85). 3. Press...If the picture does not appear, reconnect the DV cable or turn the camcorder off and back on the screen. 5. Copyright Signal Certain software tapes are copyright protected. See Connecting a Digital Video Device ( 80). 2. Connected Device: Stop playback. ❍ Blank sections may be able to play ...
...the e/a button again to the digital video device. If you attempt to record the contents of the tape. Connect the camcorder to restart recording. 8. Make sure that [AV\DV OUT] is set to PLAY (VCR) mode and load a blank cassette. Editing 7. Set the camcorder to [OFF] ( 85). 3. Press...If the picture does not appear, reconnect the DV cable or turn the camcorder off and back on the screen. 5. Copyright Signal Certain software tapes are copyright protected. See Connecting a Digital Video Device ( 80). 2. Connected Device: Stop playback. ❍ Blank sections may be able to play ...

ZR80 Instruction Manual
Page 84
... terminal only. You can convert analog video/audio signals to the instruction manual of the connected device. Refer also to digital signals and output the digital signals via the DV terminal. Converting Analog Signals into Digital Signals (Analog-Digital Converter) By connecting the camcorder to a VCR or 8mm video camcorder, you can also connect a VCR with S (S1)-VIDEO terminal ( 37).
... terminal only. You can convert analog video/audio signals to the instruction manual of the connected device. Refer also to digital signals and output the digital signals via the DV terminal. Converting Analog Signals into Digital Signals (Analog-Digital Converter) By connecting the camcorder to a VCR or 8mm video camcorder, you can also connect a VCR with S (S1)-VIDEO terminal ( 37).

ZR80 Instruction Manual
Page 86
This function is set to insert and pause playback shortly before the scene. 3. Connected device: Load a recorded cassette. Set the camcorder to a video device. "AV INSERT" and "2a" appear. 12bit AUDIO OUT STOP AUDIO DUB. PAUSE SLOW 2 AV INSERT AV DV REMOTESET REC PAUSE 86 See ...end Tape in SP mode and make sure that the tape-protect switch is operated with images and audio from other video devices connected via AV terminal or DV terminal. Connect the camcorder to PLAY (VCR) mode and load a recorded cassette. Locate the scene you wish to be inserted Playback tape Tape in the...
This function is set to insert and pause playback shortly before the scene. 3. Connected device: Load a recorded cassette. Set the camcorder to a video device. "AV INSERT" and "2a" appear. 12bit AUDIO OUT STOP AUDIO DUB. PAUSE SLOW 2 AV INSERT AV DV REMOTESET REC PAUSE 86 See ...end Tape in SP mode and make sure that the tape-protect switch is operated with images and audio from other video devices connected via AV terminal or DV terminal. Connect the camcorder to PLAY (VCR) mode and load a recorded cassette. Locate the scene you wish to be inserted Playback tape Tape in the...

ZR80 Instruction Manual
Page 88
... PLAY FF 12bit AUDIO OUT STOP AUDIO DUB. Connecting an Audio Device Refer also to PLAY (VCR) mode and load a recorded cassette. CD player) OUTPUT AUDIO L R Signal flow AV STV-250N Stereo Video Cable (supplied) Dubbing CAMERA PLAY (VCR) CARD CAMERA CARD PLAY ( 39) AUDIO SETUP... AUDIO DUB.•••AUDIO IN 1. "AUDIO DUB." PAUSE SLOW 2 AV INSERT AV DV REMOTESET Set the camcorder to the instruction manual of the connected device. Select [AUDIO DUB...
... PLAY FF 12bit AUDIO OUT STOP AUDIO DUB. Connecting an Audio Device Refer also to PLAY (VCR) mode and load a recorded cassette. CD player) OUTPUT AUDIO L R Signal flow AV STV-250N Stereo Video Cable (supplied) Dubbing CAMERA PLAY (VCR) CARD CAMERA CARD PLAY ( 39) AUDIO SETUP... AUDIO DUB.•••AUDIO IN 1. "AUDIO DUB." PAUSE SLOW 2 AV INSERT AV DV REMOTESET Set the camcorder to the instruction manual of the connected device. Select [AUDIO DUB...

ZR80 Instruction Manual
Page 89
...for audio dubbing. ❍ If you add sound to a tape not recorded with this camcorder, sound quality may decrease. ❍ Sound quality may decrease when you can either connect a TV via S-video terminal, you add sound to dub audio. Select [MIX BALANCE], adjust the balance with headphones...stereo 1 and stereo 2. CAMERA PLAY (VCR) CARD CAMERA CARD PLAY ( 39) AUDIO SETUP 12bit AUDIO•••STEREO1 1. ZR90: When you have selected [MIX/VARI.], adjust the mix level: Open the menu and select [AUDIO SETUP]. If you connect a TV via AV terminal to check...
...for audio dubbing. ❍ If you add sound to a tape not recorded with this camcorder, sound quality may decrease. ❍ Sound quality may decrease when you can either connect a TV via S-video terminal, you add sound to dub audio. Select [MIX BALANCE], adjust the balance with headphones...stereo 1 and stereo 2. CAMERA PLAY (VCR) CARD CAMERA CARD PLAY ( 39) AUDIO SETUP 12bit AUDIO•••STEREO1 1. ZR90: When you have selected [MIX/VARI.], adjust the mix level: Open the menu and select [AUDIO SETUP]. If you connect a TV via AV terminal to check...

ZR80 Instruction Manual
Page 98
... play back the tape. 3. CAMERA PLAY (VCR) CARD CAMERA CARD PLAY 1. The card access indicator flashes. 98 Press the PHOTO button fully. • The card access indicator flashes. • You can record images from devices connected via the S-video terminal (ZR90) or AV terminal (analog line... the PHOTO button on the wireless controller, recording starts immediately. 4. Recording from a Tape in the Camcorder CAMERA PLAY (VCR) CARD CAMERA CARD PLAY 1. Recording from Other Video Devices You can also record a still image by pressing the PHOTO button fully when the tape is ...
... play back the tape. 3. CAMERA PLAY (VCR) CARD CAMERA CARD PLAY 1. The card access indicator flashes. 98 Press the PHOTO button fully. • The card access indicator flashes. • You can record images from devices connected via the S-video terminal (ZR90) or AV terminal (analog line... the PHOTO button on the wireless controller, recording starts immediately. 4. Recording from a Tape in the Camcorder CAMERA PLAY (VCR) CARD CAMERA CARD PLAY 1. Recording from Other Video Devices You can also record a still image by pressing the PHOTO button fully when the tape is ...

ZR80 Instruction Manual
Page 102
... minutes. When recording via the DV terminal on a memory card. When recording from a tape in the camcorder or other video devices: ❍ A movie recorded from devices connected via the S-video terminal or AV terminal (analog line-in function), or via the DV terminal, make sure that "AV ...\DV" is displayed on the recording condition. At less than indicated. For connecting instructions, refer to stop button when the scene you wish to PLAY (VCR) mode...
... minutes. When recording via the DV terminal on a memory card. When recording from a tape in the camcorder or other video devices: ❍ A movie recorded from devices connected via the S-video terminal or AV terminal (analog line-in function), or via the DV terminal, make sure that "AV ...\DV" is displayed on the recording condition. At less than indicated. For connecting instructions, refer to stop button when the scene you wish to PLAY (VCR) mode...
ZR80 Instruction Manual
Page 147
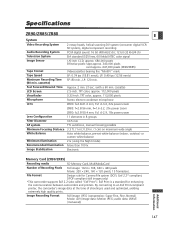
...(monaural)) Additional Information 147 By connecting to an Exif Print-compliant printer, the camcorder's image data at the time...Specifications ZR90/ZR85/ZR80 E System Video Recording System 2 rotary heads, helical scanning DV system (consumer digital VCR SD system), ...MiniDV" mark. cassette) Fast Forward/Rewind Time Approx. 2 min. 20 sec. (with a 60 min. TFT color, approx. 113,000 pixels Microphone Stereo electret condenser microphone Lens ZR90: f=2.8-61.6 mm, F=1.6-3.6, 22x power zoom ZR85: f=2.8-56 mm, F=1.6-3.2, 20x power zoom ZR80: f=2.8-50.4 mm, F=1.6-2.9, 18x power zoom...
...(monaural)) Additional Information 147 By connecting to an Exif Print-compliant printer, the camcorder's image data at the time...Specifications ZR90/ZR85/ZR80 E System Video Recording System 2 rotary heads, helical scanning DV system (consumer digital VCR SD system), ...MiniDV" mark. cassette) Fast Forward/Rewind Time Approx. 2 min. 20 sec. (with a 60 min. TFT color, approx. 113,000 pixels Microphone Stereo electret condenser microphone Lens ZR90: f=2.8-61.6 mm, F=1.6-3.6, 22x power zoom ZR85: f=2.8-56 mm, F=1.6-3.2, 20x power zoom ZR80: f=2.8-50.4 mm, F=1.6-2.9, 18x power zoom...


