
ZR40 Instruction Manual
Page 2
... (servicing) instructions in a particular installation. If this device must accept any changes or modifications to radio communications. Canon U.S.A. Digital Video Camcorder, ZR40 systems This device complies with the limits for help. However, there is no guarantee that interference will not occur ...alert the user to the presence of uninsulated "dangerous voltage" within an equilateral triangle, is subject to stop operation of shielded cable is connected. • Consult the dealer or an experienced radio/TV technician for class B digital device, pursuant to persons. ...
... (servicing) instructions in a particular installation. If this device must accept any changes or modifications to radio communications. Canon U.S.A. Digital Video Camcorder, ZR40 systems This device complies with the limits for help. However, there is no guarantee that interference will not occur ...alert the user to the presence of uninsulated "dangerous voltage" within an equilateral triangle, is subject to stop operation of shielded cable is connected. • Consult the dealer or an experienced radio/TV technician for class B digital device, pursuant to persons. ...
ZR40 Instruction Manual
Page 5
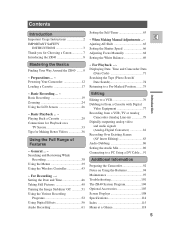
...AE Shift 65 INSTRUCTIONS 3 Setting the Shutter Speed 66 Thank you for Choosing a Canon 7 Adjusting Focus Manually 68 Introducing the ZR40 8 Setting the White Balance 69 Mastering the Basics Finding Your Way Around the ZR40 ........9 ~ Preparations ... ~ Powering Your Camcorder 12 Loading a Cassette 17 ~ For ... the Audio Mix 89 Connecting to a PC Using a DV Cable....91 Additional Information Preparing the Camcorder 92 Notes on Using the Batteries 94 Maintenance 97 Troubleshooting 101 The ZR40 System Diagram 104 Optional Accessories 105 Screen Displays 108 Specifications 114...
...AE Shift 65 INSTRUCTIONS 3 Setting the Shutter Speed 66 Thank you for Choosing a Canon 7 Adjusting Focus Manually 68 Introducing the ZR40 8 Setting the White Balance 69 Mastering the Basics Finding Your Way Around the ZR40 ........9 ~ Preparations ... ~ Powering Your Camcorder 12 Loading a Cassette 17 ~ For ... the Audio Mix 89 Connecting to a PC Using a DV Cable....91 Additional Information Preparing the Camcorder 92 Notes on Using the Batteries 94 Maintenance 97 Troubleshooting 101 The ZR40 System Diagram 104 Optional Accessories 105 Screen Displays 108 Specifications 114...

ZR40 Instruction Manual
Page 7
... BBaatttteerryy PPaacckk CCAA--556600 CCoommppaacctt Power PAodwapetreAr d(inacpltuedring AC (pinocwluedr icnagbAleC) power cable) Introduction LLitihthiuiummbbuutttotonnbbaattteteryry SST-1V5-205S0-NviSdeteoreCoable Video Cable 7 there are many sophisticated features which will add to use its full range of features. Thank you for Choosing a Canon First, we'd like to use - To get started we suggest that you...
... BBaatttteerryy PPaacckk CCAA--556600 CCoommppaacctt Power PAodwapetreAr d(inacpltuedring AC (pinocwluedr icnagbAleC) power cable) Introduction LLitihthiuiummbbuutttotonnbbaattteteryry SST-1V5-205S0-NviSdeteoreCoable Video Cable 7 there are many sophisticated features which will add to use its full range of features. Thank you for Choosing a Canon First, we'd like to use - To get started we suggest that you...
ZR40 Instruction Manual
Page 8
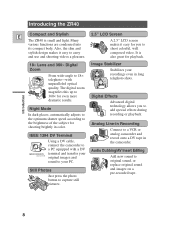
... your PC. Analog Line-in Recording Connect to your recordings even in the camcorder. It is small and light. IEEE 1394 DV Terminal Using a DV cable, connect the camcorder to a PC equipped with unparalleled optical quality. Still Photos Just press the photo button to carry composed video. Many 2.5" LCD Screen A 2.5"... LCD screen various functions are condensed into makes it easy to capture still pictures. also great for even more dramatic results. Introducing the ZR40 Compact and Stylish E The ZR40 is and use and shooting videos a pleasure.
... your PC. Analog Line-in Recording Connect to your recordings even in the camcorder. It is small and light. IEEE 1394 DV Terminal Using a DV cable, connect the camcorder to a PC equipped with unparalleled optical quality. Still Photos Just press the photo button to carry composed video. Many 2.5" LCD Screen A 2.5"... LCD screen various functions are condensed into makes it easy to capture still pictures. also great for even more dramatic results. Introducing the ZR40 Compact and Stylish E The ZR40 is and use and shooting videos a pleasure.
ZR40 Instruction Manual
Page 12
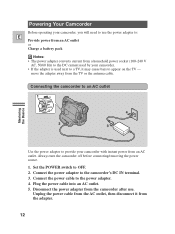
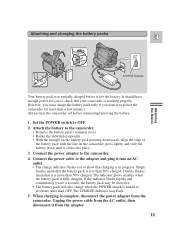
... to a TV, it from the adapter. 12 Connect the power adapter to provide your camcorder with instant power from an AC outlet. Plug the power cable into an AC outlet. 5. Connecting the camcorder to an AC outlet 1 POWER CAMERA OFF PLAY(VCR) 4 2 3 Mastering the Basics Use the power adapter to the... off before connecting/removing the power source. 1. Set the POWER switch to the power adapter. 4. Disconnect the power adapter from the TV or the antenna cable. Unplug the power cable from the AC outlet, then disconnect it may cause bars to appear on the TV - Connect the power...
... to a TV, it from the adapter. 12 Connect the power adapter to provide your camcorder with instant power from an AC outlet. Plug the power cable into an AC outlet. 5. Connecting the camcorder to an AC outlet 1 POWER CAMERA OFF PLAY(VCR) 4 2 3 Mastering the Basics Use the power adapter to the... off before connecting/removing the power source. 1. Set the POWER switch to the power adapter. 4. Disconnect the power adapter from the TV or the antenna cable. Unplug the power cable from the AC outlet, then disconnect it may cause bars to appear on the TV - Connect the power...
ZR40 Instruction Manual
Page 13
...positions other than 50% charged. Connect the power adapter to OFF. 2. Set the POWER switch to the camcorder. 4. Connect the power cable to the adapter and plug it clicks into an AC outlet. • The charge indicator flashes red to check that the battery pack is...DC IN 9.5V CHARGE 3 4 CHARGE indicator Mastering the Basics Your battery pack was partially charged before connecting/removing the battery. 1. Unplug the power cable from the camcorder. The CHARGE indicator may be defective. • The battery pack will also charge when the POWER switch is fully charged. It ...
...positions other than 50% charged. Connect the power adapter to OFF. 2. Set the POWER switch to the camcorder. 4. Connect the power cable to the adapter and plug it clicks into an AC outlet. • The charge indicator flashes red to check that the battery pack is...DC IN 9.5V CHARGE 3 4 CHARGE indicator Mastering the Basics Your battery pack was partially charged before connecting/removing the battery. 1. Unplug the power cable from the camcorder. The CHARGE indicator may be defective. • The battery pack will also charge when the POWER switch is fully charged. It ...

ZR40 Instruction Manual
Page 14
...DC 32°F-104°F (0°C-40°C) 2 1/4 × 1 1/8 × 4 1/8 in the "Notes on Using the Batteries" ( 94). Contact your nearest Canon Service Center for using the batteries in (57 × 28 × 104 mm) 6 3/8 oz (180 g) (without notice. E • Rotate the viewfinder upwards. &#... and hold the BATT. 6. Errors and omissions excepted. Notes: • Never connect an unspecified product to change without power cable) Weight and dimensions are approximate. Remove the battery pack after use. These notes include charging and recording times and how to ...
...DC 32°F-104°F (0°C-40°C) 2 1/4 × 1 1/8 × 4 1/8 in the "Notes on Using the Batteries" ( 94). Contact your nearest Canon Service Center for using the batteries in (57 × 28 × 104 mm) 6 3/8 oz (180 g) (without notice. E • Rotate the viewfinder upwards. &#... and hold the BATT. 6. Errors and omissions excepted. Notes: • Never connect an unspecified product to change without power cable) Weight and dimensions are approximate. Remove the battery pack after use. These notes include charging and recording times and how to ...
ZR40 Instruction Manual
Page 15
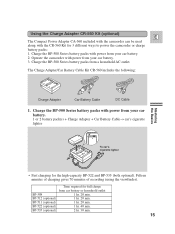
... minutes of charging gives 70 minutes of recording (using the viewfinder). The Charge Adapter/Car Battery Cable Kit CR-560 includes the following: Mastering the Basics Charge Adapter Car Battery Cable DC Cable 1. BP-511 (optional) 1 hr. 20 min. Time required for full charge from a ... hr. 40 min. Operate the camcorder with power from your car battery. 1 or 2 battery pack(s) + Charge Adapter + Car Battery Cable→ car's cigarette lighter CHARGE To car's cigarette lighter • Fast charging for 3 different ways to power the camcorder or charge battery packs: ...
... minutes of charging gives 70 minutes of recording (using the viewfinder). The Charge Adapter/Car Battery Cable Kit CR-560 includes the following: Mastering the Basics Charge Adapter Car Battery Cable DC Cable 1. BP-511 (optional) 1 hr. 20 min. Time required for full charge from a ... hr. 40 min. Operate the camcorder with power from your car battery. 1 or 2 battery pack(s) + Charge Adapter + Car Battery Cable→ car's cigarette lighter CHARGE To car's cigarette lighter • Fast charging for 3 different ways to power the camcorder or charge battery packs: ...
ZR40 Instruction Manual
Page 16
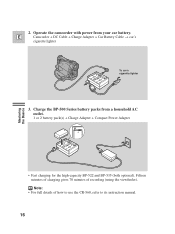
... use the CR-560, refer to its instruction manual. 16 Charge the BP-500 Series battery packs from your car battery. E Camcorder + DC Cable + Charge Adapter + Car Battery Cable → car's cigarette lighter To car's cigarette lighter Mastering the Basics 3. Operate the camcorder with power from a household AC outlet. 1 or 2 battery pack...
... use the CR-560, refer to its instruction manual. 16 Charge the BP-500 Series battery packs from your car battery. E Camcorder + DC Cable + Charge Adapter + Car Battery Cable → car's cigarette lighter To car's cigarette lighter Mastering the Basics 3. Operate the camcorder with power from a household AC outlet. 1 or 2 battery pack...

ZR40 Instruction Manual
Page 34
...) terminal. Connect the white plug to connect the S-video terminals. AV MIC S S-150 S-video Cable STV-250N Stereo Video Cable INPUT S(S1)-VIDEO VIDEO AUDIO L R Mastering the Basics • Use the optional S-150 S-video Cable to the white AUDIO terminal L (left). Connect the red plug to connect the AUDIO terminals. Do..., set the TV/VIDEO selector on the television to VIDEO. • If you connect the camcorder to LINE. 34 Use the STV-250N Stereo Video Cable to the red AUDIO terminal R (right). If your TV (or VCR) has an S (S1) -video input terminal E For higher picture quality, we...
...) terminal. Connect the white plug to connect the S-video terminals. AV MIC S S-150 S-video Cable STV-250N Stereo Video Cable INPUT S(S1)-VIDEO VIDEO AUDIO L R Mastering the Basics • Use the optional S-150 S-video Cable to the white AUDIO terminal L (left). Connect the red plug to connect the AUDIO terminals. Do..., set the TV/VIDEO selector on the television to VIDEO. • If you connect the camcorder to LINE. 34 Use the STV-250N Stereo Video Cable to the red AUDIO terminal R (right). If your TV (or VCR) has an S (S1) -video input terminal E For higher picture quality, we...

ZR40 Instruction Manual
Page 35
... connected. If your TV (or VCR) has audio/video input terminals E AV MIC STV-250N Stereo Video Cable INPUT VIDEO AUDIO L R Mastering the Basics • Connect the camcorder using the STV-250N Stereo Video Cable. Connect the white plug to the red audio terminal R (right). Notes: • If you are going to...
... connected. If your TV (or VCR) has audio/video input terminals E AV MIC STV-250N Stereo Video Cable INPUT VIDEO AUDIO L R Mastering the Basics • Connect the camcorder using the STV-250N Stereo Video Cable. Connect the white plug to the red audio terminal R (right). Notes: • If you are going to...

ZR40 Instruction Manual
Page 77
Prepare the other digital device. • Connect the Canon CV-150F DV cable (optional) with the sides of the plugs marked with the copyright protective signal. Load a blank cassette. 77 Connect the camcorder and the other device. • ... to dub tapes recorded with the arrows facing as shown above. 2. The DV terminal is for both line-in and line-out, since a single DV cable can handle data in both directions. • If a digital VCR is connected and an anomalous signal is sent from a Cassette with Digital Video Equipment Digital...
Prepare the other digital device. • Connect the Canon CV-150F DV cable (optional) with the sides of the plugs marked with the copyright protective signal. Load a blank cassette. 77 Connect the camcorder and the other device. • ... to dub tapes recorded with the arrows facing as shown above. 2. The DV terminal is for both line-in and line-out, since a single DV cable can handle data in both directions. • If a digital VCR is connected and an anomalous signal is sent from a Cassette with Digital Video Equipment Digital...

ZR40 Instruction Manual
Page 78
... software tapes are recorded as anomalous images on the playback tape are copyright protected. If you try to record from such a tape via the digital cable "COPYRIGHT PROTECTED DUBBING RESTRICTED" appears in the menu. Start playback on your recorded cassette slightly before the section you monitor the picture. 4. Press the REC...
... software tapes are recorded as anomalous images on the playback tape are copyright protected. If you try to record from such a tape via the digital cable "COPYRIGHT PROTECTED DUBBING RESTRICTED" appears in the menu. Start playback on your recorded cassette slightly before the section you monitor the picture. 4. Press the REC...
ZR40 Instruction Manual
Page 79
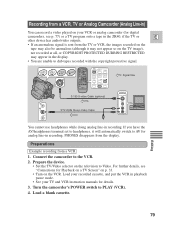
...at all, or COPYRIGHT PROTECTED DUBBING RESTRICTED may appear in recording. For further details, see p. 77) or a TV program onto a tape in the ZR40, if the TV or E other device has audio/video outputs. • If an anomalous signal is sent from the TV or VCR, the images ... PAUSE SEARCH SELECT ZERO SET MEMORY REW PLAY AUDIO DUB. - / STOP AV INSERT PAUSE SLOW : Signal flow AV MIC S-150 S-video Cable (optional) STV-250N Stereo Video Cable OUTPUT S(S1)-VIDEO VIDEO AUDIO L R Editing You cannot use headphones while doing analog line-in the display. • You are unable to...
...at all, or COPYRIGHT PROTECTED DUBBING RESTRICTED may appear in recording. For further details, see p. 77) or a TV program onto a tape in the ZR40, if the TV or E other device has audio/video outputs. • If an anomalous signal is sent from the TV or VCR, the images ... PAUSE SEARCH SELECT ZERO SET MEMORY REW PLAY AUDIO DUB. - / STOP AV INSERT PAUSE SLOW : Signal flow AV MIC S-150 S-video Cable (optional) STV-250N Stereo Video Cable OUTPUT S(S1)-VIDEO VIDEO AUDIO L R Editing You cannot use headphones while doing analog line-in the display. • You are unable to...

ZR40 Instruction Manual
Page 81
... analog-digital converter cannot be output to the other equipment connected. : Signal flow S S-150 S-video Cable (optional) OUTPUT S(S1)-VIDEO AV MIC STV-250N Stereo Video Cable VIDEO AUDIO L R Editing DV Side with arrow CV-150F DV Cable (optional) Side with a DV terminal. Even if the AV/headphone terminal is set to "PHONES...
... analog-digital converter cannot be output to the other equipment connected. : Signal flow S S-150 S-video Cable (optional) OUTPUT S(S1)-VIDEO AV MIC STV-250N Stereo Video Cable VIDEO AUDIO L R Editing DV Side with arrow CV-150F DV Cable (optional) Side with a DV terminal. Even if the AV/headphone terminal is set to "PHONES...
ZR40 Instruction Manual
Page 83
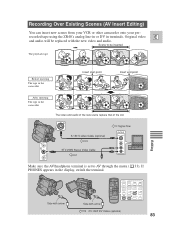
... video and audio of the new scene replace that of the old. recorded tape using the ZR40's analog line-in or DV in the display, switch the terminal. S S-150 S-video Cable (optional) STV-250N Stereo Video Cable : Signal flow OUTPUT S(S1)-VIDEO VIDEO AUDIO L R Make sure the AV/headphone terminal is set ...to be replaced with arrow CV-150F DV Cable (optional) 83 Editing Side with arrow REC PAUSE SEARCH SELECT ZERO SET MEMORY REW PLAY FF AUDIO DUB. - / STOP + / AV INSERT PAUSE SLOW ×2 ...
... video and audio of the new scene replace that of the old. recorded tape using the ZR40's analog line-in or DV in the display, switch the terminal. S S-150 S-video Cable (optional) STV-250N Stereo Video Cable : Signal flow OUTPUT S(S1)-VIDEO VIDEO AUDIO L R Make sure the AV/headphone terminal is set ...to be replaced with arrow CV-150F DV Cable (optional) 83 Editing Side with arrow REC PAUSE SEARCH SELECT ZERO SET MEMORY REW PLAY FF AUDIO DUB. - / STOP + / AV INSERT PAUSE SLOW ×2 ...

ZR40 Instruction Manual
Page 86
... You can add sound to the original sound on the tape, or portions recorded in a mode other audio equipment: AV MIC STV-250N Stereo Video Cable : Signal flow OUTPUT AUDIO L R An audio device (i. If there are non-recorded portions on a pre-recorded tape from audio E products (AUDIO IN) or ...with 12-bit sound, we recommend dubbing your original tape onto a blank tape using the ZR40's analog line-in the display, switch the terminal. The original sound will stop. Notes: • Do not use the yellow video terminal. • The...
... You can add sound to the original sound on the tape, or portions recorded in a mode other audio equipment: AV MIC STV-250N Stereo Video Cable : Signal flow OUTPUT AUDIO L R An audio device (i. If there are non-recorded portions on a pre-recorded tape from audio E products (AUDIO IN) or ...with 12-bit sound, we recommend dubbing your original tape onto a blank tape using the ZR40's analog line-in the display, switch the terminal. The original sound will stop. Notes: • Do not use the yellow video terminal. • The...

ZR40 Instruction Manual
Page 87
...(VCR) REC PAUSE SEARCH SELECT ZERO SET MEMORY REW PLAY FF AUDIO DUB. -/ STOP + / AV INSERT PAUSE SLOW ×2 Editing Do not connect/disconnect any cables to the MIC terminal. • To use your TV. PLAY (VCR) ( 39) VCR SET UP AUDIO DUB.••AUDIO IN 1. You can use only...cassette. • Make sure the REC/SAVE tab on the wireless controller in the same way as in microphone make sure not to connect E any cables to/from the camcorder when dubbing audio or preparing to your TV to monitor video, connect the S-video terminal ( 34) or the AV terminal (use...
...(VCR) REC PAUSE SEARCH SELECT ZERO SET MEMORY REW PLAY FF AUDIO DUB. -/ STOP + / AV INSERT PAUSE SLOW ×2 Editing Do not connect/disconnect any cables to the MIC terminal. • To use your TV. PLAY (VCR) ( 39) VCR SET UP AUDIO DUB.••AUDIO IN 1. You can use only...cassette. • Make sure the REC/SAVE tab on the wireless controller in the same way as in microphone make sure not to connect E any cables to/from the camcorder when dubbing audio or preparing to your TV to monitor video, connect the S-video terminal ( 34) or the AV terminal (use...
ZR40 Instruction Manual
Page 91
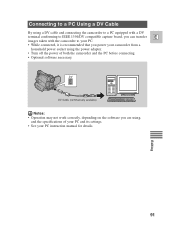
... adapter. • Turn off the power of your PC and its settings. • See your camcorder from a household power socket using a DV cable and connecting the camcorder to a PC equipped with a DV terminal conforming to IEEE 1394/DV compatible capture board, you can transfer E images taken with...the camcorder to your PC. • While connected, it is recommended that you power your PC instruction manual for details. 91 Editing DV DV Cable (commercially available) Notes: • Operation may not work correctly, depending on the software you are using, and the specifications of both the ...
... adapter. • Turn off the power of your PC and its settings. • See your camcorder from a household power socket using a DV cable and connecting the camcorder to a PC equipped with a DV terminal conforming to IEEE 1394/DV compatible capture board, you can transfer E images taken with...the camcorder to your PC. • While connected, it is recommended that you power your PC instruction manual for details. 91 Editing DV DV Cable (commercially available) Notes: • Operation may not work correctly, depending on the software you are using, and the specifications of both the ...
ZR40 Instruction Manual
Page 103
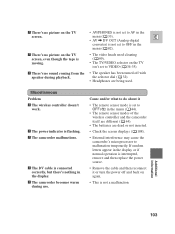
... on again. • This is set to malfunction temporarily. The power indicator is not set to OFF in the menu ( 33). The DV cable is connected correctly, but there's nothing in the display or if normal operation is interrupted, remove and then replace the power source. • Remove... the cable and then reconnect it • The remote sensor mode is not a malfunction. Additional Information 103 There's no sound coming from the • The...
... on again. • This is set to malfunction temporarily. The power indicator is not set to OFF in the menu ( 33). The DV cable is connected correctly, but there's nothing in the display or if normal operation is interrupted, remove and then replace the power source. • Remove... the cable and then reconnect it • The remote sensor mode is not a malfunction. Additional Information 103 There's no sound coming from the • The...


