CONSOLE_V1-1_ENG.pdf
Page 8
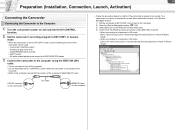
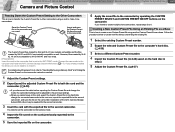
... computer in the [Device Manager] window. 1) Set the camcorder to EXT.CONT. Your camcorder is correctly connected if you see items described in step 4 in SD mode: [Canon DV camcorder], [Canon Camera Storage Device] and [Canon Virtual VCR] are shown. All audio related adjustments except for ...function while the camcorder is connected to the computer. • Refer to the computer manual for the location of the camcorder can be used. - 1-8 Preparation (Installation, Connection, Launch, Activation) Connecting the Camcorder Connecting the Camcorder to the Computer 1 Turn the camcorder's power on...
... computer in the [Device Manager] window. 1) Set the camcorder to EXT.CONT. Your camcorder is correctly connected if you see items described in step 4 in SD mode: [Canon DV camcorder], [Canon Camera Storage Device] and [Canon Virtual VCR] are shown. All audio related adjustments except for ...function while the camcorder is connected to the computer. • Refer to the computer manual for the location of the camcorder can be used. - 1-8 Preparation (Installation, Connection, Launch, Activation) Connecting the Camcorder Connecting the Camcorder to the Computer 1 Turn the camcorder's power on...

CONSOLE_V1-1_ENG.pdf
Page 18
.... When the audio mode is selected, data dropping ( 5-48) may occur. For details, refer to the camcorder. When [All pictures] or [I picture and P picture] is set to 4CH, the sounds on...picture, WAV sound files with your editing software. CONSOLE Windows Various Settings and [Performance Check] Camera and Picture Control Recording onto the Hard Disk Playback the Recorded Files 3-18 Various Settings and ...with the same file name as the recording file will be output to the instruction manual of the software. 2 Select the [Preview resolution] of the HDV standard data....
.... When the audio mode is selected, data dropping ( 5-48) may occur. For details, refer to the camcorder. When [All pictures] or [I picture and P picture] is set to 4CH, the sounds on...picture, WAV sound files with your editing software. CONSOLE Windows Various Settings and [Performance Check] Camera and Picture Control Recording onto the Hard Disk Playback the Recorded Files 3-18 Various Settings and ...with the same file name as the recording file will be output to the instruction manual of the software. 2 Select the [Preview resolution] of the HDV standard data....
CONSOLE_V1-1_ENG.pdf
Page 29
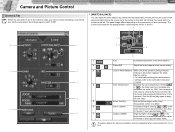
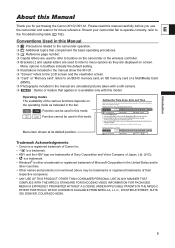
...increases/decreases the value in 9 levels (1 level: approximately 100K). left clicking the mouse turns the pointer to the camcorder instruction 3 manual. 4 Color Temperature Specifies the color temperature. You can adjust the white balance by clicking the indicated marks. Placing the...You can enter a new value by 100K. Set the camcorder's recording program to the Camera mode, you cannot control all settings on the camcorder you are connecting. The Kelvin degree for indoor and outdoor cannot be displayed when connecting the XH G1 or XH A1. 12 3 7 8 1 6 4 5 1 Auto...
...increases/decreases the value in 9 levels (1 level: approximately 100K). left clicking the mouse turns the pointer to the camcorder instruction 3 manual. 4 Color Temperature Specifies the color temperature. You can adjust the white balance by clicking the indicated marks. Placing the...You can enter a new value by 100K. Set the camcorder's recording program to the Camera mode, you cannot control all settings on the camcorder you are connecting. The Kelvin degree for indoor and outdoor cannot be displayed when connecting the XH G1 or XH A1. 12 3 7 8 1 6 4 5 1 Auto...

CONSOLE_V1-1_ENG.pdf
Page 30
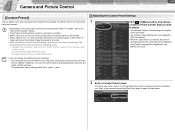
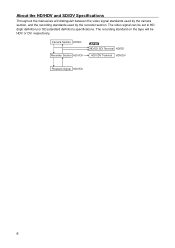
...clicking the scale. You can also adjust the zoom and focus position of the camcorder with mouse. When you are using a manual video lens, you cannot adjust the focus function from its center, the camcorder zoom and focus position will move the slider further from CONSOLE. 5 [Option ...only when AE mode is close to +12dB even you move faster. CONSOLE Windows Various Settings and [Performance Check] Camera and Picture Control Recording onto the Hard Disk Playback the Recorded Files Camera and Picture Control 4-30 2 [IRIS] You can set an aperture value. 3 [SHUTTER] You can set ...
...clicking the scale. You can also adjust the zoom and focus position of the camcorder with mouse. When you are using a manual video lens, you cannot adjust the focus function from its center, the camcorder zoom and focus position will move the slider further from CONSOLE. 5 [Option ...only when AE mode is close to +12dB even you move faster. CONSOLE Windows Various Settings and [Performance Check] Camera and Picture Control Recording onto the Hard Disk Playback the Recorded Files Camera and Picture Control 4-30 2 [IRIS] You can set an aperture value. 3 [SHUTTER] You can set ...

CONSOLE_V1-1_ENG.pdf
Page 34
... • For details about each panel by adjusting the hue, chroma, area and Y level, the corrections will only be applied to the camcorder instruction manual. • The area that will be corrected will be activated. • To set color. • [Color Phase]: Select the basic ...[+] results in stronger blue tones, and to be detected. CONSOLE Windows Various Settings and [Performance Check] Camera and Picture Control Recording onto the Hard Disk Playback the Recorded Files Camera and Picture Control 4-34 [Color Control] The settings for [Color Correction] and skin and sky details ...
... • For details about each panel by adjusting the hue, chroma, area and Y level, the corrections will only be applied to the camcorder instruction manual. • The area that will be corrected will be activated. • To set color. • [Color Phase]: Select the basic ...[+] results in stronger blue tones, and to be detected. CONSOLE Windows Various Settings and [Performance Check] Camera and Picture Control Recording onto the Hard Disk Playback the Recorded Files Camera and Picture Control 4-34 [Color Control] The settings for [Color Correction] and skin and sky details ...

CONSOLE_V1-1_ENG.pdf
Page 35
...will be corrected if [OFF] is selected. Click of [B Area Review] to finish the setting. For details about each parameter, refer to the camcorder instruction manual. „ Setting the Skin Detail Area 1 Click the [Detail] tab and of [Area Select]. Adjust the levels of [Hue], [Chroma],... appear as they are managed on the [Detail] window. CONSOLE Windows Various Settings and [Performance Check] Camera and Picture Control Recording onto the Hard Disk Playback the Recorded Files Camera and Picture Control 4-35 2 Adjust the levels of [R Gain] and [B [Detail] Gain] by ...
...will be corrected if [OFF] is selected. Click of [B Area Review] to finish the setting. For details about each parameter, refer to the camcorder instruction manual. „ Setting the Skin Detail Area 1 Click the [Detail] tab and of [Area Select]. Adjust the levels of [Hue], [Chroma],... appear as they are managed on the [Detail] window. CONSOLE Windows Various Settings and [Performance Check] Camera and Picture Control Recording onto the Hard Disk Playback the Recorded Files Camera and Picture Control 4-35 2 Adjust the levels of [R Gain] and [B [Detail] Gain] by ...
CONSOLE_V1-1_ENG.pdf
Page 37
...change the setting using XL H1, you need to set the camcorder's recording program to import and export the Custom Preset file saved on the camcorder connected, some parameters differ. For details, refer to the camcorder instruction manual. Depending on the card. After altering the...] key. The parameters can also select items by pressing [2] (down), [4] (left), [6] (right), and [8] (up) keys. - Changing the camcorder mode from Camera mode to apply the new name. Enter a new name and press the [Enter] key again to other modes - Disconnecting the IEEE1394 (DV) cable ...
...change the setting using XL H1, you need to set the camcorder's recording program to import and export the Custom Preset file saved on the camcorder connected, some parameters differ. For details, refer to the camcorder instruction manual. Depending on the card. After altering the...] key. The parameters can also select items by pressing [2] (down), [4] (left), [6] (right), and [8] (up) keys. - Changing the camcorder mode from Camera mode to apply the new name. Enter a new name and press the [Enter] key again to other modes - Disconnecting the IEEE1394 (DV) cable ...
CONSOLE_V1-1_ENG.pdf
Page 41
... and XL H1 are mutually compatible and the files created by XH G1 and XH A1 are not compatible to XH G1/XH A1 and vice versa. [Preparations] Insert the card to the camcorder that is set the camcorder to the Camera mode. 4 Import the file saved on the card (previously ...Custom Preset" on the camcorder instruction manual. 1 Adjust the Custom Preset settings. 2 Export (save) the adjusted Custom Preset file to both the card and the camcorder. ( 4-39) If you intend to create multiple clone camcorders, repeat steps 3 to the computer and install the AV/C Camera Storage Subunit-WIA driver ...
... and XL H1 are mutually compatible and the files created by XH G1 and XH A1 are not compatible to XH G1/XH A1 and vice versa. [Preparations] Insert the card to the camcorder that is set the camcorder to the Camera mode. 4 Import the file saved on the card (previously ...Custom Preset" on the camcorder instruction manual. 1 Adjust the Custom Preset settings. 2 Export (save) the adjusted Custom Preset file to both the card and the camcorder. ( 4-39) If you intend to create multiple clone camcorders, repeat steps 3 to the computer and install the AV/C Camera Storage Subunit-WIA driver ...
XH G1 XH A1 Instruction Manual
Page 3
... by items placed upon or against voltage surges and built-up static charges. Cleaning - Do not use this product near water or in this manual. 6. Water and Moisture - Power Sources - If you are unable to . 4. Pay particular attention to spill liquid of overhead power lines ... as recommended in rainy/moist situations. 9. Do not attempt to service this product yourself as battery power, refer to the Canon HD Video Camera Recorder XH G1 A/XH A1 A and all servicing to dangerous voltage or other hazards. Refer all its accessories. 1. Avoid magnetic or electric fields -...
... by items placed upon or against voltage surges and built-up static charges. Cleaning - Do not use this product near water or in this manual. 6. Water and Moisture - Power Sources - If you are unable to . 4. Pay particular attention to spill liquid of overhead power lines ... as recommended in rainy/moist situations. 9. Do not attempt to service this product yourself as battery power, refer to the Canon HD Video Camera Recorder XH G1 A/XH A1 A and all servicing to dangerous voltage or other hazards. Refer all its accessories. 1. Avoid magnetic or electric fields -...
XH G1 XH A1 Instruction Manual
Page 5
...the wireless controller. Brackets [ ] and capital letters are simulated pictures taken with a still camera. : Option or feature that applies or is New York. 4. Should your camcorder, or if the built-in this mode. , : Function cannot be used to refer to buttons on...setting is available only with the next to the Troubleshooting table ( 152). Please read this manual carefully before you use E the camcorder and retain it for purchasing the Canon XH G1/XH A1. Introduction Operating modes The availability of their respective companies. • ANY USE OF THIS ...
...the wireless controller. Brackets [ ] and capital letters are simulated pictures taken with a still camera. : Option or feature that applies or is New York. 4. Should your camcorder, or if the built-in this mode. , : Function cannot be used to refer to buttons on...setting is available only with the next to the Troubleshooting table ( 152). Please read this manual carefully before you use E the camcorder and retain it for purchasing the Canon XH G1/XH A1. Introduction Operating modes The availability of their respective companies. • ANY USE OF THIS ...
XH G1 XH A1 Instruction Manual
Page 6
Camera Section HD/SD Recorder Section HDV/DV HD/SD SDI Terminal HD/SD HDV/DV Terminal HDV/DV Playback Signal HDV/DV 6 The video signal can be HDV or DV, respectively. The recording standard on the tape will distinguish between the video signal standards used by the camera section, and the recording standards used by the recorder section. About the HD/HDV and SD/DV Specifications Throughout the manual we will be set to HD (high definition) or SD (standard definition) specifications.
Camera Section HD/SD Recorder Section HDV/DV HD/SD SDI Terminal HD/SD HDV/DV Terminal HDV/DV Playback Signal HDV/DV 6 The video signal can be HDV or DV, respectively. The recording standard on the tape will distinguish between the video signal standards used by the camera section, and the recording standards used by the recorder section. About the HD/HDV and SD/DV Specifications Throughout the manual we will be set to HD (high definition) or SD (standard definition) specifications.
XH G1 XH A1 Instruction Manual
Page 31
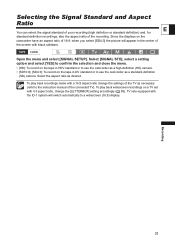
... with black sidebars. Since the displays on the tape in the center of the screen with the ID-1 system will switch automatically to the instruction manual of the recording. Select [SIGNAL STD], select a setting option and select [YES] to confirm the selection and close the menu. • [HD]: To ...record on the tape in HDV standard or to use the camcorder as a high-definition (HD) camera. • [SD16:9], [SD4:3]: To record on the camcorder have an aspect ratio of 16:9, when you select [SD4:3] the picture will appear in DV standard or to ...
... with black sidebars. Since the displays on the tape in the center of the screen with the ID-1 system will switch automatically to the instruction manual of the recording. Select [SIGNAL STD], select a setting option and select [YES] to confirm the selection and close the menu. • [HD]: To ...record on the tape in HDV standard or to use the camcorder as a high-definition (HD) camera. • [SD16:9], [SD4:3]: To record on the camcorder have an aspect ratio of 16:9, when you select [SD4:3] the picture will appear in DV standard or to ...

XH G1 XH A1 Instruction Manual
Page 35
... useful even when recording in this mode making it easier to focus manually, you can obtain a very fast initial automatic focus even while focusing manually. Adjusting the Focus The camcorder can be set to AF. The camcorder has also a Push-AF function to change the direction of the Peaking...when you operate the PUSH AF button, the Instant AF is set to Autofocus or Manual Focus. MENU ( 25) CAMERA SETUP AF MODE ••• INSTANT AF Open the menu and select [CAMERA SETUP]. The camcorder focuses on the subject in .) (at wide-angle from the front of the screen...
... useful even when recording in this mode making it easier to focus manually, you can obtain a very fast initial automatic focus even while focusing manually. Adjusting the Focus The camcorder can be set to AF. The camcorder has also a Push-AF function to change the direction of the Peaking...when you operate the PUSH AF button, the Instant AF is set to Autofocus or Manual Focus. MENU ( 25) CAMERA SETUP AF MODE ••• INSTANT AF Open the menu and select [CAMERA SETUP]. The camcorder focuses on the subject in .) (at wide-angle from the front of the screen...
XH G1 XH A1 Instruction Manual
Page 52
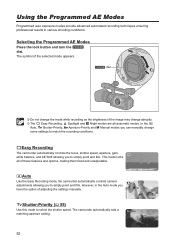
... simply point and film. dial Do not change the mode while recording as the brightness of adjusting the settings manually. Easy Recording The camcorder automatically controls the focus, shutter speed, aperture, gain, white balance, and AE Shift allowing you to match the recording... Selecting the Programmed AE Modes Press the lock button and turn the dial. Auto Like the Easy Recording mode, the camcorder automatically controls camera adjustments allowing you to select the shutter speed. However, in various shooting conditions. Using the Programmed AE Modes Programmed auto...
... simply point and film. dial Do not change the mode while recording as the brightness of adjusting the settings manually. Easy Recording The camcorder automatically controls the focus, shutter speed, aperture, gain, white balance, and AE Shift allowing you to match the recording... Selecting the Programmed AE Modes Press the lock button and turn the dial. Auto Like the Easy Recording mode, the camcorder automatically controls camera adjustments allowing you to select the shutter speed. However, in various shooting conditions. Using the Programmed AE Modes Programmed auto...

XH G1 XH A1 Instruction Manual
Page 59
Using AE Shift You can use the AE Shift control to manually override the automatic exposure system in order to , Tv or Av. 2. MENU ( 25) CAMERA SETUP AE SHIFT•••±0 1. Select the desired AE shift level: Open the menu and select [CAMERA SETUP]. Select [AE SHIFT], select a setting option and close the menu. Recording 59 Select from 15 AE levels (+2.0, +1.5, +1.25, +1.0, +0.75, +0.5, +0.25, ±0, -0.25, E -0.5, -0.75, -1.0, -1.25, -1.5, -2.0). Set the dial to darken or lighten the image.
Using AE Shift You can use the AE Shift control to manually override the automatic exposure system in order to , Tv or Av. 2. MENU ( 25) CAMERA SETUP AE SHIFT•••±0 1. Select the desired AE shift level: Open the menu and select [CAMERA SETUP]. Select [AE SHIFT], select a setting option and close the menu. Recording 59 Select from 15 AE levels (+2.0, +1.5, +1.25, +1.0, +0.75, +0.5, +0.25, ±0, -0.25, E -0.5, -0.75, -1.0, -1.25, -1.5, -2.0). Set the dial to darken or lighten the image.

XH G1 XH A1 Instruction Manual
Page 60
... to the other GAIN switch options in mode. 3. Close the menu. 60 Set the dial to the GAIN Switch Positions MENU ( 25) CAMERA SETUP GAIN SETTING GAIN L•••±0dB GAIN M•••6dB GAIN H•••12dB 1. Select the [GAIN SETTING.... AGC switch set to +36 dB ( ) or +18 dB ( ). Available gain levels that can independently assign gain values from -3 dB to OFF: Manual gain level selection (L, M or H) with the GAIN switch. dial GAIN switch AGC switch Assigning Gain Values to , Tv, Av or M. 2. Adjusting the ...
... to the other GAIN switch options in mode. 3. Close the menu. 60 Set the dial to the GAIN Switch Positions MENU ( 25) CAMERA SETUP GAIN SETTING GAIN L•••±0dB GAIN M•••6dB GAIN H•••12dB 1. Select the [GAIN SETTING.... AGC switch set to +36 dB ( ) or +18 dB ( ). Available gain levels that can independently assign gain values from -3 dB to OFF: Manual gain level selection (L, M or H) with the GAIN switch. dial GAIN switch AGC switch Assigning Gain Values to , Tv, Av or M. 2. Adjusting the ...

XH G1 XH A1 Instruction Manual
Page 98
.../Cb green Y Select the appropriate component video signal depending on the TV to recognize the camera. Select [COMP. Close the menu. 2 Using the COMPONENT OUT Terminal Open the terminal cover Set the switch to the instruction manual of the TV or monitor. 98 Select [AUTO] or [SD LOCKED] to match the video... close the menu. 3 Using the HDV/DV Terminal CV-150F/CV-250F DV Cable (optional) Open the terminal cover 4-pin 6-pin • When connecting the camcorder to a monitor TV that supports DV, you wish to [ON]. 3.
.../Cb green Y Select the appropriate component video signal depending on the TV to recognize the camera. Select [COMP. Close the menu. 2 Using the COMPONENT OUT Terminal Open the terminal cover Set the switch to the instruction manual of the TV or monitor. 98 Select [AUTO] or [SD LOCKED] to match the video... close the menu. 3 Using the HDV/DV Terminal CV-150F/CV-250F DV Cable (optional) Open the terminal cover 4-pin 6-pin • When connecting the camcorder to a monitor TV that supports DV, you wish to [ON]. 3.

XH G1 XH A1 Instruction Manual
Page 118
...conditions, as you are not using the autofocus and with Canon SLR cameras, including the 420EX/430EX/550EX/580EX models, to [ON]). The Speedlite flash will flash in Tv mode are 1/4 - 1/500. The camcorder does not support the Bounce Flash function or the Wireless Multiple... way to the instruction manual of the flash straight, fully into the hot shoe. 2. Using an Optional Flash You can use E-TTL II compatible Canon Speedlite flashes designed for use the Off-Camera Shoe Cord designed for Canon EOS SLR cameras. Always turn off the camcorder when connecting or detaching ...
...conditions, as you are not using the autofocus and with Canon SLR cameras, including the 420EX/430EX/550EX/580EX models, to [ON]). The Speedlite flash will flash in Tv mode are 1/4 - 1/500. The camcorder does not support the Bounce Flash function or the Wireless Multiple... way to the instruction manual of the flash straight, fully into the hot shoe. 2. Using an Optional Flash You can use E-TTL II compatible Canon Speedlite flashes designed for use the Off-Camera Shoe Cord designed for Canon EOS SLR cameras. Always turn off the camcorder when connecting or detaching ...
XH G1 XH A1 Instruction Manual
Page 158
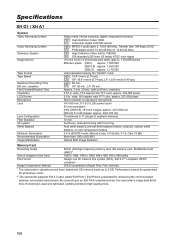
... ** The camcorder supports Exif 2.2 (also called "Exif Print"). wide, 16:9 aspect ratio TFT color, approx. 269,000 pixels 2.8 in . By connecting to 2 GB. Specifications XH G1 / XH A1 System Video ... 39.8-796 mm 16 elements in 11 groups (1 aspheric element) 72 mm Autofocus, manual focusing with focus ring Auto white balance, pre-set white balance (indoor, outdoor), custom white balance... cannot be guaranteed for Camera File system (DCF), Exif 2.2** compliant, DPOF compliant Image Compression Method JPEG compression (Super Fine, Fine, Normal) * The camcorder's operations have been tested...
... ** The camcorder supports Exif 2.2 (also called "Exif Print"). wide, 16:9 aspect ratio TFT color, approx. 269,000 pixels 2.8 in . By connecting to 2 GB. Specifications XH G1 / XH A1 System Video ... 39.8-796 mm 16 elements in 11 groups (1 aspheric element) 72 mm Autofocus, manual focusing with focus ring Auto white balance, pre-set white balance (indoor, outdoor), custom white balance... cannot be guaranteed for Camera File system (DCF), Exif 2.2** compliant, DPOF compliant Image Compression Method JPEG compression (Super Fine, Fine, Normal) * The camcorder's operations have been tested...


