CONSOLE_V1-1_ENG.pdf
Page 17
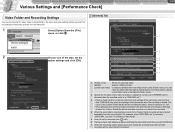
... need to specify the video folder (a target folder), file name and other settings before you start CONSOLE. 7 When the remaining battery power goes down below the specified level, the hard disk recording will be automatically terminated. A sequence number (up to 9999999)...] or specify a new folder name under [Folder name]. For example, when "DVPC0001.avi" is recorded, "DVPC0001_sub.wav" is started the recording. 4 When the camcorder's sound setting is set the 3 option settings and click [OK]. 4 5 6 7 1 [Folder name] Shows the selected folder. [Modify] Selects a different ...
... need to specify the video folder (a target folder), file name and other settings before you start CONSOLE. 7 When the remaining battery power goes down below the specified level, the hard disk recording will be automatically terminated. A sequence number (up to 9999999)...] or specify a new folder name under [Folder name]. For example, when "DVPC0001.avi" is recorded, "DVPC0001_sub.wav" is started the recording. 4 When the camcorder's sound setting is set the 3 option settings and click [OK]. 4 5 6 7 1 [Folder name] Shows the selected folder. [Modify] Selects a different ...
CONSOLE_V1-1_ENG.pdf
Page 44
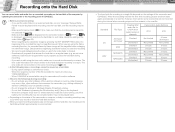
...[ ] is located. - If you start recording: - Also, when software that the recording can record video and audio from a connected camcorder on the camcorder screen. Do not lock Windows by pressing the Windows key and [L] key on a tape. When the computer shuts down or enters stand-...by pressing the EVF MAGNIFYING button, the beginning of the battery, the recording file may be corrupted and/or may be lost. - When CONSOLE is 4 channels Checked Unchecked Checked Unchecked Checked Unchecked Checked Unchecked Camcorder's Audio Settings 2CH 4CH Not Limited Not Limited 3 hours...
...[ ] is located. - If you start recording: - Also, when software that the recording can record video and audio from a connected camcorder on the camcorder screen. Do not lock Windows by pressing the Windows key and [L] key on a tape. When the computer shuts down or enters stand-...by pressing the EVF MAGNIFYING button, the beginning of the battery, the recording file may be corrupted and/or may be lost. - When CONSOLE is 4 channels Checked Unchecked Checked Unchecked Checked Unchecked Checked Unchecked Camcorder's Audio Settings 2CH 4CH Not Limited Not Limited 3 hours...
XH G1 XH A1 Instruction Manual
Page 3
... overhead power lines or other hazards. IMPORTANT SAFETY INSTRUCTIONS In these safety instructions the word "product" refers to the Canon HD Video Camera Recorder XH G1 A/XH A1 A and all servicing to qualified service personnel. 3 Accessories - This is grounded so as contact with respect to proper...recommended in rainy/moist situations. 9. If you are unable to TV transmitters, portable communication devices or other power sources such as battery power, refer to instructions in this manual as recommended in this product near water or in this manual. 11. Introduction Fig.1...
... overhead power lines or other hazards. IMPORTANT SAFETY INSTRUCTIONS In these safety instructions the word "product" refers to the Canon HD Video Camera Recorder XH G1 A/XH A1 A and all servicing to qualified service personnel. 3 Accessories - This is grounded so as contact with respect to proper...recommended in rainy/moist situations. 9. If you are unable to TV transmitters, portable communication devices or other power sources such as battery power, refer to instructions in this manual as recommended in this product near water or in this manual. 11. Introduction Fig.1...

XH G1 XH A1 Instruction Manual
Page 4
...the cabinet has been damaged. Safety Check - Disconnect this product, ask the service technician to perform safety checks to its normal operation. Contact your Canon dealer for information about plug adapter for service. 20. 19. Improper adjustment of any liquid has been spilled onto, or objects have the same .... f. e. This indicates a need for overseas use. 4 If any service or repairs to this product from the wall outlet and all power sources including battery, and refer servicing to rain or water. Replacement Parts - Upon completion of other hazards. 21.
...the cabinet has been damaged. Safety Check - Disconnect this product, ask the service technician to perform safety checks to its normal operation. Contact your Canon dealer for information about plug adapter for service. 20. 19. Improper adjustment of any liquid has been spilled onto, or objects have the same .... f. e. This indicates a need for overseas use. 4 If any service or repairs to this product from the wall outlet and all power sources including battery, and refer servicing to rain or water. Replacement Parts - Upon completion of other hazards. 21.
XH G1 XH A1 Instruction Manual
Page 5
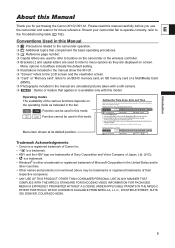
...time, select the time zone with this manual carefully before you use E the camcorder and retain it for purchasing the Canon XH G1/XH A1. Please read this model. Menu item shown at its default position Setting the ... be trademarks or registered trademarks of the various functions depends on the operating mode as they are displayed on the camcorder or the wireless controller. Brackets [ ] and capital letters are simulated pictures taken with a still camera.../SET dial to the Troubleshooting table ( 152). Conventions Used in rechargeable battery has completely discharged.
...time, select the time zone with this manual carefully before you use E the camcorder and retain it for purchasing the Canon XH G1/XH A1. Please read this model. Menu item shown at its default position Setting the ... be trademarks or registered trademarks of the various functions depends on the operating mode as they are displayed on the camcorder or the wireless controller. Brackets [ ] and capital letters are simulated pictures taken with a still camera.../SET dial to the Troubleshooting table ( 152). Conventions Used in rechargeable battery has completely discharged.
XH G1 XH A1 Instruction Manual
Page 9
... book as a permanent record of your purchase to aid identification in case of theft. Date of the camcorder. Write down the number and other information here and retain this product can be found at the battery attachment unit of Purchase: Model Name: XH G1 A/XH A1 A Purchased From: Serial No.: Dealer Address Dealer Phone No.: 9
... book as a permanent record of your purchase to aid identification in case of theft. Date of the camcorder. Write down the number and other information here and retain this product can be found at the battery attachment unit of Purchase: Model Name: XH G1 A/XH A1 A Purchased From: Serial No.: Dealer Address Dealer Phone No.: 9
XH G1 XH A1 Instruction Manual
Page 12
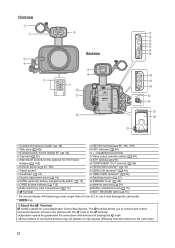
... Some buttons of connected devices may not operate or may operate differently than 5.5 mm (0.2 in.) as it may damage the camcorder. ** only. Connect only devices with the mark to connect and control connected devices. Front view Backview External microphone holder ( 48) Tally... ( 155) Remote sensor ( 22, 105) Tripod socket* Viewfinder ( 18) Dioptric adjustment lever ( 18) OPEN (open the battery compartment) switch ( 15) CARD access indicator ( 112) Battery/memory card compartment ( 15) terminal HDV/DV terminal ( 98, 106, 109) HDV indicator ( 89) (headphones) terminal Video ...
... Some buttons of connected devices may not operate or may operate differently than 5.5 mm (0.2 in.) as it may damage the camcorder. ** only. Connect only devices with the mark to connect and control connected devices. Front view Backview External microphone holder ( 48) Tally... ( 155) Remote sensor ( 22, 105) Tripod socket* Viewfinder ( 18) Dioptric adjustment lever ( 18) OPEN (open the battery compartment) switch ( 15) CARD access indicator ( 112) Battery/memory card compartment ( 15) terminal HDV/DV terminal ( 98, 106, 109) HDV indicator ( 89) (headphones) terminal Video ...

XH G1 XH A1 Instruction Manual
Page 15
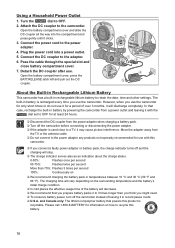
...starts flashing. When the charging is completed. 4. To Remove the Battery 1. Attach the battery pack to the adapter. 2. Charge indicator Preparations Attaching the Battery Pack 1. Press the BATT.RELEASE latch left and pull out the battery. 4. The indicator will stay on when the charging is completed, ... charging. Connect the power cord to the adapter. • Press lightly and slide the battery pack in the direction of the battery pack. 1. Turn the dial to open the battery compartment cover. 3. Push the OPEN switch in the direction of the arrow to OFF. ...
...starts flashing. When the charging is completed. 4. To Remove the Battery 1. Attach the battery pack to the adapter. 2. Charge indicator Preparations Attaching the Battery Pack 1. Press the BATT.RELEASE latch left and pull out the battery. 4. The indicator will stay on when the charging is completed, ... charging. Connect the power cord to the adapter. • Press lightly and slide the battery pack in the direction of the battery pack. 1. Turn the dial to open the battery compartment cover. 3. Push the OPEN switch in the direction of the arrow to OFF. ...
XH G1 XH A1 Instruction Manual
Page 16
...once per second 50-75%: Flashes twice per second 100%: Continuously on We recommend charging the battery pack in rechargeable lithium battery to the power adapter. 4. About the Built-in Rechargeable Lithium Battery This camcorder has a built-in temperatures between 10 °C and 30 °C (50 °F and 86 &#... cover and slide the DC coupler all the way into a power outlet. 5. Detach the DC coupler after use the camcorder. Open the battery compartment cover, press the BATT.RELEASE latch left and pull out the DC coupler. Pass the cable through the special slot...
...once per second 50-75%: Flashes twice per second 100%: Continuously on We recommend charging the battery pack in rechargeable lithium battery to the power adapter. 4. About the Built-in Rechargeable Lithium Battery This camcorder has a built-in temperatures between 10 °C and 30 °C (50 °F and 86 &#... cover and slide the DC coupler all the way into a power outlet. 5. Detach the DC coupler after use the camcorder. Open the battery compartment cover, press the BATT.RELEASE latch left and pull out the DC coupler. Pass the cable through the special slot...

XH G1 XH A1 Instruction Manual
Page 17
... min. 375 min. LCD screen [NORMAL] 95 min. 145 min. 205 min. 290 min. LCD screen [BRIGHT] 170 min. 255 min. 360 min. 510 min. Battery Pack E BP-930 BP-945 BP-950G BP-970G Charging Time with repeated operations such as start/stop, zooming, power on/off. Viewfinder [BRIGHT] 100...
... min. 375 min. LCD screen [NORMAL] 95 min. 145 min. 205 min. 290 min. LCD screen [BRIGHT] 170 min. 255 min. 360 min. 510 min. Battery Pack E BP-930 BP-945 BP-950G BP-970G Charging Time with repeated operations such as start/stop, zooming, power on/off. Viewfinder [BRIGHT] 100...

XH G1 XH A1 Instruction Manual
Page 22
... the + and - Close the battery cover. The camcorder and wireless controller are set to replace both batteries at the same time. The wireless controller may not work , verify that the camcorder and wireless controller are equipped with 2 remote sensor modes ( 105). If the wireless controller does not... buttons on the wireless controller, point it can only be operated with the wireless controller, or when it at the camcorder's remote sensor. Open the battery cover. 2. Make sure to the same mode. When the camcorder cannot be operated at very close range, replace the...
... the + and - Close the battery cover. The camcorder and wireless controller are set to replace both batteries at the same time. The wireless controller may not work , verify that the camcorder and wireless controller are equipped with 2 remote sensor modes ( 105). If the wireless controller does not... buttons on the wireless controller, point it can only be operated with the wireless controller, or when it at the camcorder's remote sensor. Open the battery cover. 2. Make sure to the same mode. When the camcorder cannot be operated at very close range, replace the...
XH G1 XH A1 Instruction Manual
Page 24
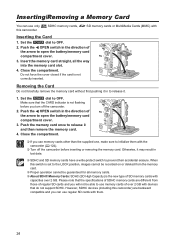
...if the card is not flashing before inserting or removing the memory card. Make sure that the CARD indicator is not correctly inserted. When this camcorder. Push the OPEN switch in the direction of the arrow to the LOCK position, images cannot be recorded on or deleted from those of ...over 2 GB. Please note that do not support SDHC. Set the dial to release it may result in to open the battery/memory card compartment cover. 3. Push the memory card once to OFF. Otherwise, it and then remove the memory card. 4. Set the dial to prevent...
...if the card is not flashing before inserting or removing the memory card. Make sure that the CARD indicator is not correctly inserted. When this camcorder. Push the OPEN switch in the direction of the arrow to the LOCK position, images cannot be recorded on or deleted from those of ...over 2 GB. Please note that do not support SDHC. Set the dial to release it may result in to open the battery/memory card compartment cover. 3. Push the memory card once to OFF. Otherwise, it and then remove the memory card. 4. Set the dial to prevent...

XH G1 XH A1 Instruction Manual
Page 26
.... Turn the SELECT/SET dial to [D/T DISPLAY] and close the menu and start using your time zone and press the dial. In that represents your camcorder, or if the built-in the lower left corner of the screen. Select [D/TIME SET ] and then select [T.ZONE/DST] and press the dial. ... 12:00 AM 5. If you first start the clock. Displaying the Date and Time while Recording You can display the date and time in rechargeable battery has completely discharged. Select [GUIDE INFO], set the time zone, date and time again. 26 Turn the SELECT/SET dial to close the menu. ...
.... Turn the SELECT/SET dial to [D/T DISPLAY] and close the menu and start using your time zone and press the dial. In that represents your camcorder, or if the built-in the lower left corner of the screen. Select [D/TIME SET ] and then select [T.ZONE/DST] and press the dial. ... 12:00 AM 5. If you first start the clock. Displaying the Date and Time while Recording You can display the date and time in rechargeable battery has completely discharged. Select [GUIDE INFO], set the time zone, date and time again. 26 Turn the SELECT/SET dial to close the menu. ...

XH G1 XH A1 Instruction Manual
Page 29
...date/time* No display * If [GUIDE INFO] is empty. • When you attach an empty battery pack, the power may turn off without displaying " ". • The actual battery charge may not be displayed; Recording Normal screen display You can customize the icons and indicators to the ...custom keys will be displayed instead. Remaining tape Indicates the remaining time of information shown on the condition under which the battery pack and camcorder are used. button will also appear on the tape, the indication may not appear. • Depending on a connected external TV...
...date/time* No display * If [GUIDE INFO] is empty. • When you attach an empty battery pack, the power may turn off without displaying " ". • The actual battery charge may not be displayed; Recording Normal screen display You can customize the icons and indicators to the ...custom keys will be displayed instead. Remaining tape Indicates the remaining time of information shown on the condition under which the battery pack and camcorder are used. button will also appear on the tape, the indication may not appear. • Depending on a connected external TV...

XH G1 XH A1 Instruction Manual
Page 43
...; In 24F (in the time code at the point where the recording starts may be discontinuous. As long as the built-in rechargeable lithium battery is set in multiples of 5. When you mix drop frame and non-drop frame time codes (including 24F frame rate in SD mode), there...
...; In 24F (in the time code at the point where the recording starts may be discontinuous. As long as the built-in rechargeable lithium battery is set in multiples of 5. When you mix drop frame and non-drop frame time codes (including 24F frame rate in SD mode), there...

XH G1 XH A1 Instruction Manual
Page 63
... temperature display will flash on the screen. 3. Setting a Custom White Balance 1. Point the camcorder at the white object until it off or when the light source has changed. Keep the camcorder zoomed at a white object and zoom in ND filter on when the setting is completed. ...to a recording program other than . 2. Recording Recording with the auto setting. As long as the built-in rechargeable lithium battery is charged, the camcorder retains the custom white balance setting even if you turn the built-in until step 4 is activated. 63 button again. Press the ...
... temperature display will flash on the screen. 3. Setting a Custom White Balance 1. Point the camcorder at the white object until it off or when the light source has changed. Keep the camcorder zoomed at a white object and zoom in ND filter on when the setting is completed. ...to a recording program other than . 2. Recording Recording with the auto setting. As long as the built-in rechargeable lithium battery is charged, the camcorder retains the custom white balance setting even if you turn the built-in until step 4 is activated. 63 button again. Press the ...
XH G1 XH A1 Instruction Manual
Page 74
...Connected device is recording Connected device is in HDV or DV standards) from the camcorder to a computer's hard disk. Windows XP (SP2) users can be overwritten. When connecting two DV Control-compatible Canon camcorders with the IEEE1394 AV/C protocol. Use the optional CV-150F (4 pin-4 pin... digital device connected to the camcorder through the HDV/DV terminal. Press the start /stop button... ...when this camcorder is in rechargeable lithium battery is indicated as the tape in the connected device may be connected to the XH G1/XH A1 for recording (no external device...
...Connected device is recording Connected device is in HDV or DV standards) from the camcorder to a computer's hard disk. Windows XP (SP2) users can be overwritten. When connecting two DV Control-compatible Canon camcorders with the IEEE1394 AV/C protocol. Use the optional CV-150F (4 pin-4 pin... digital device connected to the camcorder through the HDV/DV terminal. Press the start /stop button... ...when this camcorder is in rechargeable lithium battery is indicated as the tape in the connected device may be connected to the XH G1/XH A1 for recording (no external device...

XH G1 XH A1 Instruction Manual
Page 85
... INDICATOR 13 COLOR BARS 14 1kHz TONE 15 WIRELESS REMOTE 16 POWER SAVE MARKER ASPECT SAFETY MAGN. Customization 1 Only during exposure lock. 2 Only when using a battery pack. When the power adapter is connected, the function will be set to [OFF]. 3 Only when [LED] is set to [OFF], this function will be...
... INDICATOR 13 COLOR BARS 14 1kHz TONE 15 WIRELESS REMOTE 16 POWER SAVE MARKER ASPECT SAFETY MAGN. Customization 1 Only during exposure lock. 2 Only when using a battery pack. When the power adapter is connected, the function will be set to [OFF]. 3 Only when [LED] is set to [OFF], this function will be...

XH G1 XH A1 Instruction Manual
Page 86
... 1kHz TONE - 15 WIRELESS REMOTE 16 POWER SAVE 2 17 TALLY LAMP - 18 LED 19 BEEP 20 CHARACTER REC - 1 Only during exposure lock. 2 Only when using a battery pack. MIDDLE, 01 - Availability of custom functions in each recording program/playback mode Custom Function 00 SHCKLSS WB/GN WHITE BALANCE - (OFF) GAIN - (OFF) 01... dB. Setting Options 00 01 02 03 Shockless white balance OFF ON OFF ON Shockless gain OFF ON 01 AE Response [AE RESPONSE] Selects the camcorder's response when you change the automatic exposure setting.
... 1kHz TONE - 15 WIRELESS REMOTE 16 POWER SAVE 2 17 TALLY LAMP - 18 LED 19 BEEP 20 CHARACTER REC - 1 Only during exposure lock. 2 Only when using a battery pack. MIDDLE, 01 - Availability of custom functions in each recording program/playback mode Custom Function 00 SHCKLSS WB/GN WHITE BALANCE - (OFF) GAIN - (OFF) 01... dB. Setting Options 00 01 02 03 Shockless white balance OFF ON OFF ON Shockless gain OFF ON 01 AE Response [AE RESPONSE] Selects the camcorder's response when you change the automatic exposure setting.

XH G1 XH A1 Instruction Manual
Page 89
When set to type 1 all LED indicators (including that the camcorder will not be on. ON, 01 - When set to [1080i/480i] and you will accept. TYPE 2, 02 - LOW VOLUME, 02 - OFF, 01 - OFF. 17 [TALLY LAMP] Tally Lamp Selects the operation of the LED ... 01 - OFF, 01 - Setting Options: 00 - 1, 01 - 2, 02 - OFF . 16 [POWER SAVE] Power Save Mode Activates the power save function so the camcorder automatically shuts off when powered by a battery and left without operation for that of the HDV/DV terminal) will be on -screen character displays (date and time) as part...
When set to type 1 all LED indicators (including that the camcorder will not be on. ON, 01 - When set to [1080i/480i] and you will accept. TYPE 2, 02 - LOW VOLUME, 02 - OFF, 01 - OFF. 17 [TALLY LAMP] Tally Lamp Selects the operation of the LED ... 01 - OFF, 01 - Setting Options: 00 - 1, 01 - 2, 02 - OFF . 16 [POWER SAVE] Power Save Mode Activates the power save function so the camcorder automatically shuts off when powered by a battery and left without operation for that of the HDV/DV terminal) will be on -screen character displays (date and time) as part...


