CONSOLE_V1-1_ENG.pdf
Page 20
... type used for writing (DV or HDV) will not be dropped when a program accessing the hard disk (e.g. When receiving the DV standard data from the camcorder while [Frame] is selected and data dropping occurs, select a smaller size at [Preview resolution] or [I picture only] at [Preview picture] in the [... the red line after executing the hard disk performance check or no data dropping has occurred during recording (a part of the system starts. 4 Review the result and click [Close]. • CONSOLE writes the data to the selected folder to the hard disk. The performance check of the ...
... type used for writing (DV or HDV) will not be dropped when a program accessing the hard disk (e.g. When receiving the DV standard data from the camcorder while [Frame] is selected and data dropping occurs, select a smaller size at [Preview resolution] or [I picture only] at [Preview picture] in the [... the red line after executing the hard disk performance check or no data dropping has occurred during recording (a part of the system starts. 4 Review the result and click [Close]. • CONSOLE writes the data to the selected folder to the hard disk. The performance check of the ...

CONSOLE_V1-1_ENG.pdf
Page 34
... correction will be set by clicking the tabs. Adjusting to [+] results in stronger red tones, and to [-] in stronger yellow tones. 1 Click of [A Area Review]. • [R Gain] and [B Gain] sliders will only be applied to the set the B area, click Select]. Adjusting to [+] detects a wider color ...the color to be detected. of [B Area 2 Adjust the levels of the detected area. You can switch over each parameter, refer to the camcorder instruction manual. • The area that will be corrected will be activated. • To set color. • [Color Phase]: Select the ...
... correction will be set by clicking the tabs. Adjusting to [+] results in stronger red tones, and to [-] in stronger yellow tones. 1 Click of [A Area Review]. • [R Gain] and [B Gain] sliders will only be applied to the set the B area, click Select]. Adjusting to [+] detects a wider color ...the color to be detected. of [B Area 2 Adjust the levels of the detected area. You can switch over each parameter, refer to the camcorder instruction manual. • The area that will be corrected will be activated. • To set color. • [Color Phase]: Select the ...

CONSOLE_V1-1_ENG.pdf
Page 35
Adjust the levels of [Hue], [Chroma], [Area] and [Y Level] by moving the sliders. • For details about each of [A Area Review] to the [Color Correction] ( 4-34). • The area that will be corrected will appear as they are managed on the [Detail] window. ...[Hue], [Chroma], [Area] and [Y Level] sliders will be activated. 3 Click of the terms, refer to finish the setting. Click of [B Area Review] to the camcorder instruction manual. „ Setting the Skin Detail Area 1 Click the [Detail] tab and of [Area Select]. The color will not be corrected if [OFF...
Adjust the levels of [Hue], [Chroma], [Area] and [Y Level] by moving the sliders. • For details about each of [A Area Review] to the [Color Correction] ( 4-34). • The area that will be corrected will appear as they are managed on the [Detail] window. ...[Hue], [Chroma], [Area] and [Y Level] sliders will be activated. 3 Click of the terms, refer to finish the setting. Click of [B Area Review] to the camcorder instruction manual. „ Setting the Skin Detail Area 1 Click the [Detail] tab and of [Area Select]. The color will not be corrected if [OFF...
CONSOLE_V1-1_ENG.pdf
Page 48
... [CPU usage] displayed in the [Performance Check] window ( 3-19) shows 100%, change the software settings using one or more of followings to review the history after finalizing in [Sequence] or [Frame] mode, the created file information will be displayed under [Recording history] in a file will ...Control] window. When recording in DV, a number of dropped frames and when recording in HDV recording corresponds to dropping from the camcorder may happen also when the processing capacity of the computer is played back from the point where the data dropping occurred. Dropping one ...
... [CPU usage] displayed in the [Performance Check] window ( 3-19) shows 100%, change the software settings using one or more of followings to review the history after finalizing in [Sequence] or [Frame] mode, the created file information will be displayed under [Recording history] in a file will ...Control] window. When recording in DV, a number of dropped frames and when recording in HDV recording corresponds to dropping from the camcorder may happen also when the processing capacity of the computer is played back from the point where the data dropping occurred. Dropping one ...
XH G1 XH A1 Instruction Manual
Page 8
... File Numbers ...111 Recording Still Images on a Memory Card ...112 Selecting the Drive Mode ...115 Selecting the Metering Method...117 Using an Optional Flash ...118 Reviewing a Still Image Right after Recording 119 Playing Back Still Images from a Memory Card 120 Erasing Images...122 Protecting Images...123 Initializing a Memory Card ...124 Print...
... File Numbers ...111 Recording Still Images on a Memory Card ...112 Selecting the Drive Mode ...115 Selecting the Metering Method...117 Using an Optional Flash ...118 Reviewing a Still Image Right after Recording 119 Playing Back Still Images from a Memory Card 120 Erasing Images...122 Protecting Images...123 Initializing a Memory Card ...124 Print...

XH G1 XH A1 Instruction Manual
Page 10
... 62) CUSTOM KEYS ( 70) CUSTOM PRESET ON/OFF button ( 81) CUSTOM PRESET SELECT button ( 81) 10 Components Guide XH G1/XH A1 Left side view POWER dial External control mode VCR/PLAY mode Power off Auto Shutter-Priority Aperture-Priority Manual Spotlight Night Easy Recording ...Recording programs DISP. (display) button ( 29) PEAKING button ( 37) MAGN. (magnification) button ( 37) (record review) button ( 30) POSITION PRESET switch (...
... 62) CUSTOM KEYS ( 70) CUSTOM PRESET ON/OFF button ( 81) CUSTOM PRESET SELECT button ( 81) 10 Components Guide XH G1/XH A1 Left side view POWER dial External control mode VCR/PLAY mode Power off Auto Shutter-Priority Aperture-Priority Manual Spotlight Night Easy Recording ...Recording programs DISP. (display) button ( 29) PEAKING button ( 37) MAGN. (magnification) button ( 37) (record review) button ( 30) POSITION PRESET switch (...
XH G1 XH A1 Instruction Manual
Page 30
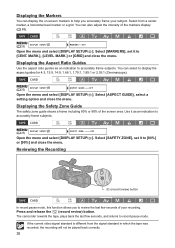
...the screen area. If the current video signal standard is different from a center marker, a horizontal level marker or a grid. Reviewing the Recording (record review) button In record pause mode, this function allows you accurately frame your recording. MENU ( 25) DISPLAY SETUP/ MARKERS••... [SAFETY ZONE], set it to display the aspect guides for 4:3, 13:9, 14:9, 1.66:1, 1.75:1, 1.85:1 or 2.35:1 (Cinemascope). The camcorder rewinds the tape, plays back the last few seconds of your subject. Displaying the Aspect Ratio Guides Use the aspect ratio guides as an indication...
...the screen area. If the current video signal standard is different from a center marker, a horizontal level marker or a grid. Reviewing the Recording (record review) button In record pause mode, this function allows you accurately frame your recording. MENU ( 25) DISPLAY SETUP/ MARKERS••... [SAFETY ZONE], set it to display the aspect guides for 4:3, 13:9, 14:9, 1.66:1, 1.75:1, 1.85:1 or 2.35:1 (Cinemascope). The camcorder rewinds the tape, plays back the last few seconds of your subject. Displaying the Aspect Ratio Guides Use the aspect ratio guides as an indication...
XH G1 XH A1 Instruction Manual
Page 119
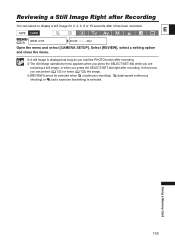
... a setting option and close the menu. A still image is selected. Using a Memory Card 119 Reviewing a Still Image Right after Recording You can protect ( 123) or erase ( 122) the image. [REVIEW] cannot be selected when (continuous shooting), (high-speed continuous shooting) or (auto exposure bracketing) is displayed as... the PHOTO button after recording. The still image operations menu appears when you press the SELECT/SET dial while you are reviewing a still image, or when you can select to display a still image for 2, 4, 6, 8 or 10 seconds after it has been recorded...
... a setting option and close the menu. A still image is selected. Using a Memory Card 119 Reviewing a Still Image Right after Recording You can protect ( 123) or erase ( 122) the image. [REVIEW] cannot be selected when (continuous shooting), (high-speed continuous shooting) or (auto exposure bracketing) is displayed as... the PHOTO button after recording. The still image operations menu appears when you press the SELECT/SET dial while you are reviewing a still image, or when you can select to display a still image for 2, 4, 6, 8 or 10 seconds after it has been recorded...

XH G1 XH A1 Instruction Manual
Page 122
.... 122 Press the SELECT/SET dial to erase. 2. The image is erased and the previous image appears. 5. All still images except the protected ones are reviewing a still image, or if you press the SELECT/SET dial immediately after recording an image. 3. Select [ERASE]. Open the menu and select [CARD OPERATIONS]. 2. Select...
.... 122 Press the SELECT/SET dial to erase. 2. The image is erased and the previous image appears. 5. All still images except the protected ones are reviewing a still image, or if you press the SELECT/SET dial immediately after recording an image. 3. Select [ERASE]. Open the menu and select [CARD OPERATIONS]. 2. Select...
XH G1 XH A1 Instruction Manual
Page 123
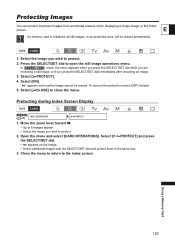
... protect them in the same way. 3. Using a Memory Card 123 In mode, the menu appears when you press the SELECT/SET dial while you are reviewing a still image, or if you wish to protect. 2. To remove the protection select [OFF] instead. 5. Select the image you wish to protect. 2. Select [ PROTECT]. 4. " " appears...
... protect them in the same way. 3. Using a Memory Card 123 In mode, the menu appears when you press the SELECT/SET dial while you are reviewing a still image, or if you wish to protect. 2. To remove the protection select [OFF] instead. 5. Select the image you wish to protect. 2. Select [ PROTECT]. 4. " " appears...
XH G1 XH A1 Instruction Manual
Page 156
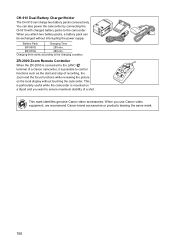
... BP-950G 280 min. This is particularly useful while the camcorder is possible to control functions such as the start and stop of recording, the zoom and the focus functions while reviewing the picture on a tripod and you use Canon video equipment, we recommend Canon-brand accessories or products bearing the same mark. 156...
... BP-950G 280 min. This is particularly useful while the camcorder is possible to control functions such as the start and stop of recording, the zoom and the focus functions while reviewing the picture on a tripod and you use Canon video equipment, we recommend Canon-brand accessories or products bearing the same mark. 156...
XH G1 XH A1 Instruction Manual
Page 161
Movies 27 Recording - Programmed AE 52 Protecting still images 123 Pulldown mode (24F frame rate 41 R Record review 30 Recording - Still images 112 Recording mode (SD 75 Recording programs 52 Rec-run (time code 42 Rec-run preset (time code...recording (tape/memory card 113 Skin detail 67 Sky detail 68 Slideshow 120 Specifications 158 Spotlight (recording program 53 Still image quality 110 Still image review 119 Still image size 110 T E Tape protection 150 Temporary autofocus 36 Time code 42 Time code synchronization 44 Troubleshooting 152 Tv (recording program...
Movies 27 Recording - Programmed AE 52 Protecting still images 123 Pulldown mode (24F frame rate 41 R Record review 30 Recording - Still images 112 Recording mode (SD 75 Recording programs 52 Rec-run (time code 42 Rec-run preset (time code...recording (tape/memory card 113 Skin detail 67 Sky detail 68 Slideshow 120 Specifications 158 Spotlight (recording program 53 Still image quality 110 Still image review 119 Still image size 110 T E Tape protection 150 Temporary autofocus 36 Time code 42 Time code synchronization 44 Troubleshooting 152 Tv (recording program...


