CONSOLE_V1-1_ENG.pdf
Page 8
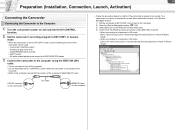
... Follow the procedure below to confirm if the camcorder is properly connected. mode, only the following names are shown under IEEE1394 controller. • When connecting to a computer in HD mode: [AV/C Tape Device], [Canon Camera Storage Device] and [Canon Virtual VCR] are shown. • When ...connecting to a computer in the [Device Manager] window. 1) Set the camcorder to EXT.CONT. Handle and grip zoom lever -
... Follow the procedure below to confirm if the camcorder is properly connected. mode, only the following names are shown under IEEE1394 controller. • When connecting to a computer in HD mode: [AV/C Tape Device], [Canon Camera Storage Device] and [Canon Virtual VCR] are shown. • When ...connecting to a computer in the [Device Manager] window. 1) Set the camcorder to EXT.CONT. Handle and grip zoom lever -
CONSOLE_V1-1_ENG.pdf
Page 23
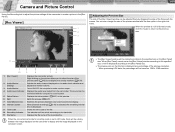
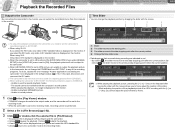
...] cannot resize the [Rec Viewer] window according to the specified size, it will turn while recording on the title bar is set to HD mode, there will be a delay between color and monochrome display. Turns ON/OFF the computer's audio monitor output. Displays the audio level output... Recording onto the Hard Disk Playback the Recorded Files Camera and Picture Control 4-23 Using the Recording tool to adjust the picture settings of the camcorder to create a picture in [Full Screen] mode, click the mouse to return to the previous size. 4 11 10 9 8 7 6 5 1 [Rec Viewer] 2 Audio Monitor...
...] cannot resize the [Rec Viewer] window according to the specified size, it will turn while recording on the title bar is set to HD mode, there will be a delay between color and monochrome display. Turns ON/OFF the computer's audio monitor output. Displays the audio level output... Recording onto the Hard Disk Playback the Recorded Files Camera and Picture Control 4-23 Using the Recording tool to adjust the picture settings of the camcorder to create a picture in [Full Screen] mode, click the mouse to return to the previous size. 4 11 10 9 8 7 6 5 1 [Rec Viewer] 2 Audio Monitor...
CONSOLE_V1-1_ENG.pdf
Page 42
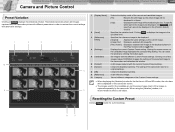
...the same settings as the current image. Displays a selected still image file. Clicking one of the images makes CONSOLE to apply the settings of the camcorder returns to be displayed in the [Play Viewer] window ( 6-50). Closes the [Variation] window. Each of the displayed picture in the [...of different categories of the current and candidate images. [Fit]: [Clip]: Resizes the still image so the whole image will be displayed in HD and SD modes, the color bars will be displayed on displays the [Variation] window. Placing the mouse cursor on the candidate image highlights ...
...the same settings as the current image. Displays a selected still image file. Clicking one of the images makes CONSOLE to apply the settings of the camcorder returns to be displayed in the [Play Viewer] window ( 6-50). Closes the [Variation] window. Each of the displayed picture in the [...of different categories of the current and candidate images. [Fit]: [Clip]: Resizes the still image so the whole image will be displayed in HD and SD modes, the color bars will be displayed on displays the [Variation] window. Placing the mouse cursor on the candidate image highlights ...
CONSOLE_V1-1_ENG.pdf
Page 51
...the picture frame by dragging the slider with the computer's sound system. - By clicking , the slider moves to the camcorder. When [HD DOWN-CONV] is accessing the camcorder." the following limitations apply to use the special playback modes. - Unable to CONSOLE. - Clicking restarts the playback. &#... slider. - When pausing the playback, no image is displayed on the monitor. - if you select the HD mode, only video in [Play Viewer] and the camcorder. • Clicking pauses the playback. By clicking , the slider moves to the next data dropping point after...
...the picture frame by dragging the slider with the computer's sound system. - By clicking , the slider moves to the camcorder. When [HD DOWN-CONV] is accessing the camcorder." the following limitations apply to use the special playback modes. - Unable to CONSOLE. - Clicking restarts the playback. &#... slider. - When pausing the playback, no image is displayed on the monitor. - if you select the HD mode, only video in [Play Viewer] and the camcorder. • Clicking pauses the playback. By clicking , the slider moves to the next data dropping point after...
XH G1 XH A1 Instruction Manual
Page 12
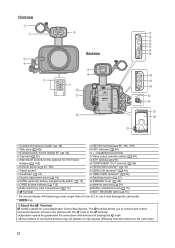
...devices may not operate or may operate differently than 5.5 mm (0.2 in.) as it may damage the camcorder. ** only. Connect only devices with fastening screws longer than the buttons on the camcorder. 12 RELEASE latch ( 15) * Do not use tripods with the mark to connect and control ...HDV/DV terminal ( 98, 106, 109) HDV indicator ( 89) (headphones) terminal Video output selection switch ( 99) A/V1 terminal ( 97) COMPONENT OUT terminal ( 98) HD/SD SDI terminal** ( 97) GENLOCK terminal** ( 44) TIME CODE terminal** ( 44) Start/stop button ( 27) STANDBY lever ( 28) Memory card slot ( 24) ...
...devices may not operate or may operate differently than 5.5 mm (0.2 in.) as it may damage the camcorder. ** only. Connect only devices with fastening screws longer than the buttons on the camcorder. 12 RELEASE latch ( 15) * Do not use tripods with the mark to connect and control ...HDV/DV terminal ( 98, 106, 109) HDV indicator ( 89) (headphones) terminal Video output selection switch ( 99) A/V1 terminal ( 97) COMPONENT OUT terminal ( 98) HD/SD SDI terminal** ( 97) GENLOCK terminal** ( 44) TIME CODE terminal** ( 44) Start/stop button ( 27) STANDBY lever ( 28) Memory card slot ( 24) ...
XH G1 XH A1 Instruction Manual
Page 31
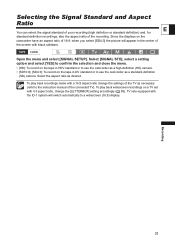
...play back widescreen recordings on the tape in the center of 16:9, when you select [SD4:3] the picture will switch automatically to use the camcorder as a standard-definition (SD) camera. Selecting the Signal Standard and Aspect Ratio E You can select the signal standard of your recording (...SIGNAL STD], select a setting option and select [YES] to confirm the selection and close the menu. • [HD]: To record on the tape in HDV standard or to use the camcorder as a high-definition (HD) camera. • [SD16:9], [SD4:3]: To record on a TV set with black sidebars. TV sets equipped ...
...play back widescreen recordings on the tape in the center of 16:9, when you select [SD4:3] the picture will switch automatically to use the camcorder as a standard-definition (SD) camera. Selecting the Signal Standard and Aspect Ratio E You can select the signal standard of your recording (...SIGNAL STD], select a setting option and select [YES] to confirm the selection and close the menu. • [HD]: To record on the tape in HDV standard or to use the camcorder as a high-definition (HD) camera. • [SD16:9], [SD4:3]: To record on a TV set with black sidebars. TV sets equipped ...
XH G1 XH A1 Instruction Manual
Page 37
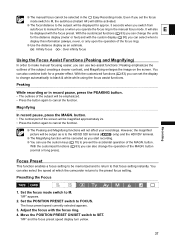
...when to display this information (always, never, or only upon the operation of the focus ring). Use the distance display as is to the HD/SD SDI terminal ( only) and the HDV/DV terminal. The Magnifying function will be magnified approximately 2x. • Press the button again to... a focus setting to be emphasized. • Press the button again to the preset focus setting. You can also select the speed at which the camcorder returns to cancel the function. Even if you set the display to change the units for approx. 3 seconds when you switch from E autofocus to ...
...when to display this information (always, never, or only upon the operation of the focus ring). Use the distance display as is to the HD/SD SDI terminal ( only) and the HDV/DV terminal. The Magnifying function will be magnified approximately 2x. • Press the button again to... a focus setting to be emphasized. • Press the button again to the preset focus setting. You can also select the speed at which the camcorder returns to cancel the function. Even if you set the display to change the units for approx. 3 seconds when you switch from E autofocus to ...
XH G1 XH A1 Instruction Manual
Page 44
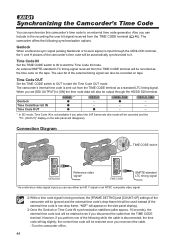
... timing signal received from the TIME CODE terminal. Time Code OUT Set the TIME CODE switch to OUT to it. Synchronizing the Camcorder's Time Code You can use either an HD Y signal or an NTSC composite video signal. While a time code signal is being received, the [FRAME SETTNG] and [COUNT-UP...] settings of the camcorder will be ignored and the external time code's drop-frame bit will be used instead (if the external time ...
... timing signal received from the TIME CODE terminal. Time Code OUT Set the TIME CODE switch to OUT to it. Synchronizing the Camcorder's Time Code You can use either an HD Y signal or an NTSC composite video signal. While a time code signal is being received, the [FRAME SETTNG] and [COUNT-UP...] settings of the camcorder will be ignored and the external time code's drop-frame bit will be used instead (if the external time ...

XH G1 XH A1 Instruction Manual
Page 45
...However, the Genlock synchronization will not be possible if the external Genlock signal is in HD standard but the camcorder is set to SD standard. The phase difference between the external Genlock signal and the camcorder is no input signal, the external time code being recorded on tape may be ...recorded on the side panel will disappear). When the camcorder is set to HD standard, Genlock synchronization is possible even if the external Genlock signal is set to HD standard and [SDI SPEC.] is in SD mode, Time Code IN is not available if ...
...However, the Genlock synchronization will not be possible if the external Genlock signal is in HD standard but the camcorder is set to SD standard. The phase difference between the external Genlock signal and the camcorder is no input signal, the external time code being recorded on tape may be ...recorded on the side panel will disappear). When the camcorder is set to HD standard, Genlock synchronization is possible even if the external Genlock signal is set to HD standard and [SDI SPEC.] is in SD mode, Time Code IN is not available if ...
XH G1 XH A1 Instruction Manual
Page 47
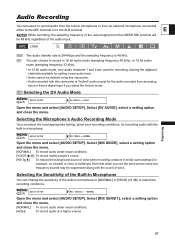
... audio channels 1 and 2 are used for recording, leaving the adjacent channels available for adding a new audio track. • Audio cannot be dubbed using this camcorder. • Audio recorded with the sound of the built-in windy surroundings (for the audio recorded from an analog input or from the... HD/SD SDI terminal will be suppressed along with this camcorder is 48 kHz. Recording HDV The audio transfer rate is 384 Kbps and the sampling frequency is "locked" audio ...
... audio channels 1 and 2 are used for recording, leaving the adjacent channels available for adding a new audio track. • Audio cannot be dubbed using this camcorder. • Audio recorded with the sound of the built-in windy surroundings (for the audio recorded from an analog input or from the... HD/SD SDI terminal will be suppressed along with this camcorder is 48 kHz. Recording HDV The audio transfer rate is 384 Kbps and the sampling frequency is "locked" audio ...
XH G1 XH A1 Instruction Manual
Page 72
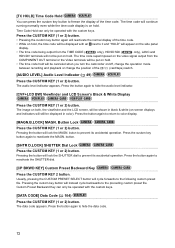
The time code superimposed on the video signal output from the TIME CODE ( only), HD/SD SDI ( only), LANC and HDV/DV terminals will lock the MAGN. The audio level indicator appears. The image on both, the viewfinder and the ... hold. • The time code hold will still be displayed in black & white (on-screen displays and indicators will be canceled when you turn the camcorder on/off, change the operation mode between recording and playback or change the position of the / (card/tape) switch. [AUDIO LEVEL] Audio Level Indicator ( 49...
The time code superimposed on the video signal output from the TIME CODE ( only), HD/SD SDI ( only), LANC and HDV/DV terminals will lock the MAGN. The audio level indicator appears. The image on both, the viewfinder and the ... hold. • The time code hold will still be displayed in black & white (on-screen displays and indicators will be canceled when you turn the camcorder on/off, change the operation mode between recording and playback or change the position of the / (card/tape) switch. [AUDIO LEVEL] Audio Level Indicator ( 49...
XH G1 XH A1 Instruction Manual
Page 99
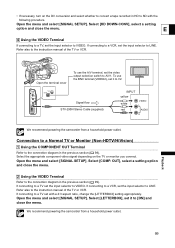
... close the menu. Refer also to the connection diagram in the previous section ( 99). We recommend powering the camcorder from a household power outlet. Select [HD DOWN-CONV], select a setting option and close the menu. 2 Using the VIDEO Terminal Refer to the instruction ...input selector to LINE. Signal flow STV-290N Stereo Cable (supplied) INPUT yellow white VIDEO L red AUDIO R We recommend powering the camcorder from a household power outlet. 99 Playback If connecting to the connection diagram in the previous section ( 98). Connection to a Normal ...
... close the menu. Refer also to the connection diagram in the previous section ( 99). We recommend powering the camcorder from a household power outlet. Select [HD DOWN-CONV], select a setting option and close the menu. 2 Using the VIDEO Terminal Refer to the instruction ...input selector to LINE. Signal flow STV-290N Stereo Cable (supplied) INPUT yellow white VIDEO L red AUDIO R We recommend powering the camcorder from a household power outlet. 99 Playback If connecting to the connection diagram in the previous section ( 98). Connection to a Normal ...
XH G1 XH A1 Instruction Manual
Page 106
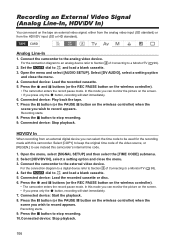
... to a digital device refer to Section 3 of the video source, or [REGEN.] to the external video device. Recording starts. 8. Connect the camcorder to use instead this camcorder's internal time code. 1. Select [COPY] to keep the original time code of Connecting to a Monitor/TV ( 99). 2. Set the dial ...In, HDV/DV In) You can select the time code to be used for the recording made with this camcorder. HDV/DV In When recording from the HDV/DV input (SD or HD standard). Connected device: Start the playback. 8. Press the button to stop recording. 10.Connected device: Stop...
... to a digital device refer to Section 3 of the video source, or [REGEN.] to the external video device. Recording starts. 8. Connect the camcorder to use instead this camcorder's internal time code. 1. Select [COPY] to keep the original time code of Connecting to a Monitor/TV ( 99). 2. Set the dial ...In, HDV/DV In) You can select the time code to be used for the recording made with this camcorder. HDV/DV In When recording from the HDV/DV input (SD or HD standard). Connected device: Start the playback. 8. Press the button to stop recording. 10.Connected device: Stop...
XH G1 XH A1 Instruction Manual
Page 109
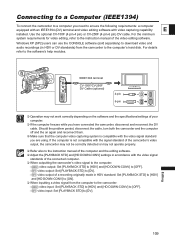
... to [DV]. Editing 109 HDV video output: Set [PLAYBACK STD] to [HDV] and [HD DOWN-CONV] to [DV]. - DV video output: Set [PLAYBACK STD] to [OFF]. - Connecting to a Computer (IEEE1394) To connect the camcorder to a computer you need to the software's help modules. Use the optional CV-150F (4 ... using. DV video output of a recording originally made in HDV standard: Set [PLAYBACK STD] to [HDV] and [HD DOWN-CONV] to [ON]. When inputting a video signal from the camcorder to the instruction manual of your computer. If the computer freezes while you have connected the...
... to [DV]. Editing 109 HDV video output: Set [PLAYBACK STD] to [HDV] and [HD DOWN-CONV] to [DV]. - DV video output: Set [PLAYBACK STD] to [OFF]. - Connecting to a Computer (IEEE1394) To connect the camcorder to a computer you need to the software's help modules. Use the optional CV-150F (4 ... using. DV video output of a recording originally made in HDV standard: Set [PLAYBACK STD] to [HDV] and [HD DOWN-CONV] to [ON]. When inputting a video signal from the camcorder to the instruction manual of your computer. If the computer freezes while you have connected the...

XH G1 XH A1 Instruction Manual
Page 132
... of the original recording. Even if the audio was originally recorded using all 4 channels (with another camcorder), only channels 1 and 2 will be 60 fps interlaced, regardless of the frame rate of the tape [HD DOWN-CONV] being played back Setting HDV [ON] [OFF] DV [ON] [OFF] [AUTO] DV HDV DV DV...(SD). ** only. VCR/PLAY MENU Submenu Menu Item Setting Options *Only in HDV standard. OUT 480i, 1080i/480i 98 SDI OUTPUT** ON, OFF 97 SDI SPEC.** AUTO, SD LOCKED 97 AV DV ON, OFF 108 HD DOWN-CONV ON, OFF 98 LETTERBOX ON, OFF 97 RECORDING DV REC MOD* SP, LP 75...
... of the original recording. Even if the audio was originally recorded using all 4 channels (with another camcorder), only channels 1 and 2 will be 60 fps interlaced, regardless of the frame rate of the tape [HD DOWN-CONV] being played back Setting HDV [ON] [OFF] DV [ON] [OFF] [AUTO] DV HDV DV DV...(SD). ** only. VCR/PLAY MENU Submenu Menu Item Setting Options *Only in HDV standard. OUT 480i, 1080i/480i 98 SDI OUTPUT** ON, OFF 97 SDI SPEC.** AUTO, SD LOCKED 97 AV DV ON, OFF 108 HD DOWN-CONV ON, OFF 98 LETTERBOX ON, OFF 97 RECORDING DV REC MOD* SP, LP 75...
XH G1 XH A1 Instruction Manual
Page 158
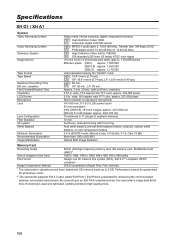
...Illumination Image Stabilization Rotary head, helical scanning, digital component recording HDV High Definition Video 1080i DV Consumer digital VCR SD system HDV MPEG-1 audio layer 2, 16 bit (48... kbps (2CH) DV PCM digital sound, 16 bit (48 kHz) or 12 bit (32 kHz) HD High Definition Video (HDV) 1080/60i SD EIA standard (525 lines, 60 fields) NTSC color signal ...all memory cards. ** The camcorder supports Exif 2.2 (also called "Exif Print"). Exif Print is used and optimized, yielding extremely high quality prints. 158 Specifications XH G1 / XH A1 System Video Recording System Audio Recording...
...Illumination Image Stabilization Rotary head, helical scanning, digital component recording HDV High Definition Video 1080i DV Consumer digital VCR SD system HDV MPEG-1 audio layer 2, 16 bit (48... kbps (2CH) DV PCM digital sound, 16 bit (48 kHz) or 12 bit (32 kHz) HD High Definition Video (HDV) 1080/60i SD EIA standard (525 lines, 60 fields) NTSC color signal ...all memory cards. ** The camcorder supports Exif 2.2 (also called "Exif Print"). Exif Print is used and optimized, yielding extremely high quality prints. 158 Specifications XH G1 / XH A1 System Video Recording System Audio Recording...
XH G1 XH A1 Instruction Manual
Page 160
Movies 95 Playback - Index A Abroad, using the camcorder 151 Accessories 9, 155 AE shift 59 AEB - Auto exposure bracketing 116 Analog/digital (A/D) converter 108 Aspect guides 30 Aspect ratio 31 Audio level indicator 49 ... 118 Focus 35 Focus preset 37 Frame rate 40 Free-run (time code 42 G Gain 60 Gamma 76 Genlock 44 Grip belt 20 H HD/SD SDI terminal 97 HD/SD video signal standards 6 HDV/DV tape recording standards 6 HDV/DV terminal 98, 106, 109 I Image jump 121 Image stabilizer 51 Index search...
Movies 95 Playback - Index A Abroad, using the camcorder 151 Accessories 9, 155 AE shift 59 AEB - Auto exposure bracketing 116 Analog/digital (A/D) converter 108 Aspect guides 30 Aspect ratio 31 Audio level indicator 49 ... 118 Focus 35 Focus preset 37 Frame rate 40 Free-run (time code 42 G Gain 60 Gamma 76 Genlock 44 Grip belt 20 H HD/SD SDI terminal 97 HD/SD video signal standards 6 HDV/DV tape recording standards 6 HDV/DV terminal 98, 106, 109 I Image jump 121 Image stabilizer 51 Index search...

