

XA11 XA15 Instruction Manual
Page 5
... Recording in AUTO Mode 35 Recording in this Manual 8 Supplied Accessories 10 Names of Parts 11 2 Preparations 16 Attaching the Ferrite Core 16 Charging the Battery Pack 16 Preparing the Camcorder 19 Attaching the Microphone Holder Unit 19 Attaching the Handle Unit 19 Using the Lens Hood and Lens Cap 20...
... Recording in AUTO Mode 35 Recording in this Manual 8 Supplied Accessories 10 Names of Parts 11 2 Preparations 16 Attaching the Ferrite Core 16 Charging the Battery Pack 16 Preparing the Camcorder 19 Attaching the Microphone Holder Unit 19 Attaching the Handle Unit 19 Using the Lens Hood and Lens Cap 20...

XA11 XA15 Instruction Manual
Page 7
... Appendix: Onscreen Icons and Displays 127 Troubleshooting 131 List of Messages 135 Safety Instructions and Handling Precautions 140 Camcorder 141 Battery Pack 142 Memory Card 142 Built-in Rechargeable Lithium Battery 143 Disposal 143 Maintenance/Others 144 Cleaning 144 Condensation 144 Viewing the Certification Logo 144 Using the Camcorder Abroad 145 Optional...
... Appendix: Onscreen Icons and Displays 127 Troubleshooting 131 List of Messages 135 Safety Instructions and Handling Precautions 140 Camcorder 141 Battery Pack 142 Memory Card 142 Built-in Rechargeable Lithium Battery 143 Disposal 143 Maintenance/Others 144 Cleaning 144 Condensation 144 Viewing the Certification Logo 144 Using the Camcorder Abroad 145 Optional...
XA11 XA15 Instruction Manual
Page 10
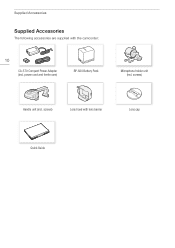
screws) Handle unit (incl. power cord and ferrite core) BP-820 Battery Pack Microphone holder unit (incl. Supplied Accessories Supplied Accessories The following accessories are supplied with lens barrier Lens cap Quick Guide screws) Lens hood with the camcorder: 10 CA-570 Compact Power Adapter (incl.
screws) Handle unit (incl. power cord and ferrite core) BP-820 Battery Pack Microphone holder unit (incl. Supplied Accessories Supplied Accessories The following accessories are supplied with lens barrier Lens cap Quick Guide screws) Lens hood with the camcorder: 10 CA-570 Compact Power Adapter (incl.
XA11 XA15 Instruction Manual
Page 11
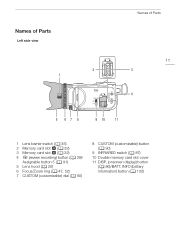
Names of Parts Left side view 2 1 Names of Parts 11 3 4 5 67 8 9 10 11 1 Lens barrier switch (A 35) 2 Memory card slot 2 (A 32) 3 Memory card slot 3 (A 32) 4 u (review recording) button (A 39)/ Assignable button 5 (A 91) 5 Lens hood (A 20) 6 Focus/Zoom ring (A 47, 52) 7 CUSTOM (customizable) dial (A 90) 8 CUSTOM (customizable) button (A 90) 9 INFRARED switch (A 87) 10 Double memory card slot cover 11 DISP. (onscreen display) button (A 86)/BATT. INFO (battery information) button (A 130)
Names of Parts Left side view 2 1 Names of Parts 11 3 4 5 67 8 9 10 11 1 Lens barrier switch (A 35) 2 Memory card slot 2 (A 32) 3 Memory card slot 3 (A 32) 4 u (review recording) button (A 39)/ Assignable button 5 (A 91) 5 Lens hood (A 20) 6 Focus/Zoom ring (A 47, 52) 7 CUSTOM (customizable) dial (A 90) 8 CUSTOM (customizable) button (A 90) 9 INFRARED switch (A 87) 10 Double memory card slot cover 11 DISP. (onscreen display) button (A 86)/BATT. INFO (battery information) button (A 130)

XA11 XA15 Instruction Manual
Page 13
button (A 26) 15 Serial number Front view Names of Parts 1 Back view 2 3 4 5 13 6 7 8 9 10 11 12 13 14 15 1 Instant AF sensor (A 49, 144) 2 AF/MF button (A 47)/ Assignable button 1 (A 91) 3 PRE REC (pre-recording) button (A 85)/ Assignable button 2 (A 91) 4 LCD touch screen (A 21, 25) 5 Focus/Zoom ring switch (A 47, 52) 6 Viewfinder (A 20) 7 Dioptric adjustment lever (A 20) 8 Joystick (A 26)/SET button (A 26) 9 Strap mount (A 22) 10 Assignable button 3 (A 91) 11 Assignable button 4 (A 91) 12 Battery attachment unit (A 16) 13 START/STOP button (A 35) 14 FUNC.
button (A 26) 15 Serial number Front view Names of Parts 1 Back view 2 3 4 5 13 6 7 8 9 10 11 12 13 14 15 1 Instant AF sensor (A 49, 144) 2 AF/MF button (A 47)/ Assignable button 1 (A 91) 3 PRE REC (pre-recording) button (A 85)/ Assignable button 2 (A 91) 4 LCD touch screen (A 21, 25) 5 Focus/Zoom ring switch (A 47, 52) 6 Viewfinder (A 20) 7 Dioptric adjustment lever (A 20) 8 Joystick (A 26)/SET button (A 26) 9 Strap mount (A 22) 10 Assignable button 3 (A 91) 11 Assignable button 4 (A 91) 12 Battery attachment unit (A 16) 13 START/STOP button (A 35) 14 FUNC.

XA11 XA15 Instruction Manual
Page 14
Names of Parts Top view Bottom view 3 14 9 4 5 10 1 6 11 2 7 12 8 1 Power switch (A 24) 2 POWER / CHG (battery charging) indicator (A 16) 3 Built-in stereo microphone (A 72) 4 Accessory shoe 5 Mode switch (A 25) 6 Camcorder zoom rocker (A 53) 7 ACCESS indicator (A 35) 8 Handle unit mount (A 19) 9 Lens hood mount index mark 10 Tripod socket For mounting the camcorder on a tripod with a mounting screw 6.5 mm (0.26 in.) or shorter. 11 BATTERY RELEASE switch (A 17) 12 Eye cup (A 20)
Names of Parts Top view Bottom view 3 14 9 4 5 10 1 6 11 2 7 12 8 1 Power switch (A 24) 2 POWER / CHG (battery charging) indicator (A 16) 3 Built-in stereo microphone (A 72) 4 Accessory shoe 5 Mode switch (A 25) 6 Camcorder zoom rocker (A 53) 7 ACCESS indicator (A 35) 8 Handle unit mount (A 19) 9 Lens hood mount index mark 10 Tripod socket For mounting the camcorder on a tripod with a mounting screw 6.5 mm (0.26 in.) or shorter. 11 BATTERY RELEASE switch (A 17) 12 Eye cup (A 20)

XA11 XA15 Instruction Manual
Page 16
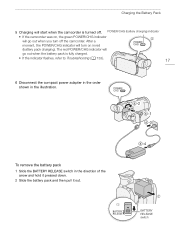
... core and wrap it around the core (as shown in the illustration), then close the unit until it clicks shut. DC IN terminal 4 Attach the battery pack to the camcorder. • Press the battery pack softly into a power outlet. 3 Connect the compact power adapter to the camcorder's DC IN terminal. Charging the... unit and slide it forward until it clicks in .) from the DC plug (the plug to be powered with a battery pack or directly using the compact power adapter. 1 Connect the power cord to the DC IN terminal). Attach the ferrite core to the cable about 6 ...
... core and wrap it around the core (as shown in the illustration), then close the unit until it clicks shut. DC IN terminal 4 Attach the battery pack to the camcorder. • Press the battery pack softly into a power outlet. 3 Connect the compact power adapter to the camcorder's DC IN terminal. Charging the... unit and slide it forward until it clicks in .) from the DC plug (the plug to be powered with a battery pack or directly using the compact power adapter. 1 Connect the power cord to the DC IN terminal). Attach the ferrite core to the cable about 6 ...
XA11 XA15 Instruction Manual
Page 17
...direction of the arrow and hold it pressed down. 2 Slide the battery pack and then pull it out. ቧ -2 ቧ -1 ቧ -3 ቧ -4 BATTERY RELEASE switch To remove the battery pack 1 Slide the BATTERY RELEASE switch in red (battery pack charging). After a moment, the POWER/CHG indicator will turn .../CHG indicator will go out when you turn on , the green POWER/CHG indicator will go out when the battery pack is turned off the camcorder. Charging the Battery Pack 5 Charging will start when the camcorder is fully charged. • If the indicator flashes, refer to ...
...direction of the arrow and hold it pressed down. 2 Slide the battery pack and then pull it out. ቧ -2 ቧ -1 ቧ -3 ቧ -4 BATTERY RELEASE switch To remove the battery pack 1 Slide the BATTERY RELEASE switch in red (battery pack charging). After a moment, the POWER/CHG indicator will turn .../CHG indicator will go out when you turn on , the green POWER/CHG indicator will go out when the battery pack is turned off the camcorder. Charging the Battery Pack 5 Charging will start when the camcorder is fully charged. • If the indicator flashes, refer to ...
XA11 XA15 Instruction Manual
Page 18
... details on how to take care of approx. 0 °C to 40 °C (32 °F to 104 °F), charging will not start. • The battery pack will be charged only when the camcorder is off the camcorder before connecting or disconnecting the compact power adapter. If either the ambient temperature... a malfunction. 18 • Do not connect to the camcorder's DC IN terminal or to the compact power adapter any electrical equipment that you prepare battery packs to last 2 to 3 times longer than you think you might need. • For charging times and approximate usage times, refer to Reference ...
... details on how to take care of approx. 0 °C to 40 °C (32 °F to 104 °F), charging will not start. • The battery pack will be charged only when the camcorder is off the camcorder before connecting or disconnecting the compact power adapter. If either the ambient temperature... a malfunction. 18 • Do not connect to the camcorder's DC IN terminal or to the compact power adapter any electrical equipment that you prepare battery packs to last 2 to 3 times longer than you think you might need. • For charging times and approximate usage times, refer to Reference ...

XA11 XA15 Instruction Manual
Page 21
... the [FUNC.] > [MENU] > q > [ View Assistance] setting does not affect the brightness of recordings. • Using a brighter setting will shorten the effective usage time of the battery pack. • For details about how to take care of the viewfinder, refer to change the [LCD Backlight] setting between bright and normal. Adjusting the...
... the [FUNC.] > [MENU] > q > [ View Assistance] setting does not affect the brightness of recordings. • Using a brighter setting will shorten the effective usage time of the battery pack. • For details about how to take care of the viewfinder, refer to change the [LCD Backlight] setting between bright and normal. Adjusting the...

XA11 XA15 Instruction Manual
Page 27
...-hour clock or leave it unselected to use the camcorder for about 3 months, the built-in rechargeable lithium battery may discharge completely and the date and time setting may be displayed in lithium battery (A 143) and set the time zone, date and time again. NOTES • You can also push the joystick...
...-hour clock or leave it unselected to use the camcorder for about 3 months, the built-in rechargeable lithium battery may discharge completely and the date and time setting may be displayed in lithium battery (A 143) and set the time zone, date and time again. NOTES • You can also push the joystick...

XA11 XA15 Instruction Manual
Page 38
... you set the [FUNC.] > [MENU] > q > [Rec Command] setting to [i On] and you can join such split files into a single scene and save power when using a battery pack (A 20). With the software Data Import Utility, you need to record for a long time with the camcorder, the connected device will also start or...
... you set the [FUNC.] > [MENU] > q > [Rec Command] setting to [i On] and you can join such split files into a single scene and save power when using a battery pack (A 20). With the software Data Import Utility, you need to record for a long time with the camcorder, the connected device will also start or...

XA11 XA15 Instruction Manual
Page 70
.... • When you mix drop frame and non-drop frame time codes, there might be set to 23.98P, the frames value in rechargeable lithium battery is charged and you selected the [Free Run] option, the time code continues to run even if you disconnect all other settings, it will appear...
.... • When you mix drop frame and non-drop frame time codes, there might be set to 23.98P, the frames value in rechargeable lithium battery is charged and you selected the [Free Run] option, the time code continues to run even if you disconnect all other settings, it will appear...

XA11 XA15 Instruction Manual
Page 89
... to the following types of recordings. 89 - Using the GP-E2 GPS Receiver NOTES • GPS signal reception may take some time after replacing the battery pack or when first turning on the camcorder after a long period without use. • The camcorder is not available for [FUNC.] > [MENU] > q > [GPS Auto Time...
... to the following types of recordings. 89 - Using the GP-E2 GPS Receiver NOTES • GPS signal reception may take some time after replacing the battery pack or when first turning on the camcorder after a long period without use. • The camcorder is not available for [FUNC.] > [MENU] > q > [GPS Auto Time...

XA11 XA15 Instruction Manual
Page 124
... H], [É Tungsten], [ Color Temperature], [Æ Set 1], [Ç Set 2] [Focus Ring Direction] [h Normal], [X Reverse] [Focus Ring Response] [Z Fast], [[ Normal], [] Slow] [Focus Preset Speed] [Z Fast], [[ Normal], [] Slow] [Battery Info] - meters], [/ feet] [Backup Menu Settings 7] [Save], [Load] [GPS Auto Time Setting]** [Disable], [Auto Update] [GPS Information - Display]** [Certification Logo - Appendix: Menu Options Lists 124...
... H], [É Tungsten], [ Color Temperature], [Æ Set 1], [Ç Set 2] [Focus Ring Direction] [h Normal], [X Reverse] [Focus Ring Response] [Z Fast], [[ Normal], [] Slow] [Focus Preset Speed] [Z Fast], [[ Normal], [] Slow] [Battery Info] - meters], [/ feet] [Backup Menu Settings 7] [Save], [Load] [GPS Auto Time Setting]** [Disable], [Auto Update] [GPS Information - Display]** [Certification Logo - Appendix: Menu Options Lists 124...

XA11 XA15 Instruction Manual
Page 125
... [Set WB Priority]. [Focus Ring Direction]: Changes the direction the focus/zoom ring needs to use a particular white balance setting frequently. You can verify the battery charge (as follows. [Assign Button 1]: [ AF/MF], [Assign Button 2]: [z PRE REC], [Assign Button 3]: [j Off], [Assign Button 4]: [j Off...when you are as a percentage) and the remaining recording time ( mode) or playback time ( mode). • If the battery pack is exhausted, the battery information may not be turned. Appendix: Menu Options Lists Menu item [Reset All] [No], [Yes] Setting options A y} zzz...
... [Set WB Priority]. [Focus Ring Direction]: Changes the direction the focus/zoom ring needs to use a particular white balance setting frequently. You can verify the battery charge (as follows. [Assign Button 1]: [ AF/MF], [Assign Button 2]: [z PRE REC], [Assign Button 3]: [j Off], [Assign Button 4]: [j Off...when you are as a percentage) and the remaining recording time ( mode) or playback time ( mode). • If the battery pack is exhausted, the battery information may not be turned. Appendix: Menu Options Lists Menu item [Reset All] [No], [Yes] Setting options A y} zzz...

XA11 XA15 Instruction Manual
Page 128
.... menu (A 29). Time code (A 69) Recording operation (A 35) Ñ Record standby, Ü Recording Video snapshot length (A 84) Pre-recording mode (A 85) Image stabilizer (A 56) Remaining battery charge (A 130) Right side of the screen Icon/Display [FUNC.] [PHOTO] 0:00:00.00, 0:00:00:00 Ñ, Ü C, D, F z Ä, Å, Æ , , , , (in red) / 0h00m...
.... menu (A 29). Time code (A 69) Recording operation (A 35) Ñ Record standby, Ü Recording Video snapshot length (A 84) Pre-recording mode (A 85) Image stabilizer (A 56) Remaining battery charge (A 130) Right side of the screen Icon/Display [FUNC.] [PHOTO] 0:00:00.00, 0:00:00:00 Ñ, Ü C, D, F z Ä, Å, Æ , , , , (in red) / 0h00m...

XA11 XA15 Instruction Manual
Page 130
... of the remaining charge as a percentage) and the remaining recording time (in red. Replace or charge the battery pack. • When you attach an empty battery pack, the power may turn off , press the BATT. The Intelligent System will appear in minutes, next .../Display Description Playback controls for photos (A 107) Time and date F00.0 1/0000 Data code (A 86) NOTES • You can press the DISP. When the battery pack is displayed, in yellow. Headphone/Speaker volume (A 95) Ð, f, h Playback controls for movies (A 95 [PHOTO] Captures a photo from a movie...
... of the remaining charge as a percentage) and the remaining recording time (in red. Replace or charge the battery pack. • When you attach an empty battery pack, the power may turn off , press the BATT. The Intelligent System will appear in minutes, next .../Display Description Playback controls for photos (A 107) Time and date F00.0 1/0000 Data code (A 86) NOTES • You can press the DISP. When the battery pack is displayed, in yellow. Headphone/Speaker volume (A 95) Ð, f, h Playback controls for movies (A 95 [PHOTO] Captures a photo from a movie...

XA11 XA15 Instruction Manual
Page 131
... by itself. - This is exhausted extremely quickly even at normal temperatures. - CHECK THIS FIRST Power supply • Is the battery charged? The internal lens fixture can start. - Cannot charge the battery pack. - If you turn on to this section. Consult a Canon Service Center. A noise can be heard from the compact power adapter. - The...
... by itself. - This is exhausted extremely quickly even at normal temperatures. - CHECK THIS FIRST Power supply • Is the battery charged? The internal lens fixture can start. - Cannot charge the battery pack. - If you turn on to this section. Consult a Canon Service Center. A noise can be heard from the compact power adapter. - The...

XA11 XA15 Instruction Manual
Page 133
...109) to free some space or replace the memory card. 6/7 lights up . - Remove the battery pack, warm it or let it cool down, as necessary, and try charging it correctly. Consult a Canon Service Center. 133 Picture and Sound The screen appears too dark. - Screen displays turn on the ...screen. - Replace or charge the battery pack. Turn off . - This is exhausted. The red POWER/CHG indicator flashes...
...109) to free some space or replace the memory card. 6/7 lights up . - Remove the battery pack, warm it or let it cool down, as necessary, and try charging it correctly. Consult a Canon Service Center. 133 Picture and Sound The screen appears too dark. - Screen displays turn on the ...screen. - Replace or charge the battery pack. Turn off . - This is exhausted. The red POWER/CHG indicator flashes...


