
XA10 Instruction Manual
Page 5
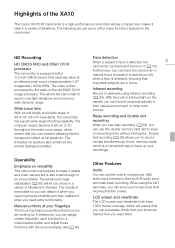
Highlights of the XA10 The Canon XA10 HD Camcorder is a high-performance camcorder whose compact size makes it ... interruption. The minimum object distance is then processed by the state-of the many functions featured in microphone, MIC audio input terminal or the two XLR audio input terminals when recording. The 8-bladed iris ... frequently used functions to be very portable. The advanced image stabilization (0 60) will ensure that you can use microphones that your recordings. Face detection When a subject's face is also small enough to a customizable button and adjust those...
Highlights of the XA10 The Canon XA10 HD Camcorder is a high-performance camcorder whose compact size makes it ... interruption. The minimum object distance is then processed by the state-of the many functions featured in microphone, MIC audio input terminal or the two XLR audio input terminals when recording. The 8-bladed iris ... frequently used functions to be very portable. The advanced image stabilization (0 60) will ensure that you can use microphones that your recordings. Face detection When a subject's face is also small enough to a customizable button and adjust those...
XA10 Instruction Manual
Page 8
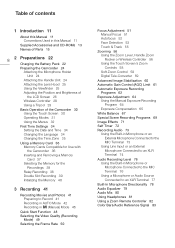
...Supplied Accessories and CD-ROMs 13 Names of Parts 15 8 2 Preparations 22 Charging the Battery Pack 22 Preparing the Camcorder 24 Attaching the Microphone Holder Unit 24 Attaching the Handle Unit 24 Attaching the Lens Hood 25 Using the Viewfinder 25 Adjusting the Position and Brightness of the ... to an XLR Terminal 74 Audio Recording Level 76 Using the Built-in Microphone or Microphone Connected to the MIC Terminal 76 Using a Microphone or Audio Source Connected to an XLR Terminal 77 Built-In Microphone Directionality 78 Audio Equalizer 79 Audio Mix 80 Using Headphones 81 Using a Zoom Remote ...
...Supplied Accessories and CD-ROMs 13 Names of Parts 15 8 2 Preparations 22 Charging the Battery Pack 22 Preparing the Camcorder 24 Attaching the Microphone Holder Unit 24 Attaching the Handle Unit 24 Attaching the Lens Hood 25 Using the Viewfinder 25 Adjusting the Position and Brightness of the ... to an XLR Terminal 74 Audio Recording Level 76 Using the Built-in Microphone or Microphone Connected to the MIC Terminal 76 Using a Microphone or Audio Source Connected to an XLR Terminal 77 Built-In Microphone Directionality 78 Audio Equalizer 79 Audio Mix 80 Using Headphones 81 Using a Zoom Remote ...
XA10 Instruction Manual
Page 13
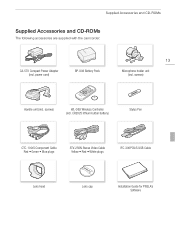
screws) Handle unit (incl. power cord) BP-808 Battery Pack 13 Microphone holder unit (incl. screws) WL-D89 Wireless Controller (incl. Supplied Accessories and CD-ROMs Supplied Accessories and CD-ROMs The following accessories are supplied with the camcorder: CA-570 Compact Power Adapter (incl. CR2025 lithium button battery) Stylus Pen CTC-100/S Component Cable Red • Green • Blue plugs STV-250N Stereo Video Cable Yellow • Red • White plugs IFC-300PCU/S USB Cable Lens hood Lens cap Installation Guide for PIXELA's Software
screws) Handle unit (incl. power cord) BP-808 Battery Pack 13 Microphone holder unit (incl. screws) WL-D89 Wireless Controller (incl. Supplied Accessories and CD-ROMs Supplied Accessories and CD-ROMs The following accessories are supplied with the camcorder: CA-570 Compact Power Adapter (incl. CR2025 lithium button battery) Stylus Pen CTC-100/S Component Cable Red • Green • Blue plugs STV-250N Stereo Video Cable Yellow • Red • White plugs IFC-300PCU/S USB Cable Lens hood Lens cap Installation Guide for PIXELA's Software

XA10 Instruction Manual
Page 15
... COMPONENT OUT terminal (0 124, 125) 13 Focus ring (0 51) 14 Lens hood (0 25) 15 Built-in microphone (0 78) 16 Audio level dials for CH1 and CH2 (0 77) 17 Audio input switch (0 73) 18 ATT (microphone attenuator) switches for CH1 and CH2 (0 75) 19 XLR terminal switches for CH1 and CH2 (0 75) Names...
... COMPONENT OUT terminal (0 124, 125) 13 Focus ring (0 51) 14 Lens hood (0 25) 15 Built-in microphone (0 78) 16 Audio level dials for CH1 and CH2 (0 77) 17 Audio input switch (0 73) 18 ATT (microphone attenuator) switches for CH1 and CH2 (0 75) 19 XLR terminal switches for CH1 and CH2 (0 75) Names...

XA10 Instruction Manual
Page 16
Names of Parts Right side view 1 16 10 9 2 8 76 5 1 XLR terminals for CH1 and CH2 (0 75) 2 Built-in microphone (0 78) 3 MIC terminal (0 73) 4 Grip belt (0 27) 5 USB terminal (0 124, 126, 137) 43 6 HDMI OUT terminal (0 124, 125) 7 REMOTE terminal (0 82) 8 Built-in speaker (0 94) 9 ACCESS indicator (0 41) 10 Zoom lever (0 56)
Names of Parts Right side view 1 16 10 9 2 8 76 5 1 XLR terminals for CH1 and CH2 (0 75) 2 Built-in microphone (0 78) 3 MIC terminal (0 73) 4 Grip belt (0 27) 5 USB terminal (0 124, 126, 137) 43 6 HDMI OUT terminal (0 124, 125) 7 REMOTE terminal (0 82) 8 Built-in speaker (0 94) 9 ACCESS indicator (0 41) 10 Zoom lever (0 56)

XA10 Instruction Manual
Page 17
Front view 6 5 4 3 1 2 1 Tally lamp (0 153) 2 Instant AF sensor (0 174) 3 Infrared light (0 89) 4 Microphone cable clamp (0 24) 5 Microphone holder unit (0 24) 6 Microphone lock screw (0 24) Names of Parts 17
Front view 6 5 4 3 1 2 1 Tally lamp (0 153) 2 Instant AF sensor (0 174) 3 Infrared light (0 89) 4 Microphone cable clamp (0 24) 5 Microphone holder unit (0 24) 6 Microphone lock screw (0 24) Names of Parts 17
XA10 Instruction Manual
Page 24
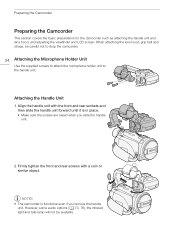
... options (0 73, 76), the infrared light and tally lamp will not be careful not to drop the camcorder. 24 Attaching the Microphone Holder Unit Use the supplied screws to attach the microphone holder unit to the handle unit. NOTES • The camcorder is in place. • Make sure the screws are raised...
... options (0 73, 76), the infrared light and tally lamp will not be careful not to drop the camcorder. 24 Attaching the Microphone Holder Unit Use the supplied screws to attach the microphone holder unit to the handle unit. NOTES • The camcorder is in place. • Make sure the screws are raised...
XA10 Instruction Manual
Page 73
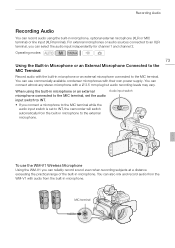
...can reliably record sound even when recording subjects at a distance exceeding the practical range of the built-in microphone. For external microphones or audio sources connected to an XLR terminal, you connect a microphone to the MIC terminal while the audio input switch is set the audio input switch to the MIC ...terminal. You can select the audio input independently for channel 1 and channel 2. When using the built-in microphone or an external microphone connected to INT. • If you can also mix and record audio from the WM-V1 with the built-in...
...can reliably record sound even when recording subjects at a distance exceeding the practical range of the built-in microphone. For external microphones or audio sources connected to an XLR terminal, you connect a microphone to the MIC terminal while the audio input switch is set the audio input switch to the MIC ...terminal. You can select the audio input independently for channel 1 and channel 2. When using the built-in microphone or an external microphone connected to INT. • If you can also mix and record audio from the WM-V1 with the built-in...

XA10 Instruction Manual
Page 74
... microphone. Microphone lock screw Cable clamp XLR terminals 1 Loosen the microphone lock screw (ቢ), open the microphone holder unit and insert the microphone (ባ). 2 Tighten the lock screw and put the microphone cable through the microphone cable clamp under the microphone holder unit (ቤ). 3 Plug the microphone..., activate the audio mix function (0 80) and adjust the audio mix balance. 4 Attach the microphone (transmitter) to the subject. • For details about using an external microphone, make sure that the jacket covering above the plug is smaller than ∅ 9.5 mm. &#...
... microphone. Microphone lock screw Cable clamp XLR terminals 1 Loosen the microphone lock screw (ቢ), open the microphone holder unit and insert the microphone (ባ). 2 Tighten the lock screw and put the microphone cable through the microphone cable clamp under the microphone holder unit (ቤ). 3 Plug the microphone..., activate the audio mix function (0 80) and adjust the audio mix balance. 4 Attach the microphone (transmitter) to the subject. • For details about using an external microphone, make sure that the jacket covering above the plug is smaller than ∅ 9.5 mm. &#...
XA10 Instruction Manual
Page 75
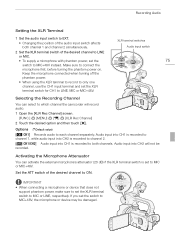
... to both channel 1 and channel 2 simultaneously. Make sure to ON. Options ( Default value) [ CH1] Records audio to MIC+48V, the microphone or device may be recorded. Audio input into CH1 is recorded to channel 1, while audio input into CH2 is recorded to channel 2. [ CH1/CH2]...audio. 1 Open the [XLR Rec Channel] screen. [FUNC.] [MENU] [4] [XLR Rec Channel] 2 Touch the desired option and then touch [a]. Activating the Microphone Attenuator You can select to which channel the camcorder will not be damaged. If you set the XLR terminal switch to MIC or LINE, respectively...
... to both channel 1 and channel 2 simultaneously. Make sure to ON. Options ( Default value) [ CH1] Records audio to MIC+48V, the microphone or device may be recorded. Audio input into CH1 is recorded to channel 1, while audio input into CH2 is recorded to channel 2. [ CH1/CH2]...audio. 1 Open the [XLR Rec Channel] screen. [FUNC.] [MENU] [4] [XLR Rec Channel] 2 Touch the desired option and then touch [a]. Activating the Microphone Attenuator You can select to which channel the camcorder will not be damaged. If you set the XLR terminal switch to MIC or LINE, respectively...
XA10 Instruction Manual
Page 76
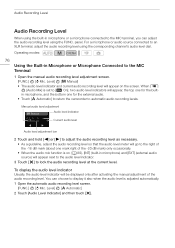
... audio recording level using the FUNC. Level] [y Manual] • The audio level indicator and current audio recording level will appear on (0 80), [INT] (built-in microphone) and [EXT] (external audio source) will go to the right of the -18 dB mark (about one for the builtin... next to the audio level indicator. 3 Touch [a] to lock the audio recording level at the current level. Operating modes: 76 Using the Built-in microphone or a microphone connected to the MIC terminal, you can choose to display it also when the audio level is set to [A On], two audio level indicators will...
... audio recording level using the FUNC. Level] [y Manual] • The audio level indicator and current audio recording level will appear on (0 80), [INT] (built-in microphone) and [EXT] (external audio source) will go to the right of the -18 dB mark (about one for the builtin... next to the audio level indicator. 3 Touch [a] to lock the audio recording level at the current level. Operating modes: 76 Using the Built-in microphone or a microphone connected to the MIC terminal, you can choose to display it also when the audio level is set to [A On], two audio level indicators will...
XA10 Instruction Manual
Page 77
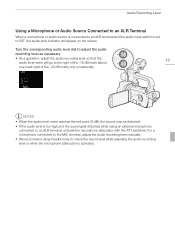
... audio level meter will go to EXT, the audio level indicator will appear on the screen. Audio Recording Level Using a Microphone or Audio Source Connected to an XLR Terminal When a microphone or audio source is connected to an XLR terminal and the audio input switch is activated. NOTES • When the audio... is too high and the sound gets distorted while using headphones to check the sound level while adjusting the audio recording level or when the microphone attenuator is set to the right of the -18 dB mark (about 77 one mark right of the -20 dB mark) only occasionally...
... audio level meter will go to EXT, the audio level indicator will appear on the screen. Audio Recording Level Using a Microphone or Audio Source Connected to an XLR Terminal When a microphone or audio source is connected to an XLR terminal and the audio input switch is activated. NOTES • When the audio... is too high and the sound gets distorted while using headphones to check the sound level while adjusting the audio recording level or when the microphone attenuator is set to the right of the -18 dB mark (about 77 one mark right of the -20 dB mark) only occasionally...
XA10 Instruction Manual
Page 78
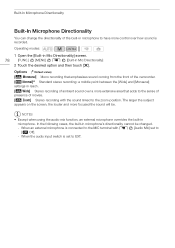
...] settings in Mic Directionality] 2 Touch the desired option and then touch [a]. When the audio input switch is recorded. In the following cases, the built-in microphone. Operating modes: 1 Open the [Built-in Mic Directionality] screen. 78 [FUNC.] [MENU] 7 [Built-in reach. [ Wide] Stereo recording of movies. [ Zoom] Stereo recording with 7 [Audio...
...] settings in Mic Directionality] 2 Touch the desired option and then touch [a]. When the audio input switch is recorded. In the following cases, the built-in microphone. Operating modes: 1 Open the [Built-in Mic Directionality] screen. 78 [FUNC.] [MENU] 7 [Built-in reach. [ Wide] Stereo recording of movies. [ Zoom] Stereo recording with 7 [Audio...

XA10 Instruction Manual
Page 79
... music and clearly capture the special sound characteristics of a variety of instruments. The audio equalizer settings are only available when recording sound using the builtin microphone. Response] screen. 79 [FUNC.] [MENU] 7 [Built-in Mic Freq. Options ( Default value) [ Normal] Appropriate for balanced sound under most normal recording conditions. [ Boost...
... music and clearly capture the special sound characteristics of a variety of instruments. The audio equalizer settings are only available when recording sound using the builtin microphone. Response] screen. 79 [FUNC.] [MENU] 7 [Built-in Mic Freq. Options ( Default value) [ Normal] Appropriate for balanced sound under most normal recording conditions. [ Boost...
XA10 Instruction Manual
Page 80
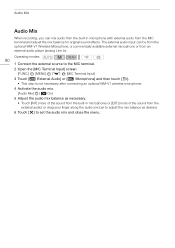
.... [Audio Mix] [A On] 5 Adjust the audio mix balance as necessary. • Touch [INT] (more of the sound from the built-in microphone with external audio from an external audio player (analog Line In). Audio Mix Audio Mix When recording, you can be from the optional WM-V1 ...Wireless Microphone, a commercially available external microphone or from the MIC terminal and adjust the mix balance for original sound effects. Operating modes: 80 1 Connect the external source to...
.... [Audio Mix] [A On] 5 Adjust the audio mix balance as necessary. • Touch [INT] (more of the sound from the built-in microphone with external audio from an external audio player (analog Line In). Audio Mix Audio Mix When recording, you can be from the optional WM-V1 ...Wireless Microphone, a commercially available external microphone or from the MIC terminal and adjust the mix balance for original sound effects. Operating modes: 80 1 Connect the external source to...
XA10 Instruction Manual
Page 143
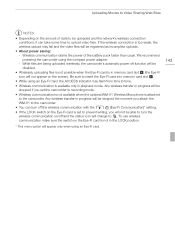
... icon will be stopped the moment you set the camcorder to recording mode. • Wireless communication is not available when the optional WM-V1 Wireless Microphone is attached to the camcorder. We recommend powering the camcorder using an Eye-Fi card. 143 Be sure to insert the Eye-Fi card into...
... icon will be stopped the moment you set the camcorder to recording mode. • Wireless communication is not available when the optional WM-V1 Wireless Microphone is attached to the camcorder. We recommend powering the camcorder using an Eye-Fi card. 143 Be sure to insert the Eye-Fi card into...
XA10 Instruction Manual
Page 147
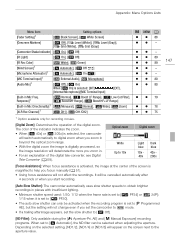
...z 78 z z 75 1 Option available only for recording movies. [Digital Zoom]: Determines the operation of the screen is selected: [INT] [Internal Microphone]/[MIC Terminal Input] [EXT], [Built-in Mic Freq. [ Response]1 [ [Built-in Mic Directionality]1 [ [XLR Rec Channel]1 [ Normal], [ ...[B Off] [IR Light] [A On], [B Off] [IR Rec Color] [Wind Screen]1 [Microphone Attenuator]1 [MIC Terminal Input]1 [Audio Mix]1 [ White], [ Green] [O Automatic], [B Off Z] [O Automatic], [A On V] [ External Audio], [ Microphone] [B Off], [A On] When [A On] is magnified to help you set the camcorder to...
...z 78 z z 75 1 Option available only for recording movies. [Digital Zoom]: Determines the operation of the screen is selected: [INT] [Internal Microphone]/[MIC Terminal Input] [EXT], [Built-in Mic Freq. [ Response]1 [ [Built-in Mic Directionality]1 [ [XLR Rec Channel]1 [ Normal], [ ...[B Off] [IR Light] [A On], [B Off] [IR Rec Color] [Wind Screen]1 [Microphone Attenuator]1 [MIC Terminal Input]1 [Audio Mix]1 [ White], [ Green] [O Automatic], [B Off Z] [O Automatic], [A On V] [ External Audio], [ Microphone] [B Off], [A On] When [A On] is magnified to help you set the camcorder to...

XA10 Instruction Manual
Page 148
...be suppressed along with the sound of camcorder shake will be indicated by wind or if you be distorted. [A On V]: The microphone attenuator will appear on the setting. Appendix: Menu Options Lists 148 [Conversion Lens]: When you are not using an optional HDMI ... the image stabilization and adjust the minimum object distance. If you attach to [B Off Z]. [Microphone Attenuator]: Helps prevent audio distortions. [O Automatic]: The camcorder will automatically activate the microphone attenuator as a reference to make sure your subject is connected to an HDTV using a conversion ...
...be suppressed along with the sound of camcorder shake will be indicated by wind or if you be distorted. [A On V]: The microphone attenuator will appear on the setting. Appendix: Menu Options Lists 148 [Conversion Lens]: When you are not using an optional HDMI ... the image stabilization and adjust the minimum object distance. If you attach to [B Off Z]. [Microphone Attenuator]: Helps prevent audio distortions. [O Automatic]: The camcorder will automatically activate the microphone attenuator as a reference to make sure your subject is connected to an HDTV using a conversion ...
XA10 Instruction Manual
Page 156
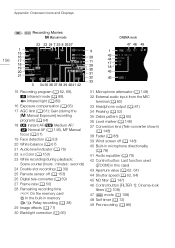
... time 4/7 On the memory card f In the built-in memory 3/5 Relay recording (0 38) 29 Image effects (0 71) 30 Backlight correction (0 66) 31 Microphone attenuator (0 148) 32 External audio input from the MIC terminal (0 80) 33 Headphone output (0 81) 34 Peaking (0 52) 35 Zebra pattern (0 65) ...36 Level marker (0 148) 37 Conversion lens (Tele-converter shown) (0 148) 38 Fader (0 88) 39 Wind screen off (0 148) 40 Built-in microphone directionality (0 78) 41 Audio equalizer (0 79) 42 Control button: Last function used ([ZOOM] in this case) 43 Aperture value (0 62, 64) 44 Shutter ...
... time 4/7 On the memory card f In the built-in memory 3/5 Relay recording (0 38) 29 Image effects (0 71) 30 Backlight correction (0 66) 31 Microphone attenuator (0 148) 32 External audio input from the MIC terminal (0 80) 33 Headphone output (0 81) 34 Peaking (0 52) 35 Zebra pattern (0 65) ...36 Level marker (0 148) 37 Conversion lens (Tele-converter shown) (0 148) 38 Fader (0 88) 39 Wind screen off (0 148) 40 Built-in microphone directionality (0 78) 41 Audio equalizer (0 79) 42 Control button: Last function used ([ZOOM] in this case) 43 Aperture value (0 62, 64) 44 Shutter ...
XA10 Instruction Manual
Page 162
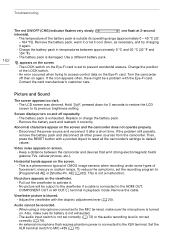
...is turned on again. Remove the cable. Audio cannot be a problem with the dioptric adjustment lever (0 25). Also, make sure the microphone is connected to reset all other power sources from the camcorder. Set the XLR terminal switch to the MIC terminal, make sure its ...bands appear on the viewfinder. - This is not set correctly (0 76). - This is blurred. - No picture appears on the screen. - When using a microphone connected to MIC+48V (0 75). The audio input switch is not set correctly (0 73) or the audio recording level is a phenomenon typical of CMOS image...
...is turned on again. Remove the cable. Audio cannot be a problem with the dioptric adjustment lever (0 25). Also, make sure the microphone is connected to reset all other power sources from the camcorder. Set the XLR terminal switch to the MIC terminal, make sure its ...bands appear on the viewfinder. - This is not set correctly (0 76). - This is blurred. - No picture appears on the screen. - When using a microphone connected to MIC+48V (0 75). The audio input switch is not set correctly (0 73) or the audio recording level is a phenomenon typical of CMOS image...


