Instruction Manual
Page 10
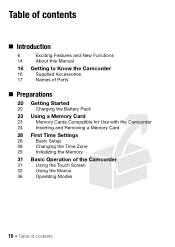
... Getting to Know the Camcorder 16 Supplied Accessories 17 Names of Parts „ Preparations 20 Getting Started 20 Charging the Battery Pack 23 Using a Memory Card 23 Memory Cards Compatible for Use with the Camcorder 24 Inserting and Removing a Memory Card 26 First Time Settings 26 Basic Setup 28 Changing the Time Zone 29 Initializing the...
... Getting to Know the Camcorder 16 Supplied Accessories 17 Names of Parts „ Preparations 20 Getting Started 20 Charging the Battery Pack 23 Using a Memory Card 23 Memory Cards Compatible for Use with the Camcorder 24 Inserting and Removing a Memory Card 26 First Time Settings 26 Basic Setup 28 Changing the Time Zone 29 Initializing the...

Instruction Manual
Page 11
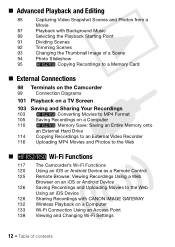
... 50 Viewing Photos 53 Deleting Recordings „ Advanced Shooting 56 Selecting the Movie Format (AVCHD/MP4) 56 Selecting the Video Quality 58 B Selecting the Memory (Built-in Memory/ Memory Card) for Recordings 58 B Dual Recording and Relay Recording 59 Shooting Modes 60 Baby Mode 61 Cinema Mode and Cinema-Look Filters 62 Special Scene...
... 50 Viewing Photos 53 Deleting Recordings „ Advanced Shooting 56 Selecting the Movie Format (AVCHD/MP4) 56 Selecting the Video Quality 58 B Selecting the Memory (Built-in Memory/ Memory Card) for Recordings 58 B Dual Recording and Relay Recording 59 Shooting Modes 60 Baby Mode 61 Cinema Mode and Cinema-Look Filters 62 Special Scene...
Instruction Manual
Page 12
... Starting Point 91 Dividing Scenes 92 Trimming Scenes 93 Changing the Thumbnail Image of a Scene 94 Photo Slideshow 95 B Copying Recordings to a Memory Card „ External Connections 98 Terminals on the Camcorder 99 Connection Diagrams 101 Playback on a TV Screen 103 Saving and Sharing Your Recordings 103... on an iOS or Android Device 126 Saving Recordings and Uploading Movies to the Web Using an iOS Device 128 Sharing Recordings with CANON iMAGE GATEWAY 132 Wireless Playback on a Computer 133 Wi-Fi Connection Using an Access Point 138 Viewing and Changing Wi-Fi Settings ...
... Starting Point 91 Dividing Scenes 92 Trimming Scenes 93 Changing the Thumbnail Image of a Scene 94 Photo Slideshow 95 B Copying Recordings to a Memory Card „ External Connections 98 Terminals on the Camcorder 99 Connection Diagrams 101 Playback on a TV Screen 103 Saving and Sharing Your Recordings 103... on an iOS or Android Device 126 Saving Recordings and Uploading Movies to the Web Using an iOS Device 128 Sharing Recordings with CANON iMAGE GATEWAY 132 Wireless Playback on a Computer 133 Wi-Fi Connection Using an Access Point 138 Viewing and Changing Wi-Fi Settings ...
Instruction Manual
Page 14
... manual: When not specified as "memory card" or "built-in this manual are simulated pictures taken with a still camera. Unless indicated otherwise, illustrations and menu icons refer to Troubleshooting (A 159). About this manual carefully before you use the camcorder and retain it for purchasing the Canon VIXIA HF R52 / VIXIA HF R50 / VIXIA HF R500. Please read this Manual Thank...
... manual: When not specified as "memory card" or "built-in this manual are simulated pictures taken with a still camera. Unless indicated otherwise, illustrations and menu icons refer to Troubleshooting (A 159). About this manual carefully before you use the camcorder and retain it for purchasing the Canon VIXIA HF R52 / VIXIA HF R50 / VIXIA HF R500. Please read this Manual Thank...
Instruction Manual
Page 16
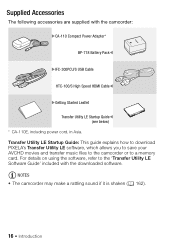
Getting to a memory card. NOTES • The camcorder may make a rattling sound if it is shaken (A 162). 16 Š Introduction Transfer Utility LE Startup Guide: This guide explains how ...
Getting to a memory card. NOTES • The camcorder may make a rattling sound if it is shaken (A 162). 16 Š Introduction Transfer Utility LE Startup Guide: This guide explains how ...

Instruction Manual
Page 17
... (A 144) Ad Introduction Š 17 Names of Parts Left side view 1 23 4 56 7 8 Right side view 9 1 (playback mode) button (A 46) 2 ON/OFF button 3 Memory card slot cover (A 24) 4 MIC (microphone) terminal (A 83) 5 AV OUT terminal (A 98, 100)/ × (headphones) terminal (A 82) 6 HDMI OUT terminal (A 98, 99) 7... USB terminal (A 98, 100) 8 Memory card slot (A 24) 9 START/STOP button (A 37) A q DC IN terminal (A 20) A a Grip belt Adjust the grip belt so that you can reach the zoom lever ...
... (A 144) Ad Introduction Š 17 Names of Parts Left side view 1 23 4 56 7 8 Right side view 9 1 (playback mode) button (A 46) 2 ON/OFF button 3 Memory card slot cover (A 24) 4 MIC (microphone) terminal (A 83) 5 AV OUT terminal (A 98, 100)/ × (headphones) terminal (A 82) 6 HDMI OUT terminal (A 98, 99) 7... USB terminal (A 98, 100) 8 Memory card slot (A 24) 9 START/STOP button (A 37) A q DC IN terminal (A 20) A a Grip belt Adjust the grip belt so that you can reach the zoom lever ...
Instruction Manual
Page 23
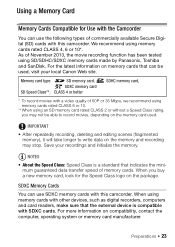
... indicates the minimum guaranteed data transfer speed of November 2013, the movie recording function has been tested using memory cards rated CLASS 4, 6 or 10*. Save your local Canon Web site. When you buy a new memory card, look for Use with the Camcorder You can use the following types of 60P or 35 Mbps, we recommend...
... indicates the minimum guaranteed data transfer speed of November 2013, the movie recording function has been tested using memory cards rated CLASS 4, 6 or 10*. Save your local Canon Web site. When you buy a new memory card, look for Use with the Camcorder You can use the following types of 60P or 35 Mbps, we recommend...

Instruction Manual
Page 24
...indicator is off. 3 Open the memory card slot cover. 4 Insert the memory card at a slight angle toward the lens, all the way into the memory card slot until it . 5 Close the memory card slot cover. ᕆ Memory card Top view Do not force the cover closed if the memory card is not correctly inserted. 24 ... may be careful not to prevent data loss. IMPORTANT • If you use a memory card for recording, turn off the camcorder. Inserting and Removing a Memory Card To use an SDXC memory card with the label facing toward the lens so be prompted to turn off the camcorder and...
...indicator is off. 3 Open the memory card slot cover. 4 Insert the memory card at a slight angle toward the lens, all the way into the memory card slot until it . 5 Close the memory card slot cover. ᕆ Memory card Top view Do not force the cover closed if the memory card is not correctly inserted. 24 ... may be careful not to prevent data loss. IMPORTANT • If you use a memory card for recording, turn off the camcorder. Inserting and Removing a Memory Card To use an SDXC memory card with the label facing toward the lens so be prompted to turn off the camcorder and...

Instruction Manual
Page 25
IMPORTANT • Memory cards have front and back sides that are not interchangeable. Inserting a memory card facing the wrong direction can cause a malfunction of the camcorder. Be sure to release it all the way out. When the memory card springs out, pull it . To remove the memory card Push the memory card once to insert the memory card as described in step 4. Preparations Š 25
IMPORTANT • Memory cards have front and back sides that are not interchangeable. Inserting a memory card facing the wrong direction can cause a malfunction of the camcorder. Be sure to release it all the way out. When the memory card springs out, pull it . To remove the memory card Push the memory card once to insert the memory card as described in step 4. Preparations Š 25

Instruction Manual
Page 27
...LCD panel or press [ to turn off the camcorder. NOTES • Some buttons, such as [ZOOM] or [PHOTO], will appear in memory) or [8] (memory card) and then touch [æ]. The settings you selected will appear briefly and then the camcorder will be ready to record. • After completing...Media for Movies] screen will appear, where you can select the memory to which you want to record movies. • @ Skip to step 11. 9 Touch [&] (built-in memory) or [8] (memory card) and then touch [æ]. • When selecting the memory, you can check the available recording time based on the video...
...LCD panel or press [ to turn off the camcorder. NOTES • Some buttons, such as [ZOOM] or [PHOTO], will appear in memory) or [8] (memory card) and then touch [æ]. The settings you selected will appear briefly and then the camcorder will be ready to record. • After completing...Media for Movies] screen will appear, where you can select the memory to which you want to record movies. • @ Skip to step 11. 9 Touch [&] (built-in memory) or [8] (memory card) and then touch [æ]. • When selecting the memory, you can check the available recording time based on the video...

Instruction Manual
Page 29
... 1 Power the camcorder using the compact power adapter. All recordings will be erased and the memory can also initialize a memory card or the built-in memory (B only) to permanently delete all the data rather than just clear the file allocation table ... and contains music files for use with this option if you can touch [Cancel] to physically erase all the recordings it is completed. 2 Initialize the memory. Card] > [Initialize] > [Complete Initialization]1 > [Yes]2 > [OK] > [X] @ 0 > [1 Other Settings] > q > [Initialize 8] > [Initialize] > [Complete Initialization]1 > [Yes]2 > [OK]...
... 1 Power the camcorder using the compact power adapter. All recordings will be erased and the memory can also initialize a memory card or the built-in memory (B only) to permanently delete all the data rather than just clear the file allocation table ... and contains music files for use with this option if you can touch [Cancel] to physically erase all the recordings it is completed. 2 Initialize the memory. Card] > [Initialize] > [Complete Initialization]1 > [Yes]2 > [OK] > [X] @ 0 > [1 Other Settings] > q > [Initialize 8] > [Initialize] > [Complete Initialization]1 > [Yes]2 > [OK]...

Instruction Manual
Page 30
nal recordings cannot be restored after it is initialized.) 30 Š Preparations IMPORTANT • Initializing the memory will be recovered. Make sure you save important recordings in advance using an external device (A 103). • Initializing a memory card will permanently erase any music files and images you may have transferred to the card. (B The music files and image mix frames that come pre-installed in the built-in memory will permanently erase all recordings. Lost origi-
nal recordings cannot be restored after it is initialized.) 30 Š Preparations IMPORTANT • Initializing the memory will be recovered. Make sure you save important recordings in advance using an external device (A 103). • Initializing a memory card will permanently erase any music files and images you may have transferred to the card. (B The music files and image mix frames that come pre-installed in the built-in memory will permanently erase all recordings. Lost origi-

Instruction Manual
Page 39
... will shut off the camcorder. - NOTES • About the power saving mode: If 1 > q > [Auto Power Off] is set to [Off]. Canon shall not be difficult to save your recordings regularly (A 103), especially after making a long recording while the camcorder is left without any operation for any...• When recording in bright places, it may be liable for 3 minutes. Basic Shooting and Playback Š 39 Do not open the memory card slot cover. - Should this happen, turn off automatically to use the LCD screen. Do not disconnect the power source or turn the camcorder ...
... will shut off the camcorder. - NOTES • About the power saving mode: If 1 > q > [Auto Power Off] is set to [Off]. Canon shall not be difficult to save your recordings regularly (A 103), especially after making a long recording while the camcorder is left without any operation for any...• When recording in bright places, it may be liable for 3 minutes. Basic Shooting and Playback Š 39 Do not open the memory card slot cover. - Should this happen, turn off automatically to use the LCD screen. Do not disconnect the power source or turn the camcorder ...
Instruction Manual
Page 41
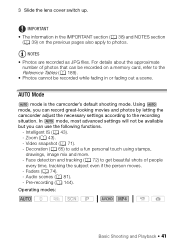
.... - Pre-recording (A 144). Decoration (A 65) to the recording situation. Zoom (A 43). - IMPORTANT • The information in the IMPORTANT section (A 38) and NOTES section (A 39) on a memory card, refer to photos.
.... - Pre-recording (A 144). Decoration (A 65) to the recording situation. Zoom (A 43). - IMPORTANT • The information in the IMPORTANT section (A 38) and NOTES section (A 39) on a memory card, refer to photos.

Instruction Manual
Page 49
... appears. • Touch [Ï]/[Ð] to increase the playback speed 1/8 → 1/4 the normal speed. Failing to adjust the volume, and touch [K]. Do not open the memory card slot cover. During playback pause: ! Adjusting the volume 1 During playback, touch the screen to display the playback controls. 2 Touch [Ý], touch [Ø] or [Ù] to...
... appears. • Touch [Ï]/[Ð] to increase the playback speed 1/8 → 1/4 the normal speed. Failing to adjust the volume, and touch [K]. Do not open the memory card slot cover. During playback pause: ! Adjusting the volume 1 During playback, touch the screen to display the playback controls. 2 Touch [Ý], touch [Ø] or [Ù] to...

Instruction Manual
Page 50
.... - Video snapshot scenes recorded in MP4 format can be played back only from the [y] index screen. • You can play back videos. • Depending on a memory card using another device.
.... - Video snapshot scenes recorded in MP4 format can be played back only from the [y] index screen. • You can play back videos. • Depending on a memory card using another device.
Instruction Manual
Page 52
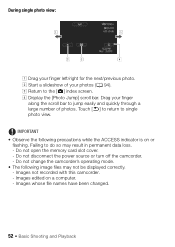
Do not open the memory card slot cover. - Do not disconnect the power source or turn off the camcorder. - IMPORTANT • Observe the following image files may result in permanent data ...
Do not open the memory card slot cover. - Do not disconnect the power source or turn off the camcorder. - IMPORTANT • Observe the following image files may result in permanent data ...

Instruction Manual
Page 55
... flashing (while recordings are being deleted). - NOTES • To delete all recordings and make all recordable space available again you may prefer to initialize the memory (A 29). Do not change the camcorder's operating mode. • Photos that were protected with this camcorder. Do not disconnect the power source or turn off...
... flashing (while recordings are being deleted). - NOTES • To delete all recordings and make all recordable space available again you may prefer to initialize the memory (A 29). Do not change the camcorder's operating mode. • Photos that were protected with this camcorder. Do not disconnect the power source or turn off...
Instruction Manual
Page 58
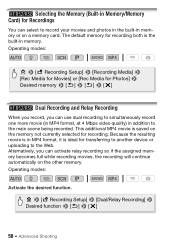
...: SCN Activate the desired function. 0 > [3 Recording Setup] > [Dual/Relay Recording] > Desired function > [K] > [X] 58 Š Advanced Shooting This additional MP4 movie is saved on a memory card. B Selecting the Memory (Built-in Memory/Memory Card) for Recordings You can select to the main scene being recorded. Operating modes: SCN 0 > [3 Recording Setup] > [Recording Media] > [Rec Media for Movies] or...
...: SCN Activate the desired function. 0 > [3 Recording Setup] > [Dual/Relay Recording] > Desired function > [K] > [X] 58 Š Advanced Shooting This additional MP4 movie is saved on a memory card. B Selecting the Memory (Built-in Memory/Memory Card) for Recordings You can select to the main scene being recorded. Operating modes: SCN 0 > [3 Recording Setup] > [Recording Media] > [Rec Media for Movies] or...

Instruction Manual
Page 67
... playback before loading a previously saved canvas file. 1 The freehand drawings and stamps will be saved in the built-in memory (B only) or on a memory card (@ only). 2 The camcorder will apply the last freehand drawings and stamps that come pre-installed in the built-in... memory will be restored after it is initialized.) To use especially designed, baby- NOTES • Initializing a memory will need to a different location. The [Animated Stamps] screen...
... playback before loading a previously saved canvas file. 1 The freehand drawings and stamps will be saved in the built-in memory (B only) or on a memory card (@ only). 2 The camcorder will apply the last freehand drawings and stamps that come pre-installed in the built-in... memory will be restored after it is initialized.) To use especially designed, baby- NOTES • Initializing a memory will need to a different location. The [Animated Stamps] screen...


