
Instruction Manual
Page 3
...-OK-CANON (1-800-652-2666) This Class B digital apparatus complies with Industry Canada license-exempt RSS standard(s). However, there is subject to Part 15 of the device. FCC/IC NOTICE HD Camcorder, VIXIA HF R42 / VIXIA HF R40 / VIXIA HF R400 systems This device complies with Part 15 of FCC Rules. Whereas high levels of RF can be co-located or operated in Subpart B of Part 15...
...-OK-CANON (1-800-652-2666) This Class B digital apparatus complies with Industry Canada license-exempt RSS standard(s). However, there is subject to Part 15 of the device. FCC/IC NOTICE HD Camcorder, VIXIA HF R42 / VIXIA HF R40 / VIXIA HF R400 systems This device complies with Part 15 of FCC Rules. Whereas high levels of RF can be co-located or operated in Subpart B of Part 15...
Instruction Manual
Page 6
..., Google Play, YouTube are trademarks of the Wi-Fi Alliance. • WPS as used on the camcorder's settings, onscreen displays and in this manual signifies Wi-Fi Protected Setup. • The Wi-Fi Protected Setup Identifier Mark...Windows are trademarks or registered trademarks of Microsoft Corporation in the United States and/or other countries. • App Store, iPad, iPhone, iTunes and Mac OS are trademarks of Panasonic Corporation and Sony Corporation. • Manufactured under license from Microsoft. • "Full HD 1080" refers to Canon camcorders compliant with high-definition video...
..., Google Play, YouTube are trademarks of the Wi-Fi Alliance. • WPS as used on the camcorder's settings, onscreen displays and in this manual signifies Wi-Fi Protected Setup. • The Wi-Fi Protected Setup Identifier Mark...Windows are trademarks or registered trademarks of Microsoft Corporation in the United States and/or other countries. • App Store, iPad, iPhone, iTunes and Mac OS are trademarks of Panasonic Corporation and Sony Corporation. • Manufactured under license from Microsoft. • "Full HD 1080" refers to Canon camcorders compliant with high-definition video...
Instruction Manual
Page 23
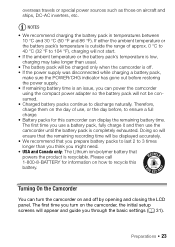
... you can turn on the camcorder, the initial setup screens will appear and guide you use a battery pack, fully charge it and then use the camcorder until the battery pack is off by opening and closing the LCD panel. overseas travels or special power sources such as those on and off . • If the power supply was disconnected while charging a battery pack, make sure the POWER/CHG indicator...
... you can turn on the camcorder, the initial setup screens will appear and guide you use a battery pack, fully charge it and then use the camcorder until the battery pack is off by opening and closing the LCD panel. overseas travels or special power sources such as those on and off . • If the power supply was disconnected while charging a battery pack, make sure the POWER/CHG indicator...
Instruction Manual
Page 25
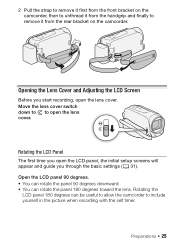
... finally to open the lens cover. Rotating the LCD Panel The first time you through the basic settings (A 31). Rotating the LCD panel 180 degrees can rotate the panel 180 degrees toward the lens. Preparations Š 25 Opening the Lens Cover and Adjusting the LCD Screen Before you start recording, open the LCD panel, the initial setup screens will appear and guide you open the lens cover. Open the LCD panel 90...
... finally to open the lens cover. Rotating the LCD Panel The first time you through the basic settings (A 31). Rotating the LCD panel 180 degrees can rotate the panel 180 degrees toward the lens. Preparations Š 25 Opening the Lens Cover and Adjusting the LCD Screen Before you start recording, open the LCD panel, the initial setup screens will appear and guide you open the lens cover. Open the LCD panel 90...

Instruction Manual
Page 32
... adjust the date and time later on with the > q > [Date/Time] setting. You can change the movie format later on with the > [Recording Media] > [v Rec Media for Movies] and [{ Rec Media for Photos] settings. • When you turn on a photo size of photos that can select the memory for movies and photos later on with the > [Movie Format] setting. 6/4 You can be ready to configure the initial settings again. 32 Š Preparations The next time you do not use the camcorder for Photos] screen...
... adjust the date and time later on with the > q > [Date/Time] setting. You can change the movie format later on with the > [Recording Media] > [v Rec Media for Movies] and [{ Rec Media for Photos] settings. • When you turn on a photo size of photos that can select the memory for movies and photos later on with the > [Movie Format] setting. 6/4 You can be ready to configure the initial settings again. 32 Š Preparations The next time you do not use the camcorder for Photos] screen...

Instruction Manual
Page 49
... zoom to [ Optical]. > [Zoom Type] > Desired zoom type > [X] Options [ Optical] For optical zoom, the camcorder uses the optical magnification ratio of the lens. [ Advanced] For advanced zoom, the camcorder processes the image beyond the range of view with optical zoom. [ Digital] For digital zoom (light blue area on , the zoom position will be faster in record pause mode than when actually recording, except when pre-recording (A 82) is activated. • When you turn off the camcorder...
... zoom to [ Optical]. > [Zoom Type] > Desired zoom type > [X] Options [ Optical] For optical zoom, the camcorder uses the optical magnification ratio of the lens. [ Advanced] For advanced zoom, the camcorder processes the image beyond the range of view with optical zoom. [ Digital] For digital zoom (light blue area on , the zoom position will be faster in record pause mode than when actually recording, except when pre-recording (A 82) is activated. • When you turn off the camcorder...

Instruction Manual
Page 60
... 4 Mbps mode for longer recording times. Advanced Shooting This chapter covers advanced shooting functions, such as Special Scene modes and Baby mode. Operating modes: SCN > [ Recording Setup] > [Movie Format] > Desired movie format > [K] > [X] Selecting the Video Quality The camcorder offers several video quality options (measured by bit rate*) for playback with lower bit rates will be played back on smartphones or uploaded to record movies in 1 second of video and also affects recording time available on the memory. If...
... 4 Mbps mode for longer recording times. Advanced Shooting This chapter covers advanced shooting functions, such as Special Scene modes and Baby mode. Operating modes: SCN > [ Recording Setup] > [Movie Format] > Desired movie format > [K] > [X] Selecting the Video Quality The camcorder offers several video quality options (measured by bit rate*) for playback with lower bit rates will be played back on smartphones or uploaded to record movies in 1 second of video and also affects recording time available on the memory. If...

Instruction Manual
Page 61
...; When the shooting mode is set to , recording in 60P is not available. Scenes exceeding 4 GB - Scenes recorded at a video quality other devices. - When the shooting mode is set to , recording in 60P or 35 Mbps is not available. A screen with AVCHD Ver. 2.0 specifications to copy those movies onto Blu-ray discs. • Depending on the portable device, you may not be able to play back movies recorded in 60P...
...; When the shooting mode is set to , recording in 60P is not available. Scenes exceeding 4 GB - Scenes recorded at a video quality other devices. - When the shooting mode is set to , recording in 60P or 35 Mbps is not available. A screen with AVCHD Ver. 2.0 specifications to copy those movies onto Blu-ray discs. • Depending on the portable device, you may not be able to play back movies recorded in 60P...
Instruction Manual
Page 105
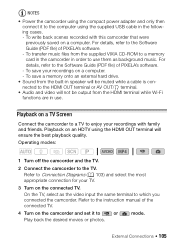
... Software Guide (PDF file) of PIXELA's software. - Refer to the instruction manual of the connected TV. 4 Turn on a computer. - To save a memory onto an external hard drive. • Sound from the built-in speaker will be muted while a cable is connected to a memory card in the camcorder in the following cases. - To save your recordings on the camcorder and set it to the computer using the HDMI OUT terminal will not be output from the supplied VIXIA...
... Software Guide (PDF file) of PIXELA's software. - Refer to the instruction manual of the connected TV. 4 Turn on a computer. - To save a memory onto an external hard drive. • Sound from the built-in speaker will be muted while a cable is connected to a memory card in the camcorder in the following cases. - To save your recordings on the camcorder and set it to the computer using the HDMI OUT terminal will not be output from the supplied VIXIA...
Instruction Manual
Page 112
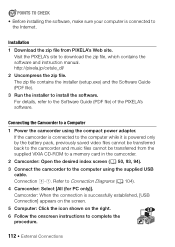
... the battery pack, previously saved video files cannot be transferred back to the camcorder and music files cannot be transferred from PIXELA's Web site. Camcorder: When the connection is successfully established, [USB Connection] appears on the screen. 5 Computer: Click the icon shown on the right. 6 Follow the onscreen instructions to the computer using the compact power adapter. Installation 1 Download the zip file from the supplied VIXIA CD-ROM to a memory card in the camcorder. 2 Camcorder: Open the...
... the battery pack, previously saved video files cannot be transferred back to the camcorder and music files cannot be transferred from PIXELA's Web site. Camcorder: When the connection is successfully established, [USB Connection] appears on the screen. 5 Computer: Click the icon shown on the right. 6 Follow the onscreen instructions to the computer using the compact power adapter. Installation 1 Download the zip file from the supplied VIXIA CD-ROM to a memory card in the camcorder. 2 Camcorder: Open the...

Instruction Manual
Page 113
... Internet. 1 Insert the VIXIA CD-ROM into the computer's disc drive. 2 Windows: Open the drive into which you inserted the CD-ROM using Windows Explorer. Installation Install the software before you features optimized for the full system requirements and other information. POINTS TO CHECK • Before installing the software, make available to you connect the camcorder to the 'ImageBrowser EX User Guide' (PDF file) for this camcorder. External Connections Š 113 Mac OS: Use Finder and click...
... Internet. 1 Insert the VIXIA CD-ROM into the computer's disc drive. 2 Windows: Open the drive into which you inserted the CD-ROM using Windows Explorer. Installation Install the software before you features optimized for the full system requirements and other information. POINTS TO CHECK • Before installing the software, make available to you connect the camcorder to the 'ImageBrowser EX User Guide' (PDF file) for this camcorder. External Connections Š 113 Mac OS: Use Finder and click...

Instruction Manual
Page 120
..., [USB Connection] appears on the camcorder and open the [y Movie Playback] index screen for AVCHD movies (A 50). • We recommend powering the camcorder using the compact power adapter. • Verify that > q > [AV/Headphones] is set the recorder to the instruction manual of the digital video recorder. Connecting Connect the camcorder to a VCR or a digital video recorder with analog audio/video inputs. Connection #-1. In Standard Definition You can copy your movies by connecting the camcorder to the VCR using Connection ". Video output will vary depending on the device used...
..., [USB Connection] appears on the camcorder and open the [y Movie Playback] index screen for AVCHD movies (A 50). • We recommend powering the camcorder using the compact power adapter. • Verify that > q > [AV/Headphones] is set the recorder to the instruction manual of the digital video recorder. Connecting Connect the camcorder to a VCR or a digital video recorder with analog audio/video inputs. Connection #-1. In Standard Definition You can copy your movies by connecting the camcorder to the VCR using Connection ". Video output will vary depending on the device used...

Instruction Manual
Page 121
.... 4 Camcorder: Resume playback. The software is compatible with AVCHD ver. 2.0 specifications to copy onto Blu-Ray discs movies recorded in the output video signal. NOTES • Use an external Blu-Ray Disc recorder compliant with computers running Windows or Mac OS operating systems. Refer to Saving MP4 Movies and Photos (Windows/Mac OS) (A 113). By default, the date and time will be available in the 'ImageBrowser EX Instruction Manual' (PDF file). External Connections Š 121 Connecting to the Computer and Uploading Your Recordings Refer...
.... 4 Camcorder: Resume playback. The software is compatible with AVCHD ver. 2.0 specifications to copy onto Blu-Ray discs movies recorded in the output video signal. NOTES • Use an external Blu-Ray Disc recorder compliant with computers running Windows or Mac OS operating systems. Refer to Saving MP4 Movies and Photos (Windows/Mac OS) (A 113). By default, the date and time will be available in the 'ImageBrowser EX Instruction Manual' (PDF file). External Connections Š 121 Connecting to the Computer and Uploading Your Recordings Refer...
Instruction Manual
Page 131
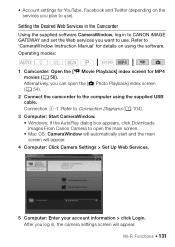
... Downloads Images From Canon Camera to open the [} Photo Playback] index screen (A 54). 2 Connect the camcorder to the computer using the software. After you want to use . Refer to CANON iMAGE GATEWAY and set the Web services you log in, the camera settings screen will appear. 4 Computer: Click Camera Settings > Set Up Web Services. 5 Computer: Enter your account information > click Login. Connection #-1. Operating modes: SCN 1 Camcorder: Open the [y Movie Playback] index screen for details on the services you can open the main screen. • Mac OS...
... Downloads Images From Canon Camera to open the [} Photo Playback] index screen (A 54). 2 Connect the camcorder to the computer using the software. After you want to use . Refer to CANON iMAGE GATEWAY and set the Web services you log in, the camera settings screen will appear. 4 Computer: Click Camera Settings > Set Up Web Services. 5 Computer: Enter your account information > click Login. Connection #-1. Operating modes: SCN 1 Camcorder: Open the [y Movie Playback] index screen for details on the services you can open the main screen. • Mac OS...
Instruction Manual
Page 135
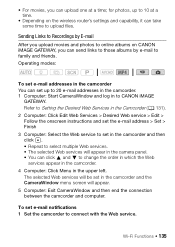
... onscreen instructions and set the e-mail address > Set > Finish 3 Computer: Select the Web service to set in the camcorder and the CameraWindow menu screen will appear in the camera panel. • You can upload one at a time. • Depending on the wireless router's settings and capability, it can send links to those albums by E-mail After you upload movies and photos to online albums on CANON iMAGE GATEWAY...
... onscreen instructions and set the e-mail address > Set > Finish 3 Computer: Select the Web service to set in the camcorder and the CameraWindow menu screen will appear in the camera panel. • You can upload one at a time. • Depending on the wireless router's settings and capability, it can send links to those albums by E-mail After you upload movies and photos to online albums on CANON iMAGE GATEWAY...
Instruction Manual
Page 141
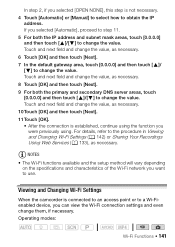
... Changing Wi-Fi Settings When the camcorder is connected to an access point or to change the value, as necessary. 10 Touch [OK] and then touch [Next]. 11 Touch [OK]. • After the connection is not necessary. 4 Touch [Automatic] or [Manual] to select how to use. Operating modes: SCN Wi-Fi Functions Š 141 NOTES • The Wi-Fi functions available and the setup...
... Changing Wi-Fi Settings When the camcorder is connected to an access point or to change the value, as necessary. 10 Touch [OK] and then touch [Next]. 11 Touch [OK]. • After the connection is not necessary. 4 Touch [Automatic] or [Manual] to select how to use. Operating modes: SCN Wi-Fi Functions Š 141 NOTES • The Wi-Fi functions available and the setup...
Instruction Manual
Page 152
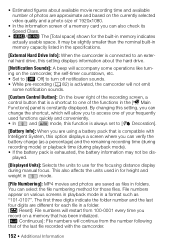
... used functions quickly and conveniently. • In and mode, this option displays a screen where you can also check its Speed Class. • 6/4 The [Total space] shown for the built-in a folder. [m Reset]: File numbers will continue from the number following that is connected to access one of a memory card you can change the shortcut, which will allow you to an external hard drive, this setting displays information about available movie recording time and available number of photos...
... used functions quickly and conveniently. • In and mode, this option displays a screen where you can also check its Speed Class. • 6/4 The [Total space] shown for the built-in a folder. [m Reset]: File numbers will continue from the number following that is connected to access one of a memory card you can change the shortcut, which will allow you to an external hard drive, this setting displays information about available movie recording time and available number of photos...
Instruction Manual
Page 170
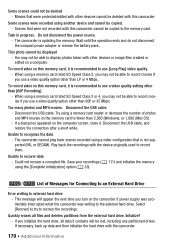
... using a video configuration that were not recorded with this memory card, it contains will appear the next time you turn on a computer. The camcorder cannot play back scenes recorded using a memory card reader or decrease the number of Messages for Connecting to an External Hard Drive Error writing to fewer than LP or 4 Mbps.. Select [Recover] to try to recognize the data - Initialize? - To record video on the memory card to external hard drive - Too many photos and MP4 movies...
... using a video configuration that were not recorded with this memory card, it contains will appear the next time you turn on a computer. The camcorder cannot play back scenes recorded using a memory card reader or decrease the number of Messages for Connecting to an External Hard Drive Error writing to fewer than LP or 4 Mbps.. Select [Recover] to try to recognize the data - Initialize? - To record video on the memory card to external hard drive - Too many photos and MP4 movies...
Instruction Manual
Page 173
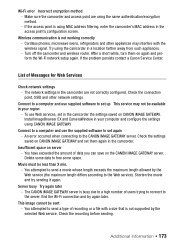
... and use supplied software to the Web service). An error occurred when connecting to set in the camcorder the settings saved on server - Delete some data to send a type of data you can save on again and perform the Wi-Fi network setup again. Shorten the movie and try again later. This image cannot be available in a location farther away from such appliances. - Make sure the camcorder and access...
... and use supplied software to the Web service). An error occurred when connecting to set in the camcorder the settings saved on server - Delete some data to send a type of data you can save on again and perform the Wi-Fi network setup again. Shorten the movie and try again later. This image cannot be available in a location farther away from such appliances. - Make sure the camcorder and access...
Instruction Manual
Page 192
... Scene mode 67 Notification sounds 152 O Onscreen icons 154 Other Settings menus . . . . . .37, 146 P P mode 68 Playback Movies 50 Photos 54 Portrait (Special Scene mode) . . . .67 Power saving 45 Powered IS 76 Pre-recording 82 R Recording 39 Movies 41, 65 Photos 46 Recording time 62 Relay recording 63 Remote Browse 126 Remote Control+Streaming* . . . . . 125 Resetting all camcorder settings 162 S Saving recordings 107 Transferring to a computer 111 Using external video recorders 119 Scene mode 66 Self timer 84 Serial number 20 Shooting mode 39 Shooting mode button 39...
... Scene mode 67 Notification sounds 152 O Onscreen icons 154 Other Settings menus . . . . . .37, 146 P P mode 68 Playback Movies 50 Photos 54 Portrait (Special Scene mode) . . . .67 Power saving 45 Powered IS 76 Pre-recording 82 R Recording 39 Movies 41, 65 Photos 46 Recording time 62 Relay recording 63 Remote Browse 126 Remote Control+Streaming* . . . . . 125 Resetting all camcorder settings 162 S Saving recordings 107 Transferring to a computer 111 Using external video recorders 119 Scene mode 66 Self timer 84 Serial number 20 Shooting mode 39 Shooting mode button 39...


