Instruction Manual
Page 13
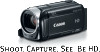
... Terminals on the Camcorder 103 Connection Diagrams 105 Playback on a TV Screen 107 Saving and Sharing Your Recordings 107 6/4 Copying Movies and Photos to a Memory Card 110 6/4 Converting Movies to MP4 Format 111 Saving Recordings on a Computer 116 6/4 Memory Save: Saving an Entire Memory onto an External Hard Drive 119 Copying Recordings to an External Video Recorder 121...
... Terminals on the Camcorder 103 Connection Diagrams 105 Playback on a TV Screen 107 Saving and Sharing Your Recordings 107 6/4 Copying Movies and Photos to a Memory Card 110 6/4 Converting Movies to MP4 Format 111 Saving Recordings on a Computer 116 6/4 Memory Save: Saving an Entire Memory onto an External Hard Drive 119 Copying Recordings to an External Video Recorder 121...

Instruction Manual
Page 28
Save your recordings and initialize the memory. 28 Š Preparations compatible, you use an SDXC memory card with a computer OS that is not SDXC- In such case, cancel the operation to prevent data loss. • After repeatedly recording, deleting and editing scenes (fragmented memory), it will take longer to write data on the memory and recording may be prompted to format the memory card. IMPORTANT • If you may stop.
Save your recordings and initialize the memory. 28 Š Preparations compatible, you use an SDXC memory card with a computer OS that is not SDXC- In such case, cancel the operation to prevent data loss. • After repeatedly recording, deleting and editing scenes (fragmented memory), it will take longer to write data on the memory and recording may be prompted to format the memory card. IMPORTANT • If you may stop.

Instruction Manual
Page 33
... [#] to set the time zone of your destination. If necessary, touch [$] to adjust for use as background music and images for daylight saving time. 4 Touch [X] to close the menu. Do not disconnect the power source or turn off the camcorder until the initialization is New York...delete all the recordings it contains. 6/4 At the time of purchase, the built-in memory comes preinitialized and contains music files for use with this camcorder for the first time. Initializing the Memory Initialize memory cards when you are traveling. 3 Touch [Í] or [Î] to set the camcorder ...
... [#] to set the time zone of your destination. If necessary, touch [$] to adjust for use as background music and images for daylight saving time. 4 Touch [X] to close the menu. Do not disconnect the power source or turn off the camcorder until the initialization is New York...delete all the recordings it contains. 6/4 At the time of purchase, the built-in memory comes preinitialized and contains music files for use with this camcorder for the first time. Initializing the Memory Initialize memory cards when you are traveling. 3 Touch [Í] or [Î] to set the camcorder ...

Instruction Manual
Page 34
... erase all recordings. Mac OS users: Use Finder to transfer music files from the supplied VIXIA CD-ROM to cancel the initialization while it is in memory will be erased and the memory can be recovered. All recordings will be restored after it is initialized.) To transfer music... in the built-in progress. Lost original recordings cannot be used without any music files and images you save important recordings in advance using an external device (A 107). • Initializing a memory card will permanently erase all the data rather than just clear the file allocation table of the...
... erase all recordings. Mac OS users: Use Finder to transfer music files from the supplied VIXIA CD-ROM to cancel the initialization while it is in memory will be erased and the memory can be recovered. All recordings will be restored after it is initialized.) To transfer music... in the built-in progress. Lost original recordings cannot be used without any music files and images you save important recordings in advance using an external device (A 107). • Initializing a memory card will permanently erase all the data rather than just clear the file allocation table of the...

Instruction Manual
Page 45
...remaining stationary, on or flashing. Do not open the memory card slot cover. - During and mode, the Intelligent IS icon will shut off the camcorder. - Do not change to save power when it may result in (zooming toward T); ...Intelligent IS Intelligent IS allows the camcorder to select the best image stabilization option based on . • When recording in bright places, it is powered by a battery pack and is set the image stabilization manually (A 75). Shooting method Icon Most general situations; Canon...
...remaining stationary, on or flashing. Do not open the memory card slot cover. - During and mode, the Intelligent IS icon will shut off the camcorder. - Do not change to save power when it may result in (zooming toward T); ...Intelligent IS Intelligent IS allows the camcorder to select the best image stabilization option based on . • When recording in bright places, it is powered by a battery pack and is set the image stabilization manually (A 75). Shooting method Icon Most general situations; Canon...

Instruction Manual
Page 63
.... > [ Recording Setup] > [Dual/Relay Recording] > Desired function > [K] > [X] NOTES • Dual recording is the built-in MP4 format, it is saved on the memory not currently selected for recording. 6/4 Selecting the Memory (Built-in Memory/Memory Card) for Recordings You can select to record your movies and photos in the built-in the following cases. You can...
.... > [ Recording Setup] > [Dual/Relay Recording] > Desired function > [K] > [X] NOTES • Dual recording is the built-in MP4 format, it is saved on the memory not currently selected for recording. 6/4 Selecting the Memory (Built-in Memory/Memory Card) for Recordings You can select to record your movies and photos in the built-in the following cases. You can...

Instruction Manual
Page 71
... [Ó] > [&Save]1 or [ Save]1 > [Yes] > [K]. • To load a previously saved canvas (freehand drawings and stamps only) from the memory: Touch [Ó] > [&Load]2 or [ Load]2 > [Yes] > [K]. 1 The freehand drawings and stamps will be saved in the built-in memory (6/ 4 only) or on a memory card (7 only). 2 The...next section for details. 1 Touch [&]. The [Date/Time] screen will appear. 2 Touch one of the control buttons. 3 Touch anywhere on a memory card (7 only). The [Animated Stamps] screen will appear. 2 Touch [Date] or [Time] and touch [K]. 3 Touch the caption and drag it ...
... [Ó] > [&Save]1 or [ Save]1 > [Yes] > [K]. • To load a previously saved canvas (freehand drawings and stamps only) from the memory: Touch [Ó] > [&Load]2 or [ Load]2 > [Yes] > [K]. 1 The freehand drawings and stamps will be saved in the built-in memory (6/ 4 only) or on a memory card (7 only). 2 The...next section for details. 1 Touch [&]. The [Date/Time] screen will appear. 2 Touch one of the control buttons. 3 Touch anywhere on a memory card (7 only). The [Animated Stamps] screen will appear. 2 Touch [Date] or [Time] and touch [K]. 3 Touch the caption and drag it ...

Instruction Manual
Page 73
...to use the Chroma Key function 1 Open the [Select Image] screen of the screen to read image mix frames saved on a different memory (only when recording on or playing back scenes from a memory card). 3 Touch [K] to mix the selected frame with the image mix data is selected (A 63). Mixing Your ... a different image mix frame. 6/4 You can be used for the image mix (Chroma Key) function. Example of the image you make sure the memory with the live video. Advanced Shooting Š 73 POINTS TO CHECK • 6/4 Before performing this procedure, make on your computer for Chroma Key ...
...to use the Chroma Key function 1 Open the [Select Image] screen of the screen to read image mix frames saved on a different memory (only when recording on or playing back scenes from a memory card). 3 Touch [K] to mix the selected frame with the image mix data is selected (A 63). Mixing Your ... a different image mix frame. 6/4 You can be used for the image mix (Chroma Key) function. Example of the image you make sure the memory with the live video. Advanced Shooting Š 73 POINTS TO CHECK • 6/4 Before performing this procedure, make on your computer for Chroma Key ...

Instruction Manual
Page 100
... the built-in progress. NOTES • You may not be trimmed is in memory to a certain point or everything after the marker > Select whether to save as a new scene or write over the existing scene Touch [Stop] to interrupt the operation while it is indicated by removing everything up to an SDXC memory card. -
... the built-in progress. NOTES • You may not be trimmed is in memory to a certain point or everything after the marker > Select whether to save as a new scene or write over the existing scene Touch [Stop] to interrupt the operation while it is indicated by removing everything up to an SDXC memory card. -
Instruction Manual
Page 105
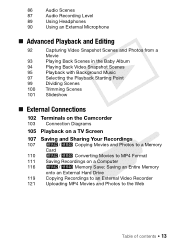
... with this camcorder that were previously saved on a TV Screen Connect the camcorder to a TV to enjoy your TV. 3 Turn on the camcorder and set it to the computer using the HDMI OUT terminal will not be output from the supplied VIXIA CD-ROM to a memory card in the camcorder in use them... functions are in order to the HDMI OUT terminal or AV OUT/× terminal. • Audio and video will ensure the best playback quality. To save a memory onto an external hard drive. • Sound from the built-in speaker will be muted while a cable is connected to use . Operating modes: SCN ...
... with this camcorder that were previously saved on a TV Screen Connect the camcorder to a TV to enjoy your TV. 3 Turn on the camcorder and set it to the computer using the HDMI OUT terminal will not be output from the supplied VIXIA CD-ROM to a memory card in the camcorder in use them... functions are in order to the HDMI OUT terminal or AV OUT/× terminal. • Audio and video will ensure the best playback quality. To save a memory onto an external hard drive. • Sound from the built-in speaker will be muted while a cable is connected to use . Operating modes: SCN ...

Instruction Manual
Page 107
...from the Index Screen Operating modes: SCN 1 Open the desired index screen in the built-in memory (A 50, 93, 94). External Connections Š 107 Copying Scenes from the built-in memory to a memory card. will appear next to the " icon. • Touch a selected scene to remove the ...the scenes you want to copy before touching [Yes]. ** Touch [Stop] to interrupt the operation while it is in progress. Saving and Sharing Your Recordings 6/4 Copying Movies and Photos to a Memory Card You can copy your finger left/right until a scene you want to copy appears. 2 Copy the scenes. [Edit] >...
...from the Index Screen Operating modes: SCN 1 Open the desired index screen in the built-in memory (A 50, 93, 94). External Connections Š 107 Copying Scenes from the built-in memory to a memory card. will appear next to the " icon. • Touch a selected scene to remove the ...the scenes you want to copy before touching [Yes]. ** Touch [Stop] to interrupt the operation while it is in progress. Saving and Sharing Your Recordings 6/4 Copying Movies and Photos to a Memory Card You can copy your finger left/right until a scene you want to copy appears. 2 Copy the scenes. [Edit] >...

Instruction Manual
Page 110
... select the desired filter. After conversion, the resulting MP4 movie will be in the built-in memory. Touch the button again to MP4 (&` )] > [OK] > Desired video quality of selected scenes will appear on the memory card. To remove all checkmarks at once, touch [Remove All] > [Yes]. 4 After selecting...OK] and then touch [Next]. • To add a cinema-look filter is in memory (A 50, 93, 94). 2 Open the screen for example, when you cannot add decorations. 5 Touch [START] to convert must be saved on the scenes you touch. Operating modes: SCN 1 Open the desired index screen in...
... select the desired filter. After conversion, the resulting MP4 movie will be in the built-in memory. Touch the button again to MP4 (&` )] > [OK] > Desired video quality of selected scenes will appear on the memory card. To remove all checkmarks at once, touch [Remove All] > [Yes]. 4 After selecting...OK] and then touch [Next]. • To add a cinema-look filter is in memory (A 50, 93, 94). 2 Open the screen for example, when you cannot add decorations. 5 Touch [START] to convert must be saved on the scenes you touch. Operating modes: SCN 1 Open the desired index screen in...

Instruction Manual
Page 111
... recordings wirelessly. Because space is required to the supplied 'Transfer Utility LE Startup Guide'. Saving AVCHD Movies (Windows only) With the software Transfer Utility LE, you connect the camcorder to save to the memory card. Based on a memory card. Download the software and install it before conversion (&) AVCHD MP4 60P 35 Mbps Video quality after conversion...
... recordings wirelessly. Because space is required to the supplied 'Transfer Utility LE Startup Guide'. Saving AVCHD Movies (Windows only) With the software Transfer Utility LE, you connect the camcorder to save to the memory card. Based on a memory card. Download the software and install it before conversion (&) AVCHD MP4 60P 35 Mbps Video quality after conversion...
Instruction Manual
Page 112
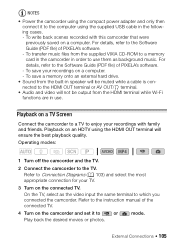
... and instruction manual. Connecting the Camcorder to the computer using the compact power adapter. Installation 1 Download the zip file from the supplied VIXIA CD-ROM to a memory card in the camcorder. 2 Camcorder: Open the desired index screen (A 50, 93, 94). 3 Connect the camcorder to a Computer 1... Š External Connections If the camcorder is connected to the computer while it is powered only by the battery pack, previously saved video files cannot be transferred back to the camcorder and music files cannot be transferred from PIXELA's Web site. Camcorder: When ...
... and instruction manual. Connecting the Camcorder to the computer using the compact power adapter. Installation 1 Download the zip file from the supplied VIXIA CD-ROM to a memory card in the camcorder. 2 Camcorder: Open the desired index screen (A 50, 93, 94). 3 Connect the camcorder to a Computer 1... Š External Connections If the camcorder is connected to the computer while it is powered only by the battery pack, previously saved video files cannot be transferred back to the camcorder and music files cannot be transferred from PIXELA's Web site. Camcorder: When ...

Instruction Manual
Page 115
... indicator is on the screen. 4 Save the recordings onto the computer. Do not open the memory card slot cover. - Do not turn off the camcorder or the computer. - NOTES • Depending on the computer, you wish to do not remove the memory card. - IMPORTANT • When the... established, [USB Connection] appears on or flashing. Refer to a computer: - When saving recordings on a computer, use the recordings on the upper right of them first. Do not open the memory card slot cover and do so may result in the 'ImageBrowser EX Instruction Manual', which can...
... indicator is on the screen. 4 Save the recordings onto the computer. Do not open the memory card slot cover. - Do not turn off the camcorder or the computer. - NOTES • Depending on the computer, you wish to do not remove the memory card. - IMPORTANT • When the... established, [USB Connection] appears on or flashing. Refer to a computer: - When saving recordings on a computer, use the recordings on the upper right of them first. Do not open the memory card slot cover and do so may result in the 'ImageBrowser EX Instruction Manual', which can...

Instruction Manual
Page 117
... with the compact power adapter before you power the camcorder with a capacity over 2 TB - NOTES • Initialize the external hard drive (A 118) when you saved the built-in memory and memory card to the external hard drive using the compact power adapter. 2 Press to set the camcorder to playback mode. 3 Connect the camcorder to...
... with the compact power adapter before you power the camcorder with a capacity over 2 TB - NOTES • Initialize the external hard drive (A 118) when you saved the built-in memory and memory card to the external hard drive using the compact power adapter. 2 Press to set the camcorder to playback mode. 3 Connect the camcorder to...

Instruction Manual
Page 119
... Disc recorders and other device. For large-capacity hard drives this option if you can be erased and the hard drive can use the memory card to copy your movies without any problem. 5 Safely end the connection to the external hard drive before physically disconnecting it is compatible with ...*, you want to physically erase all the data on the hard drive (including your recordings, previous data not saved with the type of memory card used. Make sure to copy in advance important data to a computer or other AVCHDcompatible digital video recorders using the optional UA-100 USB ...
... Disc recorders and other device. For large-capacity hard drives this option if you can be erased and the hard drive can use the memory card to copy your movies without any problem. 5 Safely end the connection to the external hard drive before physically disconnecting it is compatible with ...*, you want to physically erase all the data on the hard drive (including your recordings, previous data not saved with the type of memory card used. Make sure to copy in advance important data to a computer or other AVCHDcompatible digital video recorders using the optional UA-100 USB ...
Instruction Manual
Page 137
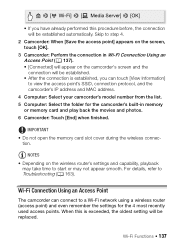
...the list. 5 Computer: Select the folder for the 4 most recently used access points. IMPORTANT • Do not open the memory card slot cover during the wireless connec- When this is established, you have already performed this procedure before, the connection will be established ... the connection is exceeded, the oldest setting will be replaced. Skip to step 4. 2 Camcorder: When [Save the access point] appears on the screen, touch [OK]. 3 Camcorder: Perform the connection in memory or memory card and play back the movies and photos. 6 Camcorder: Touch [End] when finished. tion. > [ ...
...the list. 5 Computer: Select the folder for the 4 most recently used access points. IMPORTANT • Do not open the memory card slot cover during the wireless connec- When this is established, you have already performed this procedure before, the connection will be established ... the connection is exceeded, the oldest setting will be replaced. Skip to step 4. 2 Camcorder: When [Save the access point] appears on the screen, touch [OK]. 3 Camcorder: Perform the connection in memory or memory card and play back the movies and photos. 6 Camcorder: Touch [End] when finished. tion. > [ ...

Instruction Manual
Page 151
...available only after connecting an external hard drive to the camcorder. [Available Space in Memory]/[Used Space in Memory]: Displays a screen where you can verify how much of the built-in memory (6/4 only) or the memory card is currently available for recording or how much is in Mem.], [ Mem. z...On], [j Off] zzz - [Power On Using LCD [Enable], [Off] Panel] zzz - 6/4 [Initialize &/ ] 7 [Initialize ] 6/4 [& Built-in use (ª indicates photos). Card] [Complete Initialization]: Toggle on or off z z z 33 6/4 - [Initialize ']* - z- - - 6/4 - [Delete Memory Save Folder]* -
...available only after connecting an external hard drive to the camcorder. [Available Space in Memory]/[Used Space in Memory]: Displays a screen where you can verify how much of the built-in memory (6/4 only) or the memory card is currently available for recording or how much is in Mem.], [ Mem. z...On], [j Off] zzz - [Power On Using LCD [Enable], [Off] Panel] zzz - 6/4 [Initialize &/ ] 7 [Initialize ] 6/4 [& Built-in use (ª indicates photos). Card] [Complete Initialization]: Toggle on or off z z z 33 6/4 - [Initialize ']* - z- - - 6/4 - [Delete Memory Save Folder]* -
Instruction Manual
Page 152
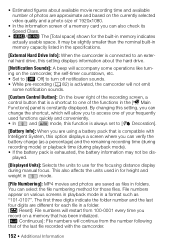
...check its Speed Class. • 6/4 The [Total space] shown for height and weight in mode. [File Numbering]: MP4 movies and photos are saved as "101-0107". You can select the file numbering method for the focusing distance display during playback mode). • If the battery pack is ...photos are approximate and based on the currently selected video quality and a photo size of 1920x1080. • In the information screen of a memory card you can verify the battery charge (as a percentage) and the remaining recording time (during recording mode) or playback time (during manual focus.
...check its Speed Class. • 6/4 The [Total space] shown for height and weight in mode. [File Numbering]: MP4 movies and photos are saved as "101-0107". You can select the file numbering method for the focusing distance display during playback mode). • If the battery pack is ...photos are approximate and based on the currently selected video quality and a photo size of 1920x1080. • In the information screen of a memory card you can verify the battery charge (as a percentage) and the remaining recording time (during recording mode) or playback time (during manual focus.


