Instruction Manual
Page 3
...the FCC Rules. Model ID0019 (including WLAN Module Model WM217, FCC ID: AZD217) This device complies with Canadian ICES-003. 3 Canon U.S.A., Inc. If such changes or modifications should be made, you could be co-located or operated in Supplement C to Part 15.... Operation is subject to stop operation of the FCC Rules. There is required to radio communications. FCC/IC NOTICE HD Camcorder, VIXIA HF R42 / VIXIA HF R40 / VIXIA HF R400 systems This device complies with class B limits in the microwave range while being used. These limits are associated with the...
...the FCC Rules. Model ID0019 (including WLAN Module Model WM217, FCC ID: AZD217) This device complies with Canadian ICES-003. 3 Canon U.S.A., Inc. If such changes or modifications should be made, you could be co-located or operated in Supplement C to Part 15.... Operation is subject to stop operation of the FCC Rules. There is required to radio communications. FCC/IC NOTICE HD Camcorder, VIXIA HF R42 / VIXIA HF R40 / VIXIA HF R400 systems This device complies with class B limits in the microwave range while being used. These limits are associated with the...

Instruction Manual
Page 4
... the apparatus, the apparatus has been exposed to qualified service personnel. IMPORTANT SAFETY INSTRUCTIONS In these safety instructions the word "apparatus" refers to the Canon HD Camcorder VIXIA HF R42 / VIXIA HF R40 / VIXIA HF R400 and all its accessories. 1 Read these instructions. 2 Keep these instructions. 3 Heed all warnings. 4 Follow all instructions. 5 Do not use attachments/accessories specified by...
... the apparatus, the apparatus has been exposed to qualified service personnel. IMPORTANT SAFETY INSTRUCTIONS In these safety instructions the word "apparatus" refers to the Canon HD Camcorder VIXIA HF R42 / VIXIA HF R40 / VIXIA HF R400 and all its accessories. 1 Read these instructions. 2 Keep these instructions. 3 Heed all warnings. 4 Follow all instructions. 5 Do not use attachments/accessories specified by...
Instruction Manual
Page 6
...Fi Certified, WPA, WPA2, and the Wi-Fi Certified logo are trademarks of the Wi-Fi Alliance. • WPS as used on the camcorder's settings, onscreen displays and in this manual signifies Wi-Fi Protected Setup. • The Wi-Fi Protected Setup Identifier Mark is a mark of... from Dolby Laboratories. and other use for a personal and non-commercial purpose or (2) by a video provider licensed under the AT&T patents to Canon camcorders compliant with high-definition video composed of 1,080 vertical pixels (scanning lines). • This product is a trademark or registered trademark of Cisco in...
...Fi Certified, WPA, WPA2, and the Wi-Fi Certified logo are trademarks of the Wi-Fi Alliance. • WPS as used on the camcorder's settings, onscreen displays and in this manual signifies Wi-Fi Protected Setup. • The Wi-Fi Protected Setup Identifier Mark is a mark of... from Dolby Laboratories. and other use for a personal and non-commercial purpose or (2) by a video provider licensed under the AT&T patents to Canon camcorders compliant with high-definition video composed of 1,080 vertical pixels (scanning lines). • This product is a trademark or registered trademark of Cisco in...
Instruction Manual
Page 7
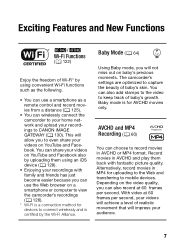
... play them using convenient Wi-Fi functions such as the following. • You can use the Web browser on a smartphone or computer to view the camcorder's recordings (A 126). * Wi-Fi is for devices to even share your videos on YouTube and Facebook also by uploading them back with family and friends... your home network and upload your recordings to keep track of baby's growth. You can also add stamps to the video to CANON iMAGE GATEWAY (A 130). Exciting Features and New Functions 6/4 Wi-Fi Functions (A 122) Enjoy the freedom of Wi-Fi* by using an iOS device (A 128). • ...
... play them using convenient Wi-Fi functions such as the following. • You can use the Web browser on a smartphone or computer to view the camcorder's recordings (A 126). * Wi-Fi is for devices to even share your videos on YouTube and Facebook also by uploading them back with family and friends... your home network and upload your recordings to keep track of baby's growth. You can also add stamps to the video to CANON iMAGE GATEWAY (A 130). Exciting Features and New Functions 6/4 Wi-Fi Functions (A 122) Enjoy the freedom of Wi-Fi* by using an iOS device (A 128). • ...

Instruction Manual
Page 8
...selects the best scene mode for the scene you want to your favorite background music. Image Stabilization Dynamic IS (A 75) compensates for camcorder shake when you zoom in on distant subjects (full telephoto). Powered IS (A 76) will produce stable shots when you shoot video .... Cinema-Look Filters (A 65) Use professional cinema-look filters to create unique movies with distinctive looks. Face Detection (A 76) The camcorder automatically detects people's faces and adjusts the focus and other settings accordingly for the recording situation. 8 You get spectacular recordings every time ...
...selects the best scene mode for the scene you want to your favorite background music. Image Stabilization Dynamic IS (A 75) compensates for camcorder shake when you zoom in on distant subjects (full telephoto). Powered IS (A 76) will produce stable shots when you shoot video .... Cinema-Look Filters (A 65) Use professional cinema-look filters to create unique movies with distinctive looks. Face Detection (A 76) The camcorder automatically detects people's faces and adjusts the focus and other settings accordingly for the recording situation. 8 You get spectacular recordings every time ...
Instruction Manual
Page 9
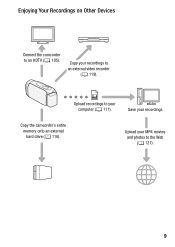
Save your MP4 movies and photos to the Web (A 121). 9 Upload your recordings. Copy the camcorder's entire memory onto an external hard drive (A 116). Upload recordings to your recordings to an HDTV (A 105). Copy your computer (A 111). Enjoying Your Recordings on Other Devices Connect the camcorder to an external video recorder (A 119).
Save your MP4 movies and photos to the Web (A 121). 9 Upload your recordings. Copy the camcorder's entire memory onto an external hard drive (A 116). Upload recordings to your recordings to an HDTV (A 105). Copy your computer (A 111). Enjoying Your Recordings on Other Devices Connect the camcorder to an external video recorder (A 119).

Instruction Manual
Page 10
... on an iPhone or iPad and play them back (A 128). After connecting the camcorder to remotely control the camcorder (A 125). Use the Web browser on your recordings on the camcorder (A 126). Connect the camcorder to an access point on your home network and then share your iOS or Android... smartphone or tablet to an iPhone, iPad or CANON iMAGE GATEWAY, you can upload your recordings. 6/4 Enjoying Your Recordings Using the Camcorder's Wi-Fi Functions ...
... on an iPhone or iPad and play them back (A 128). After connecting the camcorder to remotely control the camcorder (A 125). Use the Web browser on your recordings on the camcorder (A 126). Connect the camcorder to an access point on your home network and then share your iOS or Android... smartphone or tablet to an iPhone, iPad or CANON iMAGE GATEWAY, you can upload your recordings. 6/4 Enjoying Your Recordings Using the Camcorder's Wi-Fi Functions ...

Instruction Manual
Page 11
... Supplied Accessories and CD-ROM 19 Names of Parts „ Preparations 21 Getting Started 21 Charging the Battery Pack 23 Turning On the Camcorder 24 Using the Grip Belt 25 Opening the Lens Cover and Adjusting the LCD Screen 27 Using a Memory Card 27 Memory Cards Compatible for ...Use with the Camcorder 29 Inserting and Removing a Memory Card 31 First Time Settings 31 Basic Setup 33 Changing the Time Zone 33 Initializing the Memory 35 Basic ...
... Supplied Accessories and CD-ROM 19 Names of Parts „ Preparations 21 Getting Started 21 Charging the Battery Pack 23 Turning On the Camcorder 24 Using the Grip Belt 25 Opening the Lens Cover and Adjusting the LCD Screen 27 Using a Memory Card 27 Memory Cards Compatible for ...Use with the Camcorder 29 Inserting and Removing a Memory Card 31 First Time Settings 31 Basic Setup 33 Changing the Time Zone 33 Initializing the Memory 35 Basic ...
Instruction Manual
Page 13
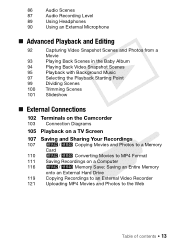
... Playback with Background Music 97 Selecting the Playback Starting Point 99 Dividing Scenes 100 Trimming Scenes 101 Slideshow „ External Connections 102 Terminals on the Camcorder 103 Connection Diagrams 105 Playback on a TV Screen 107 Saving and Sharing Your Recordings 107 6/4 Copying Movies and Photos to a Memory Card 110 6/4 Converting Movies...
... Playback with Background Music 97 Selecting the Playback Starting Point 99 Dividing Scenes 100 Trimming Scenes 101 Slideshow „ External Connections 102 Terminals on the Camcorder 103 Connection Diagrams 105 Playback on a TV Screen 107 Saving and Sharing Your Recordings 107 6/4 Copying Movies and Photos to a Memory Card 110 6/4 Converting Movies...

Instruction Manual
Page 14
... Browse: Viewing Recordings Using a Web Browser on Your iOS Device or Android Smartphone 128 Uploading Videos Using an iOS Device 130 Sharing Recordings with CANON iMAGE GATEWAY 136 Playback on a Computer 137 Wi-Fi Connection Using an Access Point 141 Viewing and Changing Wi-Fi Settings „ Additional Information...Displays 158 Trouble? 158 Troubleshooting 164 List of Messages 175 Do's and Don'ts 175 Handling Precautions 179 Maintenance/Others 180 Using the Camcorder Abroad 181 General Information 181 Accessories 182 Optional Accessories 186 Specifications 191 Index 14 Š Table of contents
... Browse: Viewing Recordings Using a Web Browser on Your iOS Device or Android Smartphone 128 Uploading Videos Using an iOS Device 130 Sharing Recordings with CANON iMAGE GATEWAY 136 Playback on a Computer 137 Wi-Fi Connection Using an Access Point 141 Viewing and Changing Wi-Fi Settings „ Additional Information...Displays 158 Trouble? 158 Troubleshooting 164 List of Messages 175 Do's and Don'ts 175 Handling Precautions 179 Maintenance/Others 180 Using the Camcorder Abroad 181 General Information 181 Accessories 182 Optional Accessories 186 Specifications 191 Index 14 Š Table of contents
Instruction Manual
Page 15
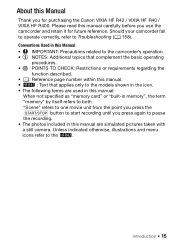
Please read this manual carefully before you use the camcorder and retain it for purchasing the Canon VIXIA HF R42 / VIXIA HF R40 / VIXIA HF R400. Conventions Used in this Manual • IMPORTANT: Precautions related to the camcorder's operation. • NOTES: Additional topics that complement the basic operating procedures. • POINTS TO CHECK: Restrictions or requirements regarding the function described. •...
Please read this manual carefully before you use the camcorder and retain it for purchasing the Canon VIXIA HF R42 / VIXIA HF R40 / VIXIA HF R400. Conventions Used in this Manual • IMPORTANT: Precautions related to the camcorder's operation. • NOTES: Additional topics that complement the basic operating procedures. • POINTS TO CHECK: Restrictions or requirements regarding the function described. •...

Instruction Manual
Page 16
... appendix Menu Options Lists (A 144). 16 Š Introduction Movies: In record pause mode, press Y. Photos: In record pause mode, touch [PHOTO]. • The camcorder will record the photo after a 10-second countdown. The names of all available menu options and settings, refer to abbreviate menu selections. For a detailed explanation... operating mode indicated and indicates that the function is used to refer to control buttons and menu options you will touch on the camcorder are divided into the following three groups. The operating modes are indicated within a "button" frame.
... appendix Menu Options Lists (A 144). 16 Š Introduction Movies: In record pause mode, press Y. Photos: In record pause mode, touch [PHOTO]. • The camcorder will record the photo after a 10-second countdown. The names of all available menu options and settings, refer to abbreviate menu selections. For a detailed explanation... operating mode indicated and indicates that the function is used to refer to control buttons and menu options you will touch on the camcorder are divided into the following three groups. The operating modes are indicated within a "button" frame.

Instruction Manual
Page 17
... guide explains how to download PIXELA's Transfer Utility LE software, which allows you to save your AVCHD movies and transfer music data from the supplied Canon VIXIA CD-ROM (see below) * CA-110E including power cord, in Asia. ** 6/4 only. NOTES • The camcorder may make a rattling sound if it is shaken (A 161).
... guide explains how to download PIXELA's Transfer Utility LE software, which allows you to save your AVCHD movies and transfer music data from the supplied Canon VIXIA CD-ROM (see below) * CA-110E including power cord, in Asia. ** 6/4 only. NOTES • The camcorder may make a rattling sound if it is shaken (A 161).

Instruction Manual
Page 18
...- The disc cannot be used with PIXELA's software. The CD-ROM contains an automatic installer for full installation of the camcorder (this PDF file). - The Canon VIXIA CD-ROM is required for the software ImageBrowser EX, which allows you to save and manage MP4 movies and photos and ...upload CANON iMAGE GATEWAY*, YouTube and Facebook. ImageBrowser EX - This service may not be used as background music during playback. The...
...- The disc cannot be used with PIXELA's software. The CD-ROM contains an automatic installer for full installation of the camcorder (this PDF file). - The Canon VIXIA CD-ROM is required for the software ImageBrowser EX, which allows you to save and manage MP4 movies and photos and ...upload CANON iMAGE GATEWAY*, YouTube and Facebook. ImageBrowser EX - This service may not be used as background music during playback. The...

Instruction Manual
Page 21
... and recording/playback times with a battery pack or directly using the touch panel, navigating the menus, and first time settings to the camcorder. Press the battery pack softly into a power outlet. For Asia only: Connect the power cord to the compact power adapter before plugging ...cord into the power outlet. 2 Connect the compact power adapter to the camcorder's DC IN terminal. 3 Attach the battery pack to help you learn more about your camcorder. Getting Started Charging the Battery Pack The camcorder can be powered with a fully charged battery pack, refer to Charging, ...
... and recording/playback times with a battery pack or directly using the touch panel, navigating the menus, and first time settings to the camcorder. Press the battery pack softly into a power outlet. For Asia only: Connect the power cord to the compact power adapter before plugging ...cord into the power outlet. 2 Connect the compact power adapter to the camcorder's DC IN terminal. 3 Attach the battery pack to help you learn more about your camcorder. Getting Started Charging the Battery Pack The camcorder can be powered with a fully charged battery pack, refer to Charging, ...

Instruction Manual
Page 22
...; the battery pack is fully charged. • If the indicator flashes, refer to Troubleshooting (A 161). The red POWER/ CHG indicator will start when the camcorder is turned off the camcorder. Be sure to wait until the green POWER/CHG indicator goes out. • Do not connect to the... camcorder's DC IN terminal or to voltage converters for use with this camcorder. • To prevent equipment breakdowns and excessive heating, do not connect the supplied compact power adapter to the compact power ...
...; the battery pack is fully charged. • If the indicator flashes, refer to Troubleshooting (A 161). The red POWER/ CHG indicator will start when the camcorder is turned off the camcorder. Be sure to wait until the green POWER/CHG indicator goes out. • Do not connect to the... camcorder's DC IN terminal or to voltage converters for use with this camcorder. • To prevent equipment breakdowns and excessive heating, do not connect the supplied compact power adapter to the compact power ...
Instruction Manual
Page 23
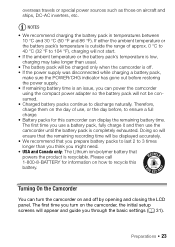
...or the day before restoring the power supply. • If remaining battery time is an issue, you through the basic settings (A 31). Turning On the Camcorder You can display the remaining battery time. NOTES • We recommend charging the battery pack in temperatures between 10 °C and 30 °C (50 ...°F and 86 °F). The first time you turn the camcorder on the day of approx. 0 °C to 40 °C (32 °F to 104 °F), charging will not start. • If the ambient ...
...or the day before restoring the power supply. • If remaining battery time is an issue, you through the basic settings (A 31). Turning On the Camcorder You can display the remaining battery time. NOTES • We recommend charging the battery pack in temperatures between 10 °C and 30 °C (50 ...°F and 86 °F). The first time you turn the camcorder on the day of approx. 0 °C to 40 °C (32 °F to 104 °F), charging will not start. • If the ambient ...
Instruction Manual
Page 24
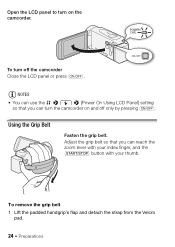
Adjust the grip belt so that you can turn the camcorder on the camcorder. Open the LCD panel to turn off only by pressing . To remove the grip belt 1 Lift the padded handgrip's flap and detach the strap from the Velcro pad. 24 Š Preparations Using the Grip Belt Fasten the grip belt. To turn on and off the camcorder Close the LCD panel or press . [ NOTES • You can use the > q > [Power On Using LCD Panel] setting so that you can reach the zoom lever with your index finger, and the Y button with your thumb.
Adjust the grip belt so that you can turn the camcorder on the camcorder. Open the LCD panel to turn off only by pressing . To remove the grip belt 1 Lift the padded handgrip's flap and detach the strap from the Velcro pad. 24 Š Preparations Using the Grip Belt Fasten the grip belt. To turn on and off the camcorder Close the LCD panel or press . [ NOTES • You can use the > q > [Power On Using LCD Panel] setting so that you can reach the zoom lever with your index finger, and the Y button with your thumb.
Instruction Manual
Page 25
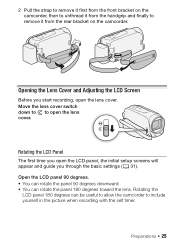
... the lens. Open the LCD panel 90 degrees. • You can rotate the panel 90 degrees downward. • You can be useful to allow the camcorder to open the lens cover. Opening the Lens Cover and Adjusting the LCD Screen Before you through the basic settings (A 31). Move the lens cover... to include yourself in the picture when recording with the self timer. 2 Pull the strap to remove it first from the front bracket on the camcorder, then to unthread it from the handgrip and finally to remove it from the rear bracket on the...
... the lens. Open the LCD panel 90 degrees. • You can rotate the panel 90 degrees downward. • You can be useful to allow the camcorder to open the lens cover. Opening the Lens Cover and Adjusting the LCD Screen Before you through the basic settings (A 31). Move the lens cover... to include yourself in the picture when recording with the self timer. 2 Pull the strap to remove it first from the front bracket on the camcorder, then to unthread it from the handgrip and finally to remove it from the rear bracket on the...

Instruction Manual
Page 27
... Card Memory Cards Compatible for the Speed Class logo on the package. When you buy a new memory card, look for Use with the Camcorder You can use the following types of 60P or 35 Mbps, we recommend using an SD memory card without a speed class rating, you record... movies with this camcorder. NOTES • About the Speed Class: Speed Class is compatible with this camcorder. For more information on the memory card used , visit your local Canon Web site. For the latest information on cards that the external device ...
... Card Memory Cards Compatible for the Speed Class logo on the package. When you buy a new memory card, look for Use with the Camcorder You can use the following types of 60P or 35 Mbps, we recommend using an SD memory card without a speed class rating, you record... movies with this camcorder. NOTES • About the Speed Class: Speed Class is compatible with this camcorder. For more information on the memory card used , visit your local Canon Web site. For the latest information on cards that the external device ...


