Instruction Manual
Page 3
...prong. Servicing is in the literature accompanying the product. 3 IMPORTANT SAFETY INSTRUCTIONS In these safety instructions the word "product" refers to the Canon HD Camcorder VIXIA HF G30 and all its accessories. 1 Read these instructions. 2 Keep these instructions. 3 Heed all warnings. 4 Follow all servicing to death.... or objects have been swallowed or placed inside any way, such as radiators, heat registers, stoves, or other . The lightning flash with one wider than the other apparatus (including amplifiers) that may be used batteries away from children. Keep new and used ,...
...prong. Servicing is in the literature accompanying the product. 3 IMPORTANT SAFETY INSTRUCTIONS In these safety instructions the word "product" refers to the Canon HD Camcorder VIXIA HF G30 and all its accessories. 1 Read these instructions. 2 Keep these instructions. 3 Heed all warnings. 4 Follow all servicing to death.... or objects have been swallowed or placed inside any way, such as radiators, heat registers, stoves, or other . The lightning flash with one wider than the other apparatus (including amplifiers) that may be used batteries away from children. Keep new and used ,...
Instruction Manual
Page 22
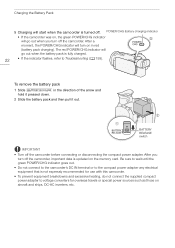
... connect to the camcorder's DC IN terminal or to the compact power adapter any electrical equipment that is fully charged. 22 • If the indicator flashes, refer to voltage converters for use with this camcorder. • To prevent equipment breakdowns and excessive heating, do not connect the supplied compact power adapter...
... connect to the camcorder's DC IN terminal or to the compact power adapter any electrical equipment that is fully charged. 22 • If the indicator flashes, refer to voltage converters for use with this camcorder. • To prevent equipment breakdowns and excessive heating, do not connect the supplied compact power adapter...
Instruction Manual
Page 36
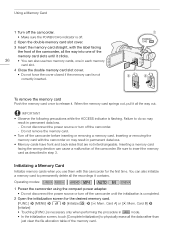
... • You can also use them with the camcorder on may result in step 3. IMPORTANT • Observe the following precautions while the ACCESS indicator is flashing. Operating modes: 1 Power the camcorder using the compact power adapter. • Do not disconnect the power source or turn off the camcorder. - Card B] > [Initialize] •...
... • You can also use them with the camcorder on may result in step 3. IMPORTANT • Observe the following precautions while the ACCESS indicator is flashing. Operating modes: 1 Power the camcorder using the compact power adapter. • Do not disconnect the power source or turn off the camcorder. - Card B] > [Initialize] •...
Instruction Manual
Page 39
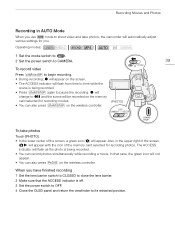
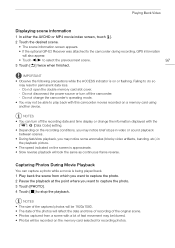
...switch to CAMERA. 39 To record video Press Y to begin recording. • During recording, Ü will appear on the screen. • The ACCESS indicator will flash from time to time while the scene is being recorded. • You can record photos simultaneously while recording a movie. The ACCESS indicator will... flash as the photo is off. 3 Set the power switch to OFF. 4 Close the OLED panel and return the viewfinder to shoot video and take ...
...switch to CAMERA. 39 To record video Press Y to begin recording. • During recording, Ü will appear on the screen. • The ACCESS indicator will flash from time to time while the scene is being recorded. • You can record photos simultaneously while recording a movie. The ACCESS indicator will... flash as the photo is off. 3 Set the power switch to OFF. 4 Close the OLED panel and return the viewfinder to shoot video and take ...
Instruction Manual
Page 41
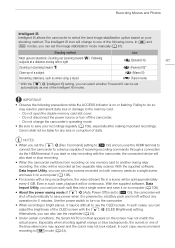
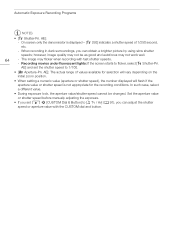
...scene will be difficult to [i On], the camcorder will also start or stop recording. • When the camcorder switches form recording on or flashing. Shooting method Icon Most general situations; The Intelligent IS icon will be liable for 5 minutes. Zooming out (zooming toward S) È (...Powered IS)* Close-up of the Intelligent IS modes. Canon shall not be continuous. In and modes, you can adjust the brightness of receiving recording commands through a connection via the HDMI terminal, ...
...scene will be difficult to [i On], the camcorder will also start or stop recording. • When the camcorder switches form recording on or flashing. Shooting method Icon Most general situations; The Intelligent IS icon will be liable for 5 minutes. Zooming out (zooming toward S) È (...Powered IS)* Close-up of the Intelligent IS modes. Canon shall not be continuous. In and modes, you can adjust the brightness of receiving recording commands through a connection via the HDMI terminal, ...
Instruction Manual
Page 43
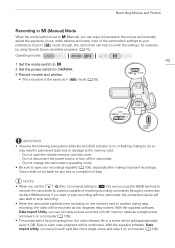
...relay recording, the video will be recorded as two separate relay scenes. Do not disconnect the power source or turn off the camcorder. - Canon shall not be liable for example, by using Special Scene recording programs (A 70). With the supplied software, Data Import Utility, you start or... • For scenes with the camcorder, the connected device will also start or stop recording. • When the camcorder switches form recording on or flashing. Operating modes: 43 1 Set the mode switch to n. 2 Set the power switch to the menus and manually adjust the exposure, focus, white ...
...relay recording, the video will be recorded as two separate relay scenes. Do not disconnect the power source or turn off the camcorder. - Canon shall not be liable for example, by using Special Scene recording programs (A 70). With the supplied software, Data Import Utility, you start or... • For scenes with the camcorder, the connected device will also start or stop recording. • When the camcorder switches form recording on or flashing. Operating modes: 43 1 Set the mode switch to n. 2 Set the power switch to the menus and manually adjust the exposure, focus, white ...
Instruction Manual
Page 52
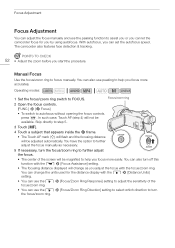
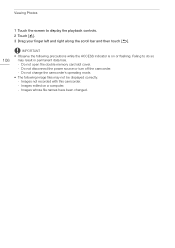
... distance display with the focus/zoom ring. Skip directly to step 5. 3 Touch [D]. 4 Touch a subject that appears inside the < frame. • The Touch AF mark (I) will flash and the focusing distance will change the units used for you focus more accurately. In such case, Touch AF (step 4) will be magnified to help...
... distance display with the focus/zoom ring. Skip directly to step 5. 3 Touch [D]. 4 Touch a subject that appears inside the < frame. • The Touch AF mark (I) will flash and the focusing distance will change the units used for you focus more accurately. In such case, Touch AF (step 4) will be magnified to help...
Instruction Manual
Page 64
... values available for selection will vary depending on the initial zoom position. • When setting a numeric value (aperture or shutter speed), the number displayed will flash if the aperture value or shutter speed is not appropriate for the recording conditions. When recording in dark surroundings, you set the shutter speed to...
... values available for selection will vary depending on the initial zoom position. • When setting a numeric value (aperture or shutter speed), the number displayed will flash if the aperture value or shutter speed is not appropriate for the recording conditions. When recording in dark surroundings, you set the shutter speed to...
Instruction Manual
Page 66
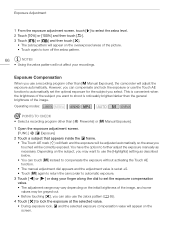
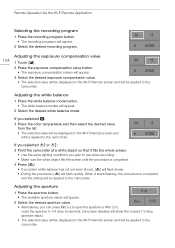
... [Š Fireworks] or [n Manual Exposure]. 1 Open the exposure adjustment screen. [FUNC.] > [y Exposure] 2 Touch a subject that appears inside the y frame. • The Touch AE mark (I) will flash and the exposure will be correctly exposed. Operating modes: POINTS TO CHECK • Select a recording program other than the general brightness of the image. You...
... [Š Fireworks] or [n Manual Exposure]. 1 Open the exposure adjustment screen. [FUNC.] > [y Exposure] 2 Touch a subject that appears inside the y frame. • The Touch AE mark (I) will flash and the exposure will be correctly exposed. Operating modes: POINTS TO CHECK • Select a recording program other than the general brightness of the image. You...
Instruction Manual
Page 68
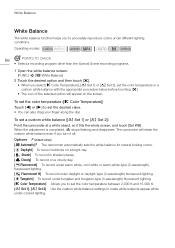
... set a custom white balance ([Æ Set 1] or [Ç Set 2]) Point the camcorder at a white object, so it off. When the adjustment is completed, Å stops flashing and disappears. The camcorder will appear on a cloudy day. [¿Fluorescent] To record under warm white, cool white or warm-white-type (3-wavelength) fluorescent lighting...
... set a custom white balance ([Æ Set 1] or [Ç Set 2]) Point the camcorder at a white object, so it off. When the adjustment is completed, Å stops flashing and disappears. The camcorder will appear on a cloudy day. [¿Fluorescent] To record under warm white, cool white or warm-white-type (3-wavelength) fluorescent lighting...

Instruction Manual
Page 69
... change locations or the lighting or other conditions change. - The result will still be obtained with [Ã Automatic]. • Using a custom white balance may keep flashing. Depending on the type of fluorescent lights and LED lights • Depending on the light source, Å may provide better results in a single color (sky...
... change locations or the lighting or other conditions change. - The result will still be obtained with [Ã Automatic]. • Using a custom white balance may keep flashing. Depending on the type of fluorescent lights and LED lights • Depending on the light source, Å may provide better results in a single color (sky...
Instruction Manual
Page 77
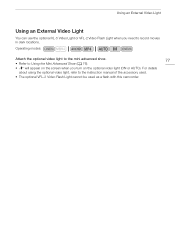
... when you turn on the screen when you need to the instruction manual of the accessory used. • The optional VFL-2 Video Flash Light cannot be used as a flash with this camcorder. For details about using the optional video light, refer to record movies in dark locations. Operating modes: Attach the optional...
... when you turn on the screen when you need to the instruction manual of the accessory used. • The optional VFL-2 Video Flash Light cannot be used as a flash with this camcorder. For details about using the optional video light, refer to record movies in dark locations. Operating modes: Attach the optional...
Instruction Manual
Page 97
... be recorded on the memory card selected for recording photos. Do not change the information displayed with the s > [Data Code] setting. • Depending on or flashing.
... be recorded on the memory card selected for recording photos. Do not change the information displayed with the s > [Data Code] setting. • Depending on or flashing.
Instruction Manual
Page 99
...; To delete all movies and make all recordable space available again you may prefer to delete. [All Scenes] Delete all the scenes recorded on or flashing (while scenes are being deleted). - Once deleted, scenes cannot be recovered. • Save copies of important scenes before deleting them (A 108). • Observe the following...
...; To delete all movies and make all recordable space available again you may prefer to delete. [All Scenes] Delete all the scenes recorded on or flashing (while scenes are being deleted). - Once deleted, scenes cannot be recovered. • Save copies of important scenes before deleting them (A 108). • Observe the following...
Instruction Manual
Page 106
...; The following precautions while the ACCESS indicator is on a computer. - Do not disconnect the power source or turn off the camcorder. - Images edited on or flashing. Images not recorded with this camcorder. - Images whose file names have been changed. Do not open the double memory card slot cover. -
...; The following precautions while the ACCESS indicator is on a computer. - Do not disconnect the power source or turn off the camcorder. - Images edited on or flashing. Images not recorded with this camcorder. - Images whose file names have been changed. Do not open the double memory card slot cover. -
Instruction Manual
Page 111
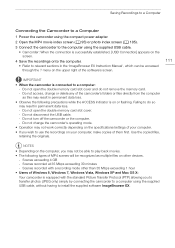
... established, [USB Connection] appears on the screen. 4 Save the recordings onto the computer. • Refer to do not remove the memory card. - menu on or flashing. Scenes recorded at 35 Mbps exceeding 30 minutes - Failing to relevant sections in permanent data loss. -
... established, [USB Connection] appears on the screen. 4 Save the recordings onto the computer. • Refer to do not remove the memory card. - menu on or flashing. Scenes recorded at 35 Mbps exceeding 30 minutes - Failing to relevant sections in permanent data loss. -

Instruction Manual
Page 113
... you select [Select], perform the following procedure to select the individual photos you want to prevent writing. - The folder name (A 96) will appear on or flashing.
... you select [Select], perform the following procedure to select the individual photos you want to prevent writing. - The folder name (A 96) will appear on or flashing.
Instruction Manual
Page 124
...; Alternatively, you selected Æ or Ç: 3 Point the camcorder at a white object so that it stops flashing, the procedure is completed. 4 Press [Å]. • If a custom white balance has not yet been stored, [Å] will flash slowly. • During the procedure, [Å] will be applied to the camcorder. Remote Operation Via the... will be applied to use when recording. • Make sure the white object fills the screen until the procedure is completed and the setting will flash quickly. If you plan to the camcorder.
...; Alternatively, you selected Æ or Ç: 3 Point the camcorder at a white object so that it stops flashing, the procedure is completed. 4 Press [Å]. • If a custom white balance has not yet been stored, [Å] will flash slowly. • During the procedure, [Å] will be applied to the camcorder. Remote Operation Via the... will be applied to use when recording. • Make sure the white object fills the screen until the procedure is completed and the setting will flash quickly. If you plan to the camcorder.
Instruction Manual
Page 158
...camcorder. Changing the operating mode between pressing Y and the actual start recording. - Cannot divide scenes - Autofocus does not work on or flashing). This is dirty. You cannot divide scenes recorded or edited using the camcorder for a long time, it already contains 3,999 scenes (... card (while the ACCESS indicator is full or it becomes hot. - This is full. The memory card is not a malfunction. Consult a Canon Service Center. Save your recordings (A 108) and initialize the memory card (A 36). After using another device and then transferred to a memory card...
...camcorder. Changing the operating mode between pressing Y and the actual start recording. - Cannot divide scenes - Autofocus does not work on or flashing). This is dirty. You cannot divide scenes recorded or edited using the camcorder for a long time, it already contains 3,999 scenes (... card (while the ACCESS indicator is full or it becomes hot. - This is full. The memory card is not a malfunction. Consult a Canon Service Center. Save your recordings (A 108) and initialize the memory card (A 36). After using another device and then transferred to a memory card...
Instruction Manual
Page 159
A memory card error occurred. Remove and reinsert the memory card. The red POWER/CHG indicator flashes rapidly (one flash at 0.5-second intervals). - Remove the battery pack, warm it or let it cool down, as necessary, and try charging it correctly. Use a different battery... in red. - Select the [All Scenes] or [All Photos] option instead of the battery pack is exhausted. The temperature of [Select]. Consult a Canon Service Center. 159 Picture and Sound The screen appears too dark. - Abnormal characters appear on the screen. - You cannot select more than 100 scenes/photos...
A memory card error occurred. Remove and reinsert the memory card. The red POWER/CHG indicator flashes rapidly (one flash at 0.5-second intervals). - Remove the battery pack, warm it or let it cool down, as necessary, and try charging it correctly. Use a different battery... in red. - Select the [All Scenes] or [All Photos] option instead of the battery pack is exhausted. The temperature of [Select]. Consult a Canon Service Center. 159 Picture and Sound The screen appears too dark. - Abnormal characters appear on the screen. - You cannot select more than 100 scenes/photos...


