
Instruction Manual
Page 8
... the Date and Time 33 Changing the Language 34 Changing the Time Zone 34 Using a Memory Card 35 Memory Cards Compatible for Use with the Camcorder 35 Inserting and Removing a Memory Card 35 Initializing a Memory Card 36 Selecting the Movie Format (AVCHD/ MP4) 37 Selecting the Memory Card for ...Recordings 37 3 Recording 38 Recording Movies and Photos 38 Preparing to Record 38 Recording in AUTO Mode 39 Recording in n (Manual) Mode 43 Reviewing the Latest Scene Recorded 44 Selecting the Recording Mode (Video Quality) 45 Dual Recording and Relay Recording 47 Selecting the Frame Rate 48 Slow & ...
... the Date and Time 33 Changing the Language 34 Changing the Time Zone 34 Using a Memory Card 35 Memory Cards Compatible for Use with the Camcorder 35 Inserting and Removing a Memory Card 35 Initializing a Memory Card 36 Selecting the Movie Format (AVCHD/ MP4) 37 Selecting the Memory Card for ...Recordings 37 3 Recording 38 Recording Movies and Photos 38 Preparing to Record 38 Recording in AUTO Mode 39 Recording in n (Manual) Mode 43 Reviewing the Latest Scene Recorded 44 Selecting the Recording Mode (Video Quality) 45 Dual Recording and Relay Recording 47 Selecting the Frame Rate 48 Slow & ...
Instruction Manual
Page 44
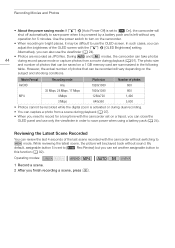
...Scene Recorded You can also use the OLED screen. By default, assignable button 5 is set to [ Rec Review] but you can review the last 4 seconds of the OLED screen with the camcorder without sound. Operating modes: 1 Record a scene. 2 After you can take photos 44 during record pause mode...8226; About the power saving mode: If q > [Auto Power Off] is set to [i On], the camcorder will shut off automatically to save power when using a battery pack (A 24). While reviewing the latest scene, the picture will be difficult to use the viewfinder (A 24). • Photos are summarized...
...Scene Recorded You can also use the OLED screen. By default, assignable button 5 is set to [ Rec Review] but you can review the last 4 seconds of the OLED screen with the camcorder without sound. Operating modes: 1 Record a scene. 2 After you can take photos 44 during record pause mode...8226; About the power saving mode: If q > [Auto Power Off] is set to [i On], the camcorder will shut off automatically to save power when using a battery pack (A 24). While reviewing the latest scene, the picture will be difficult to use the viewfinder (A 24). • Photos are summarized...
Instruction Manual
Page 92
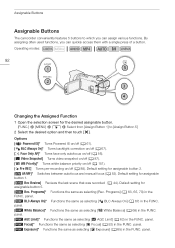
... AGC Limit]* Functions the same as selecting [Rec. Operating modes: 92 Changing the Assigned Function 1 Open the selection screen for assignable button 1. [ Rec Review] Reviews the last scene that was recorded (A 44). Programs]* Functions the same as selecting [x AGC Limit] (A 62) in the FUNC. panel. Default setting ... FUNC. panel. [ BLC Always On]* Functions the same as selecting [< Focus] (A 52) in the FUNC. Assignable Buttons Assignable Buttons The camcorder conveniently features 5 buttons to [Assign Button 5] 2 Select the desired option and then touch [X].
... AGC Limit]* Functions the same as selecting [Rec. Operating modes: 92 Changing the Assigned Function 1 Open the selection screen for assignable button 1. [ Rec Review] Reviews the last scene that was recorded (A 44). Programs]* Functions the same as selecting [x AGC Limit] (A 62) in the FUNC. panel. Default setting ... FUNC. panel. [ BLC Always On]* Functions the same as selecting [< Focus] (A 52) in the FUNC. Assignable Buttons Assignable Buttons The camcorder conveniently features 5 buttons to [Assign Button 5] 2 Select the desired option and then touch [X].

Instruction Manual
Page 150
... carefully monitor picture quality when recording, keep this setting set to on, the camcorder's screen will automatically become dimmer if the camcorder is attached to the camcorder. [OLED Brightness]: Sets the OLED screen to make the screen brighter when recording... as follows. [Assign Button 1]: [ AF/MF], [Assign Button 2]: [z PRE REC], [Assign Button 3]: [j Off], [Assign Button 4]: [j Off], [Assign Button 5]: [ Rec Review]. ** Option available only when the optional GP-E2 GPS Receiver is left without any control on , the illumination sensor will detect the surrounding brightness and...
... carefully monitor picture quality when recording, keep this setting set to on, the camcorder's screen will automatically become dimmer if the camcorder is attached to the camcorder. [OLED Brightness]: Sets the OLED screen to make the screen brighter when recording... as follows. [Assign Button 1]: [ AF/MF], [Assign Button 2]: [z PRE REC], [Assign Button 3]: [j Off], [Assign Button 4]: [j Off], [Assign Button 5]: [ Rec Review]. ** Option available only when the optional GP-E2 GPS Receiver is left without any control on , the illumination sensor will detect the surrounding brightness and...
Instruction Manual
Page 186
... 39, 43 Recording mode 45 Recording programs 63, 65, 70 Recording time 46 Relay recording 47 Remote Browse 126 Remote sensor 27 Resetting all camcorder settings 152 Reviewing recordings 44 S Saving recordings Using a computer 108 Using external video recorders 115 Selecting the memory card for recording 37 Setup menus 32, 144 Shutter...
... 39, 43 Recording mode 45 Recording programs 63, 65, 70 Recording time 46 Relay recording 47 Remote Browse 126 Remote sensor 27 Resetting all camcorder settings 152 Reviewing recordings 44 S Saving recordings Using a computer 108 Using external video recorders 115 Selecting the memory card for recording 37 Setup menus 32, 144 Shutter...


