Realis_E.pdf
Page 2
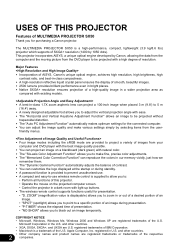
...displayable) allows you to zoom in a dark room with light-up buttons. Š The wireless remote control supports functions useful for purchasing a Canon projector. Microsoft Corporation in U.S. ZOOM" (magnification value is supplied to allow you to adjust the vertical...U.S. The MULTIMEDIA PROJECTOR SX50 is a trademark of the U.S. friendly menus. Š Four image modes including the sRGB mode are U.S. registered trademarks of IBM Corporation. • Macintosh is a high-performance, compact, lightweight (3.9 kg/8.6 lbs) projector which supports of SXGA+ resolution (1400...
...displayable) allows you to zoom in a dark room with light-up buttons. Š The wireless remote control supports functions useful for purchasing a Canon projector. Microsoft Corporation in U.S. ZOOM" (magnification value is supplied to allow you to adjust the vertical...U.S. The MULTIMEDIA PROJECTOR SX50 is a trademark of the U.S. friendly menus. Š Four image modes including the sRGB mode are U.S. registered trademarks of IBM Corporation. • Macintosh is a high-performance, compact, lightweight (3.9 kg/8.6 lbs) projector which supports of SXGA+ resolution (1400...
Realis_E.pdf
Page 4
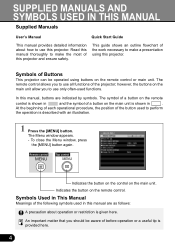
... beginning of each operational procedure, the position of the button used to use all functions of a button on the remote control is shown in and the symbol of the projector; The symbol of a button on the main unit is given here. To close the Menu window, press the ...MENU] button. This guide shows an outline flowchart of the following symbols used functions. In this projector and ensure safety. Remote control Top control Indicates the button on the control on the remote control. SUPPLIED MANUALS AND SYMBOLS USED IN THIS MANUAL Supplied Manuals User's Manual Quick Start Guide ...
... beginning of each operational procedure, the position of the button used to use all functions of a button on the remote control is shown in and the symbol of the projector; The symbol of a button on the main unit is given here. To close the Menu window, press the ...MENU] button. This guide shows an outline flowchart of the following symbols used functions. In this projector and ensure safety. Remote control Top control Indicates the button on the control on the remote control. SUPPLIED MANUALS AND SYMBOLS USED IN THIS MANUAL Supplied Manuals User's Manual Quick Start Guide ...
Realis_E.pdf
Page 5
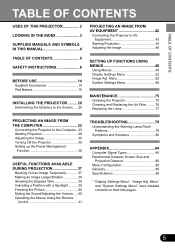
...a Position with a Spotlight ..........39 Freezing the Picture 40 Muting the Sound/Adjusting the Volume .....40 Operating the Mouse Using the Remote Control 41 TROUBLESHOOTING 79 Understanding the Warning Lamp Flash Patterns 79 Symptoms and Solutions 80 APPENDIX 84 Computer Signal Types 84 Relationship between..."System Settings Menu" have detailed contents on their title pages. 5 Menu 62 System Settings Menu 69 MAINTENANCE 75 Cleaning the Projector 75 Cleaning and Replacing the Air Filter .........76 Replacing the Lamp 77 PROJECTING AN IMAGE FROM THE COMPUTER 23 Connecting the...
...a Position with a Spotlight ..........39 Freezing the Picture 40 Muting the Sound/Adjusting the Volume .....40 Operating the Mouse Using the Remote Control 41 TROUBLESHOOTING 79 Understanding the Warning Lamp Flash Patterns 79 Symptoms and Solutions 80 APPENDIX 84 Computer Signal Types 84 Relationship between..."System Settings Menu" have detailed contents on their title pages. 5 Menu 62 System Settings Menu 69 MAINTENANCE 75 Cleaning the Projector 75 Cleaning and Replacing the Air Filter .........76 Replacing the Lamp 77 PROJECTING AN IMAGE FROM THE COMPUTER 23 Connecting the...
Realis_E.pdf
Page 14
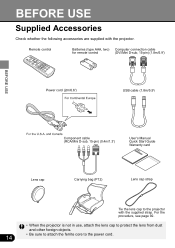
... (type AAA, two) Computer connection cable for remote control (DVI/Mini D-sub, 15-pin) (1.8m/5.9') Power cord (2m/6.6') USB cable (1.8m/5.9') BEFORE USE Component cable (RCA/Mini D-sub, 15-pin) (0.4m/1.3') User's Manual ... cap Carrying bag (P12) Lens cap strap Tie the lens cap to the power cord. 14 For the procedure, see page 92. • When the projector is not in use, attach the lens cap to protect the lens from dust and other foreign objects. • Be sure to attach the ferrite...
... (type AAA, two) Computer connection cable for remote control (DVI/Mini D-sub, 15-pin) (1.8m/5.9') Power cord (2m/6.6') USB cable (1.8m/5.9') BEFORE USE Component cable (RCA/Mini D-sub, 15-pin) (0.4m/1.3') User's Manual ... cap Carrying bag (P12) Lens cap strap Tie the lens cap to the power cord. 14 For the procedure, see page 92. • When the projector is not in use, attach the lens cap to protect the lens from dust and other foreign objects. • Be sure to attach the ferrite...
Realis_E.pdf
Page 15
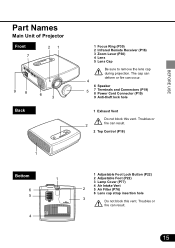
...) 8 Power Cord Connector (P19) 9 Anti-theft lock hole 1 Exhaust Vent Do not block this vent. BEFORE USE Part Names Main Unit of Projector Front 7 21 9 8 Back 6 3 1 Focus Ring (P30) 2 Infrared Remote Receiver (P16) 3 Zoom Lever (P30) 4 Lens 5 Lens Cap Be sure to remove the lens cap during projection. Troubles or fire can...
...) 8 Power Cord Connector (P19) 9 Anti-theft lock hole 1 Exhaust Vent Do not block this vent. BEFORE USE Part Names Main Unit of Projector Front 7 21 9 8 Back 6 3 1 Focus Ring (P30) 2 Infrared Remote Receiver (P16) 3 Zoom Lever (P30) 4 Lens 5 Lens Cap Be sure to remove the lens cap during projection. Troubles or fire can...
Realis_E.pdf
Page 16
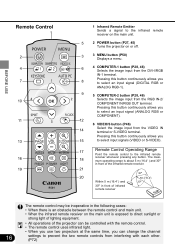
... signal (DIGITAL RGB or ANALOG RGB-1). 9 5 COMPUTER-2 button (P28, 46) Selects the image input from interfering with the remote control. • The remote control uses infrared light. • When you use two projectors at the same time, you can be controlled with each other. (P72) BEFORE USE... Remote Control 1 2 4 7 10 11 13 16 19 1 Infrared Remote Emitter Sends a signal to the infrared remote receiver on the main unit. 5 2 POWER button (P27, 45) Turns the projector on the main unit is exposed to direct sunlight or strong ...
... signal (DIGITAL RGB or ANALOG RGB-1). 9 5 COMPUTER-2 button (P28, 46) Selects the image input from interfering with the remote control. • The remote control uses infrared light. • When you use two projectors at the same time, you can be controlled with each other. (P72) BEFORE USE... Remote Control 1 2 4 7 10 11 13 16 19 1 Infrared Remote Emitter Sends a signal to the infrared remote receiver on the main unit. 5 2 POWER button (P27, 45) Turns the projector on the main unit is exposed to direct sunlight or strong ...
Realis_E.pdf
Page 17
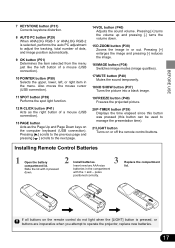
...Freezes the projected picture. 20 P-TIMER button (P39) Displays the time elapsed since this button was pressed (this button can be used to operate the projector, replace new batteries. 17 Replace the compartment lid. Pressing [ ] scrolls to the previous page and pressing [ ] scrolls to adjust the tracking,... like the left button of a mouse (USB connection). 13 PAGE button Acts as the Page Up and Page Down keys on or off the remote control buttons. poles positioned correctly. BEFORE USE 7 KEYSTONE button (P31) Corrects keystone distortion. 8 AUTO PC button (P29) When ANALOG RGB-1 or...
...Freezes the projected picture. 20 P-TIMER button (P39) Displays the time elapsed since this button was pressed (this button can be used to operate the projector, replace new batteries. 17 Replace the compartment lid. Pressing [ ] scrolls to the previous page and pressing [ ] scrolls to adjust the tracking,... like the left button of a mouse (USB connection). 13 PAGE button Acts as the Page Up and Page Down keys on or off the remote control buttons. poles positioned correctly. BEFORE USE 7 KEYSTONE button (P31) Corrects keystone distortion. 8 AUTO PC button (P29) When ANALOG RGB-1 or...

Realis_E.pdf
Page 19
... computer. 3 DVI-I/RGB IN-1 terminal (P23, 42) Receives a digital or analog RGB signal from 7 AUDIO IN terminal (P24, 43) the computer (DVI terminal). when the remote control is not used normally). 2 VIDEO IN terminal (P42) 6 USB terminal (P41) Receives a composite video signal from AV Exclusively used by selecting an option from...
... computer. 3 DVI-I/RGB IN-1 terminal (P23, 42) Receives a digital or analog RGB signal from 7 AUDIO IN terminal (P24, 43) the computer (DVI terminal). when the remote control is not used normally). 2 VIDEO IN terminal (P42) 6 USB terminal (P41) Receives a composite video signal from AV Exclusively used by selecting an option from...

Realis_E.pdf
Page 23
... connection cable (for DVI/mini D-sub 15-pin) Computer connection cable (for DVI)* Computer connection cable (for monitor output, use the remote control just like the computer mouse. Set the slide switches (1-6) on the adapter depending on the market. Connecting to Video Terminals •...; Before connecting cables, turn off both the projector and computer. • Images may be projected simply by selecting an option from the menu. (P69) To ensure projection of high-resolution ...
... connection cable (for DVI/mini D-sub 15-pin) Computer connection cable (for DVI)* Computer connection cable (for monitor output, use the remote control just like the computer mouse. Set the slide switches (1-6) on the adapter depending on the market. Connecting to Video Terminals •...; Before connecting cables, turn off both the projector and computer. • Images may be projected simply by selecting an option from the menu. (P69) To ensure projection of high-resolution ...

Realis_E.pdf
Page 26
Be sure to the computer. Starting Projection Connecting the Power Cord Before connecting the power cord, connect the projector to insert the power cord plug as far as it will go. 2 Insert the power plug. Buttons Used Here Remote control Top control PROJECTING AN IMAGE FROM THE COMPUTER Connect the power cord and turn on operation. 26 The [POWER] indicator flashes red. It stays lit when the projector is ready for power-on the projector. 1 Insert the power cord plug in the power cord connection socket.
Be sure to the computer. Starting Projection Connecting the Power Cord Before connecting the power cord, connect the projector to insert the power cord plug as far as it will go. 2 Insert the power plug. Buttons Used Here Remote control Top control PROJECTING AN IMAGE FROM THE COMPUTER Connect the power cord and turn on operation. 26 The [POWER] indicator flashes red. It stays lit when the projector is ready for power-on the projector. 1 Insert the power cord plug in the power cord connection socket.

Realis_E.pdf
Page 27
... the [POWER] indicator lights red. 1 Make sure that the [POWER] indicator lights red. 2 Press the [POWER] button. Turning On the Projector Once the projector is turned off , it cannot be turned on the Opening Screen (P59, 60) • If a password entry screen appears, enter the password.... (P71) 27 Remote control Top control PROJECTING AN IMAGE FROM THE COMPUTER The Opening window is Not in order to use the projector safely. Unplug the Power Cord When the Projector is displayed for about 20 seconds and the along with the...
... the [POWER] indicator lights red. 1 Make sure that the [POWER] indicator lights red. 2 Press the [POWER] button. Turning On the Projector Once the projector is turned off , it cannot be turned on the Opening Screen (P59, 60) • If a password entry screen appears, enter the password.... (P71) 27 Remote control Top control PROJECTING AN IMAGE FROM THE COMPUTER The Opening window is Not in order to use the projector safely. Unplug the Power Cord When the Projector is displayed for about 20 seconds and the along with the...

Realis_E.pdf
Page 28
... the RGB IN- 2/COMPONENT/RGB OUT terminal, select the [COMPUTER-2] button. Pressing the [COMPUTER-1] button repeatedly allows you to toggle between ANALOG RGB-2 and COMPONENT. Remote control ToTpopcocnotnrtorlol 4 Select a signal type. Pressing the [COMPUTER-2] button repeatedly allows you to select a desired input type. To input images from the DVI-I/RGB IN...
... the RGB IN- 2/COMPONENT/RGB OUT terminal, select the [COMPUTER-2] button. Pressing the [COMPUTER-1] button repeatedly allows you to toggle between ANALOG RGB-2 and COMPONENT. Remote control ToTpopcocnotnrtorlol 4 Select a signal type. Pressing the [COMPUTER-2] button repeatedly allows you to select a desired input type. To input images from the DVI-I/RGB IN...

Realis_E.pdf
Page 30
Adjust the projection distance. 30 Adjusting the Focus Turn the Focus ring to the position where the projected image looks sharpest. • If the projection distance is too large or small to 9.1 m (29.9'), focus adjustment may be impossible. Adjusting the Image Buttons Used Here Remote control Top control PROJECTING AN IMAGE FROM THE COMPUTER Adjusting the Image Size Move the Zoom lever to adjust the image size. • If your desired image size is outside the range from about 1.2 m (3.9') to adjust with the Zoom lever, change the projector installation position.
Adjust the projection distance. 30 Adjusting the Focus Turn the Focus ring to the position where the projected image looks sharpest. • If the projection distance is too large or small to 9.1 m (29.9'), focus adjustment may be impossible. Adjusting the Image Buttons Used Here Remote control Top control PROJECTING AN IMAGE FROM THE COMPUTER Adjusting the Image Size Move the Zoom lever to adjust the image size. • If your desired image size is outside the range from about 1.2 m (3.9') to adjust with the Zoom lever, change the projector installation position.

Realis_E.pdf
Page 31
... [v]. To reduce the length To reduce the length Keystone distortion must be corrected of the upper edge, of the right edge, []. 3 Press the [OK] button. Remote control Top control 2 Correct keystone distortion. on the screen. PROJECTING AN IMAGE FROM THE COMPUTER 31 "Keystone adjustment" appears on the screen. ("Keystone adjustment" disappears...
... [v]. To reduce the length To reduce the length Keystone distortion must be corrected of the upper edge, of the right edge, []. 3 Press the [OK] button. Remote control Top control 2 Correct keystone distortion. on the screen. PROJECTING AN IMAGE FROM THE COMPUTER 31 "Keystone adjustment" appears on the screen. ("Keystone adjustment" disappears...

Realis_E.pdf
Page 34
Remote control PROJECTING AN IMAGE FROM THE COMPUTER "IMAGE" appears on the screen, allowing you to select a desired image mode by pressing the [IMAGE] button repeatedly. [...
Remote control PROJECTING AN IMAGE FROM THE COMPUTER "IMAGE" appears on the screen, allowing you to select a desired image mode by pressing the [IMAGE] button repeatedly. [...

Realis_E.pdf
Page 35
.... • Remove the AC power cord after the [POWER] indicator lights red after turning on the projector may shorten the life of the lamp starts. Remote control Top control To continue projection, wait until the confirmation message disappears (about 90 seconds. 1 Press the [POWER] button. When the power is displayed. A confirmation ...
.... • Remove the AC power cord after the [POWER] indicator lights red after turning on the projector may shorten the life of the lamp starts. Remote control Top control To continue projection, wait until the confirmation message disappears (about 90 seconds. 1 Press the [POWER] button. When the power is displayed. A confirmation ...

Realis_E.pdf
Page 36
... no signal input within 30 seconds, a countdown timer appears. When the projector enters this mode to start projection immediately. The lamp will restart if the input signal is reconnected or any button on the top control or remote control is being cooled in advance. Projection will turn off . You can... be disabled (OFF). 36 When the projector enters this mode to turn off and its cooling starts. When the lamp has been...
... no signal input within 30 seconds, a countdown timer appears. When the projector enters this mode to start projection immediately. The lamp will restart if the input signal is reconnected or any button on the top control or remote control is being cooled in advance. Projection will turn off . You can... be disabled (OFF). 36 When the projector enters this mode to turn off and its cooling starts. When the lamp has been...

Realis_E.pdf
Page 37
... Freezing a Image [FREEZE P40 Muting the Sound/Adjusting the Volume [MUTE/VOL P40 Operating the Mouse Using the Remote Control P41 The screen changes to the projector. Showing the Image Again • A unique logo can be captured. (P59) • The company logo can be shown while the image is blacked out. (P60...
... Freezing a Image [FREEZE P40 Muting the Sound/Adjusting the Volume [MUTE/VOL P40 Operating the Mouse Using the Remote Control P41 The screen changes to the projector. Showing the Image Again • A unique logo can be captured. (P59) • The company logo can be shown while the image is blacked out. (P60...

Realis_E.pdf
Page 38
... and horizontally to display the desired portion on the screen. • Pressing the [OK] button cancels the digital zoom function. 38 Making the Image Larger Remote control Moving the Image to the Desired Position If the enlarged image is larger than the screen, you can move it so that the desired...
... and horizontally to display the desired portion on the screen. • Pressing the [OK] button cancels the digital zoom function. 38 Making the Image Larger Remote control Moving the Image to the Desired Position If the enlarged image is larger than the screen, you can move it so that the desired...

Realis_E.pdf
Page 39
...: • You want to a desired position. To cancel the SPOT function, press the [OK] button. USEFUL FUNCTIONS AVAILABLE DURING PROJECTION Starting the Timer Remote control Showing the Pointer Remote control Pressing this button once again stops the timer. Stopping the Timer A pointer appears at the center of the projected image with a Spotlight...
...: • You want to a desired position. To cancel the SPOT function, press the [OK] button. USEFUL FUNCTIONS AVAILABLE DURING PROJECTION Starting the Timer Remote control Showing the Pointer Remote control Pressing this button once again stops the timer. Stopping the Timer A pointer appears at the center of the projected image with a Spotlight...


