Realis_E.pdf
Page 2
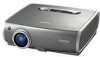
...; XGA, SXGA, SXGA+, and UXGA are provided to project a variety of an image during standby. Š A password function is provided to prevent unauthorised use. Š A compact and easy-to-use wireless remote control is supplied to black out an image temporarily. ZOOM" (magnification value is displayable) allows you to zoom in or out of a desired portion of an image. • "SPOT" (spotlight) allows you to point to a specific portion of images...
...; XGA, SXGA, SXGA+, and UXGA are provided to project a variety of an image during standby. Š A password function is provided to prevent unauthorised use. Š A compact and easy-to-use wireless remote control is supplied to black out an image temporarily. ZOOM" (magnification value is displayable) allows you to zoom in or out of a desired portion of an image. • "SPOT" (spotlight) allows you to point to a specific portion of images...
Realis_E.pdf
Page 3
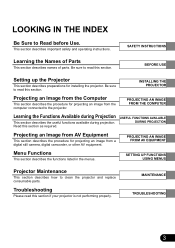
... clean the projector and replace consumable parts. PROJECTING AN IMAGE FROM THE COMPUTER Learning the Functions Available during Projection USEFUL FUNCTIONS AVAILABLE This section describes the useful functions available during projection. This section describes important safety and operating instructions. Troubleshooting Please read this section as required. PROJECTING AN IMAGE FROM AV EQUIPMENT Menu Functions This section describes the functions listed in the menus. SETTING UP FUNCTIONS USING MENUS Projector...
... clean the projector and replace consumable parts. PROJECTING AN IMAGE FROM THE COMPUTER Learning the Functions Available during Projection USEFUL FUNCTIONS AVAILABLE This section describes the useful functions available during projection. This section describes important safety and operating instructions. Troubleshooting Please read this section as required. PROJECTING AN IMAGE FROM AV EQUIPMENT Menu Functions This section describes the functions listed in the menus. SETTING UP FUNCTIONS USING MENUS Projector...
Realis_E.pdf
Page 5
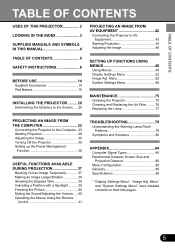
... Time 39 Indicating a Position with a Spotlight ..........39 Freezing the Picture 40 Muting the Sound/Adjusting the Volume .....40 Operating the Mouse Using the Remote Control 41 TROUBLESHOOTING 79 Understanding the Warning Lamp Flash Patterns 79 Symptoms and Solutions 80 APPENDIX 84 Computer Signal Types 84 Relationship between Screen Size and Projection Distance 85 Menu Configuration 86 Glossary 88 Specifications 90 * "Display Settings Menu", "Image Adj. Menu 62 System Settings Menu 69 MAINTENANCE 75 Cleaning the Projector 75 Cleaning and Replacing the Air Filter...
... Time 39 Indicating a Position with a Spotlight ..........39 Freezing the Picture 40 Muting the Sound/Adjusting the Volume .....40 Operating the Mouse Using the Remote Control 41 TROUBLESHOOTING 79 Understanding the Warning Lamp Flash Patterns 79 Symptoms and Solutions 80 APPENDIX 84 Computer Signal Types 84 Relationship between Screen Size and Projection Distance 85 Menu Configuration 86 Glossary 88 Specifications 90 * "Display Settings Menu", "Image Adj. Menu 62 System Settings Menu 69 MAINTENANCE 75 Cleaning the Projector 75 Cleaning and Replacing the Air Filter...
Realis_E.pdf
Page 12
... to clean and check the inside the projector. Replace the lamp with a new one immediately. • Always keep your eyes or mouth, consult the doctor immediately. There is a precision machine. The gas contains toxic mercury. CARRYING/TRANSPORTING THE PROJECTOR This projector is not guarantee of use a highly crashworthy transport case. Do not transport the projector through a courier or transport service with a loud sound or...
... to clean and check the inside the projector. Replace the lamp with a new one immediately. • Always keep your eyes or mouth, consult the doctor immediately. There is a precision machine. The gas contains toxic mercury. CARRYING/TRANSPORTING THE PROJECTOR This projector is not guarantee of use a highly crashworthy transport case. Do not transport the projector through a courier or transport service with a loud sound or...

Realis_E.pdf
Page 21
... is free from any obstacle that the installation place is as possible. Note This projector can be corrected using the KEYSTONE button. (P31) Placing on a Level Place Place the projector on a level place. • Make sure that may block the exhaust vent (fan) on the right side of the projector and the air intake vent (air filter) on the bottom of the screen...
... is free from any obstacle that the installation place is as possible. Note This projector can be corrected using the KEYSTONE button. (P31) Placing on a Level Place Place the projector on a level place. • Make sure that may block the exhaust vent (fan) on the right side of the projector and the air intake vent (air filter) on the bottom of the screen...

Realis_E.pdf
Page 26
The [POWER] indicator flashes red. Starting Projection Connecting the Power Cord Before connecting the power cord, connect the projector to insert the power cord plug as far as it will go. 2 Insert the power plug. Be sure to the computer. It stays lit when the projector is ready for power-on the projector. 1 Insert the power cord plug in the power cord connection socket. Buttons Used Here Remote control Top control PROJECTING AN IMAGE FROM THE COMPUTER Connect the power cord and turn on operation. 26
The [POWER] indicator flashes red. Starting Projection Connecting the Power Cord Before connecting the power cord, connect the projector to insert the power cord plug as far as it will go. 2 Insert the power plug. Be sure to the computer. It stays lit when the projector is ready for power-on the projector. 1 Insert the power cord plug in the power cord connection socket. Buttons Used Here Remote control Top control PROJECTING AN IMAGE FROM THE COMPUTER Connect the power cord and turn on operation. 26

Realis_E.pdf
Page 73
... Chinese (Simplified) Chinese (Traditional) Korean Japanese Select a language and press the [OK] button and all words used in the selected language. Selecting a Display Language Resetting to the Factory Defaults You can reset menu item settings. The system settings will not be restored to the factory defaults. Resetting is canceled. • The [Lamp counter] and [Language] settings will be reset even after resetting to factory defaults. • For the factory defaults, refer to factory defaults.
... Chinese (Simplified) Chinese (Traditional) Korean Japanese Select a language and press the [OK] button and all words used in the selected language. Selecting a Display Language Resetting to the Factory Defaults You can reset menu item settings. The system settings will not be restored to the factory defaults. Resetting is canceled. • The [Lamp counter] and [Language] settings will be reset even after resetting to factory defaults. • For the factory defaults, refer to factory defaults.

Realis_E.pdf
Page 74
... indicate the correct timing of the lamp counter is reset. For the lamp replacement method, refer to 1,400 hours • When the time of use is 1,000 to P77. System settings Lamp counter • When the time of use is less than 1,000 hours Reset • When the time of use is 1,400 hours or longer OK Cancel The lamp counter is canceled. Resetting of lamp replacement. Resetting the Lamp Counter When you have changed the lamp, reset the lamp counter that indicates the lamp replacement timing...
... indicate the correct timing of the lamp counter is reset. For the lamp replacement method, refer to 1,400 hours • When the time of use is 1,000 to P77. System settings Lamp counter • When the time of use is less than 1,000 hours Reset • When the time of use is 1,400 hours or longer OK Cancel The lamp counter is canceled. Resetting of lamp replacement. Resetting the Lamp Counter When you have changed the lamp, reset the lamp counter that indicates the lamp replacement timing...

Realis_E.pdf
Page 78
... Handle handle, and remove the lamp. 4 Insert a new lamp as far as it will go and secure it with a flathead screwdriver. Procedure for a least 1 hour. 2 Detach the lamp cover by loosening Lamp cover a screw with two screws. * After installation, be sure to turn up the menu and select [System settings] -> [Lamp counter]. (P74) Select [Reset] -> [OK] to cool for Replacing the Lamp 1 Turn off the projector and disconnect the power plug from the...
... Handle handle, and remove the lamp. 4 Insert a new lamp as far as it will go and secure it with a flathead screwdriver. Procedure for a least 1 hour. 2 Detach the lamp cover by loosening Lamp cover a screw with two screws. * After installation, be sure to turn up the menu and select [System settings] -> [Lamp counter]. (P74) Select [Reset] -> [OK] to cool for Replacing the Lamp 1 Turn off the projector and disconnect the power plug from the...

Realis_E.pdf
Page 82
... replacing it to the simultaneous display mode (output setting) on the key- improper. (P13) Others The projector may be out of the computer. (P23) The video signal type is as that came with a spare lamp if you have it has not burnt out. The displayed image is not the same Check whether the dual screen (multi-display) mode is incorrect. facturers. Refer to the User's Manual...
... replacing it to the simultaneous display mode (output setting) on the key- improper. (P13) Others The projector may be out of the computer. (P23) The video signal type is as that came with a spare lamp if you have it has not burnt out. The displayed image is not the same Check whether the dual screen (multi-display) mode is incorrect. facturers. Refer to the User's Manual...

Realis_E.pdf
Page 83
... remote control operating range. tem settings menu. (P72) "Key lock" is turned on to disable Check whether "Key lock" is not recognized due to a Turn on to meet rigid U.L. computer problem. safety standards against risk of lighting apparatus. (P16) The remote control code does not Check whether the remote control code has been match the projector setting. changed. The mouse is turned on the projector and computer in the Sys- If it cannot be used , install...
... remote control operating range. tem settings menu. (P72) "Key lock" is turned on to disable Check whether "Key lock" is not recognized due to a Turn on to meet rigid U.L. computer problem. safety standards against risk of lighting apparatus. (P16) The remote control code does not Check whether the remote control code has been match the projector setting. changed. The mouse is turned on the projector and computer in the Sys- If it cannot be used , install...

Realis_E.pdf
Page 86
... SHOW Black Blue User logo Projector on the remote control or top control. Display settings ANALOG RGB-1/ANALOG RGB-2 Auto PC adj. APPENDIX Menu Configuration Factory Defaults Switching between Computer and AV Equipment Select the input terminal of the equipment from which an image is to be input, and select an input signal type using a button on Return Canon logo Skip User logo None Ceiling mounted Rear Rear,Ceiling mounted Input terminal Button Input signal DVI-RGB IN-1 COMPUTER-1 DIGITAL RGB...
... SHOW Black Blue User logo Projector on the remote control or top control. Display settings ANALOG RGB-1/ANALOG RGB-2 Auto PC adj. APPENDIX Menu Configuration Factory Defaults Switching between Computer and AV Equipment Select the input terminal of the equipment from which an image is to be input, and select an input signal type using a button on Return Canon logo Skip User logo None Ceiling mounted Rear Rear,Ceiling mounted Input terminal Button Input signal DVI-RGB IN-1 COMPUTER-1 DIGITAL RGB...

Realis_E.pdf
Page 90
...Zsyosotmeming and focusing Lens shift Light source Screen size (projection distance) Number of reproducible colors Brightness Contrast ratio Uniformity Audio output Speaker Scan frequency Maximum input resolution/Panel display resolution Scan system (component) Color system (composite, S-video) Input/output DVI-I connector terminals (29-pin) Mini D-sub 15-pin RCA Mini DIN 4-pin Stereo mini jack USB (type B) Mini DIN 8-pin Input signals Digital RGB Analog RGB Video Audio Noise Operating temperature Power supply Power consumption Dimensions Weight Accessories SX50 RGB liquid...
...Zsyosotmeming and focusing Lens shift Light source Screen size (projection distance) Number of reproducible colors Brightness Contrast ratio Uniformity Audio output Speaker Scan frequency Maximum input resolution/Panel display resolution Scan system (component) Color system (composite, S-video) Input/output DVI-I connector terminals (29-pin) Mini D-sub 15-pin RCA Mini DIN 4-pin Stereo mini jack USB (type B) Mini DIN 8-pin Input signals Digital RGB Analog RGB Video Audio Noise Operating temperature Power supply Power consumption Dimensions Weight Accessories SX50 RGB liquid...

Realis Command Codes
Page 9
Mode change Switch to Remote mode REMOTE Switch to Y) RESET SYSTEM Remote control/Key Power supply Input switching Keystone Auto PC Spotlight Volume adjustment Digital zoom Image quality select Audio mute Display screen setting when nothing shown Startup screen LOGOPOS NOSIG NOSHOW PJON Image adjustment Image quality select IMAGE *This is set for SX50 "User Commands" is shown below. WBRGB 6AXR TO Y User screen registration User image position Input when no signal Screen when nothing shown Freeze image Presentation timer setting POWER INPUT VKS/HKS AUTOPC AVOL IMAGE MUTE ...
Mode change Switch to Remote mode REMOTE Switch to Y) RESET SYSTEM Remote control/Key Power supply Input switching Keystone Auto PC Spotlight Volume adjustment Digital zoom Image quality select Audio mute Display screen setting when nothing shown Startup screen LOGOPOS NOSIG NOSHOW PJON Image adjustment Image quality select IMAGE *This is set for SX50 "User Commands" is shown below. WBRGB 6AXR TO Y User screen registration User image position Input when no signal Screen when nothing shown Freeze image Presentation timer setting POWER INPUT VKS/HKS AUTOPC AVOL IMAGE MUTE ...

Realis Command Codes
Page 13
... Color level setting Color balance setting Advanced color adjustment R setting G setting 6-axis color B setting adjust C setting M setting Y setting Lamp mode setting Reset Trapezoid adjustment (vertical keystone) Trapezoid adjustment (horizontal keystone) Volume adjustment Mute Beep sound setting Image flip H/V control Power management Display screen at startup setting Display screen when no signal setting Display screen when nothing shown setting User image position setting Language selection Terminal setting Key lock setting Remote control setting Remote control emulation Front panel button...
... Color level setting Color balance setting Advanced color adjustment R setting G setting 6-axis color B setting adjust C setting M setting Y setting Lamp mode setting Reset Trapezoid adjustment (vertical keystone) Trapezoid adjustment (horizontal keystone) Volume adjustment Mute Beep sound setting Image flip H/V control Power management Display screen at startup setting Display screen when no signal setting Display screen when nothing shown setting User image position setting Language selection Terminal setting Key lock setting Remote control setting Remote control emulation Front panel button...

Realis Command Codes
Page 15
.... 1001 e TERMINAL_OUT The input cannot be selected since the user Register the user image. 1003 203X e IP_NOT_AVAILABLE e INVALID_RESOLUTION (***) IP conversion cannot be executed in the SX50. Send the correct command. Use the correct parameter(s). 8 000B 9 - Use GET COMVER to the correct input signal. The current input source is in Change the input signal. Signal setting (detection) is indicated in the projector. Change to output. The current input signal is incorrect. Wait until...
.... 1001 e TERMINAL_OUT The input cannot be selected since the user Register the user image. 1003 203X e IP_NOT_AVAILABLE e INVALID_RESOLUTION (***) IP conversion cannot be executed in the SX50. Send the correct command. Use the correct parameter(s). 8 000B 9 - Use GET COMVER to the correct input signal. The current input source is in Change the input signal. Signal setting (detection) is indicated in the projector. Change to output. The current input signal is incorrect. Wait until...

Realis Command Codes
Page 17
Appendix 1 Reset Items All System Image Item Reset setting Reference command ● Input source switching A-RGB2 INPUT ● Toggle button recording C1:DRGB C2:ARGB2 V :VIDEO ● ● ARGB manual for input signal setting ● ● Input signal select AUTO SEL ● ● Input signal select PC not selected ------------ ● ● Screen settings FULL ASPECT ● ● Menu display position CENTER ------------ ● ● Logo included/not included not included ------------ ● ● Logo position CENTER ...
Appendix 1 Reset Items All System Image Item Reset setting Reference command ● Input source switching A-RGB2 INPUT ● Toggle button recording C1:DRGB C2:ARGB2 V :VIDEO ● ● ARGB manual for input signal setting ● ● Input signal select AUTO SEL ● ● Input signal select PC not selected ------------ ● ● Screen settings FULL ASPECT ● ● Menu display position CENTER ------------ ● ● Logo included/not included not included ------------ ● ● Logo position CENTER ...

Realis Command Codes
Page 43
... are indicated by " If something other than a normal response of initial settings ・ Input source ← A-RGB2 ・ Language ← English * For details, refer to the Reset function in the appendix. ■ Notes (1) The power must never be turned off the power and restart the projector. Commands RESET Function Reset Parameter Parameter Meaning LAMPTIME Lamp on time reset IMAGE Current image adjustment reset SYSTEM Initial system settings ALL Factory shipping settings Mode Control Setting Reference...
... are indicated by " If something other than a normal response of initial settings ・ Input source ← A-RGB2 ・ Language ← English * For details, refer to the Reset function in the appendix. ■ Notes (1) The power must never be turned off the power and restart the projector. Commands RESET Function Reset Parameter Parameter Meaning LAMPTIME Lamp on time reset IMAGE Current image adjustment reset SYSTEM Initial system settings ALL Factory shipping settings Mode Control Setting Reference...

Realis Command Codes
Page 60
... KEYSTONE VALUE AVOL VOLUME ADJUSTMENT MUTE MUTE STATE BVOL BEEP SOUND SETTING STATE IMAGEFLIP FLIP DISPLAY STATE PMM POWER MANAGEMENT PJON DISPLAY SCREEN AT STARTUP NOSIG DISPLAY SCREEN WHEN NO SIGNAL NOSHOW DISPLAY SCREEN WHEN NOTHING SHOWN LOGOPOS USER IMAGE POSITION LANG LANGUAGE LAMP LAMP OUTPUT TERMINAL TERMINAL SETTING KEYLOCK KEY LOCK RCCH REMOTE CONTROL CHANNEL SIGNALSTATUS SIGNAL STATE DETECTION LAMPCOUNTER LAMP ON TIME ERR ERROR INFORMATION PRODCODE ROMVER COMVER PRODUCT INFORMATION ROM VERSION USESR COMMAND VERSION Mode Control Setting...
... KEYSTONE VALUE AVOL VOLUME ADJUSTMENT MUTE MUTE STATE BVOL BEEP SOUND SETTING STATE IMAGEFLIP FLIP DISPLAY STATE PMM POWER MANAGEMENT PJON DISPLAY SCREEN AT STARTUP NOSIG DISPLAY SCREEN WHEN NO SIGNAL NOSHOW DISPLAY SCREEN WHEN NOTHING SHOWN LOGOPOS USER IMAGE POSITION LANG LANGUAGE LAMP LAMP OUTPUT TERMINAL TERMINAL SETTING KEYLOCK KEY LOCK RCCH REMOTE CONTROL CHANNEL SIGNALSTATUS SIGNAL STATE DETECTION LAMPCOUNTER LAMP ON TIME ERR ERROR INFORMATION PRODCODE ROMVER COMVER PRODUCT INFORMATION ROM VERSION USESR COMMAND VERSION Mode Control Setting...

Realis Command Codes
Page 64
... Progressive Screen color correction method Screen color correction value (RGB) Color saturation setting value Hue setting value Advanced color correction method R setting value G setting value B setting value C setting value M setting value Y setting value Vertical keystone value Horizontal keystone value Volume adjustment Mute state BEEP sound setting state Flip display state Power management Display screen at startup Display screen when no signal Display screen when nothing shown User image position Language Lamp output Terminal setting Key lock Remote control channel Mode Control Setting...
... Progressive Screen color correction method Screen color correction value (RGB) Color saturation setting value Hue setting value Advanced color correction method R setting value G setting value B setting value C setting value M setting value Y setting value Vertical keystone value Horizontal keystone value Volume adjustment Mute state BEEP sound setting state Flip display state Power management Display screen at startup Display screen when no signal Display screen when nothing shown User image position Language Lamp output Terminal setting Key lock Remote control channel Mode Control Setting...


