
Realis_E.pdf
Page 4
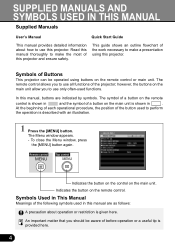
... window appears. - The remote control allows you to use this projector and ensure safety. Remote control Top control Indicates the button on the control on the remote control. SUPPLIED MANUALS AND SYMBOLS USED IN THIS MANUAL Supplied Manuals User's Manual Quick Start Guide This manual provides detailed information about operation or restriction is provided here. 4 At...
... window appears. - The remote control allows you to use this projector and ensure safety. Remote control Top control Indicates the button on the control on the remote control. SUPPLIED MANUALS AND SYMBOLS USED IN THIS MANUAL Supplied Manuals User's Manual Quick Start Guide This manual provides detailed information about operation or restriction is provided here. 4 At...
Realis_E.pdf
Page 5
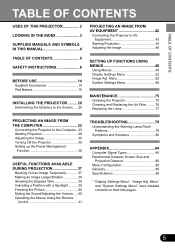
... 48 SETTING UP FUNCTIONS USING MENUS 49 Using Menus 49 Display Settings Menu 52 Image Adj. TABLE OF CONTENTS TABLE OF CONTENTS USES OF THIS PROJECTOR 2 LOOKING IN THE INDEX 3 SUPPLIED MANUALS AND SYMBOLS IN THIS MANUAL 4 TABLE OF CONTENTS 5 SAFETY INSTRUCTIONS 6 BEFORE USE 14 Supplied Accessories 14 Part Names 15 INSTALLING THE...
... 48 SETTING UP FUNCTIONS USING MENUS 49 Using Menus 49 Display Settings Menu 52 Image Adj. TABLE OF CONTENTS TABLE OF CONTENTS USES OF THIS PROJECTOR 2 LOOKING IN THE INDEX 3 SUPPLIED MANUALS AND SYMBOLS IN THIS MANUAL 4 TABLE OF CONTENTS 5 SAFETY INSTRUCTIONS 6 BEFORE USE 14 Supplied Accessories 14 Part Names 15 INSTALLING THE...

Realis_E.pdf
Page 6
...INDICATES THAT DANGEROUS VOLTAGE CONSTITUTING A RISK OF ELECTRIC SHOCK IS PRESENT WITHIN THIS UNIT. Operating the projector properly enables you purchased the projector or the service center. REFER SERVICING TO QUALIFIED SERVICE PERSONNEL. THIS SYMBOL INDICATES THAT THERE ARE ...IMPORTANT OPERATING AND MAINTENANCE INSTRUCTIONS IN THE OWNER'S MANUAL WITH THIS UNIT. 6 SAFETY INSTRUCTIONS SAFETY INSTRUCTIONS Before operating this projector, read this manual again, check operations and cable connections and try the solutions in the "Troubleshooting...
...INDICATES THAT DANGEROUS VOLTAGE CONSTITUTING A RISK OF ELECTRIC SHOCK IS PRESENT WITHIN THIS UNIT. Operating the projector properly enables you purchased the projector or the service center. REFER SERVICING TO QUALIFIED SERVICE PERSONNEL. THIS SYMBOL INDICATES THAT THERE ARE ...IMPORTANT OPERATING AND MAINTENANCE INSTRUCTIONS IN THE OWNER'S MANUAL WITH THIS UNIT. 6 SAFETY INSTRUCTIONS SAFETY INSTRUCTIONS Before operating this projector, read this manual again, check operations and cable connections and try the solutions in the "Troubleshooting...

Realis_E.pdf
Page 8
... on an unstable cart, stand, or table. Unplug this projector from the wall outlet. Do not expose this projector on the projector. Do not place this unit to rain or use . SAFETY INSTRUCTIONS READ AND KEEP THIS OWNER'S MANUAL FOR LATER USE. All the safety and operating instructions shoud ...be moved with the projector. Use a damp cloth for example, in a wet basement, near water... Use only with a cart or stand recommended...
... on an unstable cart, stand, or table. Unplug this projector from the wall outlet. Do not expose this projector on the projector. Do not place this unit to rain or use . SAFETY INSTRUCTIONS READ AND KEEP THIS OWNER'S MANUAL FOR LATER USE. All the safety and operating instructions shoud ...be moved with the projector. Use a damp cloth for example, in a wet basement, near water... Use only with a cart or stand recommended...

Realis_E.pdf
Page 14
...dust and other foreign objects. • Be sure to attach the ferrite core to the projector with the projector. BEFORE USE Supplied Accessories Check whether the following accessories are supplied with the supplied strap. ...Remote control Batteries (type AAA, two) Computer connection cable for remote control (DVI/Mini D-sub, 15-pin) (1.8m/5.9') Power cord (2m/6.6') USB cable (1.8m/5.9') BEFORE USE Component cable (RCA/Mini D-sub, 15-pin) (0.4m/1.3') User's Manual...
...dust and other foreign objects. • Be sure to attach the ferrite core to the projector with the projector. BEFORE USE Supplied Accessories Check whether the following accessories are supplied with the supplied strap. ...Remote control Batteries (type AAA, two) Computer connection cable for remote control (DVI/Mini D-sub, 15-pin) (1.8m/5.9') Power cord (2m/6.6') USB cable (1.8m/5.9') BEFORE USE Component cable (RCA/Mini D-sub, 15-pin) (0.4m/1.3') User's Manual...

Realis_E.pdf
Page 23
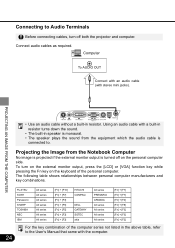
...sub 15-pin) (mini D-sub 15-pin) (DVI terminal) (mini D-sub 15-pin) Some types of high-performance cables is used to the User's Manual that came with the computer. If any connector cannot be improperly projected with digital RGB signals in the corresponding socket, refer to use the remote... OFF OFF 21" MODE (1152 x 870) ON ON ON ON OFF OFF 23 PROJECTING AN IMAGE FROM THE COMPUTER Connecting the Projector to the Computer Connect the projector to the monitor output (analog RGB) terminal by connecting the USB cable. This terminal can be projected simply by selecting an option ...
...sub 15-pin) (mini D-sub 15-pin) (DVI terminal) (mini D-sub 15-pin) Some types of high-performance cables is used to the User's Manual that came with the computer. If any connector cannot be improperly projected with digital RGB signals in the corresponding socket, refer to use the remote... OFF OFF 21" MODE (1152 x 870) ON ON ON ON OFF OFF 23 PROJECTING AN IMAGE FROM THE COMPUTER Connecting the Projector to the Computer Connect the projector to the monitor output (analog RGB) terminal by connecting the USB cable. This terminal can be projected simply by selecting an option ...
Realis_E.pdf
Page 24
... The built-in resistor. To turn off on the keyboard of the computer series not listed in the above table, refer to the User's Manual that came with the computer. 24 Connecting to Audio Terminals Before connecting cables, turn on the external monitor output, press the [LCD] or [... manufacturers and key combinations. Connect audio cables as required. Projecting the Image from the equipment which the audio cable is turned off both the projector and computer. FUJITSU SONY Panasonic SHARP TOSHIBA NEC IBM All series All series All series All series All series All series All series [Fn...
... The built-in resistor. To turn off on the keyboard of the computer series not listed in the above table, refer to the User's Manual that came with the computer. 24 Connecting to Audio Terminals Before connecting cables, turn on the external monitor output, press the [LCD] or [... manufacturers and key combinations. Connect audio cables as required. Projecting the Image from the equipment which the audio cable is turned off both the projector and computer. FUJITSU SONY Panasonic SHARP TOSHIBA NEC IBM All series All series All series All series All series All series All series [Fn...

Realis_E.pdf
Page 52
... If an image cannot be displayed Selecting a logo display position Displaying a logo (No signal input) Displaying a logo (No Show) Displaying a logo (Projector on . Display settings Auto PC Adj. P60 [No show screen] ........ P54 [Vertical position P54 [Horizontal pixels P55 [Vertical pixels P55 [Input signal... type Selecting a Screen mode Selecting a menu position Capturing a logo to be projected correctly even with the auto PC function, manually specify the parameters ([Total dots] to display. Performing the auto pc adjustment Adjusting the total number of dots Adjusting the tracking...
... If an image cannot be displayed Selecting a logo display position Displaying a logo (No signal input) Displaying a logo (No Show) Displaying a logo (Projector on . Display settings Auto PC Adj. P60 [No show screen] ........ P54 [Vertical position P54 [Horizontal pixels P55 [Vertical pixels P55 [Input signal... type Selecting a Screen mode Selecting a menu position Capturing a logo to be projected correctly even with the auto PC function, manually specify the parameters ([Total dots] to display. Performing the auto pc adjustment Adjusting the total number of dots Adjusting the tracking...
Realis_E.pdf
Page 56
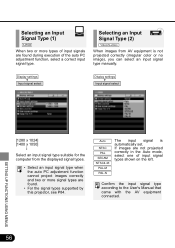
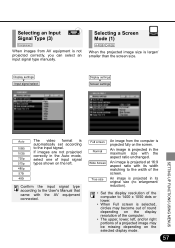
... PAL-M PAL-N The input signal is not projected correctly (irregular color or no image), you can select an input signal type manually. Confirm the input signal type according to the User's Manual that came with the AV equipment connected. 56 When images from the displayed signal types. • Select an input signal..., select one of the auto PC adjustment function, select a correct input signal type. If images are found . • For the signal types supported by this projector, see P84.
... PAL-M PAL-N The input signal is not projected correctly (irregular color or no image), you can select an input signal type manually. Confirm the input signal type according to the User's Manual that came with the AV equipment connected. 56 When images from the displayed signal types. • Select an input signal..., select one of the auto PC adjustment function, select a correct input signal type. If images are found . • For the signal types supported by this projector, see P84.
Realis_E.pdf
Page 57
...the computer to 1400 x 1050 dots or lower. • When Full screen is not projected correctly, you can select an input signal type manually. Confirm the input signal type according to the input signal. An image is projected in the Auto mode, select one of a projected image ...image is projected at 16:9 aspect ratio with the AV equipment connected. When the projected image size is automatically set according to the User's Manual that came with its original size (no enlargement/ reduction). • Set the display resolution of the screen. Display settings Input signal select Display...
...the computer to 1400 x 1050 dots or lower. • When Full screen is not projected correctly, you can select an input signal type manually. Confirm the input signal type according to the input signal. An image is projected in the Auto mode, select one of a projected image ...image is projected at 16:9 aspect ratio with the AV equipment connected. When the projected image size is automatically set according to the User's Manual that came with its original size (no enlargement/ reduction). • Set the display resolution of the screen. Display settings Input signal select Display...

Realis_E.pdf
Page 82
...- Check whether the selected signal type is dirty. Refer to the User's Manual that came with dust. If the air intake or exhaust vent is blocked, the temperature inside the projector rises and the power is automatically turned off Cause Countermeasure The air intake or... exhaust vent is Check whether the air intake or exhaust vent is properly connected properly. Contact Canon dealer immediately. (Back cover) 82 TROUBLESHOOTING...
...- Check whether the selected signal type is dirty. Refer to the User's Manual that came with dust. If the air intake or exhaust vent is blocked, the temperature inside the projector rises and the power is automatically turned off Cause Countermeasure The air intake or... exhaust vent is Check whether the air intake or exhaust vent is properly connected properly. Contact Canon dealer immediately. (Back cover) 82 TROUBLESHOOTING...
Realis_E.pdf
Page 89
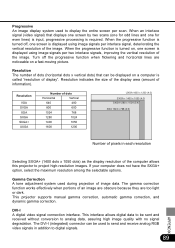
...in addition to digital signals. 89 APPENDIX The DVI-I A digital video signal connection interface. If your computer does not have the SXGA+ option, select the maximum resolution among the selectable options. DVI-I (integrated) connector can be displayed on , one screen is ... system used during projection of information). This interface allows digital data to be used to project high-resolution images. This projector supports manual gamma correction, automatic gamma correction, and dynamic gamma correction. When the progressive function is turned on a computer is required...
...in addition to digital signals. 89 APPENDIX The DVI-I A digital video signal connection interface. If your computer does not have the SXGA+ option, select the maximum resolution among the selectable options. DVI-I (integrated) connector can be displayed on , one screen is ... system used during projection of information). This interface allows digital data to be used to project high-resolution images. This projector supports manual gamma correction, automatic gamma correction, and dynamic gamma correction. When the progressive function is turned on a computer is required...

Realis_E.pdf
Page 90
...Analog RGB Video Audio Noise Operating temperature Power supply Power consumption Dimensions Weight Accessories SX50 RGB liquid crystal system Color separation by dichroic mirror/polarizing beam splitter and color... 1050) x 3 panels/4,410,000 1.7x/f = 22.0 to 37.0 mm (0.87" to 1.46")/F1.85 to F2.5 Manual focusing/Manual zooming 9 : 1 (fixed) 200W high-pressure mercury lamp 40" to 300" (1.2 to 9.1 m) 16,770,000 colors ... m (16.4¢) (to the characteristics of the LCD panel. * Using the projector continuously for an extended period of time may accelerate the deterioration of pixels may stay ...
...Analog RGB Video Audio Noise Operating temperature Power supply Power consumption Dimensions Weight Accessories SX50 RGB liquid crystal system Color separation by dichroic mirror/polarizing beam splitter and color... 1050) x 3 panels/4,410,000 1.7x/f = 22.0 to 37.0 mm (0.87" to 1.46")/F1.85 to F2.5 Manual focusing/Manual zooming 9 : 1 (fixed) 200W high-pressure mercury lamp 40" to 300" (1.2 to 9.1 m) 16,770,000 colors ... m (16.4¢) (to the characteristics of the LCD panel. * Using the projector continuously for an extended period of time may accelerate the deterioration of pixels may stay ...
Realis_E.pdf
Page 92
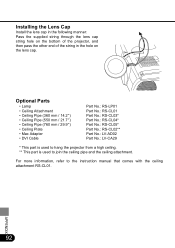
...-CL05* Part No.: RS-CL02** Part No.: LV-AD02 Part No.: LV-CA29 * This part is used to hang the projector from a high ceiling. ** This part is used to the instruction manual that comes with the ceiling attachment RS-CL01. For more information, refer to join the ceiling pipe and the ceiling... attachment. APPENDIX 92 Installing the Lens Cap Install the lens cap in the following manner: Pass the supplied string through the lens cap string hole on the bottom of the projector...
...-CL05* Part No.: RS-CL02** Part No.: LV-AD02 Part No.: LV-CA29 * This part is used to hang the projector from a high ceiling. ** This part is used to the instruction manual that comes with the ceiling attachment RS-CL01. For more information, refer to join the ceiling pipe and the ceiling... attachment. APPENDIX 92 Installing the Lens Cap Install the lens cap in the following manner: Pass the supplied string through the lens cap string hole on the bottom of the projector...

Realis_E.pdf
Page 93
..., Surrey RH2 8BF, United Kingdom CANON DEUTSCHLAND GmbH Europark Fichtenhain A 10, 47807 Krefeld, Germany CANON ITALIA S.p.A. de R.L. Palazzo L, Strada 6, 20089 Milanofiori-Rozzano (MI), Italy CANON (Schweiz) A.G. O. CANON CANADA, INC. 6390 Dixie Road Mississauga, Ontario L5T 1P7 Canada CANON LATIN AMERICA, INC. 703 Waterford Way Suite 400 Miami, Florida 33126 U.S.A. User's Manual CANON INC. 30-2, Shimomaruko 3-chome, Ohta...
..., Surrey RH2 8BF, United Kingdom CANON DEUTSCHLAND GmbH Europark Fichtenhain A 10, 47807 Krefeld, Germany CANON ITALIA S.p.A. de R.L. Palazzo L, Strada 6, 20089 Milanofiori-Rozzano (MI), Italy CANON (Schweiz) A.G. O. CANON CANADA, INC. 6390 Dixie Road Mississauga, Ontario L5T 1P7 Canada CANON LATIN AMERICA, INC. 703 Waterford Way Suite 400 Miami, Florida 33126 U.S.A. User's Manual CANON INC. 30-2, Shimomaruko 3-chome, Ohta...
Realis Command Codes
Page 10
...below shows the states and limitations of whether the power is on or off. Item Description Mode LOCAL mode Mode where projector control/operation is started. LED State ALM Transition method Main unit keys Operation buttons Remote control keys Emulation Switching Return Standby... mode Special mode (Service mode) State indicator State indicator ・Microcomputer startup ・Manual power on/off ・LOCAL command All available All available Available ※1 5 minutes elapsed from no signal · Signal input...
...below shows the states and limitations of whether the power is on or off. Item Description Mode LOCAL mode Mode where projector control/operation is started. LED State ALM Transition method Main unit keys Operation buttons Remote control keys Emulation Switching Return Standby... mode Special mode (Service mode) State indicator State indicator ・Microcomputer startup ・Manual power on/off ・LOCAL command All available All available Available ※1 5 minutes elapsed from no signal · Signal input...

Realis Command Codes
Page 17
...9679; Input source switching A-RGB2 INPUT ● Toggle button recording C1:DRGB C2:ARGB2 V :VIDEO ● ● ARGB manual for input signal setting ● ● Input signal select AUTO SEL ● ● Input signal select PC not selected...CENTER LOGOPOS ● ● Screen when nothing shown BLACK NOSHOW ● ● No signal screen BLUE NOSIG ● ● Screen at startup CANON PJON ● ● Image flip H/V NONE IMAGEFLIP ● ● Image mode STANDARD IMAGE STANDARD PRESEN CINEMA SRGB ● ● ●...
...9679; Input source switching A-RGB2 INPUT ● Toggle button recording C1:DRGB C2:ARGB2 V :VIDEO ● ● ARGB manual for input signal setting ● ● Input signal select AUTO SEL ● ● Input signal select PC not selected...CENTER LOGOPOS ● ● Screen when nothing shown BLACK NOSHOW ● ● No signal screen BLUE NOSIG ● ● Screen at startup CANON PJON ● ● Image flip H/V NONE IMAGEFLIP ● ● Image mode STANDARD IMAGE STANDARD PRESEN CINEMA SRGB ● ● ●...


