
Realis_E.pdf
Page 2
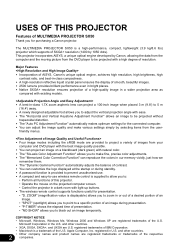
...with light-up buttons. Š The wireless remote control supports functions useful for presentation. • "D. USES OF THIS PROJECTOR Features of MULTIMEDIA PROJECTOR SX50 Thank you for the connected computer. Š You can adjust the image quality and make fine, precise color adjustments. ...is a high-performance, compact, lightweight (3.9 kg/8.6 lbs) projector which supports of SXGA+ resolution (1400 by selecting items from the user- Apple Computer, Inc. Major Features Š Incorporation of AISYS, Canon's unique optical engine, achieves high resolution, high brightness, high ...
...with light-up buttons. Š The wireless remote control supports functions useful for presentation. • "D. USES OF THIS PROJECTOR Features of MULTIMEDIA PROJECTOR SX50 Thank you for the connected computer. Š You can adjust the image quality and make fine, precise color adjustments. ...is a high-performance, compact, lightweight (3.9 kg/8.6 lbs) projector which supports of SXGA+ resolution (1400 by selecting items from the user- Apple Computer, Inc. Major Features Š Incorporation of AISYS, Canon's unique optical engine, achieves high resolution, high brightness, high ...
Realis_E.pdf
Page 3
...camcorder, or other AV equipment. MAINTENANCE TROUBLESHOOTING 3 BEFORE USE Setting up the Projector This section describes preparations for projecting an image from the computer connected to the projector. PROJECTING AN IMAGE FROM THE COMPUTER Learning the Functions Available during Projection USEFUL ...FUNCTIONS AVAILABLE This section describes the useful functions available during projection. Be sure to read this section if your projector is not performing properly. DURING PROJECTION Read this section. PROJECTING AN IMAGE FROM AV EQUIPMENT Menu Functions This section...
...camcorder, or other AV equipment. MAINTENANCE TROUBLESHOOTING 3 BEFORE USE Setting up the Projector This section describes preparations for projecting an image from the computer connected to the projector. PROJECTING AN IMAGE FROM THE COMPUTER Learning the Functions Available during Projection USEFUL ...FUNCTIONS AVAILABLE This section describes the useful functions available during projection. Be sure to read this section if your projector is not performing properly. DURING PROJECTION Read this section. PROJECTING AN IMAGE FROM AV EQUIPMENT Menu Functions This section...
Realis_E.pdf
Page 4
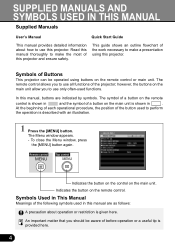
... is described with an illustration. 1 Press the [MENU] button. This guide shows an outline flowchart of Buttons This projector can be aware of the projector; An important matter that you to make the most of the following symbols used functions. Symbols Used in this...IN THIS MANUAL Supplied Manuals User's Manual Quick Start Guide This manual provides detailed information about operation or restriction is given here. Read this projector. however, the buttons on the remote control is provided here. 4 In this manual, buttons are as follows: A precaution about how to...
... is described with an illustration. 1 Press the [MENU] button. This guide shows an outline flowchart of Buttons This projector can be aware of the projector; An important matter that you to make the most of the following symbols used functions. Symbols Used in this...IN THIS MANUAL Supplied Manuals User's Manual Quick Start Guide This manual provides detailed information about operation or restriction is given here. Read this projector. however, the buttons on the remote control is provided here. 4 In this manual, buttons are as follows: A precaution about how to...
Realis_E.pdf
Page 5
... Cleaning and Replacing the Air Filter .........76 Replacing the Lamp 77 PROJECTING AN IMAGE FROM THE COMPUTER 23 Connecting the Projector to AV Equipment 42 Starting Projection 44 Adjusting the Image 48 SETTING UP FUNCTIONS USING MENUS 49 Using Menus 49 Display ...52 Image Adj. Menu" and "System Settings Menu" have detailed contents on their title pages. 5 TABLE OF CONTENTS TABLE OF CONTENTS USES OF THIS PROJECTOR 2 LOOKING IN THE INDEX 3 SUPPLIED MANUALS AND SYMBOLS IN THIS MANUAL 4 TABLE OF CONTENTS 5 SAFETY INSTRUCTIONS 6 BEFORE USE 14 Supplied Accessories 14 Part...
... Cleaning and Replacing the Air Filter .........76 Replacing the Lamp 77 PROJECTING AN IMAGE FROM THE COMPUTER 23 Connecting the Projector to AV Equipment 42 Starting Projection 44 Adjusting the Image 48 SETTING UP FUNCTIONS USING MENUS 49 Using Menus 49 Display ...52 Image Adj. Menu" and "System Settings Menu" have detailed contents on their title pages. 5 TABLE OF CONTENTS TABLE OF CONTENTS USES OF THIS PROJECTOR 2 LOOKING IN THE INDEX 3 SUPPLIED MANUALS AND SYMBOLS IN THIS MANUAL 4 TABLE OF CONTENTS 5 SAFETY INSTRUCTIONS 6 BEFORE USE 14 Supplied Accessories 14 Part...

Realis_E.pdf
Page 6
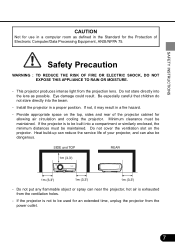
...condition for a considerable time. CAUTION : TO REDUCE THE RISK OF ELECTRIC SHOCK, DO NOT REMOVE COVER (OR BACK). If your projector seems to manage those features and maintains it in not only shortening the product-life, but also malfunctions, fire hazard, or other accidents....If the problem still persists, contact the dealer where you to operate improperly, read this booklet. SAFETY INSTRUCTIONS SAFETY INSTRUCTIONS Before operating this projector, read this manual again, check operations and cable connections and try the solutions in the "Troubleshooting " section in the end of this...
...condition for a considerable time. CAUTION : TO REDUCE THE RISK OF ELECTRIC SHOCK, DO NOT REMOVE COVER (OR BACK). If your projector seems to manage those features and maintains it in not only shortening the product-life, but also malfunctions, fire hazard, or other accidents....If the problem still persists, contact the dealer where you to operate improperly, read this booklet. SAFETY INSTRUCTIONS SAFETY INSTRUCTIONS Before operating this projector, read this manual again, check operations and cable connections and try the solutions in the "Troubleshooting " section in the end of this...
Realis_E.pdf
Page 7
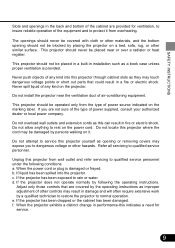
...clearance must be dangerous. - Do not cover the ventilation slot on the top, sides and rear of the projector cabinet for the Protection of your projector, and can near the projector, hot air is exhausted from the ventilation holes. - Heat build-up can reduce the service life of Electronic... similarly enclosed, the minimum distances must be used for an extended time, unplug the projector from the projection lens. Do not put any flammable object or spray can also be maintained. If the projector is to be maintained. SAFETY INSTRUCTIONS CAUTION Not for use in a computer room as...
...clearance must be dangerous. - Do not cover the ventilation slot on the top, sides and rear of the projector cabinet for the Protection of your projector, and can near the projector, hot air is exhausted from the ventilation holes. - Heat build-up can reduce the service life of Electronic... similarly enclosed, the minimum distances must be used for an extended time, unplug the projector from the projection lens. Do not put any flammable object or spray can also be maintained. If the projector is to be maintained. SAFETY INSTRUCTIONS CAUTION Not for use in a computer room as...
Realis_E.pdf
Page 8
...cart combination should use attachments not recommended by the manufacturers. Do not use near a swimming pool, etc... For added protection to the projector during a lightning storm, or when it from AC power supply before the product is left unattended and unused for cleaning. Do not place this... by the manufacturer, or sold with care. This will prevent damage due to rain or use liquid or aerosol cleaners. Unplug this projector on the projector. Do not expose this unit to lightning and power line surges. Do not use a mounting kit approved by the manufacturer as they...
...cart combination should use attachments not recommended by the manufacturers. Do not use near a swimming pool, etc... For added protection to the projector during a lightning storm, or when it from AC power supply before the product is left unattended and unused for cleaning. Do not place this... by the manufacturer, or sold with care. This will prevent damage due to rain or use liquid or aerosol cleaners. Unplug this projector on the projector. Do not expose this unit to lightning and power line surges. Do not use a mounting kit approved by the manufacturer as they...
Realis_E.pdf
Page 9
... servicing to qualified service personnel under the following the operating instructions. f. Never spill liquid of any kind into the projector. When the projector exhibits a distinct change in performance-this can result in damage and will often require extensive work by persons walking on... other hazards. Do not overload wall outlets and extension cords as improper adjustment of air-conditioning equipment. Do not locate this projector from overheating. d. The openings should be placed near the ventilation duct of other materials, and the bottom opening should not ...
... servicing to qualified service personnel under the following the operating instructions. f. Never spill liquid of any kind into the projector. When the projector exhibits a distinct change in performance-this can result in damage and will often require extensive work by persons walking on... other hazards. Do not overload wall outlets and extension cords as improper adjustment of air-conditioning equipment. Do not locate this projector from overheating. d. The openings should be placed near the ventilation duct of other materials, and the bottom opening should not ...
Realis_E.pdf
Page 10
... OR FEDERAL LAWS. 10 AC Power Cord for use in the country you be unable to persons. This is a safety feature to this projector meets the requirement for the United States and Canada : AC Power Cord used replacement parts specified by the Canadian Standard Association (CSA). Should you... purchased it. AC POWER CORD REQUIREMENT The AC Power Cord supplied with this projector, ask the service technician to perform routine safety checks to defeat this safety feature. Do not try to determine that the plug will fit...
... OR FEDERAL LAWS. 10 AC Power Cord for use in the country you be unable to persons. This is a safety feature to this projector meets the requirement for the United States and Canada : AC Power Cord used replacement parts specified by the Canadian Standard Association (CSA). Should you... purchased it. AC POWER CORD REQUIREMENT The AC Power Cord supplied with this projector, ask the service technician to perform routine safety checks to defeat this safety feature. Do not try to determine that the plug will fit...

Realis_E.pdf
Page 11
... circuit different from that interference will not occur in a residential installation. SAFETY INSTRUCTIONS Federal Communication Commission Notice Multimedia Projector, Model : SX50 This device complies with the instructions, may cause harmful interference to radio communications. This equipment generates, uses and ... by one or more of the following two conditions: (1) This device may cause undesired operation. One Canon Plaza, Lake Success, NY 11042, U.S.A. Canon U.S.A., Inc. Tel No. (516)328-5600 Canadian Radio Interference Regulations This Class B digital apparatus meets...
... circuit different from that interference will not occur in a residential installation. SAFETY INSTRUCTIONS Federal Communication Commission Notice Multimedia Projector, Model : SX50 This device complies with the instructions, may cause harmful interference to radio communications. This equipment generates, uses and ... by one or more of the following two conditions: (1) This device may cause undesired operation. One Canon Plaza, Lake Success, NY 11042, U.S.A. Canon U.S.A., Inc. Tel No. (516)328-5600 Canadian Radio Interference Regulations This Class B digital apparatus meets...
Realis_E.pdf
Page 12
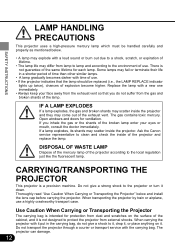
... keep your eyes or mouth, consult the doctor immediately. If a lamp explodes, its shards may come out of the exhaust vent. Ask the Canon service representative to clean and check the inside the projector. Do not give a shock to the environment of use a highly crashworthy transport case. When transporting the...mercury lamp of the cabinet, and it down. IF A LAMP EXPLODES If a lamp explodes, the gas and broken shards may scatter inside the projector and they may scatter inside of lifetime. • The lamp life may fail or terminate their life in the carrying bag, do not suffer...
... keep your eyes or mouth, consult the doctor immediately. If a lamp explodes, its shards may come out of the exhaust vent. Ask the Canon service representative to clean and check the inside the projector. Do not give a shock to the environment of use a highly crashworthy transport case. When transporting the...mercury lamp of the cabinet, and it down. IF A LAMP EXPLODES If a lamp explodes, the gas and broken shards may scatter inside the projector and they may scatter inside of lifetime. • The lamp life may fail or terminate their life in the carrying bag, do not suffer...
Realis_E.pdf
Page 13
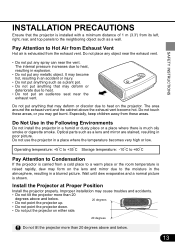
.... SAFETY INSTRUCTIONS • Do not put any metallic object. Do not place any spray can near the vent. Do not use the projector in explosion. • Do not put any object near the exhaust vent. The internal pressure increases due to heat. • Do not put anything ...are stained, resulting in a humid or dusty place or a place where there is shown. Do Not Use in the Following Environments Do not install the projector in poor picture. Operating temperature: +5°C to +35°C Storage temperature: -10°C to +60°C Pay Attention to Condensation If the...
.... SAFETY INSTRUCTIONS • Do not put any metallic object. Do not place any spray can near the vent. Do not use the projector in explosion. • Do not put any object near the exhaust vent. The internal pressure increases due to heat. • Do not put anything ...are stained, resulting in a humid or dusty place or a place where there is shown. Do Not Use in the Following Environments Do not install the projector in poor picture. Operating temperature: +5°C to +35°C Storage temperature: -10°C to +60°C Pay Attention to Condensation If the...

Realis_E.pdf
Page 14
... cap Carrying bag (P12) Lens cap strap Tie the lens cap to the power cord. 14 For the procedure, see page 92. • When the projector is not in use, attach the lens cap to protect the lens from dust and other foreign objects. • Be sure to attach the ferrite...
... cap Carrying bag (P12) Lens cap strap Tie the lens cap to the power cord. 14 For the procedure, see page 92. • When the projector is not in use, attach the lens cap to protect the lens from dust and other foreign objects. • Be sure to attach the ferrite...
Realis_E.pdf
Page 15
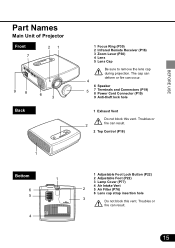
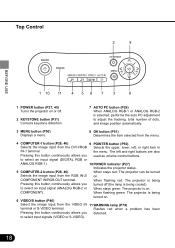
... and Connectors (P19) 8 Power Cord Connector (P19) 9 Anti-theft lock hole 1 Exhaust Vent Do not block this vent. BEFORE USE Part Names Main Unit of Projector Front 7 21 9 8 Back 6 3 1 Focus Ring (P30) 2 Infrared Remote Receiver (P16) 3 Zoom Lever (P30) 4 Lens 5 Lens Cap Be sure to remove the lens cap during projection...
... and Connectors (P19) 8 Power Cord Connector (P19) 9 Anti-theft lock hole 1 Exhaust Vent Do not block this vent. BEFORE USE Part Names Main Unit of Projector Front 7 21 9 8 Back 6 3 1 Focus Ring (P30) 2 Infrared Remote Receiver (P16) 3 Zoom Lever (P30) 4 Lens 5 Lens Cap Be sure to remove the lens cap during projection...
Realis_E.pdf
Page 16
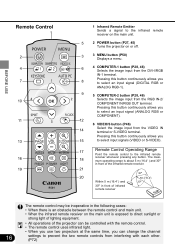
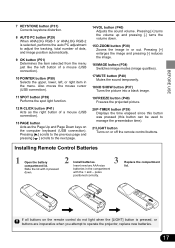
...be inoperative in the following cases: • When there is exposed to direct sunlight or strong light of lighting equipment. • All operations of the projector can be controlled with each other. (P72) BEFORE USE Remote Control 1 2 4 7 10 11 13 16 19 1 Infrared Remote Emitter Sends a ...signal to the infrared remote receiver on the main unit. 5 2 POWER button (P27, 45) Turns the projector on the main unit is an obstacle between the remote control and main unit. • When the infrared remote receiver on or off. 3 3 MENU button...
...be inoperative in the following cases: • When there is exposed to direct sunlight or strong light of lighting equipment. • All operations of the projector can be controlled with each other. (P72) BEFORE USE Remote Control 1 2 4 7 10 11 13 16 19 1 Infrared Remote Emitter Sends a ...signal to the infrared remote receiver on the main unit. 5 2 POWER button (P27, 45) Turns the projector on the main unit is an obstacle between the remote control and main unit. • When the infrared remote receiver on or off. 3 3 MENU button...
Realis_E.pdf
Page 17
...) Corrects keystone distortion. 8 AUTO PC button (P29) When ANALOG RGB-1 or ANALOG RGB-2 is pressed, or buttons are inoperative when you attempt to operate the projector, replace new batteries. 17 Slide the lid with it pressed down . 15 D.ZOOM button (P38) Zooms the image in the compartment with the + and - Pressing...
...) Corrects keystone distortion. 8 AUTO PC button (P29) When ANALOG RGB-1 or ANALOG RGB-2 is pressed, or buttons are inoperative when you attempt to operate the projector, replace new batteries. 17 Slide the lid with it pressed down . 15 D.ZOOM button (P38) Zooms the image in the compartment with the + and - Pressing...
Realis_E.pdf
Page 18
... being Pressing this button continuously allows you used as volume control buttons. to select an input signal (ANALOG RGB-2 or When stays green: The projector is being turned on. 6 VIDEO/S button (P46) Select the image input from the RGB IN-2/ on . to select input signals (VIDEO ...S-VIDEO). 18 to select an input signal (DIGITAL RGB or ANALOG RGB-1). 10 POWER indicator (P27) Indicates the projector status. 5 COMPUTER-2 button (P28, 46) When stays red: The projector can be turned Selects the image input from the VIDEO IN 11 WARNING lamp (P79) terminal or S-VIDEO terminal....
... being Pressing this button continuously allows you used as volume control buttons. to select an input signal (ANALOG RGB-2 or When stays green: The projector is being turned on. 6 VIDEO/S button (P46) Select the image input from the RGB IN-2/ on . to select input signals (VIDEO ...S-VIDEO). 18 to select an input signal (DIGITAL RGB or ANALOG RGB-1). 10 POWER indicator (P27) Indicates the projector status. 5 COMPUTER-2 button (P28, 46) When stays red: The projector can be turned Selects the image input from the VIDEO IN 11 WARNING lamp (P79) terminal or S-VIDEO terminal....

Realis_E.pdf
Page 20
...• The sizes in the above table have been obtained assuming that the aspect ratio is about 1.2 m (3.9') to 9.1 m (29.9'). INSTALLING THE PROJECTOR Determining the Distance to the screen. If the installation position is too close, the image is determined by the lens. 9.1 m (29.9′) 6.0... m (19.7′) 4.5 m (14.8′) 2.4 m (7.9′) 1.2 m (3.9′) Zoom (max.) Zoom (min.) INSTALLING THE PROJECTOR Optical axis when image is projected at the position where the projection distance is 4:3. The image size can be adjusted using the Zoom lever by...
...• The sizes in the above table have been obtained assuming that the aspect ratio is about 1.2 m (3.9') to 9.1 m (29.9'). INSTALLING THE PROJECTOR Determining the Distance to the screen. If the installation position is too close, the image is determined by the lens. 9.1 m (29.9′) 6.0... m (19.7′) 4.5 m (14.8′) 2.4 m (7.9′) 1.2 m (3.9′) Zoom (max.) Zoom (min.) INSTALLING THE PROJECTOR Optical axis when image is projected at the position where the projection distance is 4:3. The image size can be adjusted using the Zoom lever by...

Realis_E.pdf
Page 21
... recommended to limit ambient lighting in order to improve the image quality. RS-CL01) are required. 21 INSTALLING THE PROJECTOR Determining the Installation Place Placing in Front of the Screen Place the projector in front of the screen in such a manner that may block the exhaust vent (fan) on the right side... equipment. Screen Optical axis A slight error in the projection angle can project an image from any obstacle that it is hung from the ceiling or projector projects an image from behind the screen, the image must not be inverted vertically or horizontally. (P61) When hanging the...
... recommended to limit ambient lighting in order to improve the image quality. RS-CL01) are required. 21 INSTALLING THE PROJECTOR Determining the Installation Place Placing in Front of the Screen Place the projector in front of the screen in such a manner that may block the exhaust vent (fan) on the right side... equipment. Screen Optical axis A slight error in the projection angle can project an image from any obstacle that it is hung from the ceiling or projector projects an image from behind the screen, the image must not be inverted vertically or horizontally. (P61) When hanging the...

Realis_E.pdf
Page 22
... more than 20 degrees above and below, a lamp problem can be corrected using the KEYSTONE button. (P31) Keystone distortion of the projector and push the adjusting foot lock. If the distortion is trapezoidal). The keystone distortion can result. With the adjustable foot, the projection angle...adjusted with the spring force. 2 Adjust the projection angle while pushing the adjustable foot lock, and then release the lock. INSTALLING THE PROJECTOR Adjusting the Projection Angle The projection angle can be adjusted up to +/-20 degrees or less. Before making this adjustment, connect the ...
... more than 20 degrees above and below, a lamp problem can be corrected using the KEYSTONE button. (P31) Keystone distortion of the projector and push the adjusting foot lock. If the distortion is trapezoidal). The keystone distortion can result. With the adjustable foot, the projection angle...adjusted with the spring force. 2 Adjust the projection angle while pushing the adjustable foot lock, and then release the lock. INSTALLING THE PROJECTOR Adjusting the Projection Angle The projection angle can be adjusted up to +/-20 degrees or less. Before making this adjustment, connect the ...


