PowerShot SX10 IS Camera User Guide
Page 7
.../Playback Using a TV 223 Customizing the Camera (My Camera Settings) 225 Changing My Camera Settings 225 Registering My Camera Settings 226 Troubleshooting 228 List of Messages 239 Appendix 243 Safety Precautions 243 Preventing Malfunctions 249 Attaching the Lens Hood 253 Using the Power Kits (Sold... Separately 254 Using an Externally Mounted Flash (Sold Separately) . . 257 Replacing the Date Battery 265 Camera Care and Maintenance 267 Specifications 268 Index ...
.../Playback Using a TV 223 Customizing the Camera (My Camera Settings) 225 Changing My Camera Settings 225 Registering My Camera Settings 226 Troubleshooting 228 List of Messages 239 Appendix 243 Safety Precautions 243 Preventing Malfunctions 249 Attaching the Lens Hood 253 Using the Power Kits (Sold... Separately 254 Using an Externally Mounted Flash (Sold Separately) . . 257 Replacing the Date Battery 265 Camera Care and Maintenance 267 Specifications 268 Index ...

PowerShot SX10 IS Camera User Guide
Page 14
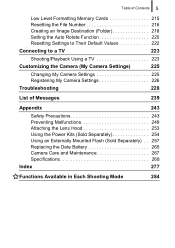
...correctly oriented before turning on the camera. Attaching/Removing the Lens Cap Press both sides of the lens cap (a), and remove it (b). • To avoid losing the lens cap, we recommend clipping it to the neck strap after removing it backward may cause the camera to fail to recognize the memory... inserting it in use, store the camera with your finger until it . Getting Started 12 Preparations 3. Inserting it (p. 13). • When not in the camera. Be sure to malfunction. To Remove the Memory Card Push the memory card with the lens cap attached. Close the cover (c) and slide ...
...correctly oriented before turning on the camera. Attaching/Removing the Lens Cap Press both sides of the lens cap (a), and remove it (b). • To avoid losing the lens cap, we recommend clipping it to the neck strap after removing it backward may cause the camera to fail to recognize the memory... inserting it in use, store the camera with your finger until it . Getting Started 12 Preparations 3. Inserting it (p. 13). • When not in the camera. Be sure to malfunction. To Remove the Memory Card Push the memory card with the lens cap attached. Close the cover (c) and slide ...
PowerShot SX10 IS Camera User Guide
Page 15
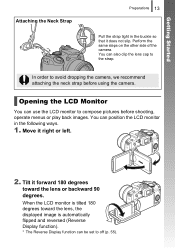
...the LCD monitor is automatically flipped and reversed (Reverse Display function). * The Reverse Display function can also clip the lens cap to avoid dropping the camera, we recommend attaching the neck strap before shooting, operate menus or play back images. Perform the same steps on the other side of... the camera. You can be set to compose pictures before using the camera. Tilt it right or left. 2. Getting Started Attaching the Neck Strap Preparations 13 Pull the strap tight in the following ways. 1. In...
...the LCD monitor is automatically flipped and reversed (Reverse Display function). * The Reverse Display function can also clip the lens cap to avoid dropping the camera, we recommend attaching the neck strap before shooting, operate menus or play back images. Perform the same steps on the other side of... the camera. You can be set to compose pictures before using the camera. Tilt it right or left. 2. Getting Started Attaching the Neck Strap Preparations 13 Pull the strap tight in the following ways. 1. In...
PowerShot SX10 IS Camera User Guide
Page 42
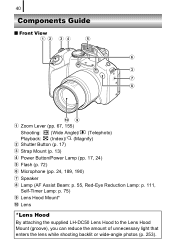
40 Components Guide „ Front View a Zoom Lever (pp. 67, 155) Shooting: (Wide Angle)/ (Telephoto) Playback: (Index)/ (Magnify) b Shutter Button (p. 17) c Strap Mount (p. 13) d Power Button/Power Lamp (pp. 17, 24) e Flash (p. 72) f Microphone (pp. 24, 189, 190) g Speaker h Lamp (AF Assist Beam: p. 55, Red-Eye Reduction Lamp: p. 111, Self-Timer Lamp: p. 75) i Lens Hood Mount* j Lens *Lens Hood By attaching the supplied LH-DC50 Lens Hood to the Lens Hood Mount (groove), you can reduce the amount of unnecessary light that enters the lens while shooting backlit or wide-angle photos (p. 253).
40 Components Guide „ Front View a Zoom Lever (pp. 67, 155) Shooting: (Wide Angle)/ (Telephoto) Playback: (Index)/ (Magnify) b Shutter Button (p. 17) c Strap Mount (p. 13) d Power Button/Power Lamp (pp. 17, 24) e Flash (p. 72) f Microphone (pp. 24, 189, 190) g Speaker h Lamp (AF Assist Beam: p. 55, Red-Eye Reduction Lamp: p. 111, Self-Timer Lamp: p. 75) i Lens Hood Mount* j Lens *Lens Hood By attaching the supplied LH-DC50 Lens Hood to the Lens Hood Mount (groove), you can reduce the amount of unnecessary light that enters the lens while shooting backlit or wide-angle photos (p. 253).

PowerShot SX10 IS Camera User Guide
Page 255
...with the mark on the lens hood with the lens hood attached, portions of the arrow until locked. • Turn the lens hood in the opposite direction to remove it to reduce the amount of light entering the lens. 1 Align the notch ( ) on the camera, and turn the lens hood in the direction of... the image may appear darker. 253 Attaching the Lens Hood When shooting a wide-angle ...
...with the mark on the lens hood with the lens hood attached, portions of the arrow until locked. • Turn the lens hood in the opposite direction to remove it to reduce the amount of light entering the lens. 1 Align the notch ( ) on the camera, and turn the lens hood in the direction of... the image may appear darker. 253 Attaching the Lens Hood When shooting a wide-angle ...


