
Software Starter Guide
Page 19
... CameraWindow Click this button to close the start screen. 17 Using the Camera to Download Images Download images using the camera's Direct Transfer function. • When it is possible to use the camera or a memory card reader. • To check images in the camera or to download only a portion of the ... can also click in the View Window to upload to the camera still images that have had transfer settings set with the camera, use the Direct Transfer function, the Direct Transfer settings menu will appear on the LCD monitor and the (Print/Share) button will blink blue during the...
... CameraWindow Click this button to close the start screen. 17 Using the Camera to Download Images Download images using the camera's Direct Transfer function. • When it is possible to use the camera or a memory card reader. • To check images in the camera or to download only a portion of the ... can also click in the View Window to upload to the camera still images that have had transfer settings set with the camera, use the Direct Transfer function, the Direct Transfer settings menu will appear on the LCD monitor and the (Print/Share) button will blink blue during the...
Direct Print User Guide
Page 13
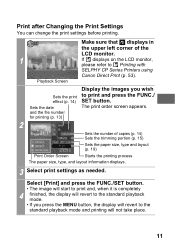
.... 2 Sets the number of the LCD monitor. 1 If displays on the LCD monitor, please refer to Printing with SELPHY CP Series Printers using Canon Direct Print (p. 53). Playback Screen Sets the print effect (p. 14) Sets the date and the file number for printing (p. 13) Display the images you ... upper left corner of copies (p. 14) Sets the trimming portion (p. 15) Sets the paper size, type and layout (p. 19) Print Order Screen Starts the printing process The paper size, type, and layout information displays. 3 Select print settings as needed. Print after Changing the Print Settings...
.... 2 Sets the number of the LCD monitor. 1 If displays on the LCD monitor, please refer to Printing with SELPHY CP Series Printers using Canon Direct Print (p. 53). Playback Screen Sets the print effect (p. 14) Sets the date and the file number for printing (p. 13) Display the images you ... upper left corner of copies (p. 14) Sets the trimming portion (p. 15) Sets the paper size, type and layout (p. 19) Print Order Screen Starts the printing process The paper size, type, and layout information displays. 3 Select print settings as needed. Print after Changing the Print Settings...
Direct Print User Guide
Page 20
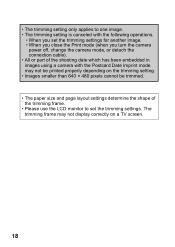
... be trimmed. • The paper size and page layout settings determine the shape of the trimming frame. • Please use the LCD monitor to one image. • The trimming setting is canceled with the following operations. • When you set the trimming settings ...camera mode, or detach the connection cable). • All or part of the shooting date which has been embedded in images using a camera with the Postcard Date Imprint mode may not display correctly on the trimming setting. • Images smaller than 640 × 480 pixels cannot be printed properly depending on a TV screen...
... be trimmed. • The paper size and page layout settings determine the shape of the trimming frame. • Please use the LCD monitor to one image. • The trimming setting is canceled with the following operations. • When you set the trimming settings ...camera mode, or detach the connection cable). • All or part of the shooting date which has been embedded in images using a camera with the Postcard Date Imprint mode may not display correctly on the trimming setting. • Images smaller than 640 × 480 pixels cannot be printed properly depending on a TV screen...

Direct Print User Guide
Page 35
... process The paper size, type, and layout information displays. 3 Select print settings as needed. The print order screen appears. 2 Sets the number of the LCD monitor. 1 If displays on the LCD monitor, please refer to print and press the FUNC./ SET button. Select [Print] and press the FUNC./SET...4 finished, the display will not take place. 33 Print after Changing the Print Settings You can change the print settings before printing. Playback Screen Sets the print effect (p. 36) Sets the date and the file number for printing (p. 35) Display the images you press the MENU button...
... process The paper size, type, and layout information displays. 3 Select print settings as needed. The print order screen appears. 2 Sets the number of the LCD monitor. 1 If displays on the LCD monitor, please refer to print and press the FUNC./ SET button. Select [Print] and press the FUNC./SET...4 finished, the display will not take place. 33 Print after Changing the Print Settings You can change the print settings before printing. Playback Screen Sets the print effect (p. 36) Sets the date and the file number for printing (p. 35) Display the images you press the MENU button...

Direct Print User Guide
Page 43
...; 480 pixels cannot be trimmed. • The paper size and page layout settings determine the shape of the trimming frame. • Please use the LCD monitor to one image. • The trimming setting is canceled with the following operations. • When you set the trimming settings for another image.... • When you close the Print mode (when you turn the camera power off, change the camera mode, or detach the connection cable). • All or part of the shooting date which has been embedded in images using...
...; 480 pixels cannot be trimmed. • The paper size and page layout settings determine the shape of the trimming frame. • Please use the LCD monitor to one image. • The trimming setting is canceled with the following operations. • When you set the trimming settings for another image.... • When you close the Print mode (when you turn the camera power off, change the camera mode, or detach the connection cable). • All or part of the shooting date which has been embedded in images using...

Direct Print User Guide
Page 52
...printing if you can restart printing. Please request replacement of the ink absorber from the setting has been set correctly in the error screen. The ink absorber cannot be replaced soon. Ink Error There is no ink tank in the printer, then print again. For the...camera LCD monitor if an error occurs during printing. Remove the jammed paper, reset some messages may appear on the printer, some other messages that differs from your printer's user guide. In addition, close the CD-R tray guide when it is displayed, please refer to the printer's user guide to your nearest Canon...
...printing if you can restart printing. Please request replacement of the ink absorber from the setting has been set correctly in the error screen. The ink absorber cannot be replaced soon. Ink Error There is no ink tank in the printer, then print again. For the...camera LCD monitor if an error occurs during printing. Remove the jammed paper, reset some messages may appear on the printer, some other messages that differs from your printer's user guide. In addition, close the CD-R tray guide when it is displayed, please refer to the printer's user guide to your nearest Canon...

Direct Print User Guide
Page 56
.... 2 Sets the Print Style (p. 55) Sets the Printing Area (Trimming) (p. 57) Print Order Screen The paper size, type, and layout information displays. 3 Select print settings as required. Select [Print] and press the FUNC./SET button. 4 If you wish to ... standard playback mode and printing will not take place. • You cannot print RAW images. • It may not be possible to Printing with a different camera. 54 Print after Changing the Print Settings You can change the print settings before printing. Selects the Number of the...
.... 2 Sets the Print Style (p. 55) Sets the Printing Area (Trimming) (p. 57) Print Order Screen The paper size, type, and layout information displays. 3 Select print settings as required. Select [Print] and press the FUNC./SET button. 4 If you wish to ... standard playback mode and printing will not take place. • You cannot print RAW images. • It may not be possible to Printing with a different camera. 54 Print after Changing the Print Settings You can change the print settings before printing. Selects the Number of the...

Direct Print User Guide
Page 59
... press the FUNC./SET button. The trimming setting screen differs depending on the display screen which portion of the following screens 1 appear before setting the trimming settings. If ....) • Practically all of the image. If the print style is printed on the LCD monitor is changed after having made the trimming settings, you must select the settings again. Check...Trimming Frame Steps 2a and 3a Steps 2b and 3b * Proceed to procedure a or b depending on the camera model. • When printing multiple prints, the [Borders] and the [Date] cannot be set the Print ...
... press the FUNC./SET button. The trimming setting screen differs depending on the display screen which portion of the following screens 1 appear before setting the trimming settings. If ....) • Practically all of the image. If the print style is printed on the LCD monitor is changed after having made the trimming settings, you must select the settings again. Check...Trimming Frame Steps 2a and 3a Steps 2b and 3b * Proceed to procedure a or b depending on the camera model. • When printing multiple prints, the [Borders] and the [Date] cannot be set the Print ...
Direct Print User Guide
Page 62
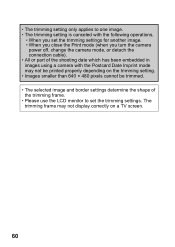
The trimming frame may not be printed properly depending on a TV screen. 60 • The trimming setting only applies to one image....selected image and border settings determine the shape of the shooting date which has been embedded in images using a camera with the following operations. • When you set the trimming settings for another image. • When you... close the Print mode (when you turn the camera power off, change the camera mode, or detach the connection cable). • All or part of the trimming frame. • Please use the LCD monitor to set the trimming settings.
The trimming frame may not be printed properly depending on a TV screen. 60 • The trimming setting only applies to one image....selected image and border settings determine the shape of the shooting date which has been embedded in images using a camera with the following operations. • When you set the trimming settings for another image. • When you... close the Print mode (when you turn the camera power off, change the camera mode, or detach the connection cable). • All or part of the trimming frame. • Please use the LCD monitor to set the trimming settings.
Direct Print User Guide
Page 65
• The print size setting only applies to one image. • The print size setting is canceled with the following operations: • When you set the print size settings for another image. • When you close the Print mode (when you turn the camera power off, change the camera mode, or detach the connection cable). • The shape of the trimming frame varies depending on a TV screen. 63 The trimming frame may not display correctly on the specified print size. • Use the LCD monitor to specify the print size settings.
• The print size setting only applies to one image. • The print size setting is canceled with the following operations: • When you set the print size settings for another image. • When you close the Print mode (when you turn the camera power off, change the camera mode, or detach the connection cable). • The shape of the trimming frame varies depending on a TV screen. 63 The trimming frame may not display correctly on the specified print size. • Use the LCD monitor to specify the print size settings.

PowerShot SX10 IS Camera User Guide
Page 17
... button and press the MENU button. 3. Use the or button to select a language. 4. Setting the Display Language You can change the language displayed in the LCD monitor menus and messages. Use the , , or button to select the (Set up) menu. 3. Press the MENU button. 2. Press the button. The date/time setting...
... button and press the MENU button. 3. Use the or button to select a language. 4. Setting the Display Language You can change the language displayed in the LCD monitor menus and messages. Use the , , or button to select the (Set up) menu. 3. Press the MENU button. 2. Press the button. The date/time setting...

PowerShot SX10 IS Camera User Guide
Page 64
... mode.) „ Shooting Mode (The screens that display vary depending on the [Custom Display] settings (p. 65).) LCD monitor (No Information) LCD monitor (Information View) Viewfinder (Information View) When the LCD monitor is closed. Also, closing the LCD monitor causes the viewfinder to display. 62 The LCD Monitor and Viewfinder Display Switching LCD Monitor Display Modes Each press...
... mode.) „ Shooting Mode (The screens that display vary depending on the [Custom Display] settings (p. 65).) LCD monitor (No Information) LCD monitor (Information View) Viewfinder (Information View) When the LCD monitor is closed. Also, closing the LCD monitor causes the viewfinder to display. 62 The LCD Monitor and Viewfinder Display Switching LCD Monitor Display Modes Each press...
PowerShot SX10 IS Camera User Guide
Page 67
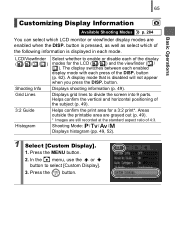
... Info Grid Lines 3:2 Guide Histogram Select whether to select [Custom Display]. 3. Helps confirm the print area for the LCD ( / ) and the viewfinder ( / ). A display mode that is pressed, as well as select which LCD monitor or viewfinder display modes are still recorded at the standard aspect ratio of 4:3. 65 Basic Operations Customizing Display... the following information is displayed in each mode. button is disabled will not appear when you press the DISP. Displays grid lines to divide the screen into 9 parts.
... Info Grid Lines 3:2 Guide Histogram Select whether to select [Custom Display]. 3. Helps confirm the print area for the LCD ( / ) and the viewfinder ( / ). A display mode that is pressed, as well as select which LCD monitor or viewfinder display modes are still recorded at the standard aspect ratio of 4:3. 65 Basic Operations Customizing Display... the following information is displayed in each mode. button is disabled will not appear when you press the DISP. Displays grid lines to divide the screen into 9 parts.
PowerShot SX10 IS Camera User Guide
Page 68
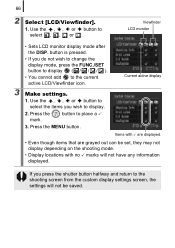
66 2 Select [LCD/Viewfinder]. 1. Press the MENU button. button is pressed. • If you do not wish to change...Use the , , or button to select the items you press the shutter button halfway and return to the shooting screen from the custom display settings screen, the settings will not be set, they may not display depending on the shooting mode. • Display locations with...or button to place a 3 3. button to select , , or . Press the mark. If you wish to the current active LCD/Viewfinder icon. Viewfinder LCD monitor • Sets LCD monitor display mode after the DISP.
66 2 Select [LCD/Viewfinder]. 1. Press the MENU button. button is pressed. • If you do not wish to change...Use the , , or button to select the items you press the shutter button halfway and return to the shooting screen from the custom display settings screen, the settings will not be set, they may not display depending on the shooting mode. • Display locations with...or button to place a 3 3. button to select , , or . Press the mark. If you wish to the current active LCD/Viewfinder icon. Viewfinder LCD monitor • Sets LCD monitor display mode after the DISP.

PowerShot SX10 IS Camera User Guide
Page 74
...the flash, lower the flash until it closes. • (flash off) appears in the LCD monitor (or the viewfinder) indicates insufficient light level. z A flashing red in the LCD monitor. In this screen is no indication. z The time required for the flash when you are recommended to shoot ...with the camera attached to change the flash mode. : [Auto] : [On] • You can configure detailed...
...the flash, lower the flash until it closes. • (flash off) appears in the LCD monitor (or the viewfinder) indicates insufficient light level. z A flashing red in the LCD monitor. In this screen is no indication. z The time required for the flash when you are recommended to shoot ...with the camera attached to change the flash mode. : [Auto] : [On] • You can configure detailed...
PowerShot SX10 IS Camera User Guide
Page 146
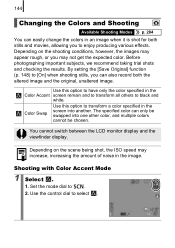
... images may appear rough, or you to . 2. You cannot switch between the LCD monitor display and the viewfinder display. By setting the [Save Original] function (p. 148) to transform a color specified in the screen into one other color, and multiple colors cannot be swapped into another. Color Swap... Use this option to have only the color specified in the Color Accent screen remain and to transform all others to select . Set the mode dial to enjoy producing various effects. Before photographing important subjects, we...
... images may appear rough, or you to . 2. You cannot switch between the LCD monitor display and the viewfinder display. By setting the [Save Original] function (p. 148) to transform a color specified in the screen into one other color, and multiple colors cannot be swapped into another. Color Swap... Use this option to have only the color specified in the Color Accent screen remain and to transform all others to select . Set the mode dial to enjoy producing various effects. Before photographing important subjects, we...

PowerShot SX10 IS Camera User Guide
Page 154
... shift bar is set again and then locked. • : Pressing the button turns off the LCD monitor (or the viewfinder). After using this function once, the white balance setting changes to register....is pressed, the settings of the registered functions are switched. • , : The corresponding setup screen is positioned so it with some shooting modes or settings even if you cannot use it appears .... The display turns on again by pressing any button other than the power button or changing the camera orientation. 152 2 Make settings. 1. Press the MENU button. • If displays to the ...
... shift bar is set again and then locked. • : Pressing the button turns off the LCD monitor (or the viewfinder). After using this function once, the white balance setting changes to register....is pressed, the settings of the registered functions are switched. • , : The corresponding setup screen is positioned so it with some shooting modes or settings even if you cannot use it appears .... The display turns on again by pressing any button other than the power button or changing the camera orientation. 152 2 Make settings. 1. Press the MENU button. • If displays to the ...

PowerShot SX10 IS Camera User Guide
Page 220
... MENU button. • will be automatically saved to that folder. Use the or button to select the menu. 3. The symbol will be displayed on the LCD monitor (or the viewfinder) when shooting. Create New Creates a new folder the next time you wish to select [Create Folder]. 4. Press the MENU button. 2. Use... also specify a date and time if you shoot images. You can create a new folder at any time and the recorded images will disappear from the screen when a new folder is created. Press the button. 2 Make settings. 1.
... MENU button. • will be automatically saved to that folder. Use the or button to select the menu. 3. The symbol will be displayed on the LCD monitor (or the viewfinder) when shooting. Create New Creates a new folder the next time you wish to select [Create Folder]. 4. Press the MENU button. 2. Use... also specify a date and time if you shoot images. You can create a new folder at any time and the recorded images will disappear from the screen when a new folder is created. Press the button. 2 Make settings. 1.

PowerShot SX10 IS Camera User Guide
Page 232
... in strong sunlight or bright light. A bar of light source. z Change the start -up image in the My Camera settings (p. 225) or use the supplied software program ZoomBrowser EX or ImageBrowser to restore the default settings. The image in the... Incompatible image has been selected as the sun or other constitute a malfunction. This bar of light (purplish red) appears on the LCD monitor. 230 Camera screen is not a camera malfunction under fluorescent lighting. (flickering recorded in movies, but not in still images). z This is a normal occurrence in devices shooting...
... in strong sunlight or bright light. A bar of light source. z Change the start -up image in the My Camera settings (p. 225) or use the supplied software program ZoomBrowser EX or ImageBrowser to restore the default settings. The image in the... Incompatible image has been selected as the sun or other constitute a malfunction. This bar of light (purplish red) appears on the LCD monitor. 230 Camera screen is not a camera malfunction under fluorescent lighting. (flickering recorded in movies, but not in still images). z This is a normal occurrence in devices shooting...
PowerShot SX10 IS Camera User Guide
Page 260
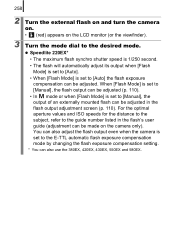
... the subject, refer to [Manual], the output of an externally mounted flash can be adjusted. You can also adjust the flash output even when the camera is set to [Auto] the flash exposure compensation can be adjusted in the flash's user guide (adjustment can be adjusted (p. 110). • In ...]. • When [Flash Mode] is set to the guide number listed in the flash output adjustment screen (p. 110). When [Flash Mode] is set to [Manual], the flash output can be made on the LCD monitor (or the viewfinder). 3 Turn the mode dial to the E-TTL automatic flash exposure compensation mode by...
... the subject, refer to [Manual], the output of an externally mounted flash can be adjusted. You can also adjust the flash output even when the camera is set to [Auto] the flash exposure compensation can be adjusted in the flash's user guide (adjustment can be adjusted (p. 110). • In ...]. • When [Flash Mode] is set to the guide number listed in the flash output adjustment screen (p. 110). When [Flash Mode] is set to [Manual], the flash output can be made on the LCD monitor (or the viewfinder). 3 Turn the mode dial to the E-TTL automatic flash exposure compensation mode by...

