
ImageBrowser 6.5 for Macintosh Instruction Manual
Page 10
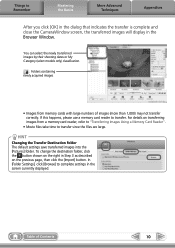
... folder, click the button shown on the right in Step 3 as described on transferring images from memory cards with large numbers of Contents 10 Table of images (more than 1,000) may not transfer correctly. For details on the previous page, then click the [Import] button....] in the dialog that indicates the transfer is complete and close the CameraWindow screen, the transferred images will display in the Browser Window. Things to complete settings in the screen currently displayed. HINT Changing the Transfer Destination Folder The default settings save transferred images into the...
... folder, click the button shown on the right in Step 3 as described on transferring images from memory cards with large numbers of Contents 10 Table of images (more than 1,000) may not transfer correctly. For details on the previous page, then click the [Import] button....] in the dialog that indicates the transfer is complete and close the CameraWindow screen, the transferred images will display in the Browser Window. Things to complete settings in the screen currently displayed. HINT Changing the Transfer Destination Folder The default settings save transferred images into the...
ZoomBrowser EX 6.5 for Windows Instruction Manual
Page 10
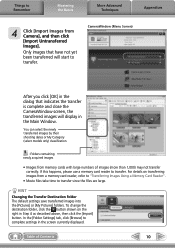
... models only) classification. : Folders containing newly acquired images • Images from memory cards with large numbers of Contents 10 In the [Folder Settings] tab, click [Browse] to complete settings in the Main Window. CameraWindow (Menu Screen) After you click [OK] in the dialog that have not yet been transferred will display in...
... models only) classification. : Folders containing newly acquired images • Images from memory cards with large numbers of Contents 10 In the [Folder Settings] tab, click [Browse] to complete settings in the Main Window. CameraWindow (Menu Screen) After you click [OK] in the dialog that have not yet been transferred will display in...
ZoomBrowser EX 6.5 for Windows Instruction Manual
Page 30
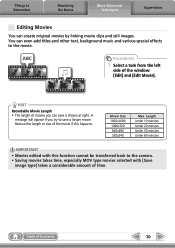
... Movies You can save a longer movie. Movie Size 1920x1080 1280x720 640x480 320x240 Max. ABC Procedures 1 Select a task from the left side of time. Length Under 10 minutes Under 20 minutes Under 30 minutes Under 60 minutes IMPORTANT • Movies edited with this happens. Table of the movie if this function cannot... movies you try to the camera. • Saving movies takes time, especially MOV type movies selected with [Save image type] takes a considerable amount of the window: [Edit] and [Edit Movie]. Things to the movie.
... Movies You can save a longer movie. Movie Size 1920x1080 1280x720 640x480 320x240 Max. ABC Procedures 1 Select a task from the left side of time. Length Under 10 minutes Under 20 minutes Under 30 minutes Under 60 minutes IMPORTANT • Movies edited with this happens. Table of the movie if this function cannot... movies you try to the camera. • Saving movies takes time, especially MOV type movies selected with [Save image type] takes a considerable amount of the window: [Edit] and [Edit Movie]. Things to the movie.

SELPHY ES1 User Guide
Page 59
10 Select [USB], select the printer name, and then click the [Add] button. 11 Close the window by clicking in the upper left-hand corner. Next, install the software to proceed. When a dialog box appears instructing that the installation is complete, click [OK]. 57 z Select [Custom Installation] to select programs for individual installation. 14 Follow the onscreen instructions to your computer. 12 Click the Application Software [Install] button. 13 Select [Easy Installation] and then click [Next].
10 Select [USB], select the printer name, and then click the [Add] button. 11 Close the window by clicking in the upper left-hand corner. Next, install the software to proceed. When a dialog box appears instructing that the installation is complete, click [OK]. 57 z Select [Custom Installation] to select programs for individual installation. 14 Follow the onscreen instructions to your computer. 12 Click the Application Software [Install] button. 13 Select [Easy Installation] and then click [Next].


