ImageBrowser 6.5 for Macintosh Instruction Manual
Page 5
... Images...45 Comparing Images...46 Comparing Multiple Images...46 My Camera Settings...47 Changing the Shutter Sound and Start-Up Image 47 Transferring Images...49 Transferring Images to a Camera 49 CANON iMAGE GATEWAY...50 About CANON iMAGE GATEWAY (for U.S.A. customers only 50 Registering...50 Available Services...51 Preference Settings...52 Customizing ImageBrowser...52 Appendices...53 List of Available Functions...53 Supported Image Types...55 Uninstalling the Software...56 Memory Card Folder Structure 57 Troubleshooting...
... Images...45 Comparing Images...46 Comparing Multiple Images...46 My Camera Settings...47 Changing the Shutter Sound and Start-Up Image 47 Transferring Images...49 Transferring Images to a Camera 49 CANON iMAGE GATEWAY...50 About CANON iMAGE GATEWAY (for U.S.A. customers only 50 Registering...50 Available Services...51 Preference Settings...52 Customizing ImageBrowser...52 Appendices...53 List of Available Functions...53 Supported Image Types...55 Uninstalling the Software...56 Memory Card Folder Structure 57 Troubleshooting...
ImageBrowser 6.5 for Macintosh Instruction Manual
Page 6
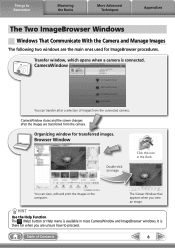
... Help menu is connected. Things to proceed. Click this icon in the computer. Transfer window, which opens when a camera is available in most CameraWindow and ImageBrowser windows. CameraWindow closes and the screen changes after the images are the main ones used for ImageBrowser procedures. CameraWindow You can view, edit and print the images in the Dock. Browser Window Double-click an image. You can transfer all or a selection...
... Help menu is connected. Things to proceed. Click this icon in the computer. Transfer window, which opens when a camera is available in most CameraWindow and ImageBrowser windows. CameraWindow closes and the screen changes after the images are the main ones used for ImageBrowser procedures. CameraWindow You can view, edit and print the images in the Dock. Browser Window Double-click an image. You can transfer all or a selection...
ImageBrowser 6.5 for Macintosh Instruction Manual
Page 22
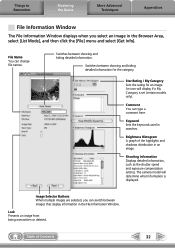
... overwritten or deleted. File Name You can type a comment here. Switches between showing and hiding detailed information. Keyword Sets the keywords used in the Browser Area, select [List Mode], and then click the [File] menu and select [Get Info]. Comment You can change file names. The camera model will display if a My Category is displayed. An icon will determine what information...
... overwritten or deleted. File Name You can type a comment here. Switches between showing and hiding detailed information. Keyword Sets the keywords used in the Browser Area, select [List Mode], and then click the [File] menu and select [Get Info]. Comment You can change file names. The camera model will display if a My Category is displayed. An icon will determine what information...
ZoomBrowser EX 6.5 for Windows Instruction Manual
Page 5
... 49 Registering...49 Available Services...50 Preference Settings...51 Customizing ZoomBrowser EX...51 Customizing the Task Buttons...51 Appendices...52 List of Available Functions...52 Supported Image Types...54 Uninstalling the Software...55 Memory Card Folder Structure 56 Troubleshooting...57 5 Things to Remember Mastering the Basics More Advanced Techniques Appendices Exporting...33 Changing Image (Stills) Sizes and Types 33 Changing Movie Sizes and Types 33 Extracting Stills...
... 49 Registering...49 Available Services...50 Preference Settings...51 Customizing ZoomBrowser EX...51 Customizing the Task Buttons...51 Appendices...52 List of Available Functions...52 Supported Image Types...54 Uninstalling the Software...55 Memory Card Folder Structure 56 Troubleshooting...57 5 Things to Remember Mastering the Basics More Advanced Techniques Appendices Exporting...33 Changing Image (Stills) Sizes and Types 33 Changing Movie Sizes and Types 33 Extracting Stills...
ZoomBrowser EX 6.5 for Windows Instruction Manual
Page 22
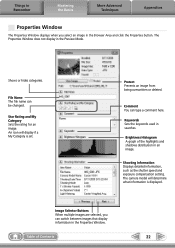
... Properties Window The Properties Window displays when you can switch between images that display information in the Preview Mode. An icon will determine what information is set. Brightness Histogram A graph of Contents 22 Comment You can be changed. File Name The file name can type a comment here. Star Rating and My Category Sets the rating for an image. Keywords Sets the keywords used...
... Properties Window The Properties Window displays when you can switch between images that display information in the Preview Mode. An icon will determine what information is set. Brightness Histogram A graph of Contents 22 Comment You can be changed. File Name The file name can type a comment here. Star Rating and My Category Sets the rating for an image. Keywords Sets the keywords used...
ZoomBrowser EX 6.5 for Windows Instruction Manual
Page 38
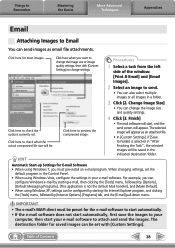
... side of Contents 38 Click here to check what the actual compressed file size will appear. The selected image will be saved in the indicated destination folder. Automatic Start-up Settings for the e-mail software to start automatically. • If the e-mail software does not start automatically, first save the images to attach and send the images. When changing settings, set the default program in the Control Panel. • When using Windows...
... side of Contents 38 Click here to check what the actual compressed file size will appear. The selected image will be saved in the indicated destination folder. Automatic Start-up Settings for the e-mail software to start automatically. • If the e-mail software does not start automatically, first save the images to attach and send the images. When changing settings, set the default program in the Control Panel. • When using Windows...
SELPHY CP710/CP510 User Guide
Page 9
.... When used with the EOS 10D, EOS 20D, EOS DIGITAL REBEL, or EOS DIGITAL REBEL XT Be sure to set [Communication] in the camera's menu to [PTP] or [Print/PTP] before connecting the camera to this warranty does not apply to repairs arising out of the malfunction of a battery pack). For details, read the camera's user guide. 7 . Canon shall not be needed when using a non-Canon digital cameras.
.... When used with the EOS 10D, EOS 20D, EOS DIGITAL REBEL, or EOS DIGITAL REBEL XT Be sure to set [Communication] in the camera's menu to [PTP] or [Print/PTP] before connecting the camera to this warranty does not apply to repairs arising out of the malfunction of a battery pack). For details, read the camera's user guide. 7 . Canon shall not be needed when using a non-Canon digital cameras.
SELPHY CP710/CP510 User Guide
Page 22
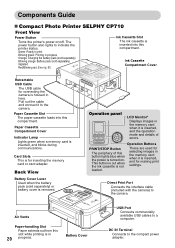
.../Blinking red: Error (p. 61) Ink Cassette Slot The ink cassette is inserted, and the operation mode and details of this button lights blue when the power is for selecting images in the memory card when it to print Blinking green: Printing in the memory card when it is inserted into this compartment. Paper Cassette Slot The paper cassette loads into this compartment. Operation Buttons PRINT/STOP Button The periphery of errors. The power button also lights to the compact power adapter. Components Guide „ Compact Photo Printer SELPHY CP710 Front View Power Button Turns...
.../Blinking red: Error (p. 61) Ink Cassette Slot The ink cassette is inserted, and the operation mode and details of this button lights blue when the power is for selecting images in the memory card when it to print Blinking green: Printing in the memory card when it is inserted into this compartment. Paper Cassette Slot The paper cassette loads into this compartment. Operation Buttons PRINT/STOP Button The periphery of errors. The power button also lights to the compact power adapter. Components Guide „ Compact Photo Printer SELPHY CP710 Front View Power Button Turns...
SELPHY CP710/CP510 User Guide
Page 23
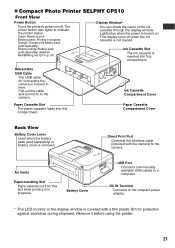
... the display window is covered with a thin plastic film for connecting the camera is inserted into this compartment. DC IN Terminal Connects to the camera. Pull out the cable and connect it before using the printer. 21 Air Vents Paper-handling Slot Paper extends out from this slot while printing is turned on /off when the ink cassette is not loaded. „ Compact Photo Printer SELPHY CP510 Front View Power Button Turns the printer's power on . The power button also lights...
... the display window is covered with a thin plastic film for connecting the camera is inserted into this compartment. DC IN Terminal Connects to the camera. Pull out the cable and connect it before using the printer. 21 Air Vents Paper-handling Slot Paper extends out from this slot while printing is turned on /off when the ink cassette is not loaded. „ Compact Photo Printer SELPHY CP510 Front View Power Button Turns the printer's power on . The power button also lights...
SELPHY CP710/CP510 User Guide
Page 50
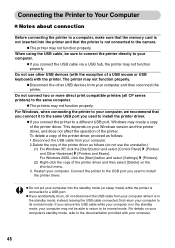
... printer to a computer, make sure that the memory card is not inserted into the standby mode (or sleep mode) while the printer is connected to a USB port. This depends on your computer to its normal mode. z If you connect the printer to install the printer driver. If you remove the USB cable while your computer is in the standby mode; zThe printer may not function properly. For Windows 2000, click the [Start] button and select [Settings] [Printers...
... printer to a computer, make sure that the memory card is not inserted into the standby mode (or sleep mode) while the printer is connected to a USB port. This depends on your computer to its normal mode. z If you connect the printer to install the printer driver. If you remove the USB cable while your computer is in the standby mode; zThe printer may not function properly. For Windows 2000, click the [Start] button and select [Settings] [Printers...

SELPHY CP710/CP510 User Guide
Page 59
... the ink sheet, resulting in the printed image, a probable cause is required, wipe first with a cloth moistened with a diluted neutral solvent, then wipe again with a new one. 57 Appendix Cleaning the Printer „ Cleaning Inside the Printer If faint stripes appear in poor print quality. Never use a chemical cleaning cloth, read the instructions that dust has accumulated inside the printer. If the ink sheet becomes dusty, remove the ink cassette and replace...
... the ink sheet, resulting in the printed image, a probable cause is required, wipe first with a cloth moistened with a diluted neutral solvent, then wipe again with a new one. 57 Appendix Cleaning the Printer „ Cleaning Inside the Printer If faint stripes appear in poor print quality. Never use a chemical cleaning cloth, read the instructions that dust has accumulated inside the printer. If the ink sheet becomes dusty, remove the ink cassette and replace...
SELPHY CP710/CP510 User Guide
Page 60
...The cable is in progress or printing connected to a computer is not correctly connected. z Turn the printer's power on again. Printing from the memory card is in progress. The printer has overheated. z Load the paper cassette correctly (p. 29). The printer's power button is not loaded correctly. Your camera's firmware is plugged into a power outlet (using the camera's optional compact power adapter). z Wait until the print outputted. The ink cassette is blinking red. The paper cassette is not correctly connected. z Take up the slack (p. 27). The compact...
...The cable is in progress or printing connected to a computer is not correctly connected. z Turn the printer's power on again. Printing from the memory card is in progress. The printer has overheated. z Load the paper cassette correctly (p. 29). The printer's power button is not loaded correctly. Your camera's firmware is plugged into a power outlet (using the camera's optional compact power adapter). z Wait until the print outputted. The ink cassette is blinking red. The paper cassette is not correctly connected. z Take up the slack (p. 27). The compact...
SELPHY CP710/CP510 User Guide
Page 63
... original paper size or change the print settings. Use the designated paper size. See the corresponding solution. If a problem occurs while the printer is stuck in the ink sheet, and then reload the cassette. z Make sure that the paper cassette is displayed also on again. If this does not solve the problem, replace with a new ink cassette. Paper Jam z Turn the power off and turn it is not feeding correctly, remove the paper cassette, and manually remove any error occurs during printing. Change back to eject the paper, contact a Canon Customer Support help...
... original paper size or change the print settings. Use the designated paper size. See the corresponding solution. If a problem occurs while the printer is stuck in the ink sheet, and then reload the cassette. z Make sure that the paper cassette is displayed also on again. If this does not solve the problem, replace with a new ink cassette. Paper Jam z Turn the power off and turn it is not feeding correctly, remove the paper cassette, and manually remove any error occurs during printing. Change back to eject the paper, contact a Canon Customer Support help...
SELPHY CP710/CP510 User Guide
Page 66
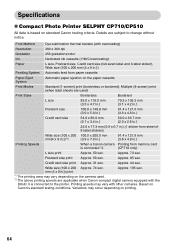
... Compact Photo Printer SELPHY CP710/CP510 All data is connected to change without notice. Based on the paper cassette Print Modes Standard (1-screen) print (borderless or bordered), Multiple (8-screen) print (when label sheets are subject to the printer. Approx. 73 sec. Variations may vary with overcoating) Resolution 300 x 300 dpi Gradation 256 gradations/color Ink Dedicated ink cassette (Y/M/C/overcoating) Paper L size, Postcard size, Credit card size (full-sized label and 8-label sticker), Wide size (100 x 200 mm (4 x 8 in .) Printing Speeds When a Canon...
... Compact Photo Printer SELPHY CP710/CP510 All data is connected to change without notice. Based on the paper cassette Print Modes Standard (1-screen) print (borderless or bordered), Multiple (8-screen) print (when label sheets are subject to the printer. Approx. 73 sec. Variations may vary with overcoating) Resolution 300 x 300 dpi Gradation 256 gradations/color Ink Dedicated ink cassette (Y/M/C/overcoating) Paper L size, Postcard size, Credit card size (full-sized label and 8-label sticker), Wide size (100 x 200 mm (4 x 8 in .) Printing Speeds When a Canon...
SELPHY CP710/CP510 User Guide
Page 68
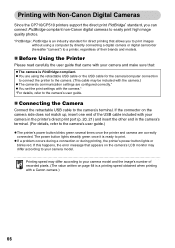
... settings are configured correctly.* z You set the print settings with the camera.* *For details, refer to the camera's user guide. „ Connecting the Camera Connect the retractable USB cable to your camera model. z You are correctly connected. The power button lights steadily green once it is PictBridge compliant. z If a problem occurs during a connection or during printing, the printer's power button lights or blinks red. Printing speed may differ according to the camera's terminal. If the connector on page...
... settings are configured correctly.* z You set the print settings with the camera.* *For details, refer to the camera's user guide. „ Connecting the Camera Connect the retractable USB cable to your camera model. z You are correctly connected. The power button lights steadily green once it is PictBridge compliant. z If a problem occurs during a connection or during printing, the printer's power button lights or blinks red. Printing speed may differ according to the camera's terminal. If the connector on page...
Printer Software Guide Windows (For Canon CP Printer Solution Disk Version 5)
Page 22
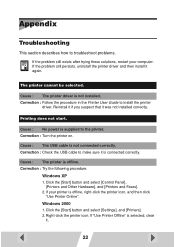
... Click the [Start] button and select [Settings], and [Printers]. 2. The printer cannot be selected. Printing does not start. Correction : Check the USB cable to make sure it again. Correction : Try the following procedure. If the problem still persists, uninstall the printer driver and then install it is connected correctly. Cause : The printer driver is not connected correctly. Cause : The USB cable is not installed. Windows XP 1. Cause : No power is supplied to install the printer driver. Windows 2000 1. If "Use Printer Offline" is selected, clear it was...
... Click the [Start] button and select [Settings], and [Printers]. 2. The printer cannot be selected. Printing does not start. Correction : Check the USB cable to make sure it again. Correction : Try the following procedure. If the problem still persists, uninstall the printer driver and then install it is connected correctly. Cause : The printer driver is not connected correctly. Cause : The USB cable is not installed. Windows XP 1. Cause : No power is supplied to install the printer driver. Windows 2000 1. If "Use Printer Offline" is selected, clear it was...

Printer Software Guide Windows (For Canon CP Printer Solution Disk Version 5)
Page 24
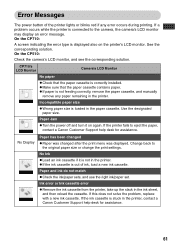
... the paper cassette is correctly installed. Check that paper is correctly loaded in the paper cassette. Cause : Paper is not inserted correctly in conjunction with the Printer User Guide. ■ Errors where printing can resume If any of the following messages appear, printing can still resume. Correction : Add more paper to resume printing. Paper-feed error. Correction : Remove the paper, and then insert it back into the paper cassette correctly. Error Messages If an error occurs while printing is in progress, an error message appears on how to troubleshoot them...
... the paper cassette is correctly installed. Check that paper is correctly loaded in the paper cassette. Cause : Paper is not inserted correctly in conjunction with the Printer User Guide. ■ Errors where printing can resume If any of the following messages appear, printing can still resume. Correction : Add more paper to resume printing. Paper-feed error. Correction : Remove the paper, and then insert it back into the paper cassette correctly. Error Messages If an error occurs while printing is in progress, an error message appears on how to troubleshoot them...

Printer Software Guide Windows (For Canon CP Printer Solution Disk Version 5)
Page 27
.... Paper jammed in printer. Cause : Paper is jammed inside the printer before printing starts. Problem with a new one. 27 Check the state of the ink cassette. 2. Turn printer off and back on . Remove the paper and then turn the printer off and back on again. Cause : There is automatically ejected from the print receptacle or the paper handling slot. After using the recommended solution to clear the error, you need to stop printing and replace the battery. Paper is a problem with the AC adapter (compact power adapter) connected...
.... Paper jammed in printer. Cause : Paper is jammed inside the printer before printing starts. Problem with a new one. 27 Check the state of the ink cassette. 2. Turn printer off and back on . Remove the paper and then turn the printer off and back on again. Cause : There is automatically ejected from the print receptacle or the paper handling slot. After using the recommended solution to clear the error, you need to stop printing and replace the battery. Paper is a problem with the AC adapter (compact power adapter) connected...

Printer Software Guide Macintosh (For Canon CP Printer Solution Disk Version 5)
Page 9
Layout Options window You can check the layout of the image. When [Prints to the Canon Compact Photo Printer] is not displayed, install the printer driver. 9 The Print window and Layout Options window appear. Print window You can adjust the settings for printing.
Layout Options window You can check the layout of the image. When [Prints to the Canon Compact Photo Printer] is not displayed, install the printer driver. 9 The Print window and Layout Options window appear. Print window You can adjust the settings for printing.

Printer Software Guide Macintosh (For Canon CP Printer Solution Disk Version 5)
Page 29
... printing, insert a new ink cassette. Cause : There is empty. Correction : Replace the ink cassette with the Printer User Guide. ■ Errors where printing can resume If any of the following cases, the number of your nearest Canon Customer Support Help Desk. • Use the information in this section in conjunction with a new one. Error Messages If an error occurs while printing is in progress, an error message appears on how to clear the error, printing restarts automatically. Correction : Insert the ink cassette into the printer...
... printing, insert a new ink cassette. Cause : There is empty. Correction : Replace the ink cassette with the Printer User Guide. ■ Errors where printing can resume If any of the following cases, the number of your nearest Canon Customer Support Help Desk. • Use the information in this section in conjunction with a new one. Error Messages If an error occurs while printing is in progress, an error message appears on how to clear the error, printing restarts automatically. Correction : Insert the ink cassette into the printer...


