Direct Print User Guide
Page 13
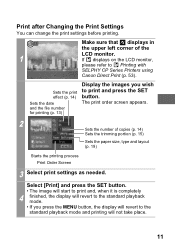
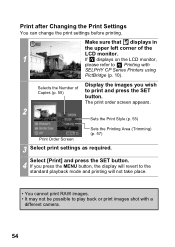
... of copies (p. 14) Sets the trimming portion (p. 15) Sets the paper size, type and layout (p. 19) Starts the printing process Print Order Screen 3 Select print settings as needed. Sets the print effect (p. 14) Sets the date and the file number for printing (p. 13) Display the images...playback mode. • If you wish to Printing with SELPHY CP Series Printers using Canon Direct Print (p. 53). The print order screen appears. 2 Sets the number of the LCD monitor. 1 If displays on the LCD monitor, please refer to print and press the SET button. Print after Changing the Print...
... of copies (p. 14) Sets the trimming portion (p. 15) Sets the paper size, type and layout (p. 19) Starts the printing process Print Order Screen 3 Select print settings as needed. Sets the print effect (p. 14) Sets the date and the file number for printing (p. 13) Display the images...playback mode. • If you wish to Printing with SELPHY CP Series Printers using Canon Direct Print (p. 53). The print order screen appears. 2 Sets the number of the LCD monitor. 1 If displays on the LCD monitor, please refer to print and press the SET button. Print after Changing the Print...
Direct Print User Guide
Page 20
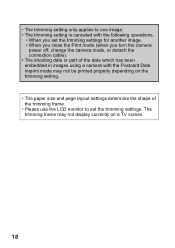
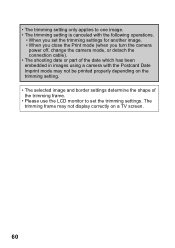
...on a TV screen. 18 • The trimming setting only applies to one image. • The trimming setting is canceled with the following operations. • When you set the trimming settings for another image. • When you close the Print mode (when you turn the camera power off, change the camera mode, or detach... the connection cable). • The shooting date or part of the date which has been embedded in images using a camera with the Postcard Date Imprint mode may not display correctly on the trimming setting. • The paper size and page layout settings determine the ...
...on a TV screen. 18 • The trimming setting only applies to one image. • The trimming setting is canceled with the following operations. • When you set the trimming settings for another image. • When you close the Print mode (when you turn the camera power off, change the camera mode, or detach... the connection cable). • The shooting date or part of the date which has been embedded in images using a camera with the Postcard Date Imprint mode may not display correctly on the trimming setting. • The paper size and page layout settings determine the ...
Direct Print User Guide
Page 25
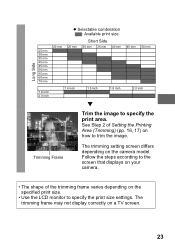
... frame varies depending on how to specify the print size settings. The trimming frame may not display correctly on the camera model. Follow the steps according to the screen that displays on your camera. • The shape of Setting the Printing Area (Trimming) (pp. 16, 17) on the specified print size. • ...Use the LCD monitor to trim the image. Long Side 25 mm 30 mm 35 mm 40 mm 45 mm 50 mm ...
... frame varies depending on how to specify the print size settings. The trimming frame may not display correctly on the camera model. Follow the steps according to the screen that displays on your camera. • The shape of Setting the Printing Area (Trimming) (pp. 16, 17) on the specified print size. • ...Use the LCD monitor to trim the image. Long Side 25 mm 30 mm 35 mm 40 mm 45 mm 50 mm ...

Direct Print User Guide
Page 35
... (p. 35) Display the images you press the MENU button, the display will not take place. 33 The print order screen appears. 2 Sets the number of the LCD monitor. 1 If displays on the LCD monitor, please refer to Printing with Bubble Jet Printers using Bubble Jet Direct (p. 71). Print after Changing the Print Settings... upper left corner of copies (p. 37) Sets the trimming portion (p. 38) Sets the paper size, type and layout (p. 42) Starts the printing process Print Order Screen 3 Select print settings as needed.
... (p. 35) Display the images you press the MENU button, the display will not take place. 33 The print order screen appears. 2 Sets the number of the LCD monitor. 1 If displays on the LCD monitor, please refer to Printing with Bubble Jet Printers using Bubble Jet Direct (p. 71). Print after Changing the Print Settings... upper left corner of copies (p. 37) Sets the trimming portion (p. 38) Sets the paper size, type and layout (p. 42) Starts the printing process Print Order Screen 3 Select print settings as needed.
Direct Print User Guide
Page 43
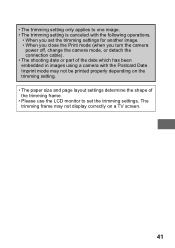
...on a TV screen. 41 • The trimming setting only applies to one image. • The trimming setting is canceled with the following operations. • When you set the trimming settings for another image. • When you close the Print mode (when you turn the camera power off, change the camera mode, or ...detach the connection cable). • The shooting date or part of the date which has been embedded in images using a camera with the Postcard Date Imprint mode may not display correctly on the trimming setting. • The paper size and page layout settings determine the ...
...on a TV screen. 41 • The trimming setting only applies to one image. • The trimming setting is canceled with the following operations. • When you set the trimming settings for another image. • When you close the Print mode (when you turn the camera power off, change the camera mode, or ...detach the connection cable). • The shooting date or part of the date which has been embedded in images using a camera with the Postcard Date Imprint mode may not display correctly on the trimming setting. • The paper size and page layout settings determine the ...
Direct Print User Guide
Page 52
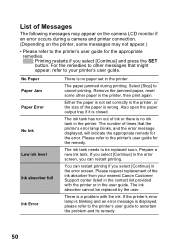
The paper jammed during a camera and printer connection. (Depending on the camera LCD monitor if an error occurs during printing. Also open the paper output tray if...ink absorber cannot be replaced soon. List of the paper is wrong. For the remedies to other paper in the error screen, you can restart printing if you select [Continue] and press the SET button. Prepare a new ink tank. There is... select [Continue] in the contact list provided with the ink. Please refer to your nearest Canon Customer Support center listed in the error screen. You can restart printing.
The paper jammed during a camera and printer connection. (Depending on the camera LCD monitor if an error occurs during printing. Also open the paper output tray if...ink absorber cannot be replaced soon. List of the paper is wrong. For the remedies to other paper in the error screen, you can restart printing if you select [Continue] and press the SET button. Prepare a new ink tank. There is... select [Continue] in the contact list provided with the ink. Please refer to your nearest Canon Customer Support center listed in the error screen. You can restart printing.
Direct Print User Guide
Page 56
... possible to print and press the SET button. Selects the Number of the LCD monitor. 1 If displays on the LCD monitor, please refer to Printing with a different camera. 54 The print order screen appears. 2 Sets the Print Style (p. 55) Print Order Screen Sets the Printing Area (Trimming) (p. 57) 3 Select print settings as required. Select [Print...
... possible to print and press the SET button. Selects the Number of the LCD monitor. 1 If displays on the LCD monitor, please refer to Printing with a different camera. 54 The print order screen appears. 2 Sets the Print Style (p. 55) Print Order Screen Sets the Printing Area (Trimming) (p. 57) 3 Select print settings as required. Select [Print...
Direct Print User Guide
Page 59
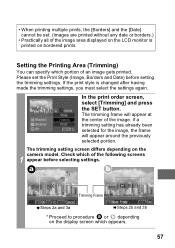
... area displayed on the LCD monitor is changed after having made the trimming settings, you must select the settings again. If a trimming setting has already been selected for the image, the frame will appear at the center of the following screens 1 appear before setting the... trimming settings. The trimming frame will appear around the previously selected portion. Setting the Printing Area (Trimming) You can specify which of the image. a b Trimming Frame Steps 2a and 3a Steps 2b and 3b * Proceed to procedure a or b depending on the camera...
... area displayed on the LCD monitor is changed after having made the trimming settings, you must select the settings again. If a trimming setting has already been selected for the image, the frame will appear at the center of the following screens 1 appear before setting the... trimming settings. The trimming frame will appear around the previously selected portion. Setting the Printing Area (Trimming) You can specify which of the image. a b Trimming Frame Steps 2a and 3a Steps 2b and 3b * Proceed to procedure a or b depending on the camera...
Direct Print User Guide
Page 62
... properly depending on the trimming setting. • The selected image and border settings determine the shape of the trimming frame. • Please use the LCD monitor to one image. • The trimming setting is canceled with the following operations. • When you set the trimming settings for another image.... • When you close the Print mode (when you turn the camera power off, change the camera mode, or detach the connection cable). • The shooting date or part of the date which has been embedded in images using...
... properly depending on the trimming setting. • The selected image and border settings determine the shape of the trimming frame. • Please use the LCD monitor to one image. • The trimming setting is canceled with the following operations. • When you set the trimming settings for another image.... • When you close the Print mode (when you turn the camera power off, change the camera mode, or detach the connection cable). • The shooting date or part of the date which has been embedded in images using...
Direct Print User Guide
Page 65
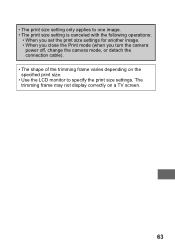
• The print size setting only applies to specify the print size settings. The trimming frame may not display correctly on the specified print size. • Use the LCD monitor to one image. • The print size setting is canceled with the following operations: • When you set the print size settings for another image. • When you close the Print mode (when you turn the camera power off, change the camera mode, or detach the connection cable). • The shape of the trimming frame varies depending on a TV screen. 63
• The print size setting only applies to specify the print size settings. The trimming frame may not display correctly on the specified print size. • Use the LCD monitor to one image. • The print size setting is canceled with the following operations: • When you set the print size settings for another image. • When you close the Print mode (when you turn the camera power off, change the camera mode, or detach the connection cable). • The shape of the trimming frame varies depending on a TV screen. 63
ZoomBrowser EX 5.8 Software User Guide
Page 15
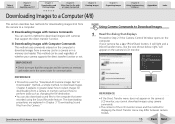
.... IMPORTANT • Check to download images from a memory card in a camera or in Chapter 3 "Downloading Sound Files from the camera to a computer. ■ Downloading Images with Camera Commands You can be used regardless of the LCD monitor screen and the method for downloading images shot from the Camera." REFERENCE • This section uses the "Download All...
.... IMPORTANT • Check to download images from a memory card in a camera or in Chapter 3 "Downloading Sound Files from the camera to a computer. ■ Downloading Images with Camera Commands You can be used regardless of the LCD monitor screen and the method for downloading images shot from the Camera." REFERENCE • This section uses the "Download All...
ImageBrowser 5.8 Software User Guide
Page 9
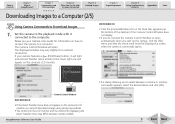
... a Direct Transfer menu similar to the lower right one will open automatically when you cannot download images using camera procedures. • The content on the LCD monitor and the method for a wireless connection. ImageBrowser Software User Guide • If a dialog allowing you... Camera Commands to the computer. Camera Control Window REFERENCE • If the Direct Transfer menu does not appear on the camera's LCD monitor, you start up the camera, click the [File] menu and clear the check mark from the [Displays this screen when the camera is ImageBrowser? Please see your camera...
... a Direct Transfer menu similar to the lower right one will open automatically when you cannot download images using camera procedures. • The content on the LCD monitor and the method for a wireless connection. ImageBrowser Software User Guide • If a dialog allowing you... Camera Commands to the computer. Camera Control Window REFERENCE • If the Direct Transfer menu does not appear on the camera's LCD monitor, you start up the camera, click the [File] menu and clear the check mark from the [Displays this screen when the camera is ImageBrowser? Please see your camera...
ImageBrowser 5.8 Software User Guide
Page 133
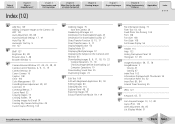
...80, 88 Browser Area 7, 48 Browser Window 6 C Camera Browser Window 22, 24, 25, 28, 32 Camera Control Window 6, 9, 11, 15 Camera Settings 41 Canon Camera 16 Caption 108 Clear 106 Color Management 131 Color/Brightness ...Mode 50 Displaying Multiple Images 57 Displaying the Subject on the Camera's LCD Monitor 45 Downloading Images 8, 9, 17, 18, 19, 22 Camera Operations 17, 18 Checking Images before Downloading 22 Computer Operations 19...53, 64 Fixed Photo Size Printing 104 Font 108 Font Size 108 Font Style 108 Full Screen Display 56 H Header 110 Help 132 Hiding the Explorer Panel 52 Histogram 77, 85 I...
...80, 88 Browser Area 7, 48 Browser Window 6 C Camera Browser Window 22, 24, 25, 28, 32 Camera Control Window 6, 9, 11, 15 Camera Settings 41 Canon Camera 16 Caption 108 Clear 106 Color Management 131 Color/Brightness ...Mode 50 Displaying Multiple Images 57 Displaying the Subject on the Camera's LCD Monitor 45 Downloading Images 8, 9, 17, 18, 19, 22 Camera Operations 17, 18 Checking Images before Downloading 22 Computer Operations 19...53, 64 Fixed Photo Size Printing 104 Font 108 Font Size 108 Font Style 108 Full Screen Display 56 H Header 110 Help 132 Hiding the Explorer Panel 52 Histogram 77, 85 I...
PowerShot SD1000 / DIGITAL IXUS 70 Camera User Guide Advanced
Page 70
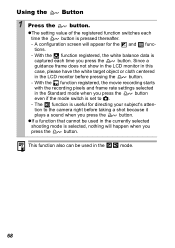
A configuration screen will happen when you press the button even if the mode switch is pressed ...will appear for directing your subject's atten- tions. - The function is captured each time the button is set to the camera right before pressing the button. - zIf a function that cannot be used in the mode. 68 Using the Button 1 Press...function registered, the movie recording starts with the recording pixels and frame rate settings selected in the LCD monitor before taking a shot because it plays a sound when you press the button. Since a guidance frame does not ...
A configuration screen will happen when you press the button even if the mode switch is pressed ...will appear for directing your subject's atten- tions. - The function is captured each time the button is set to the camera right before pressing the button. - zIf a function that cannot be used in the mode. 68 Using the Button 1 Press...function registered, the movie recording starts with the recording pixels and frame rate settings selected in the LCD monitor before taking a shot because it plays a sound when you press the button. Since a guidance frame does not ...

PowerShot SD1000 / DIGITAL IXUS 70 Camera User Guide Advanced
Page 72
...number of the recorded image. - button will change the display position (p. 71) using the MENU button or the FUNC./ SET button. but- Camera is not focused: an orange frame appears at the right appears. Contents of the area within it is recorded. 1 Shoot. Checking for Focus ... function p. 24). 2 Press (or ) while the Recorded Image image is pressed depends upon the display settings for the LCD monitor (See below). button repeatedly until the screen at the centre of times the DISP. Focus Confirmation Î Detailed Î No Information 70 ton is displayed. To...
...number of the recorded image. - button will change the display position (p. 71) using the MENU button or the FUNC./ SET button. but- Camera is not focused: an orange frame appears at the right appears. Contents of the area within it is recorded. 1 Shoot. Checking for Focus ... function p. 24). 2 Press (or ) while the Recorded Image image is pressed depends upon the display settings for the LCD monitor (See below). button repeatedly until the screen at the centre of times the DISP. Focus Confirmation Î Detailed Î No Information 70 ton is displayed. To...

PowerShot SD1000 / DIGITAL IXUS 70 Camera User Guide Advanced
Page 115
...be recorded when shooting still images, but it will shut down the LCD monitor while shooting in still images). This may occur when zThis is a normal occurrence in the My Camera settings. button to Off. Camera screen is black at start-up Incompatible image has been selected as the ...containing CCDs and does strong sunlight or bright not constitute a malfunction. (This light. The image in the LCD zThis is a normal occurrence in monitor will darken in the My Camera settings (p. 109) or use the supplied software program ZoomBrowser EX or ImageBrowser to [Display Off], the power...
...be recorded when shooting still images, but it will shut down the LCD monitor while shooting in still images). This may occur when zThis is a normal occurrence in the My Camera settings. button to Off. Camera screen is black at start-up Incompatible image has been selected as the ...containing CCDs and does strong sunlight or bright not constitute a malfunction. (This light. The image in the LCD zThis is a normal occurrence in monitor will darken in the My Camera settings (p. 109) or use the supplied software program ZoomBrowser EX or ImageBrowser to [Display Off], the power...

