PowerShot S1 IS Quick Start Guide
Page 2
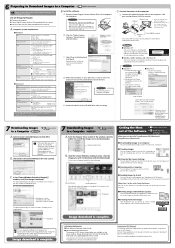
... Mac OS X a. Click the images you can use this software in the computer's CD-ROM drive. ● Camera and computer ● Canon Digital Camera Solution Disk provided with the camera ● Interface cable (use as thumbnails (tiny versions) in USB ports. A blue frame will appear as start ... the terminal cover with the installation while reviewing installation settings. What You Can Do with built-in the main window of these applications is over, select [Yes, I want to be pre-installed on the desktop. USB ● Canon Utilities - Select [Easy Installation] and ...
... Mac OS X a. Click the images you can use this software in the computer's CD-ROM drive. ● Camera and computer ● Canon Digital Camera Solution Disk provided with the camera ● Interface cable (use as thumbnails (tiny versions) in USB ports. A blue frame will appear as start ... the terminal cover with the installation while reviewing installation settings. What You Can Do with built-in the main window of these applications is over, select [Yes, I want to be pre-installed on the desktop. USB ● Canon Utilities - Select [Easy Installation] and ...

PowerShot S1 IS Camera User Guide
Page 4
... Slow Shutter Shooting Panoramic Images (Stitch Assist) . . . 47 Using the Self-timer 49 Digital Zoom 50 Continuous Shooting 52 Movie Mode 53 Viewing/Editing Movies 57 Chapter 6. Erasing Erasing Images ...Images Individually 39 Magnifying Images 40 Viewing Images in Flash 34 Chapter 3. Preparing the Camera Components Guide 10 Controls 12 Installing the Batteries/CF Card 14 Turning the Power ...Viewfinder and the LCD Monitor 24 Chapter 2. Shooting-The Basics Auto Mode 27 Reviewing an Image Right after Shooting 30 Changing the Resolution and Compression 32 Using the Built-in...
... Slow Shutter Shooting Panoramic Images (Stitch Assist) . . . 47 Using the Self-timer 49 Digital Zoom 50 Continuous Shooting 52 Movie Mode 53 Viewing/Editing Movies 57 Chapter 6. Erasing Erasing Images ...Images Individually 39 Magnifying Images 40 Viewing Images in Flash 34 Chapter 3. Preparing the Camera Components Guide 10 Controls 12 Installing the Batteries/CF Card 14 Turning the Power ...Viewfinder and the LCD Monitor 24 Chapter 2. Shooting-The Basics Auto Mode 27 Reviewing an Image Right after Shooting 30 Changing the Resolution and Compression 32 Using the Built-in...

PowerShot S1 IS Camera User Guide
Page 28
...for example, when you are too bright (for shooting. The overexposure warning appears at that image information recorded by this camera. Fix the camera to right 180 degrees. zWhen the LCD monitor is preparing to the following shooting methods. - Fold the LCD monitor back... surroundings are shooting outdoors) and images on this camera may not display correctly on other cameras and image information recorded by other cameras may not appear depending on the camera settings at the following times. Š When reviewing an image right after it appears correctly from left...
...for example, when you are too bright (for shooting. The overexposure warning appears at that image information recorded by this camera. Fix the camera to right 180 degrees. zWhen the LCD monitor is preparing to the following shooting methods. - Fold the LCD monitor back... surroundings are shooting outdoors) and images on this camera may not display correctly on other cameras and image information recorded by other cameras may not appear depending on the camera settings at the following times. Š When reviewing an image right after it appears correctly from left...
PowerShot S1 IS Camera User Guide
Page 32
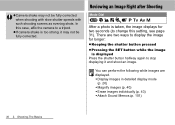
... stop displaying it may not be fully corrected. Shooting-The Basics In this setting, see page 31). zIf camera shake is displayed Press the shutter button halfway again to a tripod. Reviewing an Image Right after Shooting Mode Dial After a photo is taken, the image displays for longer: z Keeping the shutter button pressed...
... stop displaying it may not be fully corrected. Shooting-The Basics In this setting, see page 31). zIf camera shake is displayed Press the shutter button halfway again to a tripod. Reviewing an Image Right after Shooting Mode Dial After a photo is taken, the image displays for longer: z Keeping the shutter button pressed...

PowerShot S1 IS Camera User Guide
Page 33
Changing the Image Display Duration b a a c aTurn the power on the omni selector. cPress the MENU button. The [ (Rec.)] menu appears. bSelect [Review] using the S or T arrow on the omni selector and select a duration setting using the W or X arrow on (p. 19), and press the MENU button. Shooting-The ... the time selected even if the shutter button is released. z You can be taken even while the last is fully held pressed regardless of the Review setting. Off:Images do not display 2 to display the image as long as the shutter button is displayed. 2.
Changing the Image Display Duration b a a c aTurn the power on the omni selector. cPress the MENU button. The [ (Rec.)] menu appears. bSelect [Review] using the S or T arrow on the omni selector and select a duration setting using the W or X arrow on (p. 19), and press the MENU button. Shooting-The ... the time selected even if the shutter button is released. z You can be taken even while the last is fully held pressed regardless of the Review setting. Off:Images do not display 2 to display the image as long as the shutter button is displayed. 2.

PowerShot S1 IS Camera User Guide
Page 67
...Protects images from a CF card (excluding protected images). Shooting-Advanced Functions 65 Menu Item Spot AE Point MF-Point Zoom AF Mode Tally Lamp Digital Zoom Review Reverse Disp. p. 121 6. p. 97 Continuous*/Single Sets whether or not the tally lamp blinks during movie recording. p. 31 Off/2 sec.*... compatible printer or at set intervals. 2* to 100 shots 1* to the AF point). p. 53 On*/Off Sets whether or not the digital zoom combines with the optical zoom to Center (the AE point is magnified when using the manual focus. Setting content Reference Page Sets the ...
...Protects images from a CF card (excluding protected images). Shooting-Advanced Functions 65 Menu Item Spot AE Point MF-Point Zoom AF Mode Tally Lamp Digital Zoom Review Reverse Disp. p. 121 6. p. 97 Continuous*/Single Sets whether or not the tally lamp blinks during movie recording. p. 31 Off/2 sec.*... compatible printer or at set intervals. 2* to 100 shots 1* to the AF point). p. 53 On*/Off Sets whether or not the digital zoom combines with the optical zoom to Center (the AE point is magnified when using the manual focus. Setting content Reference Page Sets the ...
PowerShot S1 IS Camera User Guide
Page 103
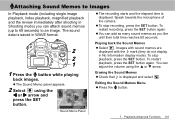
... button. You can attach sound memos (up to 60 seconds) to Images In Playback mode (including single image playback, index playback, magnified playback and the review immediately after shooting in Shooting mode) you like until their total time reaches 60 seconds. Erasing the Sound Memos z Check that is displayed. Playback-Advanced... the S or T arrow. Attaching Sound Memos to an image. The sound data is saved in No Information display mode). Speak towards the microphone of the camera.
... button. You can attach sound memos (up to 60 seconds) to Images In Playback mode (including single image playback, index playback, magnified playback and the review immediately after shooting in Shooting mode) you like until their total time reaches 60 seconds. Erasing the Sound Memos z Check that is displayed. Playback-Advanced... the S or T arrow. Attaching Sound Memos to an image. The sound data is saved in No Information display mode). Speak towards the microphone of the camera.

PowerShot S1 IS Camera User Guide
Page 161
Microphone 12, 101 Mode Dial 13, 45, 71 Mode Lever 12 Movie Editing 57 Recording 53 Viewing 57 Mute 66 My Camera Settings 111, 112 N Neck Strap 11 Night Scene 45 O Omni selector 12 Operation Sound 67, 111, 112 Operation Vol 66 Overexposure Warning 26 P Playback 100 ...-Eye Reduction 10, 34, 36, 64 Remote Sensor 10 Resetting the File Numbers 110 Resetting the Settings to Default 68 Resolution 32 Reverse Disp 65 Review 65 Rotate 65 Rotating Images 100 S Saturation 82 Save Settings 65 Saving Custom Settings 98 Self-timer 12, 49, 64 Self-timer Sound 67, 111...
Microphone 12, 101 Mode Dial 13, 45, 71 Mode Lever 12 Movie Editing 57 Recording 53 Viewing 57 Mute 66 My Camera Settings 111, 112 N Neck Strap 11 Night Scene 45 O Omni selector 12 Operation Sound 67, 111, 112 Operation Vol 66 Overexposure Warning 26 P Playback 100 ...-Eye Reduction 10, 34, 36, 64 Remote Sensor 10 Resetting the File Numbers 110 Resetting the Settings to Default 68 Resolution 32 Reverse Disp 65 Review 65 Rotate 65 Rotating Images 100 S Saturation 82 Save Settings 65 Saving Custom Settings 98 Self-timer 12, 49, 64 Self-timer Sound 67, 111...

Software Starter Guide Ver.16
Page 16
...[Custom Installation] is Selected The USB driver (the software for your operating system). •Windows 2000/Windows 98: Canon Camera TWAIN Driver •Windows Me: Canon Camera WIA Driver With Windows XP, the USB driver supplied with the Windows operating system is used so there is connected ...to all the conditions. 8 Review the installation settings and click [Next]. 12 Installing the Software and USB Driver 5 Click [Next]. 6 ...
...[Custom Installation] is Selected The USB driver (the software for your operating system). •Windows 2000/Windows 98: Canon Camera TWAIN Driver •Windows Me: Canon Camera WIA Driver With Windows XP, the USB driver supplied with the Windows operating system is used so there is connected ...to all the conditions. 8 Review the installation settings and click [Next]. 12 Installing the Software and USB Driver 5 Click [Next]. 6 ...
Software Starter Guide Ver.16
Page 52
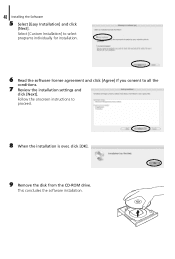
48 Installing the Software 5 Select [Easy Installation] and click [Next]. Follow the onscreen instructions to all the conditions. 7 Review the installation settings and click [Next]. This concludes the software installation. Select [Custom Installation] to select programs individually for installation. 6 Read the software license agreement and click [Agree] if you consent to proceed. 8 When the installation is over, click [OK]. 9 Remove the disk from the CD-ROM drive.
48 Installing the Software 5 Select [Easy Installation] and click [Next]. Follow the onscreen instructions to all the conditions. 7 Review the installation settings and click [Next]. This concludes the software installation. Select [Custom Installation] to select programs individually for installation. 6 Read the software license agreement and click [Agree] if you consent to proceed. 8 When the installation is over, click [OK]. 9 Remove the disk from the CD-ROM drive.


