User Guide
Page 2
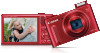
... use, make sure the following memory cards (sold separately) can be used, regardless of capacity. ●● SD memory cards* ●● SDHC memory cards* ●● SDXC memory cards* * Cards conforming to work with the camera. However, not all memory cards have been verified to SD standards. Compatible Memory Cards The following items are included in...* Do not peel off the adhesive covering from a battery pack. ●● Printed matter is also included. ●● A memory card is missing, contact your camera retailer. If anything is not included (=2).
... use, make sure the following memory cards (sold separately) can be used, regardless of capacity. ●● SD memory cards* ●● SDHC memory cards* ●● SDXC memory cards* * Cards conforming to work with the camera. However, not all memory cards have been verified to SD standards. Compatible Memory Cards The following items are included in...* Do not peel off the adhesive covering from a battery pack. ●● Printed matter is also included. ●● A memory card is missing, contact your camera retailer. If anything is not included (=2).

User Guide
Page 3
... buttons and switches on -screen icons and text are indicated in a way that Canon Inc., its subsidiaries and affiliates, and its distributors are used over an extended period, it may appear as the "memory card". ●● The symbols " Still Images" and " Movies" below titles ... expert camera use . If covered, remove the film before contacting a Canon Customer Support Help Desk. ●● Although the LCD monitor is produced under default settings. ●● For convenience, all supported memory cards are represented by the camera shall be for still images or movies. ...
... buttons and switches on -screen icons and text are indicated in a way that Canon Inc., its subsidiaries and affiliates, and its distributors are used over an extended period, it may appear as the "memory card". ●● The symbols " Still Images" and " Movies" below titles ... expert camera use . If covered, remove the film before contacting a Canon Customer Support Help Desk. ●● Although the LCD monitor is produced under default settings. ●● For convenience, all supported memory cards are represented by the camera shall be for still images or movies. ...
User Guide
Page 4
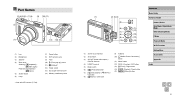
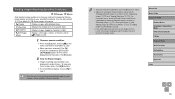
... features (=90). (7) Power button (8) Wi-Fi antenna area (9) Flash (10) [ (Flash pop up)] switch (11) (N-Mark)* (12) Tripod socket (13) DC coupler terminal cover (14) Memory card/battery cover (1) (2) (3) (4) (5) (6) (11) (12) (7) (8) (13) (9) (14) (10) (15) (1) Screen (LCD monitor) (2) Strap mount (3) AV OUT (Audio/video output) / DIGITAL terminal (4) HDMITM terminal (5) Mode switch (6) [ (Playback...
... features (=90). (7) Power button (8) Wi-Fi antenna area (9) Flash (10) [ (Flash pop up)] switch (11) (N-Mark)* (12) Tripod socket (13) DC coupler terminal cover (14) Memory card/battery cover (1) (2) (3) (4) (5) (6) (11) (12) (7) (8) (13) (9) (14) (10) (15) (1) Screen (LCD monitor) (2) Strap mount (3) AV OUT (Audio/video output) / DIGITAL terminal (4) HDMITM terminal (5) Mode switch (6) [ (Playback...

User Guide
Page 5
Table of Contents Before Use Initial Information 2 Package Contents 2 Compatible Memory Cards 2 Preliminary Notes and Legal Information 3 Conventions in This Guide 3 Part Names 4 Common Camera Operations 11 Safety Precautions 13 Basic Guide Basic Operations 16 Initial ...Preparations 16 Attaching the Strap 16 Holding the Camera 16 Charging the Battery Pack 17 Inserting the Battery Pack and Memory Card 18 Removing the Battery Pack and Memory Card 18 Setting the Date and Time 19 Changing the Date and Time 19 Display Language 20 Trying the Camera Out 21 Shooting...
Table of Contents Before Use Initial Information 2 Package Contents 2 Compatible Memory Cards 2 Preliminary Notes and Legal Information 3 Conventions in This Guide 3 Part Names 4 Common Camera Operations 11 Safety Precautions 13 Basic Guide Basic Operations 16 Initial ...Preparations 16 Attaching the Strap 16 Holding the Camera 16 Charging the Battery Pack 17 Inserting the Battery Pack and Memory Card 18 Removing the Battery Pack and Memory Card 18 Setting the Date and Time 19 Changing the Date and Time 19 Display Language 20 Trying the Camera Out 21 Shooting...

User Guide
Page 8
... to Listed Access Points 101 Previous Access Points 102 Sending Images to a Registered Web Service 103 Registering Web Services 103 Registering CANON iMAGE GATEWAY 103 Registering Other Web Services 105 Uploading Images to Web Services 105 Printing Images Wirelessly from a Connected Printer........... 106...Lens Retraction Timing 120 Using Eco Mode 120 Power-Saving Adjustment 120 Screen Brightness 121 Hiding the Start-Up Screen 121 Formatting Memory Cards 121 Low-Level Formatting 122 File Numbering 122 Date-Based Image Storage 123 Metric / Non-Metric Display 123 Before Use Basic...
... to Listed Access Points 101 Previous Access Points 102 Sending Images to a Registered Web Service 103 Registering Web Services 103 Registering CANON iMAGE GATEWAY 103 Registering Other Web Services 105 Uploading Images to Web Services 105 Printing Images Wirelessly from a Connected Printer........... 106...Lens Retraction Timing 120 Using Eco Mode 120 Power-Saving Adjustment 120 Screen Brightness 121 Hiding the Start-Up Screen 121 Formatting Memory Cards 121 Low-Level Formatting 122 File Numbering 122 Date-Based Image Storage 123 Metric / Non-Metric Display 123 Before Use Basic...

User Guide
Page 10
Digital Zoom Focal Length (35mm film equivalent 156 Number of Shots/Recording Time, Playback Time 157 Number of Shots per Memory Card 157 Recording Time per Memory Card 157 Flash Range 158 Shooting Range 158 Continuous Shooting Speed 158 Shutter Speed 158 Aperture 158 Battery Pack NB-6LH 158 Battery Charger CB-2LY/...
Digital Zoom Focal Length (35mm film equivalent 156 Number of Shots/Recording Time, Playback Time 157 Number of Shots per Memory Card 157 Recording Time per Memory Card 157 Flash Range 158 Shooting Range 158 Continuous Shooting Speed 158 Shutter Speed 158 Aperture 158 Battery Pack NB-6LH 158 Battery Charger CB-2LY/...
User Guide
Page 18
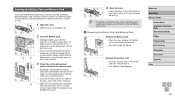
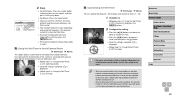
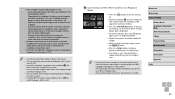
...Playback Mode Wi-Fi Functions Setting Menu Accessories Appendix Index 18 Inserting the Battery Pack and Memory Card Insert the included battery pack and a memory card (sold separately). Removing the Battery Pack and Memory Card Remove the battery pack. ●●Open the cover and press the battery lock ...many shots or hours of the arrow. ●●The battery pack will pop up . Remove the memory card. ●●Push the memory card in the direction of Shots per Memory Card" (= 157). Always confirm that is new or has been formatted in another device, you should format the...
...Playback Mode Wi-Fi Functions Setting Menu Accessories Appendix Index 18 Inserting the Battery Pack and Memory Card Insert the included battery pack and a memory card (sold separately). Removing the Battery Pack and Memory Card Remove the battery pack. ●●Open the cover and press the battery lock ...many shots or hours of the arrow. ●●The battery pack will pop up . Remove the memory card. ●●Push the memory card in the direction of Shots per Memory Card" (= 157). Always confirm that is new or has been formatted in another device, you should format the...

User Guide
Page 29
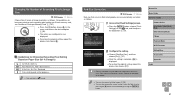
... the [ ] button again to cancel the clock display. ●● When the camera is off , open the memory card/battery cover, or shake or jolt the camera, which may corrupt images or damage the camera or memory card. Clock You can check the current time. ●●Press and hold the [ ] button. ●●...
... the [ ] button again to cancel the clock display. ●● When the camera is off , open the memory card/battery cover, or shake or jolt the camera, which may corrupt images or damage the camera or memory card. Clock You can check the current time. ●●Press and hold the [ ] button. ●●...

User Guide
Page 32
... for each shot, which ends with the still image and a shutter sound, forms a single chapter in "Shooting (Smart Auto)" (=30) to stop automatically when the memory card becomes full. A new folder is protected (=77). -- The digest movie file size reaches approximately 4 GB, or the total recording time reaches approximately 29 minutes and...
... for each shot, which ends with the still image and a shutter sound, forms a single chapter in "Shooting (Smart Auto)" (=30) to stop automatically when the memory card becomes full. A new folder is protected (=77). -- The digest movie file size reaches approximately 4 GB, or the total recording time reaches approximately 29 minutes and...
User Guide
Page 38
... delay before the shot, the lamp blinking and self-timer sound will speed up . (The lamp will play a self- Shooting will stop automatically when the memory card becomes full. ●● When a delay longer than two seconds is unsteady while you are determined by the first shot. Using the Self-Timer to...
... delay before the shot, the lamp blinking and self-timer sound will speed up . (The lamp will play a self- Shooting will stop automatically when the memory card becomes full. ●● When a delay longer than two seconds is unsteady while you are determined by the first shot. Using the Self-Timer to...
User Guide
Page 41
...than eyes (if the camera misinterprets red eye makeup as follows. For guidelines on how many shots at each recording pixel setting can fit on a memory card, see "Number of image resolution, as red pupils, for 4:3 Images) A2 (16.5 x 23.4 in [ ] mode. Guidelines for Choosing Recording...-Fi Functions Setting Menu Accessories Appendix Index 41 Changing the Number of Recording Pixels (Image Size) Still Images Movies Choose from 4 levels of Shots per Memory Card" (= 157). ●●Press the [ ] button, choose [ ] in the menu, and choose the desired option (=26). ●●...
...than eyes (if the camera misinterprets red eye makeup as follows. For guidelines on how many shots at each recording pixel setting can fit on a memory card, see "Number of image resolution, as red pupils, for 4:3 Images) A2 (16.5 x 23.4 in [ ] mode. Guidelines for Choosing Recording...-Fi Functions Setting Menu Accessories Appendix Index 41 Changing the Number of Recording Pixels (Image Size) Still Images Movies Choose from 4 levels of Shots per Memory Card" (= 157). ●●Press the [ ] button, choose [ ] in the menu, and choose the desired option (=26). ●●...
User Guide
Page 42
For guidelines on the maximum movie length at each level of image quality that will fit on a memory card, see "Recording Time per Memory Card" (= 157). ●●Press the [ ] button, choose [ ] in standard definition ●● In [ ] and [ ] modes, black bars are not recorded in your shots. These image ...
For guidelines on the maximum movie length at each level of image quality that will fit on a memory card, see "Recording Time per Memory Card" (= 157). ●●Press the [ ] button, choose [ ] in standard definition ●● In [ ] and [ ] modes, black bars are not recorded in your shots. These image ...
User Guide
Page 67
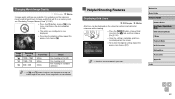
...from two compression ratios, [ ] (Super Fine) and [ ] (Fine), as people) while shooting at each shot. On Fires for each compression ratio can fit on a memory card, see "Number of flash range. ●● In [ ] mode, mount the camera on a tripod or take other measures to keep it still and prevent camera...;● If a blinking [ ] icon is finished playing. For guidelines on how many shots at a slower shutter speed to illuminate backgrounds out of Shots per Memory Card" (= 157). ●●Press the [ ] button, choose [ ] in the menu, and choose the desired option (= 26).
...from two compression ratios, [ ] (Super Fine) and [ ] (Fine), as people) while shooting at each shot. On Fires for each compression ratio can fit on a memory card, see "Number of flash range. ●● In [ ] mode, mount the camera on a tripod or take other measures to keep it still and prevent camera...;● If a blinking [ ] icon is finished playing. For guidelines on how many shots at a slower shutter speed to illuminate backgrounds out of Shots per Memory Card" (= 157). ●●Press the [ ] button, choose [ ] in the menu, and choose the desired option (= 26).
User Guide
Page 73
... displayed, and the images that were found are displayed in yellow frames. Finding Images Matching Specified Conditions Still Images Movies Find desired images quickly on a memory card full of images by choosing [Select All Images in Search] in "Protecting Images" (= 77), "Erasing All Images" (= 80), "Adding Images to the Print List (DPOF...
... displayed, and the images that were found are displayed in yellow frames. Finding Images Matching Specified Conditions Still Images Movies Find desired images quickly on a memory card full of images by choosing [Select All Images in Search] in "Protecting Images" (= 77), "Erasing All Images" (= 80), "Adding Images to the Print List (DPOF...
User Guide
Page 75
... the [ ] button, choose [ ] in and magnify the image, and [ ] is displayed for a few seconds. ●●Press the [ slideshow. ] button to single-image display from a memory card as needed. ●●To move the display position, press the buttons. ●●While [ ] is shown for about 10x by continuing to hold the...
... the [ ] button, choose [ ] in and magnify the image, and [ ] is displayed for a few seconds. ●●Press the [ slideshow. ] button to single-image display from a memory card as needed. ●●To move the display position, press the buttons. ●●While [ ] is shown for about 10x by continuing to hold the...
User Guide
Page 77
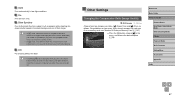
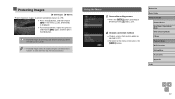
Using the Menu 1 Access the setting screen. ●●Press the [ ] button and choose [Protect] on a memory card will be erased if you format the card (=121, =122). ●● Protected images cannot be erased using the camera's erasure function. Before Use Basic Guide Advanced Guide Camera Basics Auto Mode / Hybrid ...
Using the Menu 1 Access the setting screen. ●●Press the [ ] button and choose [Protect] on a memory card will be erased if you format the card (=121, =122). ●● Protected images cannot be erased using the camera's erasure function. Before Use Basic Guide Advanced Guide Camera Basics Auto Mode / Hybrid ...
User Guide
Page 84
... resized to choose [Yes], and then press the [ ] button. ●●The saved image is now displayed. ●● Editing is only available when the memory card has sufficient free space. Movies 1 Choose [Resize]. ●●Press the [ ] button and choose [Resize] on the [ ] tab (= 27). Editing Still Images ●● Image...
... resized to choose [Yes], and then press the [ ] button. ●●The saved image is now displayed. ●● Editing is only available when the memory card has sufficient free space. Movies 1 Choose [Resize]. ●●Press the [ ] button and choose [Resize] on the [ ] tab (= 27). Editing Still Images ●● Image...

User Guide
Page 88
..., repeat step 2. ●●To cancel editing, press the [ ][ ] buttons to choose [ ]. In this case, the original movie will be erased. ●● If the memory card lacks sufficient space, only [Overwrite] will be available. ●● Movies may not be erased, as a new file. ●● To overwrite the original movie...
..., repeat step 2. ●●To cancel editing, press the [ ][ ] buttons to choose [ ]. In this case, the original movie will be erased. ●● If the memory card lacks sufficient space, only [Overwrite] will be available. ●● Movies may not be erased, as a new file. ●● To overwrite the original movie...
User Guide
Page 92
...; To disable NFC connections, choose MENU (=27) > [ ] tab > [Wi-Fi Settings] > [NFC] > [Off]. Do not place other immediately. To keep camera images private, so that a memory card be turned on the smartphone, the devices may damage the devices. -- ●● When using NFC, keep the following points in step 2 (=91). ●●...
...; To disable NFC connections, choose MENU (=27) > [ ] tab > [Wi-Fi Settings] > [NFC] > [Off]. Do not place other immediately. To keep camera images private, so that a memory card be turned on the smartphone, the devices may damage the devices. -- ●● When using NFC, keep the following points in step 2 (=91). ●●...
User Guide
Page 94
... the smartphone user manual. In this case, in the password field on the camera. (This screen will automatically turn off. ●● Connections require that a memory card be registered to the [ ] button. 6 Choose the smartphone to connect to. ●●Press the [ ][ ] buttons to choose the smartphone, and then press the [ ] button...
... the smartphone user manual. In this case, in the password field on the camera. (This screen will automatically turn off. ●● Connections require that a memory card be registered to the [ ] button. 6 Choose the smartphone to connect to. ●●Press the [ ][ ] buttons to choose the smartphone, and then press the [ ] button...

