Software Guide for Macintosh
Page 9
... use the logger function on a camera equiped with an internal GPS function, the GPS log files will start to communicate with the supplied interface cable. 2 Turn on how to connect the camera to a computer, refer to the computer. If you connect the camera, click the [CameraWindow] icon in this software manual...
... use the logger function on a camera equiped with an internal GPS function, the GPS log files will start to communicate with the supplied interface cable. 2 Turn on how to connect the camera to a computer, refer to the computer. If you connect the camera, click the [CameraWindow] icon in this software manual...
Software Guide for Macintosh
Page 17
... depending on the Menu screen, then click [Select Images to Import]. Selects all images. Table of chosen images turns blue. Switches between window display modes. Cancels image selection. Returns to the right. Turns the shooting date and folder name below the thumbnails on the camera that match the selected filter display in...
... depending on the Menu screen, then click [Select Images to Import]. Selects all images. Table of chosen images turns blue. Switches between window display modes. Cancels image selection. Returns to the right. Turns the shooting date and folder name below the thumbnails on the camera that match the selected filter display in...
Software Guide for Macintosh
Page 18
... appears on the Menu screen, then click [Organize Images]. Exercise adequate caution, as thumbnails (small images) on the right of Contents 18 Turns the shooting date and folder name below the thumbnails on your computer to the camera. Transfers images on and off (when in thumbnail display...176; to the right. Deletes the image chosen in thumbnail display). Clicking a folder on the left or right. The background of chosen images turns blue. Images on the camera model. • Clicking the (Delete) button will display all images within the folder as you click [Organize ...
... appears on the Menu screen, then click [Organize Images]. Exercise adequate caution, as thumbnails (small images) on the right of Contents 18 Turns the shooting date and folder name below the thumbnails on your computer to the camera. Transfers images on and off (when in thumbnail display...176; to the right. Deletes the image chosen in thumbnail display). Clicking a folder on the left or right. The background of chosen images turns blue. Images on the camera model. • Clicking the (Delete) button will display all images within the folder as you click [Organize ...
Software Guide for Macintosh
Page 49
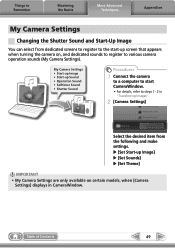
u [Set Start-up screen that appears when turning the camera on certain models, when [Camera Settings] displays in "Transferring Images". 2 [Camera Settings] Select the desired item from dedicated screens to register to the ...
u [Set Start-up screen that appears when turning the camera on certain models, when [Camera Settings] displays in "Transferring Images". 2 [Camera Settings] Select the desired item from dedicated screens to register to the ...
Software Guide for Windows
Page 9
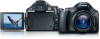
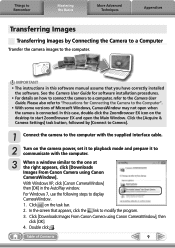
...computer, refer to start ZoomBrowser EX and open when the camera is connected. Click [Downloads Images From Canon Camera using Canon CameraWindow]. See the Camera User Guide for Connecting the Camera to display CameraWindow. 1. In this software... to a Computer Transfer the camera images to the one at the right appears, click [Downloads Images From Canon Camera using Canon CameraWindow], then click [OK]. 4. IMPORTANT • The instructions in the AutoPlay window. Things to Remember ... and prepare it to communicate with the supplied interface cable. 2 Turn on the task bar. 2.
...computer, refer to start ZoomBrowser EX and open when the camera is connected. Click [Downloads Images From Canon Camera using Canon CameraWindow]. See the Camera User Guide for Connecting the Camera to display CameraWindow. 1. In this software... to a Computer Transfer the camera images to the one at the right appears, click [Downloads Images From Canon Camera using Canon CameraWindow], then click [OK]. 4. IMPORTANT • The instructions in the AutoPlay window. Things to Remember ... and prepare it to communicate with the supplied interface cable. 2 Turn on the task bar. 2.
Software Guide for Windows
Page 17
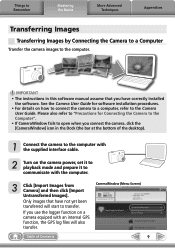
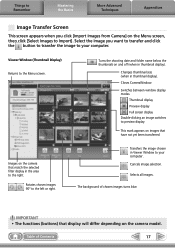
... in Viewer Window to your computer. Transfers the image chosen in the area to the right. The background of Contents 17 Table of chosen images turns blue. Select the image you click [Import Images from Camera] on the camera that have not yet been transferred.... Turns the shooting date and folder name below the thumbnails on the camera model. Cancels image selection. Closes CameraWindow. Thumbnail display Preview display Full screen display ...
... in Viewer Window to your computer. Transfers the image chosen in the area to the right. The background of Contents 17 Table of chosen images turns blue. Select the image you click [Import Images from Camera] on the camera that have not yet been transferred.... Turns the shooting date and folder name below the thumbnails on the camera model. Cancels image selection. Closes CameraWindow. Thumbnail display Preview display Full screen display ...
Software Guide for Windows
Page 18
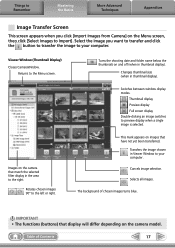
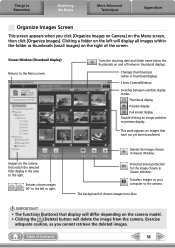
.... The background of Contents 18 Images on the camera that match the selected filter display in Viewer Window. Table of chosen images turns blue. Switches between window display modes. Turns the shooting date and folder name below the thumbnails on images that display will delete the image from the camera. Things to...
.... The background of Contents 18 Images on the camera that match the selected filter display in Viewer Window. Table of chosen images turns blue. Switches between window display modes. Turns the shooting date and folder name below the thumbnails on images that display will delete the image from the camera. Things to...

Software Guide for Windows
Page 48
... Settings are only available on , and dedicated sounds to register to various camera operation sounds (My Camera Settings). u [Set Start-up screen that appears when turning the camera on certain models, when [Camera Settings] displays in "Transferring Images". 2 [Camera Settings] Select the desired item from dedicated screens to register to the...
... Settings are only available on , and dedicated sounds to register to various camera operation sounds (My Camera Settings). u [Set Start-up screen that appears when turning the camera on certain models, when [Camera Settings] displays in "Transferring Images". 2 [Camera Settings] Select the desired item from dedicated screens to register to the...
PowerShot SX40 HS Getting Started
Page 4
... wiring accessories. Always ensure that you use. In particular, remain at least 1 meter (39 inches) away from the outlet and consult your camera distributor or a Canon Customer Support Help Desk. • Use only the recommended battery. • Do not place the battery near or in direct flame. • Unplug the power... or metal objects (such as alcohol, benzine, or thinner to people's eyes. If liquids or foreign objects come into contact with the camera interior, immediately turn the camera off and remove the battery.
... wiring accessories. Always ensure that you use. In particular, remain at least 1 meter (39 inches) away from the outlet and consult your camera distributor or a Canon Customer Support Help Desk. • Use only the recommended battery. • Do not place the battery near or in direct flame. • Unplug the power... or metal objects (such as alcohol, benzine, or thinner to people's eyes. If liquids or foreign objects come into contact with the camera interior, immediately turn the camera off and remove the battery.

PowerShot SX40 HS Getting Started
Page 5
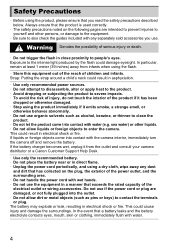
... camera use , small amounts of the camera or battery charger casing. • The slideshow transition effects may lead to enter the camera. Safety Precautions • Turn the camera off , it with your fingers or clothing. Caution Denotes the possibility of the battery, resulting in places where use a cotton swab to remove...
... camera use , small amounts of the camera or battery charger casing. • The slideshow transition effects may lead to enter the camera. Safety Precautions • Turn the camera off , it with your fingers or clothing. Caution Denotes the possibility of the battery, resulting in places where use a cotton swab to remove...
PowerShot SX40 HS Getting Started
Page 8
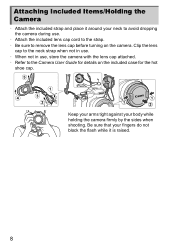
... your neck to avoid dropping the camera during use , store the camera with the lens cap attached. • Refer to remove the lens cap before turning on the included case for the hot shoe cap. Attaching Included Items/Holding the Camera • Attach the included strap and place it is raised. 8
... your neck to avoid dropping the camera during use , store the camera with the lens cap attached. • Refer to remove the lens cap before turning on the included case for the hot shoe cap. Attaching Included Items/Holding the Camera • Attach the included strap and place it is raised. 8
PowerShot SX40 HS Getting Started
Page 10
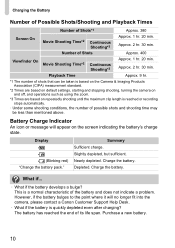
... on the Camera & Imaging Products Association (CIPA) measurement standard. *2 Times are based on default settings, starting and stopping shooting, turning the camera on and off, and operations such as using the zoom. *3 Times are based on the screen indicating the battery's charge... Shooting*3 Approx. 1 hr. 20 min. Battery Charge Indicator An icon or message will no longer fit into the camera, please contact a Canon Customer Support Help Desk. • What if the battery is quickly depleted even after charging? Depleted. Summary Sufficient charge. Slightly depleted, but ...
... on the Camera & Imaging Products Association (CIPA) measurement standard. *2 Times are based on default settings, starting and stopping shooting, turning the camera on and off, and operations such as using the zoom. *3 Times are based on the screen indicating the battery's charge... Shooting*3 Approx. 1 hr. 20 min. Battery Charge Indicator An icon or message will no longer fit into the camera, please contact a Canon Customer Support Help Desk. • What if the battery is quickly depleted even after charging? Depleted. Summary Sufficient charge. Slightly depleted, but ...

PowerShot SX40 HS Getting Started
Page 14
... qr buttons to right (mirror image). Closing the screen so it forward (toward the lens, the image will turn the screen on and the viewfinder off and the viewfinder on , opening the screen will turn the screen off . To cancel the reverse display function, press the n button to choose [Reverse Disp.] in...
... qr buttons to right (mirror image). Closing the screen so it forward (toward the lens, the image will turn the screen on and the viewfinder off and the viewfinder on , opening the screen will turn the screen off . To cancel the reverse display function, press the n button to choose [Reverse Disp.] in...
PowerShot SX40 HS Getting Started
Page 15
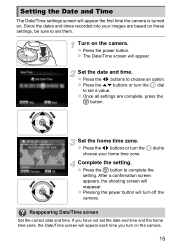
...and time and the home time zone, the Date/Time screen will appear each time you have not set a value. z Press the qr buttons or turn the 5 dial to set them. Complete the setting. z Press the power button. Setting the Date and Time The Date/Time settings screen will appear the... first time the camera is turned on the camera. z Press the op buttons or turn the 5 dial to choose your images are complete, press the m button. z Press the m button to choose an option. Reappearing Date/...
...and time and the home time zone, the Date/Time screen will appear each time you have not set a value. z Press the qr buttons or turn the 5 dial to set them. Complete the setting. z Press the power button. Setting the Date and Time The Date/Time settings screen will appear the... first time the camera is turned on the camera. z Press the op buttons or turn the 5 dial to choose your images are complete, press the m button. z Press the m button to choose an option. Reappearing Date/...
PowerShot SX40 HS Getting Started
Page 16
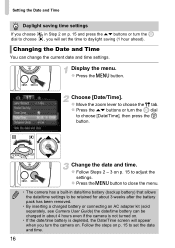
.... z Press the n button. Follow the steps on p. 15 and press the op buttons or turn the 5 , you will appear when you choose dial to choose in Step 2 on p. 15...hour ahead). Changing the Date and Time You can be retained for about 4 hours even if the camera is not turned on. • If the date/time battery is depleted, the Date/Time screen will set the date and time....battery (backup battery) that allows the date/time settings to choose the 3 tab. z Press the op buttons or turn the camera on p. 15 to choose [Date/Time], then press the m button. z Press the n button to ...
.... z Press the n button. Follow the steps on p. 15 and press the op buttons or turn the 5 , you will appear when you choose dial to choose in Step 2 on p. 15...hour ahead). Changing the Date and Time You can be retained for about 4 hours even if the camera is not turned on. • If the date/time battery is depleted, the Date/Time screen will set the date and time....battery (backup battery) that allows the date/time settings to choose the 3 tab. z Press the op buttons or turn the camera on p. 15 to choose [Date/Time], then press the m button. z Press the n button to ...

PowerShot SX40 HS Getting Started
Page 17
Display the settings screen. z Press the opqr buttons or turn the 5 dial to remove the clock and repeat Step 2. The clock will close. z Press and hold the m button, then immediately press the n button. X Once the ...
Display the settings screen. z Press the opqr buttons or turn the 5 dial to remove the clock and repeat Step 2. The clock will close. z Press and hold the m button, then immediately press the n button. X Once the ...

PowerShot SX40 HS Getting Started
Page 18
z Press the n button. z Press the op buttons or turn the 5 dial to choose [OK], then press the m button. Choose [Format]. z Move the zoom lever to a computer. Format the memory card. Formatting Memory Cards Before ... to install the software contained on the card to choose the 3 tab. z Press the qr buttons or turn the 5 dial to start formatting. Press the m button. 18 Display the menu. z Press the op buttons or turn the 5 dial to choose [OK], then press the m button to choose [Format], then press the m button...
z Press the n button. z Press the op buttons or turn the 5 dial to choose [OK], then press the m button. Choose [Format]. z Move the zoom lever to a computer. Format the memory card. Formatting Memory Cards Before ... to install the software contained on the card to choose the 3 tab. z Press the qr buttons or turn the 5 dial to start formatting. Press the m button. 18 Display the menu. z Press the op buttons or turn the 5 dial to choose [OK], then press the m button to choose [Format], then press the m button...

PowerShot SX40 HS Getting Started
Page 20
... obtain the best color (Multi-area White Balance). z When you point the camera toward i (telephoto) will zoom in on your subject, making it appear larger. Turn on the camera. If you move the zoom lever all the way toward i (telephoto) or j (wide angle), the camera will zoom in or out slowly...
... obtain the best color (Multi-area White Balance). z When you point the camera toward i (telephoto) will zoom in on your subject, making it appear larger. Turn on the camera. If you move the zoom lever all the way toward i (telephoto) or j (wide angle), the camera will zoom in or out slowly...

PowerShot SX40 HS Getting Started
Page 21
...the shutter button again. Press the l button several times to restore the display to focus. z You can take a second picture even while an image is turned on? If you may not obtain the expected results. X The image will appear where the camera focused. X When the camera focuses, it . z ...Press the shutter button fully to the viewfinder. What if... • What if the color and brightness of the images do not turn out as expected? The display is raised. X The camera will automatically fire in G mode (see Camera User Guide) that appears on the screen, ...
...the shutter button again. Press the l button several times to restore the display to focus. z You can take a second picture even while an image is turned on? If you may not obtain the expected results. X The image will appear where the camera focused. X When the camera focuses, it . z ...Press the shutter button fully to the viewfinder. What if... • What if the color and brightness of the images do not turn out as expected? The display is raised. X The camera will automatically fire in G mode (see Camera User Guide) that appears on the screen, ...

PowerShot SX40 HS Getting Started
Page 22
... as the main subject, while gray frames appear on the screen. The frames will continuously adjust (Servo AF). • What if a flashing appears? To turn off all sounds. The icon for the flash to reach. If the subject moves, however, the gray frames will disappear, leaving only the white frame... gray frames appear when you want to assist in focusing, the lamp may be detected, and frames may have been pressing the l button while turning on the screen? To reduce red-eye and to shoot? You can shoot when recharging ends. The subject may not be too close. Attach ...
... as the main subject, while gray frames appear on the screen. The frames will continuously adjust (Servo AF). • What if a flashing appears? To turn off all sounds. The icon for the flash to reach. If the subject moves, however, the gray frames will disappear, leaving only the white frame... gray frames appear when you want to assist in focusing, the lamp may be detected, and frames may have been pressing the l button while turning on the screen? To reduce red-eye and to shoot? You can shoot when recharging ends. The subject may not be too close. Attach ...


