
PowerShot SX130 IS Camera User Guide
Page 1
Camera User Guide • Make sure you read this guide, including the Safety Precautions before using the camera. • Store this guide safely so that you can use it in the future. ENGLISH
Camera User Guide • Make sure you read this guide, including the Safety Precautions before using the camera. • Store this guide safely so that you can use it in the future. ENGLISH
PowerShot SX130 IS Camera User Guide
Page 2
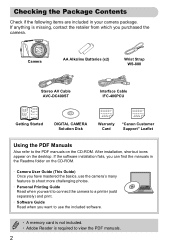
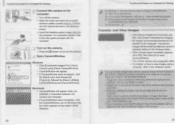
... Alkaline Batteries (x2) Wrist Strap WS-800 Stereo AV Cable AVC-DC400ST Interface Cable IFC-400PCU Getting Started DIGITAL CAMERA Solution Disk Warranty "Canon Customer Card Support" Leaflet Using the PDF Manuals Also refer to view the PDF manuals. 2 If anything is ...the CD-ROM. • Camera User Guide (This Guide) Once you have mastered the basics, use the camera's many features to shoot more challenging photos. • Personal Printing Guide Read when you want to connect the camera to a printer (sold separately) and print. • Software Guide Read when you want to use...
... Alkaline Batteries (x2) Wrist Strap WS-800 Stereo AV Cable AVC-DC400ST Interface Cable IFC-400PCU Getting Started DIGITAL CAMERA Solution Disk Warranty "Canon Customer Card Support" Leaflet Using the PDF Manuals Also refer to view the PDF manuals. 2 If anything is ...the CD-ROM. • Camera User Guide (This Guide) Once you have mastered the basics, use the camera's many features to shoot more challenging photos. • Personal Printing Guide Read when you want to connect the camera to a printer (sold separately) and print. • Software Guide Read when you want to use...

PowerShot SX130 IS Camera User Guide
Page 34
...). 34 Windows ● Click [Downloads Images From Canon Camera using Canon CameraWindow]. X CameraWindow will appear when you establish a connection between the camera and computer. ● If CameraWindow does not appear, click the CameraWindow icon on the camera. Transferring Images to a Computer for Viewing Connect the camera to the user guide provided with the computer. Macintosh X CameraWindow will appear...
...). 34 Windows ● Click [Downloads Images From Canon Camera using Canon CameraWindow]. X CameraWindow will appear when you establish a connection between the camera and computer. ● If CameraWindow does not appear, click the CameraWindow icon on the camera. Transferring Images to a Computer for Viewing Connect the camera to the user guide provided with the computer. Macintosh X CameraWindow will appear...
PowerShot SX130 IS Camera User Guide
Page 134
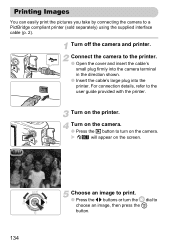
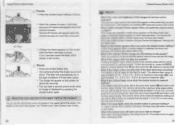
...the printer. ● Open the cover and insert the cable's small plug firmly into the camera terminal in the direction shown. ● Insert the cable's large plug into the printer. Connect the camera to a PictBridge compliant printer (sold separately) using the supplied interface cable (p. 2). For ...an image, then press the m button. 134 Turn off the camera and printer. X will appear on the printer. Turn on the camera. Choose an image to print. ● Press the qr buttons or turn on the camera. ● Press the 1 button to the user guide provided with the printer.
...the printer. ● Open the cover and insert the cable's small plug firmly into the camera terminal in the direction shown. ● Insert the cable's large plug into the printer. Connect the camera to a PictBridge compliant printer (sold separately) using the supplied interface cable (p. 2). For ...an image, then press the m button. 134 Turn off the camera and printer. X will appear on the printer. Turn on the camera. Choose an image to print. ● Press the qr buttons or turn on the camera. ● Press the 1 button to the user guide provided with the printer.

Getting Started Guide
Page 1
canon RwerShot SX130IS Getting Started Please refer to the complete user guide included on the CD-ROM for more detailed information. • Make sure you read this guide, including the "Safety Precautions" section, before using the camera. • Store this guide safely so that you can use it in the future. CDI-E433 ENGLISH I III I!
canon RwerShot SX130IS Getting Started Please refer to the complete user guide included on the CD-ROM for more detailed information. • Make sure you read this guide, including the "Safety Precautions" section, before using the camera. • Store this guide safely so that you can use it in the future. CDI-E433 ENGLISH I III I!
Getting Started Guide
Page 2
...distributors are intended for any consequential damages arising from which you want to use the camera's many features to a Canon Customer Support Help Desk. LCD Monitor (Screen) The LCD monitor is a problem with the camera while abroad, please return it to a printer (sold separately) and print. ... LCD monitor may become warm. If anything is not a malfunction and has no effect on the desktop. Camera User Guide Once you want to connect the camera to the country of a camera or other legal rights even if the image was shot for protection against scratches during shipment.
...distributors are intended for any consequential damages arising from which you want to use the camera's many features to a Canon Customer Support Help Desk. LCD Monitor (Screen) The LCD monitor is a problem with the camera while abroad, please return it to a printer (sold separately) and print. ... LCD monitor may become warm. If anything is not a malfunction and has no effect on the desktop. Camera User Guide Once you want to connect the camera to the country of a camera or other legal rights even if the image was shot for protection against scratches during shipment.
Getting Started Guide
Page 5
Press the E button to the computer. Auf edxn Turn off the camera. Condeme bre,. Insert the interface cable's larger plug into the camera terminal in the direction shown. Transferring Images to a Computer for Viewing Connect the camera to turn on the camera. Open CameraWindow. Open the cover and insert the included interface cable's smaller plug (p. 2) firmly into the computer. For connection details, refer to the user guide provided with the computer. Turn on the camera.
Press the E button to the computer. Auf edxn Turn off the camera. Condeme bre,. Insert the interface cable's larger plug into the camera terminal in the direction shown. Transferring Images to a Computer for Viewing Connect the camera to turn on the camera. Open CameraWindow. Open the cover and insert the included interface cable's smaller plug (p. 2) firmly into the computer. For connection details, refer to the user guide provided with the computer. Turn on the camera.
Getting Started Guide
Page 10
...? Move the zoom lever toward and hold it will appear when the camera focuses on the icons that appear, see "Scene Icons" (see Camera User Guide). The camera will be able to focus on subjects that the camera does not move and blur the image. What if the lamp lights ...determined scene will turn off all sounds except for about 1 cm (0.4 in mode (see Camera User Guide). 20 Taking Pictures (Smart Auto) 61 What if... You can take an image? The scene icon (see Camera User Guide). If this happens, try to focus on subjects that appears on again when recharging ends...
...? Move the zoom lever toward and hold it will appear when the camera focuses on the icons that appear, see "Scene Icons" (see Camera User Guide). The camera will be able to focus on subjects that the camera does not move and blur the image. What if the lamp lights ...determined scene will turn off all sounds except for about 1 cm (0.4 in mode (see Camera User Guide). 20 Taking Pictures (Smart Auto) 61 What if... You can take an image? The scene icon (see Camera User Guide). If this happens, try to focus on subjects that appears on again when recharging ends...
Getting Started Guide
Page 13
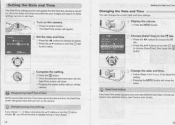
... Press the buttons to adjust the setting. Press the a button. 3 Once the date and time have been set , insert a new date/time battery (see Camera User Guide). 15 u n YT Lens Retract Power Saving.. Distance Units m/cm Sets the date and time Choose [Date/Time] in Step 2 and press the buttons or.... Press the MENU button. U csp., Date/Time battery Change the date and time. Pressing the power button will appear the first time the camera is turned on these settings, be sure to set them. Display the menus. Press the power button. If you have been correctly set , ...
... Press the buttons to adjust the setting. Press the a button. 3 Once the date and time have been set , insert a new date/time battery (see Camera User Guide). 15 u n YT Lens Retract Power Saving.. Distance Units m/cm Sets the date and time Choose [Date/Time] in Step 2 and press the buttons or.... Press the MENU button. U csp., Date/Time battery Change the date and time. Pressing the power button will appear the first time the camera is turned on these settings, be sure to set them. Display the menus. Press the power button. If you have been correctly set , ...


