User Manual
Page 16
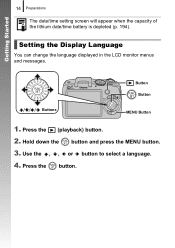
Button Button Buttons MENU Button 1. Use the , , or button to select a language. 4. Press the (playback) button. 2. Hold down the button and press the MENU button. 3. Getting Started 14 Preparations The date/time setting screen will appear when the capacity of the lithium date/time battery is depleted (p. 194). Press the button. Setting the Display Language You can change the language displayed in the LCD monitor menus and messages.
Button Button Buttons MENU Button 1. Use the , , or button to select a language. 4. Press the (playback) button. 2. Hold down the button and press the MENU button. 3. Getting Started 14 Preparations The date/time setting screen will appear when the capacity of the lithium date/time battery is depleted (p. 194). Press the button. Setting the Display Language You can change the language displayed in the LCD monitor menus and messages.
User Manual
Page 30
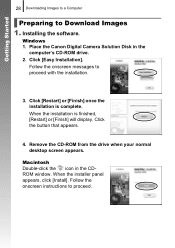
...the installation is finished, [Restart] or [Finish] will display. When the installation is complete. Remove the CD-ROM from the drive when your normal desktop screen appears. Getting Started 28 Downloading Images to a Computer Preparing to proceed. Click [Easy Installation]. When the installer panel appears, click [Install]. Macintosh Double-...Follow the onscreen instructions to Download Images 1. Follow the onscreen messages to proceed with the installation. 3. Click the button that appears. 4. Windows 1. Place the Canon Digital Camera Solution Disk in the CDROM window.
...the installation is finished, [Restart] or [Finish] will display. When the installation is complete. Remove the CD-ROM from the drive when your normal desktop screen appears. Getting Started 28 Downloading Images to a Computer Preparing to proceed. Click [Easy Installation]. When the installer panel appears, click [Install]. Macintosh Double-...Follow the onscreen instructions to Download Images 1. Follow the onscreen messages to proceed with the installation. 3. Click the button that appears. 4. Windows 1. Place the Canon Digital Camera Solution Disk in the CDROM window.

User Manual
Page 35
... wallpaper for a computer. Getting Started Downloading Images to their shooting dates. Press the MENU button after downloading finishes. • You will download. The image selection screen will display on the computer. The downloaded images will appear directly when the [Select & Transfer] or the [Wallpaper] option was last selected. Click [×] at...
... wallpaper for a computer. Getting Started Downloading Images to their shooting dates. Press the MENU button after downloading finishes. • You will download. The image selection screen will display on the computer. The downloaded images will appear directly when the [Select & Transfer] or the [Wallpaper] option was last selected. Click [×] at...

User Manual
Page 43
Components Guide 41 „ Back View a Screen (LCD Monitor) (p. 58) b Terminal Cover c Strap Mount (p. 12) d Memory Card/Battery Cover Lock (p. 10) e Memory Card/Battery Cover (p. 10) f Tripod Socket g A/V OUT (Audio/Video output) and DIGITAL Terminal (pp. 20, 29, 163) h DC IN (Power Input) Terminal (p. 191)
Components Guide 41 „ Back View a Screen (LCD Monitor) (p. 58) b Terminal Cover c Strap Mount (p. 12) d Memory Card/Battery Cover Lock (p. 10) e Memory Card/Battery Cover (p. 10) f Tripod Socket g A/V OUT (Audio/Video output) and DIGITAL Terminal (pp. 20, 29, 163) h DC IN (Power Input) Terminal (p. 191)
User Manual
Page 49
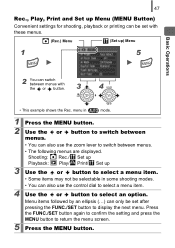
.... • The following menus are displayed. Menu items followed by an ellipsis (...) can be set after pressing the FUNC./SET button to return the menu screen. 5 Press the MENU button. Shooting: Rec./ Set up Playback: Play/ Print/ Set up 3 Use the or button to select a menu item. • Some items may...
.... • The following menus are displayed. Menu items followed by an ellipsis (...) can be set after pressing the FUNC./SET button to return the menu screen. 5 Press the MENU button. Shooting: Rec./ Set up Playback: Play/ Print/ Set up 3 Use the or button to select a menu item. • Some items may...
User Manual
Page 60
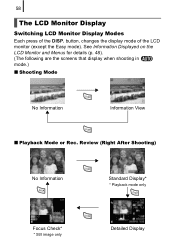
See Information Displayed on the LCD Monitor and Menus for details (p. 48). (The following are the screens that display when shooting in mode.) „ Shooting Mode No Information Information View „ Playback Mode or Rec. 58 The LCD Monitor Display Switching LCD Monitor Display Modes Each press of the LCD monitor (except the Easy mode). Review (Right After Shooting) No Information Standard Display* * Playback mode only Focus Check* * Still image only Detailed Display button, changes the display mode of the DISP.
See Information Displayed on the LCD Monitor and Menus for details (p. 48). (The following are the screens that display when shooting in mode.) „ Shooting Mode No Information Information View „ Playback Mode or Rec. 58 The LCD Monitor Display Switching LCD Monitor Display Modes Each press of the LCD monitor (except the Easy mode). Review (Right After Shooting) No Information Standard Display* * Playback mode only Focus Check* * Still image only Detailed Display button, changes the display mode of the DISP.

User Manual
Page 67
You are not using the flash, lower the flash until it closes. • (flash off) appears in the LCD monitor. p. 222 Commonly Used Shooting Functions 2 Press the button. 1. 65 Using the Flash Available Shooting Modes 1 Raise the flash manually. Use the or button to change the flash mode. : [Auto] : [On] • You can configure detailed settings for the flash when you press the MENU button while this screen is displayed (p. 95). 3 When you are recommended to shoot with the camera attached to a tripod or other device if the camera shake warning icon appears.
You are not using the flash, lower the flash until it closes. • (flash off) appears in the LCD monitor. p. 222 Commonly Used Shooting Functions 2 Press the button. 1. 65 Using the Flash Available Shooting Modes 1 Raise the flash manually. Use the or button to change the flash mode. : [Auto] : [On] • You can configure detailed settings for the flash when you press the MENU button while this screen is displayed (p. 95). 3 When you are recommended to shoot with the camera attached to a tripod or other device if the camera shake warning icon appears.
User Manual
Page 70
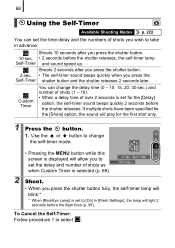
...] in advance. 68 Using the Self-Timer Available Shooting Modes p. 222 You can change the self-timer mode. • Pressing the MENU button while this screen is displayed will allow you to set the delay and number of shots as when Custom Timer is selected (p. 69). 2 Shoot. • When you press...
...] in advance. 68 Using the Self-Timer Available Shooting Modes p. 222 You can change the self-timer mode. • Pressing the MENU button while this screen is displayed will allow you to set the delay and number of shots as when Custom Timer is selected (p. 69). 2 Shoot. • When you press...

User Manual
Page 80
The screen provides guidance for checking images without confusion. • Shooting people When shooting people, the camera automatically detects faces to focus on, so you can be ...
The screen provides guidance for checking images without confusion. • Shooting people When shooting people, the camera automatically detects faces to focus on, so you can be ...
User Manual
Page 101
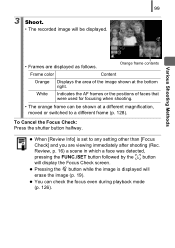
... can be displayed. Review, p. 16) a scene in which a face was detected, pressing the FUNC./SET button followed by the button will display the Focus Check screen. To Cancel the Focus Check: Press the shutter button halfway. White Indicates the AF frames or the positions of the image shown at a different magnification...
... can be displayed. Review, p. 16) a scene in which a face was detected, pressing the FUNC./SET button followed by the button will display the Focus Check screen. To Cancel the Focus Check: Press the shutter button halfway. White Indicates the AF frames or the positions of the image shown at a different magnification...
User Manual
Page 104
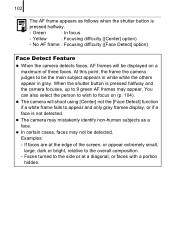
... edge of three faces. Green : In focus - When the shutter button is pressed halfway and the camera focuses, up to focus on a maximum of the screen, or appear extremely small, large, dark or bright, relative to the overall composition. -
... edge of three faces. Green : In focus - When the shutter button is pressed halfway and the camera focuses, up to focus on a maximum of the screen, or appear extremely small, large, dark or bright, relative to the overall composition. -
User Manual
Page 121
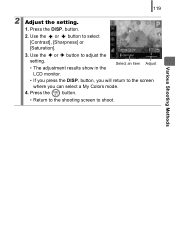
119 2 Adjust the setting. 1. Press the DISP. Select an item Adjust • If you will return to shoot. Press the button. • Return to the shooting screen to the screen where you can select a My Colors mode. 4. button. 2. Various Shooting Methods button, you press the DISP. Use the or button to adjust the setting. • The adjustment results show in the LCD monitor. Use the or button to select [Contrast], [Sharpness] or [Saturation]. 3.
119 2 Adjust the setting. 1. Press the DISP. Select an item Adjust • If you will return to shoot. Press the button. • Return to the shooting screen to the screen where you can select a My Colors mode. 4. button. 2. Various Shooting Methods button, you press the DISP. Use the or button to adjust the setting. • The adjustment results show in the LCD monitor. Use the or button to select [Contrast], [Sharpness] or [Saturation]. 3.
User Manual
Page 122
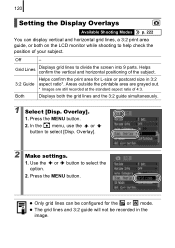
... the grid lines and the 3:2 guide simultaneously. 1 Select [Disp. Helps confirm the print area for the or mode. Use the or button to divide the screen into 9 parts. Off - Overlay]. 1. Both Displays both on the LCD monitor while shooting to select [Disp. In the menu, use the or button to help...
... the grid lines and the 3:2 guide simultaneously. 1 Select [Disp. Helps confirm the print area for the or mode. Use the or button to divide the screen into 9 parts. Off - Overlay]. 1. Both Displays both on the LCD monitor while shooting to select [Disp. In the menu, use the or button to help...

User Manual
Page 125
... the button turns off the LCD monitor. Ensure that the button is pressed, the settings of the registered functions are switched. • : The corresponding setup screen is displayed. • : Each press of the LCD monitor and then press the button. The next time a button is pressed, the LCD monitor will turn...
... the button turns off the LCD monitor. Ensure that the button is pressed, the settings of the registered functions are switched. • : The corresponding setup screen is displayed. • : Each press of the LCD monitor and then press the button. The next time a button is pressed, the LCD monitor will turn...
User Manual
Page 129
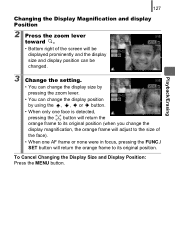
Playback/Erasing 127 Changing the Display Magnification and display Position 2 Press the zoom lever toward . • Bottom right of the screen will be displayed prominently and the display size and display position can be changed. 3 Change the setting. • You can change the display size by ...
Playback/Erasing 127 Changing the Display Magnification and display Position 2 Press the zoom lever toward . • Bottom right of the screen will be displayed prominently and the display size and display position can be changed. 3 Change the setting. • You can change the display size by ...
User Manual
Page 139
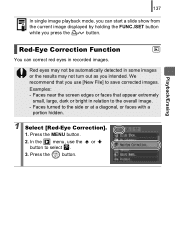
... FUNC./SET button while you press the button. We recommend that appear extremely small, large, dark or bright in relation to select . 3. Faces near the screen edges or faces that you intended. Examples: - In the menu, use [New File] to the side or at a diagonal, or faces with a portion hidden. 1 Select...
... FUNC./SET button while you press the button. We recommend that appear extremely small, large, dark or bright in relation to select . 3. Faces near the screen edges or faces that you intended. Examples: - In the menu, use [New File] to the side or at a diagonal, or faces with a portion hidden. 1 Select...
User Manual
Page 147
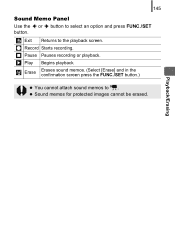
Play Begins playback. z Sound memos for protected images cannot be erased. Pause Pauses recording or playback. 145 Sound Memo Panel Use the or button to the playback screen. Record Starts recording. Exit Returns to select an option and press FUNC./SET button. Erase Erases sound memos. (Select [Erase] and in the confirmation screen press the FUNC./SET button.) Playback/Erasing z You cannot attach sound memos to .
Play Begins playback. z Sound memos for protected images cannot be erased. Pause Pauses recording or playback. 145 Sound Memo Panel Use the or button to the playback screen. Record Starts recording. Exit Returns to select an option and press FUNC./SET button. Erase Erases sound memos. (Select [Erase] and in the confirmation screen press the FUNC./SET button.) Playback/Erasing z You cannot attach sound memos to .
User Manual
Page 161
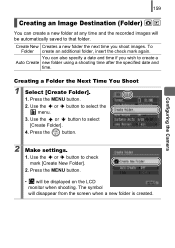
... recorded images will be displayed on the LCD monitor when shooting. Press the button. 2 Make settings. 1. Press the MENU button. • will disappear from the screen when a new folder is created. The symbol will be automatically saved to select [Create Folder]. 4. Configuring the Camera 159 Creating an Image Destination (Folder) You...
... recorded images will be displayed on the LCD monitor when shooting. Press the button. 2 Make settings. 1. Press the MENU button. • will disappear from the screen when a new folder is created. The symbol will be automatically saved to select [Create Folder]. 4. Configuring the Camera 159 Creating an Image Destination (Folder) You...


