
Direct Print User Guide
Page 13
The print order screen appears. 2 Sets the number of the LCD monitor. 1 If displays on the LCD monitor, please refer to Printing with SELPHY CP Series Printers using Canon Direct Print (p. 53). Make sure that displays in the upper left corner of copies (p. 14) Sets the trimming portion (p. 15) Sets the paper size, type ...
The print order screen appears. 2 Sets the number of the LCD monitor. 1 If displays on the LCD monitor, please refer to Printing with SELPHY CP Series Printers using Canon Direct Print (p. 53). Make sure that displays in the upper left corner of copies (p. 14) Sets the trimming portion (p. 15) Sets the paper size, type ...

Direct Print User Guide
Page 20
.... • When you close the Print mode (when you turn the camera power off, change the camera mode, or detach the connection cable). • The shooting date or part of the trimming frame. • Please use the LCD monitor to set the trimming settings. • The trimming setting only applies... to one image. • The trimming setting is canceled with the Postcard Date Imprint mode may not display correctly on a TV screen. 18
.... • When you close the Print mode (when you turn the camera power off, change the camera mode, or detach the connection cable). • The shooting date or part of the trimming frame. • Please use the LCD monitor to set the trimming settings. • The trimming setting only applies... to one image. • The trimming setting is canceled with the Postcard Date Imprint mode may not display correctly on a TV screen. 18

Direct Print User Guide
Page 35
The print order screen appears. 2 Sets the number of the LCD monitor. 1 If displays on the LCD monitor, please refer to Printing with Bubble Jet Printers using Bubble Jet Direct (p. 71). Print after Changing the Print Settings You can change the print ... upper left corner of copies (p. 37) Sets the trimming portion (p. 38) Sets the paper size, type and layout (p. 42) Starts the printing process Print Order Screen 3 Select print settings as needed.
The print order screen appears. 2 Sets the number of the LCD monitor. 1 If displays on the LCD monitor, please refer to Printing with Bubble Jet Printers using Bubble Jet Direct (p. 71). Print after Changing the Print Settings You can change the print ... upper left corner of copies (p. 37) Sets the trimming portion (p. 38) Sets the paper size, type and layout (p. 42) Starts the printing process Print Order Screen 3 Select print settings as needed.

Direct Print User Guide
Page 43
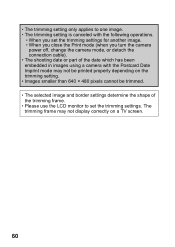
... for another image. • When you close the Print mode (when you turn the camera power off, change the camera mode, or detach the connection cable). • The shooting date or part of the date... which has been embedded in images using a camera with the Postcard Date Imprint mode may not display correctly on the trimming setting. • ...Images smaller than 640 × 480 pixels cannot be printed properly depending on a TV screen. 41 The trimming frame may not be trimmed. • The paper size and page layout settings determine ...
... for another image. • When you close the Print mode (when you turn the camera power off, change the camera mode, or detach the connection cable). • The shooting date or part of the date... which has been embedded in images using a camera with the Postcard Date Imprint mode may not display correctly on the trimming setting. • ...Images smaller than 640 × 480 pixels cannot be printed properly depending on a TV screen. 41 The trimming frame may not be trimmed. • The paper size and page layout settings determine ...
Direct Print User Guide
Page 52
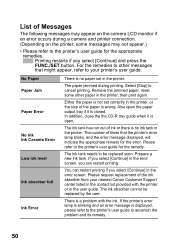
... to the printer's user guide for the error. If you select [Continue] in the error screen, you can restart printing if you select [Continue] and press the FUNC./SET button. Please... the ink absorber from your printer's user guide. The paper jammed during a camera and printer connection. (Depending on the camera LCD monitor if an error occurs during printing. Either the paper is not set in...Error There is closed. The number of times that might appear, refer to your nearest Canon Customer Support center listed in the contact list provided with the ink. You can restart printing...
... to the printer's user guide for the error. If you select [Continue] in the error screen, you can restart printing if you select [Continue] and press the FUNC./SET button. Please... the ink absorber from your printer's user guide. The paper jammed during a camera and printer connection. (Depending on the camera LCD monitor if an error occurs during printing. Either the paper is not set in...Error There is closed. The number of times that might appear, refer to your nearest Canon Customer Support center listed in the contact list provided with the ink. You can restart printing...

Direct Print User Guide
Page 56
... Changing the Print Settings You can change the print settings before printing. Selects the Number of the LCD monitor. 1 If displays on the LCD monitor, please refer to Printing with a different camera. 54 Select [Print] and press the FUNC./SET button. 4 If you wish to play back... or print images shot with SELPHY ES Series/SELPHY CP Series Printers using PictBridge (p. 10). The print order screen appears. 2 Sets the...
... Changing the Print Settings You can change the print settings before printing. Selects the Number of the LCD monitor. 1 If displays on the LCD monitor, please refer to Printing with a different camera. 54 Select [Print] and press the FUNC./SET button. 4 If you wish to play back... or print images shot with SELPHY ES Series/SELPHY CP Series Printers using PictBridge (p. 10). The print order screen appears. 2 Sets the...

Direct Print User Guide
Page 59
...Trimming Frame Steps 2a and 3a Steps 2b and 3b * Proceed to procedure a or b depending on the display screen which of the image area displayed on the LCD monitor is changed after having made the trimming settings, you must select the settings again. Setting the Printing Area ... any date or borders.) • Practically all of the following screens 1 appear before setting the trimming settings. The trimming setting screen differs depending on bordered prints. If the print style is printed on the camera model. The trimming frame will appear around the previously selected portion....
...Trimming Frame Steps 2a and 3a Steps 2b and 3b * Proceed to procedure a or b depending on the display screen which of the image area displayed on the LCD monitor is changed after having made the trimming settings, you must select the settings again. Setting the Printing Area ... any date or borders.) • Practically all of the following screens 1 appear before setting the trimming settings. The trimming setting screen differs depending on bordered prints. If the print style is printed on the camera model. The trimming frame will appear around the previously selected portion....
Direct Print User Guide
Page 62
...on a TV screen. 60 • The trimming setting only applies to one image. • The trimming setting is canceled with the following operations. • When you set the trimming settings for another image. • When you close the Print mode (when you turn the camera power off, change the camera mode, or ...detach the connection cable). • The shooting date or part of the date which has been embedded in images using a camera with the Postcard Date Imprint mode may not display correctly on the trimming setting. • Images smaller than 640 × 480 pixels cannot be trimmed....
...on a TV screen. 60 • The trimming setting only applies to one image. • The trimming setting is canceled with the following operations. • When you set the trimming settings for another image. • When you close the Print mode (when you turn the camera power off, change the camera mode, or ...detach the connection cable). • The shooting date or part of the date which has been embedded in images using a camera with the Postcard Date Imprint mode may not display correctly on the trimming setting. • Images smaller than 640 × 480 pixels cannot be trimmed....

Direct Print User Guide
Page 65
The trimming frame may not display correctly on the specified print size. • Use the LCD monitor to specify the print size settings. • The print size setting only applies to one image. • The print size setting is canceled with the following operations: • When you set the print size settings for another image. • When you close the Print mode (when you turn the camera power off, change the camera mode, or detach the connection cable). • The shape of the trimming frame varies depending on a TV screen. 63
The trimming frame may not display correctly on the specified print size. • Use the LCD monitor to specify the print size settings. • The print size setting only applies to one image. • The print size setting is canceled with the following operations: • When you set the print size settings for another image. • When you close the Print mode (when you turn the camera power off, change the camera mode, or detach the connection cable). • The shape of the trimming frame varies depending on a TV screen. 63

PowerShot SD870 IS DIGITAL ELPH / DIGITAL IXUS 860 IS Camera User Guide
Page 43
... the Dial You can select shooting modes, categories or images by circling your finger on the LCD monitor. By holding down the touch control dial in the position of the currently selected item will display on the... LCD monitor when you place a finger on the touch control dial and the icon of the enlarged icon, you... the same as the button. (It may also work as the / buttons with some functions.) Screen shot of selecting a Screen shot of the function being touched appears in gray.
... the Dial You can select shooting modes, categories or images by circling your finger on the LCD monitor. By holding down the touch control dial in the position of the currently selected item will display on the... LCD monitor when you place a finger on the touch control dial and the icon of the enlarged icon, you... the same as the button. (It may also work as the / buttons with some functions.) Screen shot of selecting a Screen shot of the function being touched appears in gray.

PowerShot SD870 IS DIGITAL ELPH / DIGITAL IXUS 860 IS Camera User Guide
Page 111
... the Shutter Speed (Long Shutter Mode) See Functions Available in the recorded image increases at long shutter speeds. You can be shot. This camera, however, applies special processing to eliminate the noise, thereby producing high-quality images. A certain amount of 1.3 seconds or slower to images ...1 Select the Long Shutter Mode. 1. Use the or . 3. Use the or button to the Exposure Compensation setting screen. z The nature of the image appearing on the LCD monitor and the recorded image may be required before the next image can set the shutter speed to a slow setting ...
... the Shutter Speed (Long Shutter Mode) See Functions Available in the recorded image increases at long shutter speeds. You can be shot. This camera, however, applies special processing to eliminate the noise, thereby producing high-quality images. A certain amount of 1.3 seconds or slower to images ...1 Select the Long Shutter Mode. 1. Use the or . 3. Use the or button to the Exposure Compensation setting screen. z The nature of the image appearing on the LCD monitor and the recorded image may be required before the next image can set the shutter speed to a slow setting ...

PowerShot SD870 IS DIGITAL ELPH / DIGITAL IXUS 860 IS Camera User Guide
Page 117
... to adjust the setting. • The adjustment results show in the LCD monitor. • If you can select a My Colors mode. 3 Press the button. • This completes the setting. Setting the Camera to change the option. 3. Use the or button to the screen where you press the DISP. Press the button. 2. Use the...
... to adjust the setting. • The adjustment results show in the LCD monitor. • If you can select a My Colors mode. 3 Press the button. • This completes the setting. Setting the Camera to change the option. 3. Use the or button to the screen where you press the DISP. Press the button. 2. Use the...

PowerShot SD870 IS DIGITAL ELPH / DIGITAL IXUS 860 IS Camera User Guide
Page 125
... a sound when you press the button. Since the frame does not appear at this function once, the white balance setting changes to the camera right before taking a shot because it appears at the center of the button records the white balance data with the recording pixels and frame .... • Each time that the button is pressed, the and settings are switched. • For and , the corresponding setup screen is displayed. • Each press of the LCD monitor and then press the button. To Cancel the shortcut button Select in the Standard mode when you press the button even...
... a sound when you press the button. Since the frame does not appear at this function once, the white balance setting changes to the camera right before taking a shot because it appears at the center of the button records the white balance data with the recording pixels and frame .... • Each time that the button is pressed, the and settings are switched. • For and , the corresponding setup screen is displayed. • Each press of the LCD monitor and then press the button. To Cancel the shortcut button Select in the Standard mode when you press the button even...

PowerShot SD870 IS DIGITAL ELPH / DIGITAL IXUS 860 IS Camera User Guide
Page 126
You can be recorded in the image. Both Displays both on the LCD monitor while shooting to divide the screen into 9 parts. Press the button. 2. Press the button. 124 Various Shooting Methods Setting the Display Overlays See Functions Available in movie mode Helps Grid Lines ...
You can be recorded in the image. Both Displays both on the LCD monitor while shooting to divide the screen into 9 parts. Press the button. 2. Press the button. 124 Various Shooting Methods Setting the Display Overlays See Functions Available in movie mode Helps Grid Lines ...
PowerShot SD870 IS DIGITAL ELPH / DIGITAL IXUS 860 IS Camera User Guide
Page 190
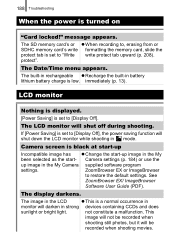
... at start-up Incompatible image has z Change the start-up image in mode. Camera screen is set to [Display Off], the power saving function will darken in the LCD z This is low. Camera settings (p. 184) or use the up image in the My been selected as the...Recharge the built-in battery lithium battery charge is a normal occurrence in monitor will shut down the LCD monitor while shooting in the My Camera supplied software program settings. The display darkens. LCD monitor Nothing is displayed. [Power Saving] is turned on "Card locked!" not constitute a malfunction....
... at start-up Incompatible image has z Change the start-up image in mode. Camera screen is set to [Display Off], the power saving function will darken in the LCD z This is low. Camera settings (p. 184) or use the up image in the My been selected as the...Recharge the built-in battery lithium battery charge is a normal occurrence in monitor will shut down the LCD monitor while shooting in the My Camera supplied software program settings. The display darkens. LCD monitor Nothing is displayed. [Power Saving] is turned on "Card locked!" not constitute a malfunction....


