
User Manual
Page 2
... use, make sure the following memory cards (sold separately) can be used, regardless of capacity. ●● SD memory cards* ●● SDHC memory cards* ●● SDXC memory cards* * Cards conforming to work with the camera. However, not all memory cards have been verified to SD standards...covering from a battery pack. ●● Printed matter is also included. ●● A memory card is missing, contact your camera retailer. Compatible Memory Cards The following items are included in the package. Before Use Basic Guide Advanced Guide Camera Basics Auto...
... use, make sure the following memory cards (sold separately) can be used, regardless of capacity. ●● SD memory cards* ●● SDHC memory cards* ●● SDXC memory cards* * Cards conforming to work with the camera. However, not all memory cards have been verified to SD standards...covering from a battery pack. ●● Printed matter is also included. ●● A memory card is missing, contact your camera retailer. Compatible Memory Cards The following items are included in the package. Before Use Basic Guide Advanced Guide Camera Basics Auto...

User Manual
Page 3
...back ●● Shooting modes and on-screen icons and text are represented by the camera shall be defective or may appear as the "memory card". ●● The symbols " Still Images" and " Movies" below titles indicate how the function is used over an extended period, it... while abroad, return to the area of purchase before contacting a Canon Customer Support Help Desk. ●● Although the screen (monitor) is produced under default settings. ●● For convenience, all supported memory cards are simply referred to as red or black dots. Preliminary Notes and...
...back ●● Shooting modes and on-screen icons and text are represented by the camera shall be defective or may appear as the "memory card". ●● The symbols " Still Images" and " Movies" below titles indicate how the function is used over an extended period, it... while abroad, return to the area of purchase before contacting a Canon Customer Support Help Desk. ●● Although the screen (monitor) is produced under default settings. ●● For convenience, all supported memory cards are simply referred to as red or black dots. Preliminary Notes and...

User Manual
Page 4
Power button Wi-Fi antenna area Flash (N-Mark)* Speaker Tripod socket Memory card/battery cover Strap mount Screen (monitor) AV OUT (Audio/video output) / DIGITAL terminal HDMITM terminal [ (Playback)] button [ (Auto Zoom)] / [ (Story Highlights)] / Up button [ (Macro)] / Left ...
Power button Wi-Fi antenna area Flash (N-Mark)* Speaker Tripod socket Memory card/battery cover Strap mount Screen (monitor) AV OUT (Audio/video output) / DIGITAL terminal HDMITM terminal [ (Playback)] button [ (Auto Zoom)] / [ (Story Highlights)] / Up button [ (Macro)] / Left ...

User Manual
Page 5
... Mode 23 Shutter Button 23 Shooting Display Options 24 Using the FUNC. Table of Contents Before Use Initial Information 2 Package Contents 2 Compatible Memory Cards 2 Preliminary Notes and Legal Information 3 Conventions in This Guide 3 Part Names 4 Common Camera Operations 11 Safety Precautions 12 Basic Guide Basic...15 Attaching the Strap 15 Holding the Camera 15 Charging the Battery Pack 16 Inserting the Battery Pack and Memory Card 16 Removing the Battery Pack and Memory Card 17 Setting the Date and Time 17 Changing the Date and Time 18 Display Language 19 Trying the Camera...
... Mode 23 Shutter Button 23 Shooting Display Options 24 Using the FUNC. Table of Contents Before Use Initial Information 2 Package Contents 2 Compatible Memory Cards 2 Preliminary Notes and Legal Information 3 Conventions in This Guide 3 Part Names 4 Common Camera Operations 11 Safety Precautions 12 Basic Guide Basic...15 Attaching the Strap 15 Holding the Camera 15 Charging the Battery Pack 16 Inserting the Battery Pack and Memory Card 16 Removing the Battery Pack and Memory Card 17 Setting the Date and Time 17 Changing the Date and Time 18 Display Language 19 Trying the Camera...

User Manual
Page 9
Power-Saving Adjustment 116 Screen Brightness 117 Hiding the Start-Up Screen 117 Formatting Memory Cards 117 Low-Level Formatting 118 File Numbering 118 Date-Based Image Storage 119 Metric / Non-Metric Display 119 Checking Certification Logos 119 Display Language 119 ...
Power-Saving Adjustment 116 Screen Brightness 117 Hiding the Start-Up Screen 117 Formatting Memory Cards 117 Low-Level Formatting 118 File Numbering 118 Date-Based Image Storage 119 Metric / Non-Metric Display 119 Checking Certification Logos 119 Display Language 119 ...

User Manual
Page 10
... 148 Handling Precautions 148 Specifications 149 Camera 149 Number of Shots/Recording Time, Playback Time 150 Shooting Range 150 Number of Shots per Memory Card 151 Recording Time per Memory Card 151 Battery Pack NB-11LH 152 Battery Charger CB-2LF/CB-2LFE 152 Index 153 Wi-Fi (Wireless LAN) Precautions 155 Radio Wave...
... 148 Handling Precautions 148 Specifications 149 Camera 149 Number of Shots/Recording Time, Playback Time 150 Shooting Range 150 Number of Shots per Memory Card 151 Recording Time per Memory Card 151 Battery Pack NB-11LH 152 Battery Charger CB-2LF/CB-2LFE 152 Index 153 Wi-Fi (Wireless LAN) Precautions 155 Radio Wave...

User Manual
Page 16
...lock (2) in the direction of the arrow and insert the battery pack until the lock clicks shut. (1) (2) ●●If you should format the memory card with this camera (= 117). (2) 1 Open the cover. ●●Slide the cover (1) and open it (2). (1) 2 Insert the battery pack.... battery pack and charger, insert the battery pack by pushing it continuously for the plug. Inserting the Battery Pack and Memory Card Insert the included battery pack and a memory card (sold with the battery pack charged. (1) (2) 1 Insert the battery pack. ●●After aligning the marks ...
...lock (2) in the direction of the arrow and insert the battery pack until the lock clicks shut. (1) (2) ●●If you should format the memory card with this camera (= 117). (2) 1 Open the cover. ●●Slide the cover (1) and open it (2). (1) 2 Insert the battery pack.... battery pack and charger, insert the battery pack by pushing it continuously for the plug. Inserting the Battery Pack and Memory Card Insert the included battery pack and a memory card (sold with the battery pack charged. (1) (2) 1 Insert the battery pack. ●●After aligning the marks ...

User Manual
Page 17
... of recording can also add a date stamp to shots, if you shoot, and it . ●●The memory card will pop up . Removing the Battery Pack and Memory Card Remove the battery pack. ●●Open the cover and press the battery lock in the locked position. Information...used when you turn the camera on. Move the switch toward (1). ●●Insert the memory card with a write-protect switch when the switch is in the direction of Shots per Memory Card" (= 151). Inserting memory cards facing the wrong way may damage the camera. 4 Close the cover. ●●Lower the...
... of recording can also add a date stamp to shots, if you shoot, and it . ●●The memory card will pop up . Removing the Battery Pack and Memory Card Remove the battery pack. ●●Open the cover and press the battery lock in the locked position. Information...used when you turn the camera on. Move the switch toward (1). ●●Insert the memory card with a write-protect switch when the switch is in the direction of Shots per Memory Card" (= 151). Inserting memory cards facing the wrong way may damage the camera. 4 Close the cover. ●●Lower the...

User Manual
Page 27
Starting up, recording, or reading -- Shooting long exposures (=52) -- Display off , or open the memory card/battery cover, or shake or hit the camera. Press the [ ][ ] buttons to change the display color. ●●Press the [ ] button again to cancel the ... hold the camera vertically while using the clock function, it will switch to display the clock. This may corrupt images or damage the camera or memory card. Communicating with other devices -- Indicator Display The indicator on the back of the camera (=4) blinks in green at these times. -- Clock You can check the...
Starting up, recording, or reading -- Shooting long exposures (=52) -- Display off , or open the memory card/battery cover, or shake or hit the camera. Press the [ ][ ] buttons to change the display color. ●●Press the [ ] button again to cancel the ... hold the camera vertically while using the clock function, it will switch to display the clock. This may corrupt images or damage the camera or memory card. Communicating with other devices -- Indicator Display The indicator on the back of the camera (=4) blinks in green at these times. -- Clock You can check the...

User Manual
Page 30
... shot as recording stops. ●●Recording will be automatically adjusted. 3) Finish recording. ●●Press the movie button again to stop automatically when the memory card becomes full. The camera beeps twice as needed. ●●To resize the subject, repeat the operations in "Shooting (Smart Auto)" (=28) to shoot a still...
... shot as recording stops. ●●Recording will be automatically adjusted. 3) Finish recording. ●●Press the movie button again to stop automatically when the memory card becomes full. The camera beeps twice as needed. ●●To resize the subject, repeat the operations in "Shooting (Smart Auto)" (=28) to shoot a still...

User Manual
Page 37
Shooting will stop automatically when the memory card becomes full. ●● When a delay longer than two seconds is specified, two seconds before the shot, the lamp blinking and self-timer sound will ...
Shooting will stop automatically when the memory card becomes full. ●● When a delay longer than two seconds is specified, two seconds before the shot, the lamp blinking and self-timer sound will ...
User Manual
Page 39
... Movie Image Quality Still Images Movies Three image quality settings are available. Image Number of image quality that will fit on a memory card, see "Recording Time per Memory Card" (= 151). ●●Press the [ ] button, choose [ ] in .) A3 - For guidelines on how many... Functions Setting Menu Accessories Appendix Index 39 Changing the Number of Recording Pixels (Image Size) Still Images Movies Choose the image's number of Shots per Memory Card" (= 151). ●●Press the [ ] button, choose [ ] in [ ] mode. For guidelines on the total recording time for 4:3...
... Movie Image Quality Still Images Movies Three image quality settings are available. Image Number of image quality that will fit on a memory card, see "Recording Time per Memory Card" (= 151). ●●Press the [ ] button, choose [ ] in .) A3 - For guidelines on how many... Functions Setting Menu Accessories Appendix Index 39 Changing the Number of Recording Pixels (Image Size) Still Images Movies Choose the image's number of Shots per Memory Card" (= 151). ●●Press the [ ] button, choose [ ] in [ ] mode. For guidelines on the total recording time for 4:3...

User Manual
Page 63
...;● The setting is displayed when you press the shutter button halfway in camera-shake inducing, low-light conditions, mount the camera on a memory card, see "Number of Shots per Memory Card" (= 151). ●●Press the [ ] button, choose [ ] in "Deactivating Image Stabilization" (=41) and choose [Shoot Only]. Other Settings Changing the Compression Ratio...
...;● The setting is displayed when you press the shutter button halfway in camera-shake inducing, low-light conditions, mount the camera on a memory card, see "Number of Shots per Memory Card" (= 151). ●●Press the [ ] button, choose [ ] in "Deactivating Image Stabilization" (=41) and choose [Shoot Only]. Other Settings Changing the Compression Ratio...

User Manual
Page 68
... Appendix Index 68 Finding Images Matching Specified Conditions Still Images Movies Find desired images quickly on a specific date. Shot Date Displays the images shot on a memory card full of images by pressing the buttons on the screen displayed, and then press the [ ] button. 2 View the filtered images. ●●Images matching your...
... Appendix Index 68 Finding Images Matching Specified Conditions Still Images Movies Find desired images quickly on a specific date. Shot Date Displays the images shot on a memory card full of images by pressing the buttons on the screen displayed, and then press the [ ] button. 2 View the filtered images. ●●Images matching your...

User Manual
Page 70
.... ●●To zoom out, move the display position, press the buttons. ●●While [ ] is displayed. You can return to single-image display from a memory card as needed. ●●To move the zoom lever toward [ ] will start after [Loading image] is displayed for a few seconds. ●●Press the [ slideshow...
.... ●●To zoom out, move the display position, press the buttons. ●●While [ ] is displayed. You can return to single-image display from a memory card as needed. ●●To move the zoom lever toward [ ] will start after [Loading image] is displayed for a few seconds. ●●Press the [ slideshow...

User Manual
Page 72
... menu screen, press the [ ] button. Using the Menu 1 Access the setting screen. ●●Press the [ ] button and choose [Protect] on a memory card will be erased if you format the card (=117). ●● Protected images cannot be erased using the camera's erasure function. To erase them this process and choose [ ] again, and...
... menu screen, press the [ ] button. Using the Menu 1 Access the setting screen. ●●Press the [ ] button and choose [Protect] on a memory card will be erased if you format the card (=117). ●● Protected images cannot be erased using the camera's erasure function. To erase them this process and choose [ ] again, and...
User Manual
Page 79
... [ ][ ] buttons to choose [Yes], and then press the [ ] button. ●●The saved image is now displayed. ●● Editing is only available when the memory card has sufficient free space. Movies 1 Choose [Resize]. ●●Press the [ ] button and choose [Resize] on the [ ] tab (= 25). Before Use Basic Guide Advanced Guide...
... [ ][ ] buttons to choose [Yes], and then press the [ ] button. ●●The saved image is now displayed. ●● Editing is only available when the memory card has sufficient free space. Movies 1 Choose [Resize]. ●●Press the [ ] button and choose [Resize] on the [ ] tab (= 25). Before Use Basic Guide Advanced Guide...
User Manual
Page 83
... press the [ ] button. ●●The movie is now saved as needed. In this case, the original movie will be erased. ●● If the memory card lacks sufficient space, only [Overwrite] will be available. ●● Movies may not be erased, as a new file. ●● To overwrite the original movie...
... press the [ ] button. ●●The movie is now saved as needed. In this case, the original movie will be erased. ●● If the memory card lacks sufficient space, only [Overwrite] will be available. ●● Movies may not be erased, as a new file. ●● To overwrite the original movie...

User Manual
Page 84
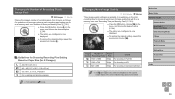
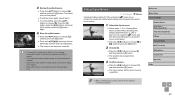
... [ ] button to access the home screen and choose themes for albums of vacations, parties, or other events. Event A good choice for the camera to use a memory card with a capacity of 16 GB or higher, and ensure at least 1 GB of free space. Digest movies (=30), except compressed movies 84 Before using this... shooting date. 1 Choose an image. ●●Choose an image in single-image display. ●●Themes available in step 3 will vary depending on the memory card. Still images --
... [ ] button to access the home screen and choose themes for albums of vacations, parties, or other events. Event A good choice for the camera to use a memory card with a capacity of 16 GB or higher, and ensure at least 1 GB of free space. Digest movies (=30), except compressed movies 84 Before using this... shooting date. 1 Choose an image. ●●Choose an image in single-image display. ●●Themes available in step 3 will vary depending on the memory card. Still images --

User Manual
Page 85
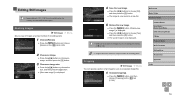
.... Adding Background Music to Albums Still Images Movies Choose from three kinds of background music to play saved albums, choose [List of Albums] on the memory card. ●● You can specify the color effect in step 4 by choosing desired images. ●● Albums cannot be saved unless there is not played...
.... Adding Background Music to Albums Still Images Movies Choose from three kinds of background music to play saved albums, choose [List of Albums] on the memory card. ●● You can specify the color effect in step 4 by choosing desired images. ●● Albums cannot be saved unless there is not played...