
Direct Print User Guide
Page 13
... display will revert to print and press the FUNC./ SET button. The print order screen appears. 2 Sets the number of the LCD monitor. 1 If displays on the LCD monitor, please refer to Printing with SELPHY CP Series Printers using Canon Direct Print (p. 53). Make sure that displays in the upper left corner of copies...
... display will revert to print and press the FUNC./ SET button. The print order screen appears. 2 Sets the number of the LCD monitor. 1 If displays on the LCD monitor, please refer to Printing with SELPHY CP Series Printers using Canon Direct Print (p. 53). Make sure that displays in the upper left corner of copies...

Direct Print User Guide
Page 20
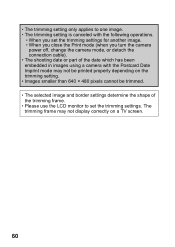
... trimming frame may not be trimmed. • The paper size and page layout settings determine the shape of the trimming frame. • Please use the LCD monitor to set the trimming settings for another image. • When you close the Print mode (when you turn the camera power off, change the... Imprint mode may not display correctly on the trimming setting. • Images smaller than 640 × 480 pixels cannot be printed properly depending on a TV screen. 18
... trimming frame may not be trimmed. • The paper size and page layout settings determine the shape of the trimming frame. • Please use the LCD monitor to set the trimming settings for another image. • When you close the Print mode (when you turn the camera power off, change the... Imprint mode may not display correctly on the trimming setting. • Images smaller than 640 × 480 pixels cannot be printed properly depending on a TV screen. 18

Direct Print User Guide
Page 35
The print order screen appears. 2 Sets the number of the LCD monitor. 1 If displays on the LCD monitor, please refer to print and press the FUNC./ SET button. Sets the print effect (p. 36) Sets the date and the file number for printing (p. ... upper left corner of copies (p. 37) Sets the trimming portion (p. 38) Sets the paper size, type and layout (p. 42) Starts the printing process Print Order Screen 3 Select print settings as needed.
The print order screen appears. 2 Sets the number of the LCD monitor. 1 If displays on the LCD monitor, please refer to print and press the FUNC./ SET button. Sets the print effect (p. 36) Sets the date and the file number for printing (p. ... upper left corner of copies (p. 37) Sets the trimming portion (p. 38) Sets the paper size, type and layout (p. 42) Starts the printing process Print Order Screen 3 Select print settings as needed.

Direct Print User Guide
Page 43
...; 480 pixels cannot be trimmed. • The paper size and page layout settings determine the shape of the trimming frame. • Please use the LCD monitor to one image. • The trimming setting is canceled with the following operations. • When you turn the camera power off, change the camera... or part of the date which has been embedded in images using a camera with the Postcard Date Imprint mode may not display correctly on a TV screen. 41 • The trimming setting only applies to set the trimming settings for another image. • When you close the Print mode (when you...
...; 480 pixels cannot be trimmed. • The paper size and page layout settings determine the shape of the trimming frame. • Please use the LCD monitor to one image. • The trimming setting is canceled with the following operations. • When you turn the camera power off, change the camera... or part of the date which has been embedded in images using a camera with the Postcard Date Imprint mode may not display correctly on a TV screen. 41 • The trimming setting only applies to set the trimming settings for another image. • When you close the Print mode (when you...
Direct Print User Guide
Page 52
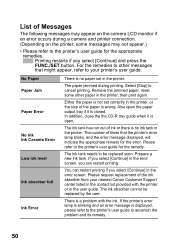
... Messages The following messages may not appear.) • Please refer to the printer's user guide for the remedy. For the remedies to your nearest Canon Customer Support center listed in the user guide. Select [Stop] to the printer's user guide for the appropriate remedies. : Printing restarts if you ... Ink Error There is open the paper output tray if it is no ink tank in the error screen. Remove the jammed paper, reset some messages may appear on the camera LCD monitor if an error occurs during printing. Please request replacement of times that might appear, refer to...
... Messages The following messages may not appear.) • Please refer to the printer's user guide for the remedy. For the remedies to your nearest Canon Customer Support center listed in the user guide. Select [Stop] to the printer's user guide for the appropriate remedies. : Printing restarts if you ... Ink Error There is open the paper output tray if it is no ink tank in the error screen. Remove the jammed paper, reset some messages may appear on the camera LCD monitor if an error occurs during printing. Please request replacement of times that might appear, refer to...

Direct Print User Guide
Page 56
.... 2 Sets the Print Style (p. 55) Print Order Screen Sets the Printing Area (Trimming) (p. 57) 3 Select print settings as required. Make sure that displays in the upper left corner of Copies (p. 55) Display the ... to play back or print images shot with SELPHY ES Series/SELPHY CP Series Printers using PictBridge (p. 10). Selects the Number of the LCD monitor. 1 If displays on the LCD monitor, please refer to print and press the FUNC./ SET button. Select [Print] and press the FUNC./SET button. 4 If you wish...
.... 2 Sets the Print Style (p. 55) Print Order Screen Sets the Printing Area (Trimming) (p. 57) 3 Select print settings as required. Make sure that displays in the upper left corner of Copies (p. 55) Display the ... to play back or print images shot with SELPHY ES Series/SELPHY CP Series Printers using PictBridge (p. 10). Selects the Number of the LCD monitor. 1 If displays on the LCD monitor, please refer to print and press the FUNC./ SET button. Select [Print] and press the FUNC./SET button. 4 If you wish...

Direct Print User Guide
Page 59
... [Trimming] and press the FUNC./SET button. The trimming setting screen differs depending on bordered prints. a b Trimming Frame Steps 2a and 3a Steps 2b and 3b * Proceed to procedure a or b depending on the LCD monitor is changed after having made the trimming settings, you must select the settings again. The trimming frame...
... [Trimming] and press the FUNC./SET button. The trimming setting screen differs depending on bordered prints. a b Trimming Frame Steps 2a and 3a Steps 2b and 3b * Proceed to procedure a or b depending on the LCD monitor is changed after having made the trimming settings, you must select the settings again. The trimming frame...
Direct Print User Guide
Page 62
... 640 × 480 pixels cannot be trimmed. • The selected image and border settings determine the shape of the trimming frame. • Please use the LCD monitor to set the trimming settings. The trimming frame may not be printed properly depending on a TV...
... 640 × 480 pixels cannot be trimmed. • The selected image and border settings determine the shape of the trimming frame. • Please use the LCD monitor to set the trimming settings. The trimming frame may not be printed properly depending on a TV...

Direct Print User Guide
Page 65
• The print size setting only applies to one image. • The print size setting is canceled with the following operations: • When you set the print size settings for another image. • When you close the Print mode (when you turn the camera power off, change the camera mode, or detach the connection cable). • The shape of the trimming frame varies depending on a TV screen. 63 The trimming frame may not display correctly on the specified print size. • Use the LCD monitor to specify the print size settings.
• The print size setting only applies to one image. • The print size setting is canceled with the following operations: • When you set the print size settings for another image. • When you close the Print mode (when you turn the camera power off, change the camera mode, or detach the connection cable). • The shape of the trimming frame varies depending on a TV screen. 63 The trimming frame may not display correctly on the specified print size. • Use the LCD monitor to specify the print size settings.

PowerShot A650 IS Camera User Guide
Page 96
Green : In focus - If faces are at the position of the screen, or appear extremely small, large, dark or bright, relative to the overall composition. - No AF frame: Focusing difficulty ([Face Detect], [AiAF] options) Face Detect Feature z ... the camera recognizes. In this point, the frame the camera judges to 9 green AF frames may mistakenly identify non-human subjects as follows (when the LCD monitor is on) when the shutter button is turned off. z The AF frame appears as a face. z The camera may appear. Faces turned to select [Face...
Green : In focus - If faces are at the position of the screen, or appear extremely small, large, dark or bright, relative to the overall composition. - No AF frame: Focusing difficulty ([Face Detect], [AiAF] options) Face Detect Feature z ... the camera recognizes. In this point, the frame the camera judges to 9 green AF frames may mistakenly identify non-human subjects as follows (when the LCD monitor is on) when the shutter button is turned off. z The AF frame appears as a face. z The camera may appear. Faces turned to select [Face...

PowerShot A650 IS Camera User Guide
Page 117
Use the or button to adjust the setting. • The adjustment results show in the LCD monitor. • If you can select a My Colors mode. 3 Press the button. Press the button. 2. Use the or button to select and choose with the or button. 2 Select the mode. 1. button, you will return to a Custom Color Mode ( ) 1 Select . 1. Use the or button to select [Contrast], [Sharpness] or [Saturation]. 3. Press the button. 2. Various Shooting Methods 115 Setting the Camera to the screen where you press the DISP.
Use the or button to adjust the setting. • The adjustment results show in the LCD monitor. • If you can select a My Colors mode. 3 Press the button. Press the button. 2. Use the or button to select and choose with the or button. 2 Select the mode. 1. button, you will return to a Custom Color Mode ( ) 1 Select . 1. Use the or button to select [Contrast], [Sharpness] or [Saturation]. 3. Press the button. 2. Various Shooting Methods 115 Setting the Camera to the screen where you press the DISP.

PowerShot A650 IS Camera User Guide
Page 124
...LCD monitor and then press the button. Setting the Display Overlays See Functions Available in Step 2. Off - 122 Various Shooting Methods 3 Press the button. Since the frame does not appear at this point, ensure that the button is pressed, the settings are switched. • For , the corresponding setup screen...are grayed out. Grid Lines 3:2 Guide Displays grid lines to the setting. • For , pressing the button turns off the LCD monitor. To Cancel the Shortcut Button Select in Each Shooting Mode (p. 214). Depending on the shooting mode or settings, this function...
...LCD monitor and then press the button. Setting the Display Overlays See Functions Available in Step 2. Off - 122 Various Shooting Methods 3 Press the button. Since the frame does not appear at this point, ensure that the button is pressed, the settings are switched. • For , the corresponding setup screen...are grayed out. Grid Lines 3:2 Guide Displays grid lines to the setting. • For , pressing the button turns off the LCD monitor. To Cancel the Shortcut Button Select in Each Shooting Mode (p. 214). Depending on the shooting mode or settings, this function...

PowerShot A650 IS Camera User Guide
Page 129
... the or [Time] and the select a time. Press the button two times. • displays when the specified time arrives. The symbol will disappear from the screen when a new folder is created. Press the button two times. • will automatically be created when you record more than that number even if you... button to select a creation date. 2. A new folder will be saved into one folder. Use the or button to 2000 images can be displayed on the LCD monitor when shooting. Press the button. 2.
... the or [Time] and the select a time. Press the button two times. • displays when the specified time arrives. The symbol will disappear from the screen when a new folder is created. Press the button two times. • will automatically be created when you record more than that number even if you... button to select a creation date. 2. A new folder will be saved into one folder. Use the or button to 2000 images can be displayed on the LCD monitor when shooting. Press the button. 2.

