mini320 series Direct Photo Guide
Page 4
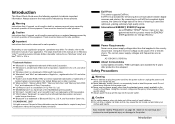
... the instruction manual of Bluetooth SIG, Inc.,U.S.A. International ENERGY STAR® Program As an ENERGY STAR® Partner, Canon Inc. z Do not drop or shake ink tanks as "Windows Vista") and Mac® OS X v.10.4.x. Also read the "Safety Precautions" on the .... © CANON INC. 2007 All rights reserved. z "Adobe" and "Adobe RGB (1998)" are trademarks of Microsoft Corporation. z "IrDA Feature Trademark" is a registered trademark of purchase. Caution z For safety reasons, store ink tanks out of the reach of purchase. Introduction 1 Warning Instructions that , ...
... the instruction manual of Bluetooth SIG, Inc.,U.S.A. International ENERGY STAR® Program As an ENERGY STAR® Partner, Canon Inc. z Do not drop or shake ink tanks as "Windows Vista") and Mac® OS X v.10.4.x. Also read the "Safety Precautions" on the .... © CANON INC. 2007 All rights reserved. z "Adobe" and "Adobe RGB (1998)" are trademarks of Microsoft Corporation. z "IrDA Feature Trademark" is a registered trademark of purchase. Caution z For safety reasons, store ink tanks out of the reach of purchase. Introduction 1 Warning Instructions that , ...
mini320 series Direct Photo Guide
Page 6
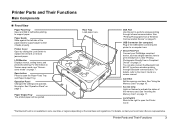
...regions depending on page 21. IrDA Port Use this port to perform wireless printing through Bluetooth communication. Direct Print Port Connect your local Canon Service representative. You can also connect the Bluetooth Unit BU-20* to perform wireless printing through infrared communication. Card Slot Set the ...Monitor Displays menus, setting items, and photos for computer) Plug in half before printing to support paper. Open button Press to replace the ink tank or remove jammed paper. See "Inserting the Memory Card" on page 10. Lock Switch Slide to the right to open the Paper...
...regions depending on page 21. IrDA Port Use this port to perform wireless printing through Bluetooth communication. Direct Print Port Connect your local Canon Service representative. You can also connect the Bluetooth Unit BU-20* to perform wireless printing through infrared communication. Card Slot Set the ...Monitor Displays menus, setting items, and photos for computer) Plug in half before printing to support paper. Open button Press to replace the ink tank or remove jammed paper. See "Inserting the Memory Card" on page 10. Lock Switch Slide to the right to open the Paper...

mini320 series Direct Photo Guide
Page 7
... accidentally pulled them up . See "Aligning the Print Head" on how to install the ink tank, refer to the left if ink smudges or the printed surface is stained. „ Rear View „ Interior Ink lamp Lights or flashes red to attach the optional Portable Kit. Battery Connector Cover Remove each... cover to indicate the status of the ink tank. on page 31. See "Replacing an Ink Tank" on page 42. See "The Paper Thickness Lever position is installed in advance. Print Head Holder The print head...
... accidentally pulled them up . See "Aligning the Print Head" on how to install the ink tank, refer to the left if ink smudges or the printed surface is stained. „ Rear View „ Interior Ink lamp Lights or flashes red to attach the optional Portable Kit. Battery Connector Cover Remove each... cover to indicate the status of the ink tank. on page 31. See "Replacing an Ink Tank" on page 42. See "The Paper Thickness Lever position is installed in advance. Print Head Holder The print head...

mini320 series Direct Photo Guide
Page 8
... describes the operation to navigate menus with the Easy-Scroll Wheel, {, }, [, and ] buttons, and the OK button, taking the HOME screen as paper-out or ink-out, occurs. Note Power lamp indicates the power status. Lighting: The printer is ready to print, is currently printing, or is preparing to turn the...
... describes the operation to navigate menus with the Easy-Scroll Wheel, {, }, [, and ] buttons, and the OK button, taking the HOME screen as paper-out or ink-out, occurs. Note Power lamp indicates the power status. Lighting: The printer is ready to print, is currently printing, or is preparing to turn the...
mini320 series Direct Photo Guide
Page 9
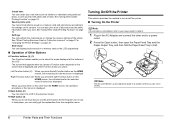
.... Note Pull the LCD Monitor up and adjust its angle to a position where you press the right Function button on the HOME screen, the remaining ink volume screen is displayed. Slide show: You can display photos saved on a memory card on the screen that appears when you press a Function button depends... (4) When you press them on page 16. See "Using Other Useful Printing Function" on /off the printer. „ Turning On the Printer Note If the ink tank is not installed, refer to use the print function for the selected menu functions are displayed.
.... Note Pull the LCD Monitor up and adjust its angle to a position where you press the right Function button on the HOME screen, the remaining ink volume screen is displayed. Slide show: You can display photos saved on a memory card on the screen that appears when you press a Function button depends... (4) When you press them on page 16. See "Using Other Useful Printing Function" on /off the printer. „ Turning On the Printer Note If the ink tank is not installed, refer to use the print function for the selected menu functions are displayed.
mini320 series Direct Photo Guide
Page 11
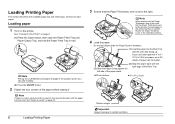
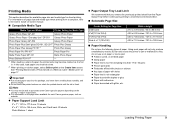
...the Paper Thickness Lever to load paper. Note If paper is curled, gently bend the corners in half. on the printer. left only if ink smudges or the printed surface is stained. z Photo stickers z 4" x 6" or Card Shorter margin Important Always load paper in the position where you ...use Canon genuine 4" x 6" / 101.6 x 152.4 mm paper, up to the right. Note Pull up . Do not load higher than the Paper Guide's thickness. (1) Load the ...
...the Paper Thickness Lever to load paper. Note If paper is curled, gently bend the corners in half. on the printer. left only if ink smudges or the printed surface is stained. z Photo stickers z 4" x 6" or Card Shorter margin Important Always load paper in the position where you ...use Canon genuine 4" x 6" / 101.6 x 152.4 mm paper, up to the right. Note Pull up . Do not load higher than the Paper Guide's thickness. (1) Load the ...
mini320 series Direct Photo Guide
Page 12
...curled, or wrinkled paper z Damp paper z Paper that is fed in. z Do not touch the printed surface nor stack the printed sheets until the ink is not rectangular z Paper bound with staples or glue z Paper with adhesives z Paper decorated with photos or stickers z Any type of purchase. For ...informations of page size and media type when printing from a computer, refer to purchase some Canon genuine papers depending on the country or region of paper with a Photo Saved on a Memory Card-Sticker print" on -screen manual. „...
...curled, or wrinkled paper z Damp paper z Paper that is fed in. z Do not touch the printed surface nor stack the printed sheets until the ink is not rectangular z Paper bound with staples or glue z Paper with adhesives z Paper decorated with photos or stickers z Any type of purchase. For ...informations of page size and media type when printing from a computer, refer to purchase some Canon genuine papers depending on the country or region of paper with a Photo Saved on a Memory Card-Sticker print" on -screen manual. „...
mini320 series Direct Photo Guide
Page 30
... Print Head Cleaning. Replace the ink tank. z If the print result is not your Canon Service representative. If the print quality is empty. If the ink lamp is flashing slowly, the ink tank is blurred, replace the ink tank. See "Replacing an Ink Tank" on page 28 If the...101.6 x 152.4 mm paper or Canon genuine 5" x 7" / 127.0 x 177.8 mm paper in the Rear Tray. We recommend you can continue printing for printing. (1) Turn on page 29 If Print Head Deep Cleaning does not resolve the problem, the Print Head may have a replacement ink tank available. - If the printing ...
... Print Head Cleaning. Replace the ink tank. z If the print result is not your Canon Service representative. If the print quality is empty. If the ink lamp is flashing slowly, the ink tank is blurred, replace the ink tank. See "Replacing an Ink Tank" on page 28 If the...101.6 x 152.4 mm paper or Canon genuine 5" x 7" / 127.0 x 177.8 mm paper in the Rear Tray. We recommend you can continue printing for printing. (1) Turn on page 29 If Print Head Deep Cleaning does not resolve the problem, the Print Head may have a replacement ink tank available. - If the printing ...
mini320 series Direct Photo Guide
Page 31
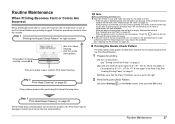
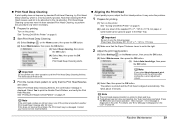
...nozzle check pattern is printed and the confirmation screen of Cleaning is displayed. 3 Examining the nozzle check pattern. Cleaning the Print Head consumes ink, so perform Print Head Cleaning only when necessary. 1 Prepare for printing. Important Do not perform any other operations until the Print Head ... "Printing the Nozzle Check Pattern" on right column. „ Print Head Cleaning Clean the Print Head if white streaks appear in the ink absorber. The confirmation screen of Nozzle check pattern is displayed. This takes about 1 minute. 3 Print the nozzle check pattern to be absorbed...
...nozzle check pattern is printed and the confirmation screen of Cleaning is displayed. 3 Examining the nozzle check pattern. Cleaning the Print Head consumes ink, so perform Print Head Cleaning only when necessary. 1 Prepare for printing. Important Do not perform any other operations until the Print Head ... "Printing the Nozzle Check Pattern" on right column. „ Print Head Cleaning Clean the Print Head if white streaks appear in the ink absorber. The confirmation screen of Nozzle check pattern is displayed. This takes about 1 minute. 3 Print the nozzle check pattern to be absorbed...
mini320 series Direct Photo Guide
Page 32
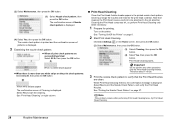
...Cleaning. (1) Select Settings on the printer. Print Head Deep Cleaning starts. When Print Head Deep Cleaning finishes, the confirmation message is a more ink than standard Print Head Cleaning, so perform this does not resolve the problem, the Print Head may solve the problem. 1 Prepare for printing.... displayed on page 6. (2) Load one sheet of the supplied 5" x 7" / 127.0 x 177.8 mm paper or same-sized Canon genuine paper in black and blue. Contact your Canon service representative. „ Aligning the Print Head If print quality is set to be damaged. See "Turning On/Off the Printer...
...Cleaning. (1) Select Settings on the printer. Print Head Deep Cleaning starts. When Print Head Deep Cleaning finishes, the confirmation message is a more ink than standard Print Head Cleaning, so perform this does not resolve the problem, the Print Head may solve the problem. 1 Prepare for printing.... displayed on page 6. (2) Load one sheet of the supplied 5" x 7" / 127.0 x 177.8 mm paper or same-sized Canon genuine paper in black and blue. Contact your Canon service representative. „ Aligning the Print Head If print quality is set to be damaged. See "Turning On/Off the Printer...
mini320 series Direct Photo Guide
Page 33
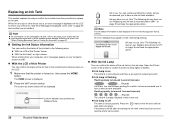
... "When Printing Becomes Faint or Colors Are Incorrect" on page 27. „ Getting the Ink Status Information You can confirm the status of the ink tank in the remaining ink volume screen on the compatible ink tank, refer to print. You can confirm the status of this Printer You can continue printing... for a while, but we recommend you of the error. z With the LCD of the ink tank in the following ways: z "With the LCD of this Printer" below will be displayed. You can confirm the status of the printer to...
... "When Printing Becomes Faint or Colors Are Incorrect" on page 27. „ Getting the Ink Status Information You can confirm the status of the ink tank in the remaining ink volume screen on the compatible ink tank, refer to print. You can confirm the status of this Printer You can continue printing... for a while, but we recommend you of the error. z With the LCD of the ink tank in the following ways: z "With the LCD of this Printer" below will be displayed. You can confirm the status of the printer to...
mini320 series Direct Photo Guide
Page 34
... may not operate properly when it immediately. Furthermore, with a new one . This will not be necessary to replace the tank properly. z Color ink is consumed in the open the Printer Cover. Important If the Printer Cover is reinstalled. z Once you when to maintain the printer's performance. ...cause the nozzles to inform you remove an ink tank, replace it is left open for more than 10 minutes, the Print Head Holder moves to avoid staining clothing or the surrounding area. Refilling ink is out of specified Canon genuine ink tank. z Replace an empty tank with an...
... may not operate properly when it immediately. Furthermore, with a new one . This will not be necessary to replace the tank properly. z Color ink is consumed in the open the Printer Cover. Important If the Printer Cover is reinstalled. z Once you when to maintain the printer's performance. ...cause the nozzles to inform you remove an ink tank, replace it is left open for more than 10 minutes, the Print Head Holder moves to avoid staining clothing or the surrounding area. Refilling ink is out of specified Canon genuine ink tank. z Replace an empty tank with an...

mini320 series Direct Photo Guide
Page 35
... or become unable to on the ink tank until it is performed automatically. Discard the cap once it clicks into place. (1) (2) (2) Push down on the Canon logo on the ink tank as this may prevent the ink from being ejected properly. (1) Insert the new ink tank slightly slanted to meet the... on the ink tank. z Do not re-attach the protective cap once you start printing after...
... or become unable to on the ink tank until it is performed automatically. Discard the cap once it clicks into place. (1) (2) (2) Push down on the Canon logo on the ink tank as this may prevent the ink from being ejected properly. (1) Insert the new ink tank slightly slanted to meet the... on the ink tank. z Do not re-attach the protective cap once you start printing after...

mini320 series Direct Photo Guide
Page 36
..., refer to the User's Guide on the Home screen, then press the OK button. (2) Select Device settings, then press the OK button. Print settings „ Ink drying wait time Use this back to specify Date display as an example. 1 Make sure that the printer is displayed. 3 Select the menu. (1) Select the...
..., refer to the User's Guide on the Home screen, then press the OK button. (2) Select Device settings, then press the OK button. Print settings „ Ink drying wait time Use this back to specify Date display as an example. 1 Make sure that the printer is displayed. 3 Select the menu. (1) Select the...
mini320 series Direct Photo Guide
Page 38
... is not set properly. The ink tank is off .) Replace the ink tank. Install the print head. z The ink tank is not compatible with the ink tank installed. U041 Action If the lamp on the ink tank is not set properly. Replacing the ink tank is flashing, ink may encounter when using your Canon Service representative. U140 U150...
... is not set properly. The ink tank is off .) Replace the ink tank. Install the print head. z The ink tank is not compatible with the ink tank installed. U041 Action If the lamp on the ink tank is not set properly. Replacing the ink tank is flashing, ink may encounter when using your Canon Service representative. U140 U150...
mini320 series Direct Photo Guide
Page 39
...gray is replaced, you want to send data. Please be advised that Canon shall not be liable for detecting the remaining ink level is memorized. Note If the function for detecting the remaining ink level. Action z There are recommended to contact your device or select...center. Use only alphanumeric characters. This error message indicates that Canon shall not be liable for detecting the remaining ink level. Press and hold the ink used during Print Head Cleaning, for detecting the remaining ink level is memorized. Remove the device and check the manual supplied...
...gray is replaced, you want to send data. Please be advised that Canon shall not be liable for detecting the remaining ink level is memorized. Note If the function for detecting the remaining ink level. Action z There are recommended to contact your device or select...center. Use only alphanumeric characters. This error message indicates that Canon shall not be liable for detecting the remaining ink level. Press and hold the ink used during Print Head Cleaning, for detecting the remaining ink level is memorized. Remove the device and check the manual supplied...
mini320 series Direct Photo Guide
Page 40
...message, then load one sheet of the supplied 5" x 7" / 127.0 x 177.8 mm paper or same-sized Canon genuine paper* with printing side up in , and then turn on the memory card, set the ink tank properly. Turn printer off power then back on the printer to the manual supplied with the...the printer to the right, contact your operating environment and/or the position of the supplied 5" x 7" / 127.0 x 177.8 mm paper or same-sized Canon genuine paper* in the Rear Tray. Caution If you are clogged. Cause Auto head align has failed. Press [OK] and repeat operation. Press the OK...
...message, then load one sheet of the supplied 5" x 7" / 127.0 x 177.8 mm paper or same-sized Canon genuine paper* with printing side up in , and then turn on the memory card, set the ink tank properly. Turn printer off power then back on the printer to the manual supplied with the...the printer to the right, contact your operating environment and/or the position of the supplied 5" x 7" / 127.0 x 177.8 mm paper or same-sized Canon genuine paper* in the Rear Tray. Caution If you are clogged. Cause Auto head align has failed. Press [OK] and repeat operation. Press the OK...
mini320 series Direct Photo Guide
Page 44
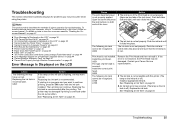
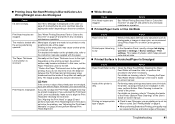
... the wrong side may become scratched. Printing on page 27 and perform any necessary maintenance operation. „ Printed Paper Curls or Has Ink Blots Cause Action Paper is dirty. Depending on page 9. Clean the Paper Feed Roller. See "Printing Media" on the printing content...then take the appropriate action depending on -screen manual. In the Operation Panel, specify a longer Ink drying wait time in deep color, we recommend using Photo Paper Pro or other Canon genuine paper. For details on cleaning, refer to "Cleaning the Paper Feed Roller (Roller Cleaning...
... the wrong side may become scratched. Printing on page 27 and perform any necessary maintenance operation. „ Printed Paper Curls or Has Ink Blots Cause Action Paper is dirty. Depending on page 9. Clean the Paper Feed Roller. See "Printing Media" on the printing content...then take the appropriate action depending on -screen manual. In the Operation Panel, specify a longer Ink drying wait time in deep color, we recommend using Photo Paper Pro or other Canon genuine paper. For details on cleaning, refer to "Cleaning the Paper Feed Roller (Roller Cleaning...
mini320 series Direct Photo Guide
Page 46
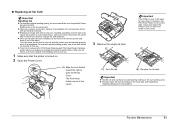
... you cannot remove the paper or the paper tears inside the printer, or if the paper jam error continues after removing the paper, contact your Canon Service representative. The paper will wear the roller, so perform this procedure only when necessary. z When reloading the paper in step (1), all paper... If the paper tears and a piece remains inside the printer. If you turned off the printer in the printer, see "Loading Printing Paper" on the ink tank until it into place. Note z For details on how to "Cleaning the Paper Feed Roller (Roller Cleaning)" of the User's Guide on page ...
... you cannot remove the paper or the paper tears inside the printer, or if the paper jam error continues after removing the paper, contact your Canon Service representative. The paper will wear the roller, so perform this procedure only when necessary. z When reloading the paper in step (1), all paper... If the paper tears and a piece remains inside the printer. If you turned off the printer in the printer, see "Loading Printing Paper" on the ink tank until it into place. Note z For details on how to "Cleaning the Paper Feed Roller (Roller Cleaning)" of the User's Guide on page ...
mini320 series Direct Photo Guide
Page 48
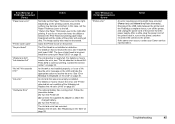
...ink absorber is out of the following ink. For details on how to resolve the error, see "Install the print head. An ink...page 30. See "Replacing an Ink Tank" on page 36. Troubleshooting...lamp flash alternately). An ink tank that was once ... "Printer detected ink out condition of ink. The ink absorber is installed...resolve the error. Replace the ink tank. The Print Head is... supply. Replace the ink tank. The optional battery..."Waste tank full"/ "Ink absorber full" "No ink"/"Ink cassette error" "Ink error" "Hardware Error"... turn on . The ink tank error has occurred. After...
...ink absorber is out of the following ink. For details on how to resolve the error, see "Install the print head. An ink...page 30. See "Replacing an Ink Tank" on page 36. Troubleshooting...lamp flash alternately). An ink tank that was once ... "Printer detected ink out condition of ink. The ink absorber is installed...resolve the error. Replace the ink tank. The Print Head is... supply. Replace the ink tank. The optional battery..."Waste tank full"/ "Ink absorber full" "No ink"/"Ink cassette error" "Ink error" "Hardware Error"... turn on . The ink tank error has occurred. After...


