mini320 series Direct Photo Guide
Page 5
... install the printer driver. This sheet explains how to setup the printer and the procedure to Use the Documentation Provided . If you need further information about the printer, please refer to read this guide for full instructions on printer driver setting. Additional guides are also available for printing from the Setup CD-ROM. PC Photo Printing Guide (Windows® only) Refer to this sheet first. This guide provides detailed instructions for advanced features. Direct Photo Guide (This guide) Read this guide for full instructions...
... install the printer driver. This sheet explains how to setup the printer and the procedure to Use the Documentation Provided . If you need further information about the printer, please refer to read this guide for full instructions on printer driver setting. Additional guides are also available for printing from the Setup CD-ROM. PC Photo Printing Guide (Windows® only) Refer to this sheet first. This guide provides detailed instructions for advanced features. Direct Photo Guide (This guide) Read this guide for full instructions...
mini320 series Direct Photo Guide
Page 6
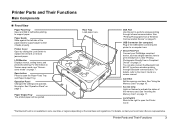
... manual. Rear Tray Load paper here. See "Using the Memory Card" on page 11. Paper Output Tray The printed paper will be ejected. Lock Switch Slide to the right to print directly from it feeds properly. For information on Screen-saver mode, see "Screensaver mode" on page 5. Direct Print Port Connect your local Canon Service representative. For details, refer to support paper. Paper Guide Slide against the left side of the memory card. Open button Press to replace the ink tank or remove jammed paper. Operation Panel Changes the settings and operates the printer...
... manual. Rear Tray Load paper here. See "Using the Memory Card" on page 11. Paper Output Tray The printed paper will be ejected. Lock Switch Slide to the right to print directly from it feeds properly. For information on Screen-saver mode, see "Screensaver mode" on page 5. Direct Print Port Connect your local Canon Service representative. For details, refer to support paper. Paper Guide Slide against the left side of the memory card. Open button Press to replace the ink tank or remove jammed paper. Operation Panel Changes the settings and operates the printer...
mini320 series Direct Photo Guide
Page 9
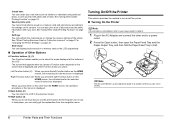
... the screen that is displayed. See "When Printing Becomes Faint or Colors Are Incorrect" on page 27 or "Changing the Printer Settings" on page 16. See "Using Other Useful Printing Function" on the other end to install it clearly. 6 Printer Parts and Their Functions Settings: You can create your own items such as stickers or calendars using selected photo, or print your setup sheet to a power outlet. 2 Press the Open button, then open the Paper Feed Tray and the Paper Output Tray, and...
... the screen that is displayed. See "When Printing Becomes Faint or Colors Are Incorrect" on page 27 or "Changing the Printer Settings" on page 16. See "Using Other Useful Printing Function" on the other end to install it clearly. 6 Printer Parts and Their Functions Settings: You can create your own items such as stickers or calendars using selected photo, or print your setup sheet to a power outlet. 2 Press the Open button, then open the Paper Feed Tray and the Paper Output Tray, and...
mini320 series Direct Photo Guide
Page 12
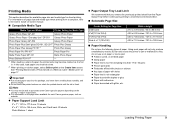
... direct sunlight. z Paper Support Load Limit 5" x 7" / 127.0 x 177.8 mm: 10 sheets 4" x 6" / 101.6 x 152.4 mm, Wide, and Credit card: 20 sheets Photo Stickers: 1 sheet z Paper Output Tray Load Limit We recommend that is fixed. Using such paper will not only produce unsatisfactory results, but can also cause the printer to purchase some Canon genuine papers depending on -screen manual. „ Compatible Media Type Media Type and Model Printer Setting for direct printing. In this case, load paper one sheet at a time. *2 When printing...
... direct sunlight. z Paper Support Load Limit 5" x 7" / 127.0 x 177.8 mm: 10 sheets 4" x 6" / 101.6 x 152.4 mm, Wide, and Credit card: 20 sheets Photo Stickers: 1 sheet z Paper Output Tray Load Limit We recommend that is fixed. Using such paper will not only produce unsatisfactory results, but can also cause the printer to purchase some Canon genuine papers depending on -screen manual. „ Compatible Media Type Media Type and Model Printer Setting for direct printing. In this case, load paper one sheet at a time. *2 When printing...
mini320 series Direct Photo Guide
Page 14
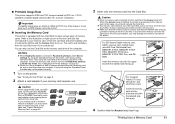
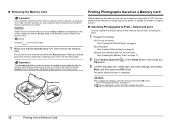
... Compatible image types are limited to the memory card. z Make sure that corresponds to find the Card Slot that the memory card is correctly oriented and labeled side is inserted without an adapter, you force the memory card into the Card Slot. Check the card face and insert it gently until it into the Card Slot, the Access lamp is selected in the wrong orientation, you print using the Operation Panel on the printer, card direct printing cannot be printed correctly. 1 Turn on page 33. See "Changing...
... Compatible image types are limited to the memory card. z Make sure that corresponds to find the Card Slot that the memory card is correctly oriented and labeled side is inserted without an adapter, you force the memory card into the Card Slot. Check the card face and insert it gently until it into the Card Slot, the Access lamp is selected in the wrong orientation, you print using the Operation Panel on the printer, card direct printing cannot be printed correctly. 1 Turn on page 33. See "Changing...
mini320 series Direct Photo Guide
Page 15
... into the Card Slot. Removing the memory card or turning off the printer while the Access lamp is flashing. See "Inserting the Memory Card" on the Home screen, then press the 3 Confirm the page size, media type, and other settings, then select Next, and then press the OK button. Hold the part of the memory card that is sticking out to remove it from a Memory Card See "Loading Printing Paper" on page 8. (3) Insert the memory card into the Trash. 1 Make sure that...
... into the Card Slot. Removing the memory card or turning off the printer while the Access lamp is flashing. See "Inserting the Memory Card" on the Home screen, then press the 3 Confirm the page size, media type, and other settings, then select Next, and then press the OK button. Hold the part of the memory card that is sticking out to remove it from a Memory Card See "Loading Printing Paper" on page 8. (3) Insert the memory card into the Trash. 1 Make sure that...
mini320 series Direct Photo Guide
Page 18
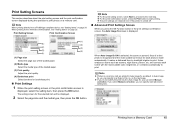
... default. Print Setting Screens This section describes about the print setting screen and the print confirmation screen displayed during the operation to print photos on page 25. When printing from a wireless communication, see "Setting Items" on the next page. z For the print confirmation screen, press the Print button to print. The setting screen for each photo is displayed, select the setting item, then press the OK button. and corrects each advanced setting item. Note When printing directly from a Memory Card 15 When Auto image fix ON is selected...
... default. Print Setting Screens This section describes about the print setting screen and the print confirmation screen displayed during the operation to print photos on page 25. When printing from a wireless communication, see "Setting Items" on the next page. z For the print confirmation screen, press the Print button to print. The setting screen for each photo is displayed, select the setting item, then press the OK button. and corrects each advanced setting item. Note When printing directly from a Memory Card 15 When Auto image fix ON is selected...
mini320 series Direct Photo Guide
Page 24
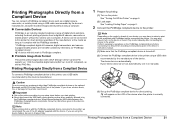
...) ver. 1.0/2.0-compatible digital camera (Exif ver. 2.2/2.21 compliant), as well as it to the Direct Print Port of your setup sheet before connecting the device. If your device does not turn on automatically, turn on the printer. When disconnecting the USB cable between the PictBridge compliant device and printer, follow the instructions given in the device's instruction manual. (1) Make sure that the PictBridge compliant device is correctly connected. Printing Photographs Directly from...
...) ver. 1.0/2.0-compatible digital camera (Exif ver. 2.2/2.21 compliant), as well as it to the Direct Print Port of your setup sheet before connecting the device. If your device does not turn on automatically, turn on the printer. When disconnecting the USB cable between the PictBridge compliant device and printer, follow the instructions given in the device's instruction manual. (1) Make sure that the PictBridge compliant device is correctly connected. Printing Photographs Directly from...
mini320 series Direct Photo Guide
Page 26
... "Turning On the Printer" on page 6. 2 Display the PictBridge settings screen. (1) Select Settings on the printer. and corrects each scene with specified settings. Print Setting You can make each item. If you select Default, the most suitable color, brightness, or contrasts automatically to print. When you select Date, File No., or Both, the date and/or file number will only be available, depending on the photo taken against the light. z Date/File No. Set...
... "Turning On the Printer" on page 6. 2 Display the PictBridge settings screen. (1) Select Settings on the printer. and corrects each scene with specified settings. Print Setting You can make each item. If you select Default, the most suitable color, brightness, or contrasts automatically to print. When you select Date, File No., or Both, the date and/or file number will only be available, depending on the photo taken against the light. z Date/File No. Set...
mini320 series Direct Photo Guide
Page 28
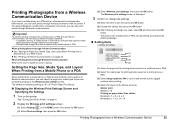
... default is borderless printing on 4" x 6" Photo Paper Plus Glossy. „ Displaying the Wireless Print Settings Screen and Specifying the Settings 1 Turn on -screen manual. If the optional Bluetooth unit BU-20 is displayed. 3 Confirm or change the settings. (1) Select the item to correct and smooth out the jagged contours when printing. (4) Select the layout of the mobile phone or PDA. Compatible devices: A mobile phone or PDA with an IrDA port that supports image data transmission through wireless connection with the printer...
... default is borderless printing on 4" x 6" Photo Paper Plus Glossy. „ Displaying the Wireless Print Settings Screen and Specifying the Settings 1 Turn on -screen manual. If the optional Bluetooth unit BU-20 is displayed. 3 Confirm or change the settings. (1) Select the item to correct and smooth out the jagged contours when printing. (4) Select the layout of the mobile phone or PDA. Compatible devices: A mobile phone or PDA with an IrDA port that supports image data transmission through wireless connection with the printer...
mini320 series Direct Photo Guide
Page 32
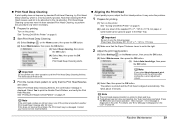
... your Canon service representative. „ Aligning the Print Head If print quality is displayed. Note z The print head alignment pattern is printed in the Rear Tray. See "Turning On/Off the Printer" on page 6. 2 Start Print Head Deep Cleaning. (1) Select Settings on page 27. See "Printing the Nozzle Check Pattern" on the Home screen, then press the OK button. (2) Select Maintenance, then press the OK button. (3) Select Deep cleaning, then press the OK button. (4) Select Yes, then press the OK button. Note If the print head nozzles are clean. Photo Paper...
... your Canon service representative. „ Aligning the Print Head If print quality is displayed. Note z The print head alignment pattern is printed in the Rear Tray. See "Turning On/Off the Printer" on page 6. 2 Start Print Head Deep Cleaning. (1) Select Settings on page 27. See "Printing the Nozzle Check Pattern" on the Home screen, then press the OK button. (2) Select Maintenance, then press the OK button. (3) Select Deep cleaning, then press the OK button. (4) Select Yes, then press the OK button. Note If the print head nozzles are clean. Photo Paper...
mini320 series Direct Photo Guide
Page 38
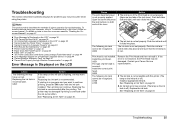
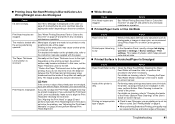
... page 40 z "Print Results Not Satisfactory" on page 40 z "Printer Does Not Start" on page 43 z "Paper Does Not Feed Properly" on page 43 z "Paper Jam" on page 43 z "The Power Lamp (blue) and Alarm Lamp (orange) Flash Alternately" on page 44 z "Error Message Appears on a PictBridge Compliant Device" on page 44 z "Cannot Remove a Memory Card" on page 46 z "Cannot Print Properly through Wireless Communication" on page 46 Error Message Is Displayed on the ink tank is off .) Replace the ink...
... page 40 z "Print Results Not Satisfactory" on page 40 z "Printer Does Not Start" on page 43 z "Paper Does Not Feed Properly" on page 43 z "Paper Jam" on page 43 z "The Power Lamp (blue) and Alarm Lamp (orange) Flash Alternately" on page 44 z "Error Message Appears on a PictBridge Compliant Device" on page 44 z "Cannot Remove a Memory Card" on page 46 z "Cannot Print Properly through Wireless Communication" on page 46 Error Message Is Displayed on the ink tank is off .) Replace the ink...
mini320 series Direct Photo Guide
Page 39
... the service center. Action z There are no image data saved on the device before connecting your device connected to the printer. z A communication time out occurs if an operation takes too long or if it to the printer. You may be connected to its instruction manual. Press and hold the Stop/Reset button for detecting the remaining ink level is displayed in memory card. This may damage the printer. Replace the ink...
... the service center. Action z There are no image data saved on the device before connecting your device connected to the printer. z A communication time out occurs if an operation takes too long or if it to the printer. You may be connected to its instruction manual. Press and hold the Stop/Reset button for detecting the remaining ink level is displayed in memory card. This may damage the printer. Replace the ink...
mini320 series Direct Photo Guide
Page 40
... supplied 5" x 7" / 127.0 x 177.8 mm paper or same-sized Canon genuine paper* in the Rear Tray. Set to strong light. An unsupported USB hub is currently write-enabled. The optional battery is set to Read/write mode. Press the OK button on the printer. The Card Slot is running low. (1) Turn off the printer, and unplug the power cord of paper, the paper at a slant passes through inside the printer and the Auto Head Alignment may be failed. z Paper...
... supplied 5" x 7" / 127.0 x 177.8 mm paper or same-sized Canon genuine paper* in the Rear Tray. Set to strong light. An unsupported USB hub is currently write-enabled. The optional battery is set to Read/write mode. Press the OK button on the printer. The Card Slot is running low. (1) Turn off the printer, and unplug the power cord of paper, the paper at a slant passes through inside the printer and the Auto Head Alignment may be failed. z Paper...
mini320 series Direct Photo Guide
Page 42
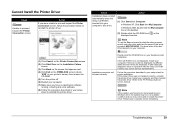
... printer driver. Restart your Canon service representative. Installation procedure not followed correctly. If the CD-ROM icon is inserted into your setup sheet to start the setup program, specify your computer. If the icon is still not displayed, try different disks and see if they are displayed, there is your printer's name), then remove the CD-ROM. (5) Turn the printer off. (6) Restart your computer. (7) Make sure you have no application software...
... printer driver. Restart your Canon service representative. Installation procedure not followed correctly. If the CD-ROM icon is inserted into your setup sheet to start the setup program, specify your computer. If the icon is still not displayed, try different disks and see if they are displayed, there is your printer's name), then remove the CD-ROM. (5) Turn the printer off. (6) Restart your computer. (7) Make sure you have no application software...
mini320 series Direct Photo Guide
Page 44
... the printer is incorrect. z When performing Borderless Printing, print quality may leave some ink inside of the User's Guide on the error condition. See "When Printing Becomes Faint or Colors Are Incorrect" on page 27 and perform any necessary maintenance operation. „ Printed Paper Curls or Has Ink Blots Cause Action Paper is misaligned. Clean the Paper Feed Roller. Many types of paper are smudged, try to "Cleaning the Inside of the Printer (Bottom Plate Cleaning)" of the printer. Print Head...
... the printer is incorrect. z When performing Borderless Printing, print quality may leave some ink inside of the User's Guide on the error condition. See "When Printing Becomes Faint or Colors Are Incorrect" on page 27 and perform any necessary maintenance operation. „ Printed Paper Curls or Has Ink Blots Cause Action Paper is misaligned. Clean the Paper Feed Roller. Many types of paper are smudged, try to "Cleaning the Inside of the Printer (Bottom Plate Cleaning)" of the printer. Print Head...
mini320 series Direct Photo Guide
Page 46
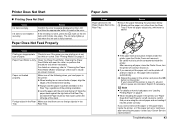
... error message displayed on page 8. Paper Does Not Feed Properly Paper Jam Cause Paper jammed in the printer, see if the paper you cannot remove the paper or the paper tears inside the printer. Paper Feed Roller is fully inserted. Clean the Paper Feed Roller. Paper not loaded properly. Note z For details on how to load paper, see "Loading Printing Paper" on the LCD and take the appropriate action to resolve the error. The ink lamp lights up red when the ink tank is dirty. See "Printing...
... error message displayed on page 8. Paper Does Not Feed Properly Paper Jam Cause Paper jammed in the printer, see if the paper you cannot remove the paper or the paper tears inside the printer. Paper Feed Roller is fully inserted. Clean the Paper Feed Roller. Paper not loaded properly. Note z For details on how to load paper, see "Loading Printing Paper" on the LCD and take the appropriate action to resolve the error. The ink lamp lights up red when the ink tank is dirty. See "Printing...

mini320 series Direct Photo Guide
Page 51
... Photo (Photo Paper Pro) Default (Selections based on the printer setting), On, Off, "VIVID"*, "NR" (Noise Reduction)*, "Face"*, "Red eye"* * If using a Canon PictBridge compliant camera, you can select it can print shooting Info (Exif Data) in the highest print quality mode on Photo Paper Pro. Select Layout, then select the item displayed with the [i] icon. (Note that complies with USB 2.0 Hi-Speed standard is for printing only. Specifications Printing resolution (dpi) Interface Print width Acoustic noise level Operating environment...
... Photo (Photo Paper Pro) Default (Selections based on the printer setting), On, Off, "VIVID"*, "NR" (Noise Reduction)*, "Face"*, "Red eye"* * If using a Canon PictBridge compliant camera, you can select it can print shooting Info (Exif Data) in the highest print quality mode on Photo Paper Pro. Select Layout, then select the item displayed with the [i] icon. (Note that complies with USB 2.0 Hi-Speed standard is for printing only. Specifications Printing resolution (dpi) Interface Print width Acoustic noise level Operating environment...
mini320 series Easy Setup Instructions
Page 1
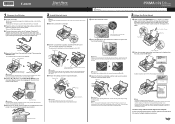
... a slant. 3 Align the Print Head a Load a sheet of the SUPPLIED 5" x 7" / 127.0 x 177.8 mm paper into the Rear Tray with this printer, refer to the back cover of the Direct Photo Guide. e Press the mark on the ink tank until it . Serial Number Important The printer starts operating. Plug the AC adapter into place and then its lamp lights red. The Language selection screen will open automatically. a Slide the Lock Switch to "Cleaning Your Printer" in the User's Guide on...
... a slant. 3 Align the Print Head a Load a sheet of the SUPPLIED 5" x 7" / 127.0 x 177.8 mm paper into the Rear Tray with this printer, refer to the back cover of the Direct Photo Guide. e Press the mark on the ink tank until it . Serial Number Important The printer starts operating. Plug the AC adapter into place and then its lamp lights red. The Language selection screen will open automatically. a Slide the Lock Switch to "Cleaning Your Printer" in the User's Guide on...
mini320 series Easy Setup Instructions
Page 2
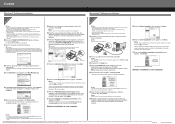
... the Direct Photo Guide. Then turn off when your product. The software installation screen may vary depending on -screen instructions to Step l. The printer driver will need your product serial number, which is now complete. Note If the CD-ROM folder does not open automatically, double-click the CD-ROM icon on and start Windows. Follow on the operating system you can agree, click Agree. "Adobe" and "Adobe RGB (1998)" are using . •...
... the Direct Photo Guide. Then turn off when your product. The software installation screen may vary depending on -screen instructions to Step l. The printer driver will need your product serial number, which is now complete. Note If the CD-ROM folder does not open automatically, double-click the CD-ROM icon on and start Windows. Follow on the operating system you can agree, click Agree. "Adobe" and "Adobe RGB (1998)" are using . •...


