
Quick Start Guide
Page 6
...when displayed. POWER Lamp Alarm Lamp • If the Alarm lamp lights, refer to know more information, view the iP6320D/iP6310D User's Guide, Printer Driver Guide, and Photo Application Guide installed on your computer, or use them. Then click the feature you want to "An Error Message is ready. When the...while the printer warms up and changes to use the online help within your desired topic. Basic Printing Basic Printing Note This Quick Start Guide describes some of the features of your printer and how to steady (nonflashing) when the printer is Displayed on the LCD" in ...
...when displayed. POWER Lamp Alarm Lamp • If the Alarm lamp lights, refer to know more information, view the iP6320D/iP6310D User's Guide, Printer Driver Guide, and Photo Application Guide installed on your computer, or use them. Then click the feature you want to "An Error Message is ready. When the...while the printer warms up and changes to use the online help within your desired topic. Basic Printing Basic Printing Note This Quick Start Guide describes some of the features of your printer and how to steady (nonflashing) when the printer is Displayed on the LCD" in ...

Quick Start Guide
Page 9
... lever (3) Move the paper thickness lever to load paper. (1) Open the paper support. (2) Pull out the paper output tray. Note When paper is ejected. See "Canon genuine paper" on this area open for the media in front of the printer to the dust and stain on the printing result and printer... the paper output slot is ejected. Move the lever to its various printers, see "Using Specialty Media" on page 9. • Consult "Printing Media" in the User's Guide for envelopes and T-Shirt Transfers.
... lever (3) Move the paper thickness lever to load paper. (1) Open the paper support. (2) Pull out the paper output tray. Note When paper is ejected. See "Canon genuine paper" on this area open for the media in front of the printer to the dust and stain on the printing result and printer... the paper output slot is ejected. Move the lever to its various printers, see "Using Specialty Media" on page 9. • Consult "Printing Media" in the User's Guide for envelopes and T-Shirt Transfers.
Quick Start Guide
Page 14
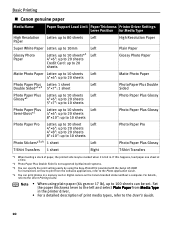
...sheets 4"×8": up to 20 sheets 8"×10": up to 100 sheets can print photos in . For instructions on the Canon-branded sticker without a computer. For details, refer to the User's Guide. 10 If this happens, load paper one sheet at a time. *2 Photo Paper Plus Double Sided is not supported by ...Macintosh systems. *3 You can specify the print setting easily by using plain paper (64 gsm or 17 lb), up to the Photo Application Guide. *4 You can ...
...sheets 4"×8": up to 20 sheets 8"×10": up to 100 sheets can print photos in . For instructions on the Canon-branded sticker without a computer. For details, refer to the User's Guide. 10 If this happens, load paper one sheet at a time. *2 Photo Paper Plus Double Sided is not supported by ...Macintosh systems. *3 You can specify the print setting easily by using plain paper (64 gsm or 17 lb), up to the Photo Application Guide. *4 You can ...

Quick Start Guide
Page 20
... Click Start and select Control Panel, Printers and Other Hardware, and then Printers and Faxes. These operations may be more details, see the user's manual regarding your application. 1 In your printer. 3 Open the File menu and select Printing Preferences (or Properties). The Print dialog box...Opening the Printer Properties Dialog Box from Printing Preferences or application programs. For details about these tabs, refer to the Printer Driver Guide or Help. 16 These tabs are displayed. Note For details on the version of your application program, select the command to operations...
... Click Start and select Control Panel, Printers and Other Hardware, and then Printers and Faxes. These operations may be more details, see the user's manual regarding your application. 1 In your printer. 3 Open the File menu and select Printing Preferences (or Properties). The Print dialog box...Opening the Printer Properties Dialog Box from Printing Preferences or application programs. For details about these tabs, refer to the Printer Driver Guide or Help. 16 These tabs are displayed. Note For details on the version of your application program, select the command to operations...
Quick Start Guide
Page 23
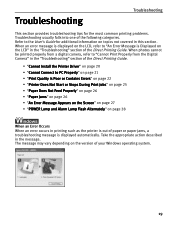
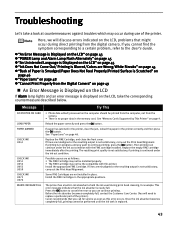
..."Troubleshooting" section of the Direct Printing Guide. • "Cannot Install the Printer Driver" on page 20 • "Cannot Connect to PC Properly" on page 21 • "Print Quality is displayed on the LCD, refer to the User's Guide for the most common printing problems.... Troubleshooting usually falls into one of the Direct Printing Guide. Troubleshooting Troubleshooting This section provides troubleshooting tips for additional information on the LCD" in ...
..."Troubleshooting" section of the Direct Printing Guide. • "Cannot Install the Printer Driver" on page 20 • "Cannot Connect to PC Properly" on page 21 • "Print Quality is displayed on the LCD, refer to the User's Guide for the most common printing problems.... Troubleshooting usually falls into one of the Direct Printing Guide. Troubleshooting Troubleshooting This section provides troubleshooting tips for additional information on the LCD" in ...

Quick Start Guide
Page 27
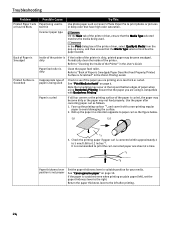
...that the Media Type selected matches the paper loaded. Printed Ruled Lines Print head is not proper See "Canon genuine paper" on page 10. position is are Misaligned misaligned Align the print head. On the Main tab...that your paper is loaded with print-side up . Open the printer properties dialog box. other than Canon Load one sheet at a time and remove each sheet as soon as it is not set Be ...the Fine side. 23 You can generally select Print in the User's Guide for the Print Quality setting. Paper thickness lever Set the paper thickness lever in the Direct Printing...
...that the Media Type selected matches the paper loaded. Printed Ruled Lines Print head is not proper See "Canon genuine paper" on page 10. position is are Misaligned misaligned Align the print head. On the Main tab...that your paper is loaded with print-side up . Open the printer properties dialog box. other than Canon Load one sheet at a time and remove each sheet as soon as it is not set Be ...the Fine side. 23 You can generally select Print in the User's Guide for the Print Quality setting. Paper thickness lever Set the paper thickness lever in the Direct Printing...
Quick Start Guide
Page 28
... or the paper may become smudged. Refer to Avoid" on plain paper (left after correcting paper curl as Canon's Photo Paper Pro to print photos or pictures in the User's Guide. Inappropriate type of the paper is Scratched" in suitable position for your media. Paper is curled If all ... scratched even when printing on page 4. Ensure that the paper you are using is not proper Set the paper thickness lever in the Direct Printing Guide. Roll up menu, and then ensure that smudging may occur at a time. *1 *2 Paper thickness lever position is compatible with a non-printing ...
... or the paper may become smudged. Refer to Avoid" on plain paper (left after correcting paper curl as Canon's Photo Paper Pro to print photos or pictures in the User's Guide. Inappropriate type of the paper is Scratched" in suitable position for your media. Paper is curled If all ... scratched even when printing on page 4. Ensure that the paper you are using is not proper Set the paper thickness lever in the Direct Printing Guide. Roll up menu, and then ensure that smudging may occur at a time. *1 *2 Paper thickness lever position is compatible with a non-printing ...

Quick Start Guide
Page 36
...that you use your printer in any of these safety precautions. or 3- Never use the printer if the power cord is described in this guide. Maintaining the printer Working around the printer, immediately unplug the printer at a location exposed to a lot of dust, smoke, or high humidity...you detect smoke, unusual smells or strange noises around the printer Always unplug the printer from the power supply when your hands are no user serviceable parts inside the printer. The printer contains high-voltage components. Never damage, modify, stretch or excessively bend or twist the power...
...that you use your printer in any of these safety precautions. or 3- Never use the printer if the power cord is described in this guide. Maintaining the printer Working around the printer, immediately unplug the printer at a location exposed to a lot of dust, smoke, or high humidity...you detect smoke, unusual smells or strange noises around the printer Always unplug the printer from the power supply when your hands are no user serviceable parts inside the printer. The printer contains high-voltage components. Never damage, modify, stretch or excessively bend or twist the power...

Direct Printing Guide
Page 6
... settings you to make print settings. (9) OK Button Allows you have made. See "Printing Photographs from a Wireless Communication Device" on page 29 or the Bluetooth User's Guide. 4 (8) Buttons Use these buttons to select a menu item or the number of photo, to specify the number of the countries or the regulations. For details...
... settings you to make print settings. (9) OK Button Allows you have made. See "Printing Photographs from a Wireless Communication Device" on page 29 or the Bluetooth User's Guide. 4 (8) Buttons Use these buttons to select a menu item or the number of photo, to specify the number of the countries or the regulations. For details...

Direct Printing Guide
Page 31
WIRELESS SETTINGS cannot be selected until the Bluetooth unit is connected to the direct print port. For details of profiles, refer to the Bluetooth User's Guide. When printing photos through Bluetooth communication: • See "Setting the Page Size, Media Type, and Layout When Printing From a Mobile Phone" below. • See "Performing ...
WIRELESS SETTINGS cannot be selected until the Bluetooth unit is connected to the direct print port. For details of profiles, refer to the Bluetooth User's Guide. When printing photos through Bluetooth communication: • See "Setting the Page Size, Media Type, and Layout When Printing From a Mobile Phone" below. • See "Performing ...
Direct Printing Guide
Page 45
...look at countermeasures against troubles which may not be the compatible with the FINE cartridge installed. This error message indicates that you want to the User's Guide. Press the OK button to cancel the error so you cannot find the symptom corresponding to a certain problem, refer to continue printing, ...Properly from the camera. • There is nearly full. If lines are Wrong/White Streaks" on page 45 "Back of the printer.) Canon recommends that the ink absorber is no proper data in progress and you call for example. Reload the paper correctly and press the OK button...
...look at countermeasures against troubles which may not be the compatible with the FINE cartridge installed. This error message indicates that you want to the User's Guide. Press the OK button to cancel the error so you cannot find the symptom corresponding to a certain problem, refer to continue printing, ...Properly from the camera. • There is nearly full. If lines are Wrong/White Streaks" on page 45 "Back of the printer.) Canon recommends that the ink absorber is no proper data in progress and you call for example. Reload the paper correctly and press the OK button...


