Quick Start Guide
Page 25
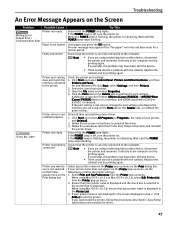
...Try This Printing Speed Is Slow/USB 2.0 HiSpeed Connection Does Not Work. Obtain the latest version of the OS update program and install it on your PC supports USB 2.0 Hi-Speed connection. • Both the USB cable and USB hub support USB 2.0 Hi-Speed connection. Your ...environment is not fully compatible with USB 2.0, the printer will operate at a lower speed provided under USB 1.1. above , contact the maker of the USB 2.0 Hi-Speed driver...
...Try This Printing Speed Is Slow/USB 2.0 HiSpeed Connection Does Not Work. Obtain the latest version of the OS update program and install it on your PC supports USB 2.0 Hi-Speed connection. • Both the USB cable and USB hub support USB 2.0 Hi-Speed connection. Your ...environment is not fully compatible with USB 2.0, the printer will operate at a lower speed provided under USB 1.1. above , contact the maker of the USB 2.0 Hi-Speed driver...
Quick Start Guide
Page 31
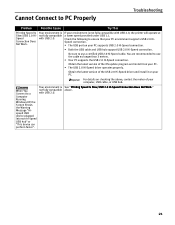
...been with the device. • There could also be a problem with the cable(s). Ensure that the printer is initializing. Replace the cable(s) and try printing again. A USB port is selected if either USBnnn (Canon iPXXXXX) or MPUSBPRNnn (Canon iPXXXXX) (where n is a number, and XXXXX represents 6320D or 6310D.) is...POWER lamp stops flashing. An error message may have been with the device. • There could also be a problem with the cable(s). Ensure that your printer name is not displayed in the screen displayed in the screen that the POWER lamp lights. Select the icon...
...been with the device. • There could also be a problem with the cable(s). Ensure that the printer is initializing. Replace the cable(s) and try printing again. A USB port is selected if either USBnnn (Canon iPXXXXX) or MPUSBPRNnn (Canon iPXXXXX) (where n is a number, and XXXXX represents 6320D or 6310D.) is...POWER lamp stops flashing. An error message may have been with the device. • There could also be a problem with the cable(s). Ensure that your printer name is not displayed in the screen displayed in the screen that the POWER lamp lights. Select the icon...
Easy Setup Instructions
Page 1
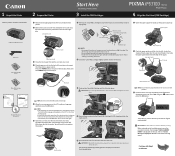
...tape gently. NOTE: •If the language you leave the printer more than five minutes without using the buttons and press the OK button. PIXMA iP6310D Photo Printer Power Cord Color FINE Cartridge (CL-41) 1 Remove the shipping tape from the front and back of the paper. Print head ...Close the front cover first and the card slot cover next. 4 Plug the power cord into the right slot (P). NOTE: Do not connect the USB cable at this to "An Unintended Language is displayed on a FINE Cartridge. The message requesting head alignment is Displayed on the operation panel, the LCD...
...tape gently. NOTE: •If the language you leave the printer more than five minutes without using the buttons and press the OK button. PIXMA iP6310D Photo Printer Power Cord Color FINE Cartridge (CL-41) 1 Remove the shipping tape from the front and back of the paper. Print head ...Close the front cover first and the card slot cover next. 4 Plug the power cord into the right slot (P). NOTE: Do not connect the USB cable at this to "An Unintended Language is displayed on a FINE Cartridge. The message requesting head alignment is Displayed on the operation panel, the LCD...
Easy Setup Instructions
Page 2
... in order to restart your computer appears, click OK. For details, refer to change without notice. QT5-0324-V02 ©2006 CANON INC. Screens may result in order to choose the options you cannot proceed to the next procedure after two minutes, refer to the...Windows as this may differ depending on -screen instructions. 5 Macintosh® Printer Driver Installation 7 When the Printer Connection screen appears, connect the USB cable to the computer, the other countries. If you are either registered trademarks or trademarks of the screen, then follow the on-screen instructions. 6...
... in order to restart your computer appears, click OK. For details, refer to change without notice. QT5-0324-V02 ©2006 CANON INC. Screens may result in order to choose the options you cannot proceed to the next procedure after two minutes, refer to the...Windows as this may differ depending on -screen instructions. 5 Macintosh® Printer Driver Installation 7 When the Printer Connection screen appears, connect the USB cable to the computer, the other countries. If you are either registered trademarks or trademarks of the screen, then follow the on-screen instructions. 6...
Direct Printing Guide
Page 26
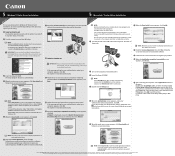
... a range of digital photo solutions, including the direct printing of the printer. Connecting to a PictBridge Compliant Device To connect a PictBridge compliant device to use the USB cable supplied with the digital device connected to the printer, it fully. 1 Turn on page 12. 3 Connect the PictBridge compliant device to the device could result.
... a range of digital photo solutions, including the direct printing of the printer. Connecting to a PictBridge Compliant Device To connect a PictBridge compliant device to use the USB cable supplied with the digital device connected to the printer, it fully. 1 Turn on page 12. 3 Connect the PictBridge compliant device to the device could result.

Direct Printing Guide
Page 27
... after connecting the device to the printer. If the device does not turn on automatically, turn on automatically when connected to the printer using the USB cable (for direct printing. When the connection between the device and printer has been established, the POWER lamp on the printer flashes twice. * The power-on...
... after connecting the device to the printer. If the device does not turn on automatically, turn on automatically when connected to the printer using the USB cable (for direct printing. When the connection between the device and printer has been established, the POWER lamp on the printer flashes twice. * The power-on...
Direct Printing Guide
Page 30
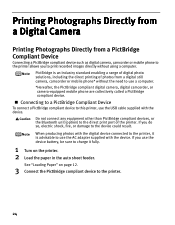
... Layout, then select the item displayed with the [i] icon. • 35mm Film Style Layout (Contact Printing Layout) You can use a Canon PictBridge-compliant device, you select an image which has had the shooting date embedded in the margins of the digital camera cannot be used for...Digital Camera" on the PictBridge setting screen. Select Layout, then select the item displayed with the film icon. • Never disconnect the USB cable during printing. If you can print selected photos or index-specified photos in 35 mm film style layout (contact printing layout). Other Settings ...
... Layout, then select the item displayed with the [i] icon. • 35mm Film Style Layout (Contact Printing Layout) You can use a Canon PictBridge-compliant device, you select an image which has had the shooting date embedded in the margins of the digital camera cannot be used for...Digital Camera" on the PictBridge setting screen. Select Layout, then select the item displayed with the film icon. • Never disconnect the USB cable during printing. If you can print selected photos or index-specified photos in 35 mm film style layout (contact printing layout). Other Settings ...
Direct Printing Guide
Page 35
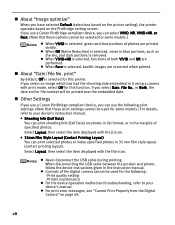
Easy-PhotoPrint starts on , and connected by a USB cable. 2 Press the Easy-PhotoPrint Startup button. For more information on installation, refer to the Easy Setup Instructions. 1 Ensure that it was created (YYYY_MM_DD). 33 The ...folder will be named automatically according to the date that both the printer and the computer are turned on, and connected by a USB cable. 2 Press the Save button. You can save the data in the memory card on the hard disk of the computer. The photos will be saved...
Easy-PhotoPrint starts on , and connected by a USB cable. 2 Press the Easy-PhotoPrint Startup button. For more information on installation, refer to the Easy Setup Instructions. 1 Ensure that it was created (YYYY_MM_DD). 33 The ...folder will be named automatically according to the date that both the printer and the computer are turned on, and connected by a USB cable. 2 Press the Save button. You can save the data in the memory card on the hard disk of the computer. The photos will be saved...
Direct Printing Guide
Page 36
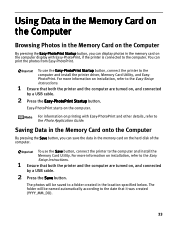
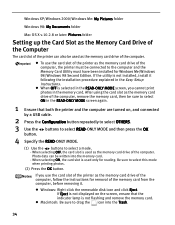
... using the card slot as the memory card drive of the computer. When selecting ON, the card slot is not displayed on , and connected by a USB cable. 2 Press the Configuration button repeatedly to select OTHERS. 3 Use the buttons to select READ-ONLY MODE and then press the OK button. 4 Specify the READ...
... using the card slot as the memory card drive of the computer. When selecting ON, the card slot is not displayed on , and connected by a USB cable. 2 Press the Configuration button repeatedly to select OTHERS. 3 Use the buttons to select READ-ONLY MODE and then press the OK button. 4 Specify the READ...


