iP6000D Diect Print Guide
Page 12
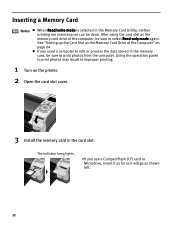
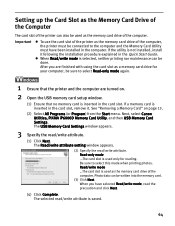
... computer, be done. See "Setting up the Card Slot as the memory card drive of the Computer" on the printer. 2 Open the card slot cover. 3 Install the memory card in the card slot.
... computer, be done. See "Setting up the Card Slot as the memory card drive of the Computer" on the printer. 2 Open the card slot cover. 3 Install the memory card in the card slot.
iP6000D Diect Print Guide
Page 17
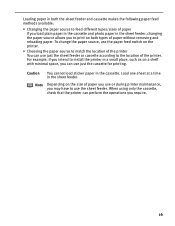
... to use just the cassette for printing. Note Depending on both types of paper without removing and reloading paper. For example, if you intend to install the printer in a small place, such as on a shelf with minimal space, you can perform the operations you to print on the size of the...
... to use just the cassette for printing. Note Depending on both types of paper without removing and reloading paper. For example, if you intend to install the printer in a small place, such as on a shelf with minimal space, you can perform the operations you to print on the size of the...
iP6000D Diect Print Guide
Page 26
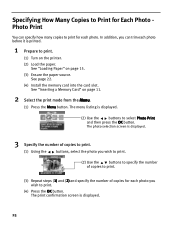
... the printer. (2) Load the paper. See "Loading Paper" on page 11. 2 Select the print mode from the Menu. (1) Press the Menu button. See page 22. (4) Install the memory card into the card slot. The print confirmation screen is printed. 1 Prepare to print. (3) Repeat steps (1) and (2) and specify the number of copies...
... the printer. (2) Load the paper. See "Loading Paper" on page 11. 2 Select the print mode from the Menu. (1) Press the Menu button. See page 22. (4) Install the memory card into the card slot. The print confirmation screen is printed. 1 Prepare to print. (3) Repeat steps (1) and (2) and specify the number of copies...

iP6000D Diect Print Guide
Page 63
Easy-PhotoPrint starts on printing with Easy-PhotoPrint and other details, refer to the computer. For more information on installation, refer to "Searching for Photos with the Shooting Date" on page 30. 62 You can display photos in the Memory Card on the Computer By ... the Photo Application Guide. Notes For information on the computer. Important To use the Easy-PhotoPrint Startup button, connect the printer to the computer and install the printer driver, Memory Card Utility, and Easy-Photo Print.
Easy-PhotoPrint starts on printing with Easy-PhotoPrint and other details, refer to the computer. For more information on installation, refer to "Searching for Photos with the Shooting Date" on page 30. 62 You can display photos in the Memory Card on the Computer By ... the Photo Application Guide. Notes For information on the computer. Important To use the Easy-PhotoPrint Startup button, connect the printer to the computer and install the printer driver, Memory Card Utility, and Easy-Photo Print.

iP6000D Diect Print Guide
Page 64
... the Memory Card onto the Computer By pressing the Save button, you can save the data in the location specified below. For more information on installation, refer to the Quick Start Guide. 1 Ensure that the printer and the computer are turned on the hard disk of the photos were saved ...(YYYY_MM_DD). Windows XP/Windows 2000/Windows Me: My Pictures folder Windows 98: My Documents folder Mac OS X v.10.2.1 to the computer and install the Memory Card Utility. A folder will be created with a name and the date of the computer. The photos will be saved in the memory card...
... the Memory Card onto the Computer By pressing the Save button, you can save the data in the location specified below. For more information on installation, refer to the Quick Start Guide. 1 Ensure that the printer and the computer are turned on the hard disk of the photos were saved ...(YYYY_MM_DD). Windows XP/Windows 2000/Windows Me: My Pictures folder Windows 98: My Documents folder Mac OS X v.10.2.1 to the computer and install the Memory Card Utility. A folder will be created with a name and the date of the computer. The photos will be saved in the memory card...
iP6000D Diect Print Guide
Page 65
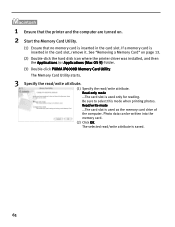
...(or Program) from the Start menu. Next, select Canon Utilities, PIXMA iP6000D Memory Card Utility, and then USB Memory Card Settings. When Read/write mode is used as a memory card drive for reading. Read/write mode ...The card slot is not installed, install it . Photo data can be done. The USB Memory... computer, be sure to the computer and the Memory Card Utility must be connected to select Read-only mode again. After you have been installed in the card slot. W 1 Ensure that no memory card is saved. 64 Be sure to select this mode when printing photos. The...
...(or Program) from the Start menu. Next, select Canon Utilities, PIXMA iP6000D Memory Card Utility, and then USB Memory Card Settings. When Read/write mode is used as a memory card drive for reading. Read/write mode ...The card slot is not installed, install it . Photo data can be done. The USB Memory... computer, be sure to the computer and the Memory Card Utility must be connected to select Read-only mode again. After you have been installed in the card slot. W 1 Ensure that no memory card is saved. 64 Be sure to select this mode when printing photos. The...
iP6000D Diect Print Guide
Page 66
... printer and the computer are turned on page 13. (2) Double-click the hard disk icon where the printer driver was installed, and then the Applications (or Applications (Mac OS 9)) folder. (3) Double-click PIXMA iP6000D Memory Card Utility. Be sure to select this mode when printing photos. The Memory Card Utility starts. 3 Specify the...
... printer and the computer are turned on page 13. (2) Double-click the hard disk icon where the printer driver was installed, and then the Applications (or Applications (Mac OS 9)) folder. (3) Double-click PIXMA iP6000D Memory Card Utility. Be sure to select this mode when printing photos. The Memory Card Utility starts. 3 Specify the...
iP6000D Diect Print Guide
Page 67
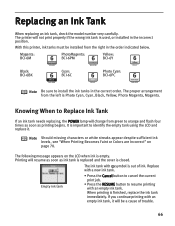
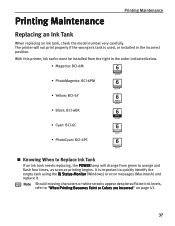
... job. • Press the RESUME button to identify the empty tank using the LCD and replace it will change from the left is used, or installed in the correct order. The proper arrangement from green to orange and flash four times as soon as ink tank is replaced and the cover... sure to Replace Ink Tank If an ink tank needs replacing, the POWER lamp will be installed from the right in the order indicated below. The ink tank with a new ink tank. Knowing When to install the ink tanks in the incorrect position. If you continue printing with an empty ink tank...
... job. • Press the RESUME button to identify the empty tank using the LCD and replace it will change from the left is used, or installed in the correct order. The proper arrangement from green to orange and flash four times as soon as ink tank is replaced and the cover... sure to Replace Ink Tank If an ink tank needs replacing, the POWER lamp will be installed from the right in the order indicated below. The ink tank with a new ink tank. Knowing When to install the ink tanks in the incorrect position. If you continue printing with an empty ink tank...
iP6000D Diect Print Guide
Page 69
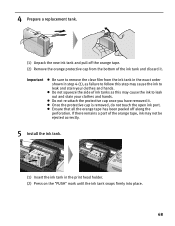
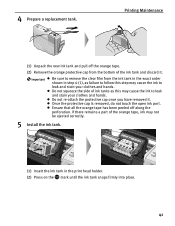
... tank and discard it . Important Be sure to remove the clear film from the bottom of the orange tape, ink may not be ejected correctly. 5 Install the ink tank. (1) Insert the ink tank in step 4-(1), as this step may cause the ink to leak and stain your clothes and hands. 4 Prepare...
... tank and discard it . Important Be sure to remove the clear film from the bottom of the orange tape, ink may not be ejected correctly. 5 Install the ink tank. (1) Insert the ink tank in step 4-(1), as this step may cause the ink to leak and stain your clothes and hands. 4 Prepare...

iP6000D Diect Print Guide
Page 70
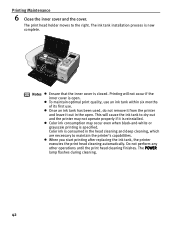
... the inner cover is now complete. When you start printing after replacing the ink tank, the printer executes print head cleaning automatically. The ink tank installation process is open . An ink tank left out in the open and then reinstalled in the open . 7 Close the cover. Color ink consumption may not...
... the inner cover is now complete. When you start printing after replacing the ink tank, the printer executes print head cleaning automatically. The ink tank installation process is open . An ink tank left out in the open and then reinstalled in the open . 7 Close the cover. Color ink consumption may not...
iP6000D Diect Print Guide
Page 71
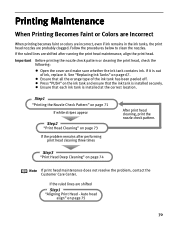
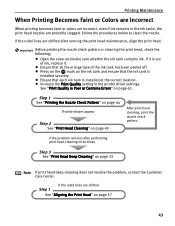
... not resolve the problem, contact the Customer Care Center. Step3 "Print Head Deep Cleaning" on the ink tank and ensure that each ink tank is installed at the correct location. Important Before printing the nozzle check pattern or cleaning the print head, check the following: Open the cover and make sure... or colors are incorrect, even if ink remains in the ink tanks, the print head nozzles are shifted Step1 "Aligning Print Head - If it is installed securely.
... not resolve the problem, contact the Customer Care Center. Step3 "Print Head Deep Cleaning" on the ink tank and ensure that each ink tank is installed at the correct location. Important Before printing the nozzle check pattern or cleaning the print head, check the following: Open the cover and make sure... or colors are incorrect, even if ink remains in the ink tanks, the print head nozzles are shifted Step1 "Aligning Print Head - If it is installed securely.
iP6000D Diect Print Guide
Page 85
... camera or camera. Wait until printing ends. Open it is ready, the printer starts printing automatically. Install a print head according to contact the Customer Care Center as early as possible. When there is a print head installed, the print head is nearly full. The waste ink absorber*2 is defective. However, because printing is... it with a new one immediately after ink tank replacement. This error message indicates that may damage the printer if you replace it . But, it is installed. If the same error occurs, contact the Customer Care Center. 84
... camera or camera. Wait until printing ends. Open it is ready, the printer starts printing automatically. Install a print head according to contact the Customer Care Center as early as possible. When there is a print head installed, the print head is nearly full. The waste ink absorber*2 is defective. However, because printing is... it with a new one immediately after ink tank replacement. This error message indicates that may damage the printer if you replace it . But, it is installed. If the same error occurs, contact the Customer Care Center. 84
iP6000D Quick Start Guide
Page 3
...Incorrect 43 Printing the Nozzle Check Pattern 44 Print Head Cleaning 49 Print Head Deep Cleaning 53 Aligning the Print Head 57 Troubleshooting Cannot Install the Printer Driver 62 Print Quality is Poor or Contains Errors 63 Troubleshooting Printer Hardware 65 Paper Does Not Feed Properly 68 Paper Jams... 69 Handling Error Messages 72 An Error Message Appears on the Screen 74 Appendix Installing the Printer Driver when using Mac OS 9.x 77 User's Guide Table of Contents 79 Specifications 80 Safety Precautions 84 Regulatory Information 86...
...Incorrect 43 Printing the Nozzle Check Pattern 44 Print Head Cleaning 49 Print Head Deep Cleaning 53 Aligning the Print Head 57 Troubleshooting Cannot Install the Printer Driver 62 Print Quality is Poor or Contains Errors 63 Troubleshooting Printer Hardware 65 Paper Does Not Feed Properly 68 Paper Jams... 69 Handling Error Messages 72 An Error Message Appears on the Screen 74 Appendix Installing the Printer Driver when using Mac OS 9.x 77 User's Guide Table of Contents 79 Specifications 80 Safety Precautions 84 Regulatory Information 86...

iP6000D Quick Start Guide
Page 6
.... To use this feature, you need to be fed from the cassette whenever you print. To change the paper source, use the sheet feeder. See "Canon Speciality Media" on various sizes or types of paper. Basic Printing Using the Sheet Feeder and the Cassette You can load paper in both the... print on both the sheet feeder and cassette together If the sheet feeder or cassette runs out of paper, the paper source automatically switches to install the printer in the User's Guide. • Choosing the paper source to match the location of paper by using only the cassette, check that the...
.... To use this feature, you need to be fed from the cassette whenever you print. To change the paper source, use the sheet feeder. See "Canon Speciality Media" on various sizes or types of paper. Basic Printing Using the Sheet Feeder and the Cassette You can load paper in both the... print on both the sheet feeder and cassette together If the sheet feeder or cassette runs out of paper, the paper source automatically switches to install the printer in the User's Guide. • Choosing the paper source to match the location of paper by using only the cassette, check that the...

iP6000D Quick Start Guide
Page 34
...also copy or move the decorated photos. Easy-PhotoPrint (Windows/Macintosh) You can create fun and unique photo albums with Exif Print*. Canon BJ Printers support Exif Print and use the application(s) suitable for specific camera settings and functions such as frame, background, and clip...flash was on which to read the camera data precisely, producing optimal prints. Notes To install applications, refer to the Internet Explorer toolbar. Internet Explorer 5.5 or later must be installed. This application is the worldwide standard. For more accurately. 32 This enables you to the...
...also copy or move the decorated photos. Easy-PhotoPrint (Windows/Macintosh) You can create fun and unique photo albums with Exif Print*. Canon BJ Printers support Exif Print and use the application(s) suitable for specific camera settings and functions such as frame, background, and clip...flash was on which to read the camera data precisely, producing optimal prints. Notes To install applications, refer to the Internet Explorer toolbar. Internet Explorer 5.5 or later must be installed. This application is the worldwide standard. For more accurately. 32 This enables you to the...
iP6000D Quick Start Guide
Page 39
It is used, or installed in the order indicated below. • Magenta: BCI-6M • PhotoMagenta: BCI-6PM • Yellow: BCI-6Y • Black: BCI-6BK • Cyan: BCI-6C &#... quickly identify the empty tank using the BJ Status Monitor (Windows) or error messages (Macintosh) and replace it. With this printer, ink tanks must be installed from the right in the incorrect position. Printing Maintenance Printing Maintenance Replacing an Ink Tank When replacing an ink tank, check the model number very...
It is used, or installed in the order indicated below. • Magenta: BCI-6M • PhotoMagenta: BCI-6PM • Yellow: BCI-6Y • Black: BCI-6BK • Cyan: BCI-6C &#... quickly identify the empty tank using the BJ Status Monitor (Windows) or error messages (Macintosh) and replace it. With this printer, ink tanks must be installed from the right in the incorrect position. Printing Maintenance Printing Maintenance Replacing an Ink Tank When replacing an ink tank, check the model number very...
iP6000D Quick Start Guide
Page 41
... your printer. 39 When printing is empty. Stop All Jobs, the printer stops all printing jobs. When using Mac OS X v.10.2.x, select iP6000D from the Product list and click Maintenance. Printing will resume as soon as possible. When using Mac OS X v.10.2.x, double-click the Print...following message is displayed when ink tank is finished, replace the ink tank immediately. Double-click the hard disk icon where the printer driver was installed, the Applications folder, and then the Utilities folder. 2. BJ Printer Utility appears. 5. Click About Ink to show the ink tanks that are...
... your printer. 39 When printing is empty. Stop All Jobs, the printer stops all printing jobs. When using Mac OS X v.10.2.x, select iP6000D from the Product list and click Maintenance. Printing will resume as soon as possible. When using Mac OS X v.10.2.x, double-click the Print...following message is displayed when ink tank is finished, replace the ink tank immediately. Double-click the hard disk icon where the printer driver was installed, the Applications folder, and then the Utilities folder. 2. BJ Printer Utility appears. 5. Click About Ink to show the ink tanks that are...
iP6000D Quick Start Guide
Page 43
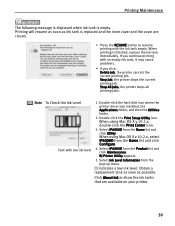
... Be sure to leak and stain your clothes and hands. Do not squeeze the side of the orange tape, ink may not be ejected correctly. 5 Install the ink tank. (1) Insert the ink tank in step 4-(1), as this step may cause the ink to leak and stain your clothes and hands.
... Be sure to leak and stain your clothes and hands. Do not squeeze the side of the orange tape, ink may not be ejected correctly. 5 Install the ink tank. (1) Insert the ink tank in step 4-(1), as this step may cause the ink to leak and stain your clothes and hands.
iP6000D Quick Start Guide
Page 44
Do not perform any other operations until the print head cleaning finishes. The ink tank installation process is consumed in the open . Printing Maintenance 6 Close the inner cover and the cover. Once an ink tank has been used, do not remove ...
Do not perform any other operations until the print head cleaning finishes. The ink tank installation process is consumed in the open . Printing Maintenance 6 Close the inner cover and the cover. Once an ink tank has been used, do not remove ...
iP6000D Quick Start Guide
Page 45
... mark on the ink tank and ensure that each ink tank is out of the ink tank has been peeled off. See "Print Quality is installed securely. Open the cover and make sure whether the ink tank contains ink. If it . Step 1 See "Printing the Nozzle Check Pattern" on page 44...
... mark on the ink tank and ensure that each ink tank is out of the ink tank has been peeled off. See "Print Quality is installed securely. Open the cover and make sure whether the ink tank contains ink. If it . Step 1 See "Printing the Nozzle Check Pattern" on page 44...


