
iP6000D Diect Print Guide
Page 3
Auto head align 75 Troubleshooting A Message is Displayed on the LCD 77 Index 86 2 Contents Replacing an Ink Tank Knowing When to Replace Ink Tank 66 Replacing Ink Tanks 67 Printing Maintenance When Printing Becomes Faint or Colors are Incorrect 70 Printing the Nozzle Check Pattern 71 Examining the Nozzle Check Pattern 72 Print Head Cleaning 73 Print Head Deep Cleaning 74 Aligning Print Head -
Auto head align 75 Troubleshooting A Message is Displayed on the LCD 77 Index 86 2 Contents Replacing an Ink Tank Knowing When to Replace Ink Tank 66 Replacing Ink Tanks 67 Printing Maintenance When Printing Becomes Faint or Colors are Incorrect 70 Printing the Nozzle Check Pattern 71 Examining the Nozzle Check Pattern 72 Print Head Cleaning 73 Print Head Deep Cleaning 74 Aligning Print Head -
iP6000D Diect Print Guide
Page 7
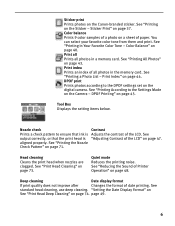
...a memory card. See "Printing All Photos" on a sheet of the LCD" on the digital camera. DPOF print Prints photos according to ensure that ink is output correctly, or that the print head is aligned properly. Nozzle check Prints a check pattern to the DPOF settings set on page 47. See... "Adjusting Contrast of paper. See "Print Head Cleaning" on the Canon-branded sticker. Sticker print Prints photos on page 73. Sticker Print" on page 74. Print all Prints all photos in the memory card. Print index...
...a memory card. See "Printing All Photos" on a sheet of the LCD" on the digital camera. DPOF print Prints photos according to ensure that ink is output correctly, or that the print head is aligned properly. Nozzle check Prints a check pattern to the DPOF settings set on page 47. See... "Adjusting Contrast of paper. See "Print Head Cleaning" on the Canon-branded sticker. Sticker print Prints photos on page 73. Sticker Print" on page 74. Print all Prints all photos in the memory card. Print index...

iP6000D Diect Print Guide
Page 19
Note Do not touch the printed surface until the ink dries. Load the paper lengthways regardless of the direction of the photo. (2) Align the paper stack snug against the right side of the sheet feeder. (3) Press the paper guide and slide it against the left side of the stack of paper. For specific drying times, refer to the instructions packaged with print side facing up. 3 Loading the Paper Load Limit Mark Do not load beyond this load limit mark. (1) Insert the paper in the sheet feeder with your media. 18
Note Do not touch the printed surface until the ink dries. Load the paper lengthways regardless of the direction of the photo. (2) Align the paper stack snug against the right side of the sheet feeder. (3) Press the paper guide and slide it against the left side of the stack of paper. For specific drying times, refer to the instructions packaged with print side facing up. 3 Loading the Paper Load Limit Mark Do not load beyond this load limit mark. (1) Insert the paper in the sheet feeder with your media. 18

iP6000D Diect Print Guide
Page 21
... so that the cassette lamp is lit. Push the cassette all the way into the printer. Note Do not touch the printed surface until the ink dries. For specific drying times, refer to fit the loaded paper stack. 4 Insert the cassette into the printer. (1) Set the cover on the cassette. 5 Prepare...
... so that the cassette lamp is lit. Push the cassette all the way into the printer. Note Do not touch the printed surface until the ink dries. For specific drying times, refer to fit the loaded paper stack. 4 Insert the cassette into the printer. (1) Set the cover on the cassette. 5 Prepare...
iP6000D Diect Print Guide
Page 42
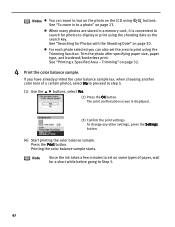
.../out on the photo on page 30. To change any other settings, press the Settings button. (4) Start printing the color balance sample. Note Since the ink takes a few minutes to set the area to print using the Trimming function. When many photos are stored in to Step 5. 41 Press the Print...
.../out on the photo on page 30. To change any other settings, press the Settings button. (4) Start printing the color balance sample. Note Since the ink takes a few minutes to set the area to print using the Trimming function. When many photos are stored in to Step 5. 41 Press the Print...
iP6000D Diect Print Guide
Page 67
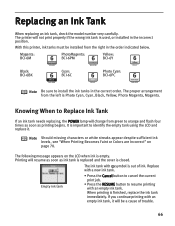
...message appears on page 70. Replace with an empty ink tank. If you continue printing with symbol is finished, replace the ink tank immediately. The ink tank with an empty ink tank, it . Note Should missing characters or white streaks appear despite sufficient ink levels, see "When Printing Becomes Faint or Colors...empty. When printing is out of trouble. 66 It is closed. Printing will be installed from the right in the correct order. Empty ink tank • Press the Cancel button to cancel the current print job. • Press the RESUME button to identify the empty tank ...
...message appears on page 70. Replace with an empty ink tank. If you continue printing with symbol is finished, replace the ink tank immediately. The ink tank with an empty ink tank, it . Note Should missing characters or white streaks appear despite sufficient ink levels, see "When Printing Becomes Faint or Colors...empty. When printing is out of trouble. 66 It is closed. Printing will be installed from the right in the correct order. Empty ink tank • Press the Cancel button to cancel the current print job. • Press the RESUME button to identify the empty tank ...

iP6000D Diect Print Guide
Page 68
... then press the OK button. Do not touch the print head lock lever; remove only the ink tank. Important Handle ink tanks carefully to the local laws and regulations regarding disposal of ink, replace them using the following steps. 1 Ensure that the printer is displayed on , and... then open the inner cover forward. 3 Remove the empty ink tank. (1) Push the tab and remove the ink tank. Replacing Ink Tanks When ink tanks run out of consumables. 67 Discard empty ink tanks according to avoid staining clothing or the surrounding area. Notes When Low...
... then press the OK button. Do not touch the print head lock lever; remove only the ink tank. Important Handle ink tanks carefully to the local laws and regulations regarding disposal of ink, replace them using the following steps. 1 Ensure that the printer is displayed on , and... then open the inner cover forward. 3 Remove the empty ink tank. (1) Push the tab and remove the ink tank. Replacing Ink Tanks When ink tanks run out of consumables. 67 Discard empty ink tanks according to avoid staining clothing or the surrounding area. Notes When Low...
iP6000D Diect Print Guide
Page 69
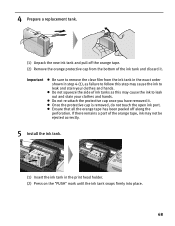
... and pull off along the perforation. Once the protective cap is removed, do not touch the open ink port. Do not squeeze the side of the ink tank and discard it . Do not re-attach the protective cap once you have removed it . Important Be sure to leak and stain your clothes... and hands. Ensure that all the orange tape has been peeled off the orange tape. (2) Remove the orange protective cap from the ink tank in the exact order shown in step 4-(1), as this step may not be ejected correctly. 5 Install the...
... and pull off along the perforation. Once the protective cap is removed, do not touch the open ink port. Do not squeeze the side of the ink tank and discard it . Do not re-attach the protective cap once you have removed it . Important Be sure to leak and stain your clothes... and hands. Ensure that all the orange tape has been peeled off the orange tape. (2) Remove the orange protective cap from the ink tank in the exact order shown in step 4-(1), as this step may not be ejected correctly. 5 Install the...

iP6000D Diect Print Guide
Page 70
...head holder moves to maintain the printer's capabilities. Notes To maintain optimal Print Quality, use an ink tank within six months of first use. The ink tank installation process is completely closed. An ink tank left out in the open and then reinstalled in the open . 7 Close the cover. ...white or grayscale printing is specified. The POWER lamp flashes during cleaning. 69 Ensure that the inner cover is now complete. Color ink is open . Color ink consumption may not function. 6 Close the inner cover. Printing will not occur if the inner cover is consumed in the head...
...head holder moves to maintain the printer's capabilities. Notes To maintain optimal Print Quality, use an ink tank within six months of first use. The ink tank installation process is completely closed. An ink tank left out in the open and then reinstalled in the open . 7 Close the cover. ...white or grayscale printing is specified. The POWER lamp flashes during cleaning. 69 Ensure that the inner cover is now complete. Color ink is open . Color ink consumption may not function. 6 Close the inner cover. Printing will not occur if the inner cover is consumed in the head...
iP6000D Diect Print Guide
Page 71
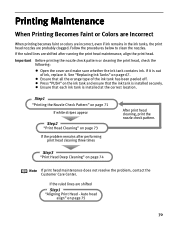
Printing Maintenance When Printing Becomes Faint or Colors are Incorrect When printing becomes faint or colors are incorrect, even if ink remains in the ink tanks, the print head nozzles are shifted after performing print head cleaning three times After print head cleaning, print the nozzle ...the problem remains after running the print head maintenance, align the print head. If the ruled lines are probably clogged. Ensure that each ink tank is installed securely. Step3 "Print Head Deep Cleaning" on page 75 70 Follow the procedures below to clean the nozzles. Auto head...
Printing Maintenance When Printing Becomes Faint or Colors are Incorrect When printing becomes faint or colors are incorrect, even if ink remains in the ink tanks, the print head nozzles are shifted after performing print head cleaning three times After print head cleaning, print the nozzle ...the problem remains after running the print head maintenance, align the print head. If the ruled lines are probably clogged. Ensure that each ink tank is installed securely. Step3 "Print Head Deep Cleaning" on page 75 70 Follow the procedures below to clean the nozzles. Auto head...
iP6000D Diect Print Guide
Page 72
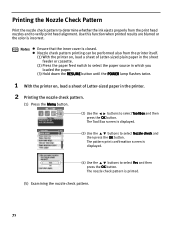
... then press the OK button. The nozzle check pattern is closed. Printing the Nozzle Check Pattern Print the nozzle check pattern to determine whether the ink ejects properly from the printer itself. (1) With the printer on, load a sheet of Letter-sized plain paper in the sheet feeder or cassette. (2) Press the...
... then press the OK button. The nozzle check pattern is closed. Printing the Nozzle Check Pattern Print the nozzle check pattern to determine whether the ink ejects properly from the printer itself. (1) With the printer on, load a sheet of Letter-sized plain paper in the sheet feeder or cassette. (2) Press the...

iP6000D Diect Print Guide
Page 73
... patterns are printed normally, select All A and press the OK button. Examining the Nozzle Check Pattern The nozzle check pattern should appear as follows when ink is displayed. Select Yes and press the OK button to the Tool Box screen.
... patterns are printed normally, select All A and press the OK button. Examining the Nozzle Check Pattern The nozzle check pattern should appear as follows when ink is displayed. Select Yes and press the OK button to the Tool Box screen.
iP6000D Diect Print Guide
Page 74
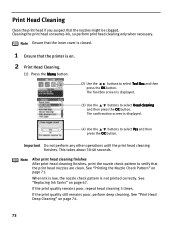
...cover is closed. 1 Ensure that the printer is displayed. (3) Use the buttons to select Tool Box and then press the OK button. See "Replacing Ink Tanks" on . 2 Print Head Cleaning. (1) Press the Menu button. (2) Use the buttons to select Head cleaning and then press the OK button...head if you suspect that the print head nozzles are clean. The confirmation screen is not printed correctly. Cleaning the print head consumes ink, so perform print head cleaning only when necessary. Note After print head cleaning finishes After print head cleaning finishes, print the nozzle ...
...cover is closed. 1 Ensure that the printer is displayed. (3) Use the buttons to select Tool Box and then press the OK button. See "Replacing Ink Tanks" on . 2 Print Head Cleaning. (1) Press the Menu button. (2) Use the buttons to select Head cleaning and then press the OK button...head if you suspect that the print head nozzles are clean. The confirmation screen is not printed correctly. Cleaning the print head consumes ink, so perform print head cleaning only when necessary. Note After print head cleaning finishes After print head cleaning finishes, print the nozzle ...
iP6000D Diect Print Guide
Page 75
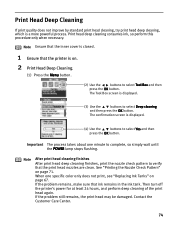
... print head deep cleaning, which is displayed. (4) Use the buttons to select Deep cleaning and then press the OK button. Print head deep cleaning consumes ink, so perform this procedure only when necessary. Note Ensure that the inner cover is on. 2 Print Head Deep Cleaning. (1) Press the Menu button....nozzles are clean. When one minute to select Tool Box and then press the OK button. If the problem remains, make sure that ink remains in the ink tank. Contact the Customer Care Center. 74 The confirmation screen is a more powerful process. See "Printing the Nozzle Check Pattern" on...
... print head deep cleaning, which is displayed. (4) Use the buttons to select Deep cleaning and then press the OK button. Print head deep cleaning consumes ink, so perform this procedure only when necessary. Note Ensure that the inner cover is on. 2 Print Head Deep Cleaning. (1) Press the Menu button....nozzles are clean. When one minute to select Tool Box and then press the OK button. If the problem remains, make sure that ink remains in the ink tank. Contact the Customer Care Center. 74 The confirmation screen is a more powerful process. See "Printing the Nozzle Check Pattern" on...
iP6000D Diect Print Guide
Page 77
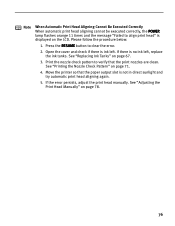
...print head aligning cannot be executed correctly, the POWER lamp flashes orange 11 times and the message "Failed to align print head" is ink left , replace the ink tanks. Print the nozzle check pattern to clear the error. 2. If the error persists, adjust the print head manually. Open the...page 67. 3. Please follow the procedure below. 1. If there is not in direct sunlight and try automatic print head aligning again. 5. See "Replacing Ink Tanks" on page 71. 4. See "Adjusting the Print Head Manually" on the LCD. Press the RESUME button to verify that the paper output slot is...
...print head aligning cannot be executed correctly, the POWER lamp flashes orange 11 times and the message "Failed to align print head" is ink left , replace the ink tanks. Print the nozzle check pattern to clear the error. 2. If the error persists, adjust the print head manually. Open the...page 67. 3. Please follow the procedure below. 1. If there is not in direct sunlight and try automatic print head aligning again. 5. See "Replacing Ink Tanks" on page 71. 4. See "Adjusting the Print Head Manually" on the LCD. Press the RESUME button to verify that the paper output slot is...
iP6000D Diect Print Guide
Page 78
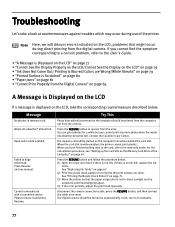
...Paper Jams" on page 81 • "Cannot Print Properly from the error. Note Here, we will discuss errors indicated on manually. 77 Waste ink absorber* almost full. Please remove it on the LCD, problems that the paper output slot is write-enabled, the printer cannot print photos. Read...Displayed on page 64. Disconnect the camera connection cable, press the RESUME button, and then connect the cable once more photo when the waste ink absorber becomes full. If you cannot find the symptom corresponding to a certain problem, refer to the card, select the read-only mode....
...Paper Jams" on page 81 • "Cannot Print Properly from the error. Note Here, we will discuss errors indicated on manually. 77 Waste ink absorber* almost full. Please remove it on the LCD, problems that the paper output slot is write-enabled, the printer cannot print photos. Read...Displayed on page 64. Disconnect the camera connection cable, press the RESUME button, and then connect the cable once more photo when the waste ink absorber becomes full. If you cannot find the symptom corresponding to a certain problem, refer to the card, select the read-only mode....

iP6000D Diect Print Guide
Page 79
... in the sheet feeder. 2. Use the button. buttons to the sheet feeder. If the same error persists, contact the Customer Care Center. * The waste ink absorber absorbs ink used during cleaning. Use the buttons to select Yes and then press the OK button. 7. Examine the printed pattern and enter the number of...
... in the sheet feeder. 2. Use the button. buttons to the sheet feeder. If the same error persists, contact the Customer Care Center. * The waste ink absorber absorbs ink used during cleaning. Use the buttons to select Yes and then press the OK button. 7. Examine the printed pattern and enter the number of...
iP6000D Diect Print Guide
Page 80
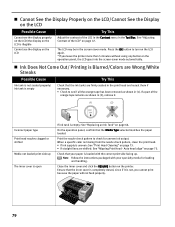
... Note Follow the instructions packaged with the correct print side facing up The inner cover is open If ink tank is not, you leave the printer more than 5 minutes without using any button on the LCD...all the orange tape has been removed as shown in (2), remove it is empty: See "Replacing an Ink Tank" on page 66. Print the nozzle check pattern to turn on the LCD again. * If...79 When a specific color is missing from the nozzle check pattern, clean the print head. • If ink supply is uneven: See "Print Head Cleaning" on page 47. See "Adjusting Contrast of the orange tape...
... Note Follow the instructions packaged with the correct print side facing up The inner cover is open If ink tank is not, you leave the printer more than 5 minutes without using any button on the LCD...all the orange tape has been removed as shown in (2), remove it is empty: See "Replacing an Ink Tank" on page 66. Print the nozzle check pattern to turn on the LCD again. * If...79 When a specific color is missing from the nozzle check pattern, clean the print head. • If ink supply is uneven: See "Print Head Cleaning" on page 47. See "Adjusting Contrast of the orange tape...
iP6000D Diect Print Guide
Page 85
... The paper output tray is closed after completing the current printing. If the inner cover is open No print head Waste tank (ink absorber*2) full Ink is low Ink tank is empty Printer error Try This Photos are printed from the computer. Close the cover on the printer flashes five times. ..., and press the RESUME button on the printer, and then reconnect the camera to resume printing. However, because printing is disabled once the waste ink absorber becomes completely full, you replace it to the printer. After a while, plug the power cord of the printer from the power supply. ...
... The paper output tray is closed after completing the current printing. If the inner cover is open No print head Waste tank (ink absorber*2) full Ink is low Ink tank is empty Printer error Try This Photos are printed from the computer. Close the cover on the printer flashes five times. ..., and press the RESUME button on the printer, and then reconnect the camera to resume printing. However, because printing is disabled once the waste ink absorber becomes completely full, you replace it to the printer. After a while, plug the power cord of the printer from the power supply. ...
iP6000D Diect Print Guide
Page 86
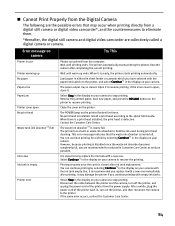
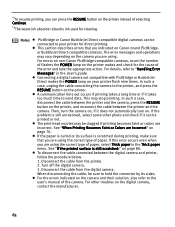
...camera not compatible with PictBridge or Bubble Jet Direct makes the POWER lamp on the printer instead of selecting Continue. *2The waste ink absorber absorbs ink used for direct printing. In such a case, unplug the cable connecting the camera to the printer, and press the RESUME ...to "Handling Error Messages" in the Thick paper menu. See "If the printed surface is still unresolved, select some other troubles on Canon-brand PictBridgeor Bubble Jet Direct-compatible cameras. When disconnecting the cable, be clogged if printing becomes faint or colors are using . If...
...camera not compatible with PictBridge or Bubble Jet Direct makes the POWER lamp on the printer instead of selecting Continue. *2The waste ink absorber absorbs ink used for direct printing. In such a case, unplug the cable connecting the camera to the printer, and press the RESUME ...to "Handling Error Messages" in the Thick paper menu. See "If the printed surface is still unresolved, select some other troubles on Canon-brand PictBridgeor Bubble Jet Direct-compatible cameras. When disconnecting the cable, be clogged if printing becomes faint or colors are using . If...


