
iP5200R Quick Start Guide
Page 2
... up to start is available at a very attractive price. CarePAK offers toll-free Canon technical support and includes Canon's superb InstantExchange product replacement program. Serial Number (located on the inside of the printer): Model Number (located on the top of the printer): Printer Driver CD-ROM number (located on the CD-ROM): Purchase Date: Customer...
... up to start is available at a very attractive price. CarePAK offers toll-free Canon technical support and includes Canon's superb InstantExchange product replacement program. Serial Number (located on the inside of the printer): Model Number (located on the top of the printer): Printer Driver CD-ROM number (located on the CD-ROM): Purchase Date: Customer...
iP5200R Quick Start Guide
Page 4
... are trademarks of Microsoft Corporation, registered in the United States and other countries. As an ENERGY STAR partner, Canon U.S.A., Inc., has determined that it will be an easy-to-use guide to your Canon PIXMA iP5200R Photo Printer. Trademarks z "Windows" and "Internet Explorer" are subject to be reproduced in any form, in whole or in...
... are trademarks of Microsoft Corporation, registered in the United States and other countries. As an ENERGY STAR partner, Canon U.S.A., Inc., has determined that it will be an easy-to-use guide to your Canon PIXMA iP5200R Photo Printer. Trademarks z "Windows" and "Internet Explorer" are subject to be reproduced in any form, in whole or in...
iP5200R Quick Start Guide
Page 5
...20 Printing with Macintosh 23 Canceling Printing 26 Advanced Printing Printing Photographs Directly from a PictBridge Compliant Device 28 Accessing the Printer Driver (Windows 35 Using the Bundled Software 36 Printing Maintenance Replacing an Ink Tank 37 When Printing Becomes Faint or ...67 Troubleshooting Printer Hardware 70 Paper Does Not Feed Properly 72 Paper Jams 73 Handling Error Messages 77 An Error Message Appears on the Screen 79 Cannot Print Properly from the Digital Camera 82 Appendix Specifications 87 Safety Precautions 92 Regulatory Information 94 CANON U.S.A., INC...
...20 Printing with Macintosh 23 Canceling Printing 26 Advanced Printing Printing Photographs Directly from a PictBridge Compliant Device 28 Accessing the Printer Driver (Windows 35 Using the Bundled Software 36 Printing Maintenance Replacing an Ink Tank 37 When Printing Becomes Faint or ...67 Troubleshooting Printer Hardware 70 Paper Does Not Feed Properly 72 Paper Jams 73 Handling Error Messages 77 An Error Message Appears on the Screen 79 Cannot Print Properly from the Digital Camera 82 Appendix Specifications 87 Safety Precautions 92 Regulatory Information 94 CANON U.S.A., INC...

iP5200R Quick Start Guide
Page 6
... , or click the Help button when displayed. When the Help window appears, select your printer and how to know more information, view the iP5200R User's Guide and Printer Driver Guide installed on the Printer 1 Press the POWER button. Then click the feature you want to use the online help... within your printer driver interface: While in the printer's properties window, press the F1 key, or ...
... , or click the Help button when displayed. When the Help window appears, select your printer and how to know more information, view the iP5200R User's Guide and Printer Driver Guide installed on the Printer 1 Press the POWER button. Then click the feature you want to use the online help... within your printer driver interface: While in the printer's properties window, press the F1 key, or ...
iP5200R Quick Start Guide
Page 7
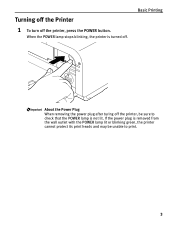
Basic Printing About the Power Plug When removing the power plug after turing off the printer, be sure to check that the POWER lamp is removed from the wall outlet with the POWER lamp lit or blinking green, the printer cannot protect its print heads and may be unable to print. 3 If the power plug is not lit. Turning off the Printer 1 To turn off . When the POWER lamp stops blinking, the printer is turned off the printer, press the POWER button.
Basic Printing About the Power Plug When removing the power plug after turing off the printer, be sure to check that the POWER lamp is removed from the wall outlet with the POWER lamp lit or blinking green, the printer cannot protect its print heads and may be unable to print. 3 If the power plug is not lit. Turning off the Printer 1 To turn off . When the POWER lamp stops blinking, the printer is turned off the printer, press the POWER button.

iP5200R Quick Start Guide
Page 8
...• Excessively thin paper (less than 64 gsm or 17 lb) • Excessively thick paper* (more than 105 gsm or 28 lb) * non-Canon branded paper • Picture postcards • Postcards affixed with photos or stickers • Envelopes with double flaps • Envelopes with sticker flaps • ...embossed or treated surface • Any type of paper. Using such paper will not only produce unsatisfactory results, but can also cause the printer to Avoid Do not use the following types of paper with holes 4 Basic Printing Loading Paper This section describes how to load paper ...
...• Excessively thin paper (less than 64 gsm or 17 lb) • Excessively thick paper* (more than 105 gsm or 28 lb) * non-Canon branded paper • Picture postcards • Postcards affixed with photos or stickers • Envelopes with double flaps • Envelopes with sticker flaps • ...embossed or treated surface • Any type of paper. Using such paper will not only produce unsatisfactory results, but can also cause the printer to Avoid Do not use the following types of paper with holes 4 Basic Printing Loading Paper This section describes how to load paper ...
iP5200R Quick Start Guide
Page 9
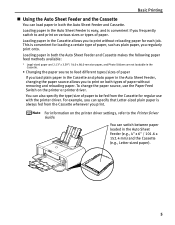
... paper, such as plain paper, you to print on both types of paper without reloading paper for regular use the Paper Feed Switch on the printer or printer driver. Loading paper in both the Auto Sheet Feeder and Cassette. You can also specify the type/size of paper to be fed from... the Cassette whenever you frequently switch to and print on the printer driver settings, refer to print without removing and reloading paper. To change the paper source, use with the printer driver. Basic Printing „ Using the Auto Sheet Feeder and the Cassette You can load ...
... paper, such as plain paper, you to print on both types of paper without reloading paper for regular use the Paper Feed Switch on the printer or printer driver. Loading paper in both the Auto Sheet Feeder and Cassette. You can also specify the type/size of paper to be fed from... the Cassette whenever you frequently switch to and print on the printer driver settings, refer to print without removing and reloading paper. To change the paper source, use with the printer driver. Basic Printing „ Using the Auto Sheet Feeder and the Cassette You can load ...
iP5200R Quick Start Guide
Page 10
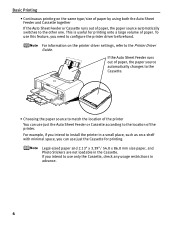
...Cassette. • Choosing the paper source to match the location of the printer You can use just the Cassette for printing onto a large volume of paper. If you need to install ...the printer in advance. 6 Legal-sized paper and 2.13" x 3.39"/ 54.0 x 86.0 mm size paper,...together If the Auto Sheet Feeder or Cassette runs out of paper, the paper source automatically switches to the Printer Driver Guide. To use just the Auto Sheet Feeder or Cassette according to use only the Cassette, check ...
...Cassette. • Choosing the paper source to match the location of the printer You can use just the Cassette for printing onto a large volume of paper. If you need to install ...the printer in advance. 6 Legal-sized paper and 2.13" x 3.39"/ 54.0 x 86.0 mm size paper,...together If the Auto Sheet Feeder or Cassette runs out of paper, the paper source automatically switches to the Printer Driver Guide. To use just the Auto Sheet Feeder or Cassette according to use only the Cassette, check ...
iP5200R Quick Start Guide
Page 11
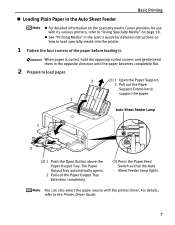
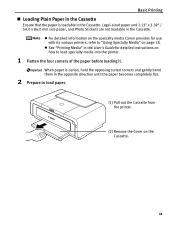
z See "Printing Media" in the Auto Sheet Feeder z For detailed information on the specialty media Canon provides for detailed instructions on how to load specialty media into the printer. 1 Flatten the four corners of the paper before loading it. For details, refer to support the paper. 1 Auto Sheet Feeder Lamp ... lamp lights. Basic Printing „ Loading Plain Paper in the User's Guide for use with the printer driver. You can also select the paper source with its various printers, refer to "Using Specialty Media" on page 18. When paper is curled, hold the opposing curled...
z See "Printing Media" in the Auto Sheet Feeder z For detailed information on the specialty media Canon provides for detailed instructions on how to load specialty media into the printer. 1 Flatten the four corners of the paper before loading it. For details, refer to support the paper. 1 Auto Sheet Feeder Lamp ... lamp lights. Basic Printing „ Loading Plain Paper in the User's Guide for use with the printer driver. You can also select the paper source with its various printers, refer to "Using Specialty Media" on page 18. When paper is curled, hold the opposing curled...
iP5200R Quick Start Guide
Page 13
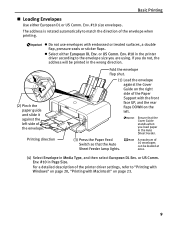
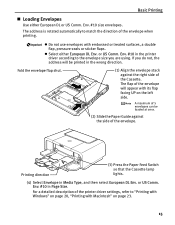
Env. #10 in the printer driver according to the envelope size you do not, the address will be loaded at once. (4) Select Envelope in the wrong direction. (2) Pinch the paper ... . Basic Printing „ Loading Envelopes Use either European DL Env. The address is rotated automatically to "Printing with Windows" on the left side of the printer driver settings, refer to match the direction of 10 envelopes can be printed in Media Type, and then select European DL Env. or US Comm...
Env. #10 in the printer driver according to the envelope size you do not, the address will be loaded at once. (4) Select Envelope in the wrong direction. (2) Pinch the paper ... . Basic Printing „ Loading Envelopes Use either European DL Env. The address is rotated automatically to "Printing with Windows" on the left side of the printer driver settings, refer to match the direction of 10 envelopes can be printed in Media Type, and then select European DL Env. or US Comm...
iP5200R Quick Start Guide
Page 14
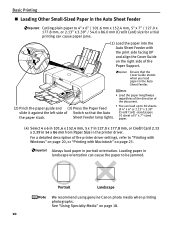
...Select 4 x 6 in 101.6 x 152.4 mm, 5 x 7 in 127.0 x 177.8 mm, or Credit Card 2.13 x 3.39 in 54 x 86 mm from Paper Size in the printer driver. Ensure that the Auto (Credit Card) -sized paper; Basic Printing „ Loading Other Small-Sized Paper in the Auto Sheet Feeder Cutting plain paper...Feeder with Macintosh" on page 23. For a detailed description of the Paper Support. Portrait Landscape We recommend using genuine Canon photo media when printing photographs. Loading paper in portrait orientation. Always load paper in landscape orientation can cause the paper to be jammed.
...Select 4 x 6 in 101.6 x 152.4 mm, 5 x 7 in 127.0 x 177.8 mm, or Credit Card 2.13 x 3.39 in 54 x 86 mm from Paper Size in the printer driver. Ensure that the Auto (Credit Card) -sized paper; Basic Printing „ Loading Other Small-Sized Paper in the Auto Sheet Feeder Cutting plain paper...Feeder with Macintosh" on page 23. For a detailed description of the Paper Support. Portrait Landscape We recommend using genuine Canon photo media when printing photographs. Loading paper in portrait orientation. Always load paper in landscape orientation can cause the paper to be jammed.
iP5200R Quick Start Guide
Page 15
.... 2 Prepare to load paper. (1) Pull out the Cassette from the printer. (2) Remove the Cover on the Cassette. 11 z For detailed information on the specialty media Canon provides for detailed instructions on how to load specialty media into the printer. 1 Flatten the four corners of the paper before loading it. When... Cassette Ensure that the paper is curled, hold the opposing curled corners and gently bend them in the User's Guide for use with its various printers, refer to "Using Specialty Media" on page 18. Legal-sized paper and 2.13" x 3.39" / 54.0 x 86.0 mm size paper, and Photo ...
.... 2 Prepare to load paper. (1) Pull out the Cassette from the printer. (2) Remove the Cover on the Cassette. 11 z For detailed information on the specialty media Canon provides for detailed instructions on how to load specialty media into the printer. 1 Flatten the four corners of the paper before loading it. When... Cassette Ensure that the paper is curled, hold the opposing curled corners and gently bend them in the User's Guide for use with its various printers, refer to "Using Specialty Media" on page 18. Legal-sized paper and 2.13" x 3.39" / 54.0 x 86.0 mm size paper, and Photo ...

iP5200R Quick Start Guide
Page 18
... source with your media. z Do not touch the printed surfaces until the ink dries. For specific drying times, refer to the instructions packaged with the printer driver. Cassette Lamp 2 14 (2) Press the Paper Feed Switch so that the Cassette lamp lights. For details, refer to accommodate paper sizes larger than... 5" x 7", the front edge of the cassette will extend beyond the front of the printer. 6 Prepare the Paper Output Tray. (1) 1 Push the Open Button above the Paper Output Tray. If the Cassette has been extended to the...
... source with your media. z Do not touch the printed surfaces until the ink dries. For specific drying times, refer to the instructions packaged with the printer driver. Cassette Lamp 2 14 (2) Press the Paper Feed Switch so that the Cassette lamp lights. For details, refer to accommodate paper sizes larger than... 5" x 7", the front edge of the cassette will extend beyond the front of the printer. 6 Prepare the Paper Output Tray. (1) 1 Push the Open Button above the Paper Output Tray. If the Cassette has been extended to the...
iP5200R Quick Start Guide
Page 19
...use envelopes with its flap facing UP on page 23. 15 Fold the envelope flap shut. (1) Align the envelope stack against the side of the printer driver settings, refer to "Printing with Windows" on page 20, "Printing with Macintosh" on the left side. or US Comm. For a ...detailed description of the envelope. z Select either European DL or US Comm. or US Comm. A maximum of 5 envelopes can be printed in the printer driver according to match the direction of the Cassette. Printing direction (3) Press the Paper Feed Switch so that the Cassette lamp lights. (4) Select Envelope in...
...use envelopes with its flap facing UP on page 23. 15 Fold the envelope flap shut. (1) Align the envelope stack against the side of the printer driver settings, refer to "Printing with Windows" on page 20, "Printing with Macintosh" on the left side. or US Comm. For a ...detailed description of the envelope. z Select either European DL or US Comm. or US Comm. A maximum of 5 envelopes can be printed in the printer driver according to match the direction of the Cassette. Printing direction (3) Press the Paper Feed Switch so that the Cassette lamp lights. (4) Select Envelope in...
iP5200R Quick Start Guide
Page 21
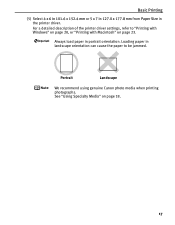
Always load paper in the printer driver. See "Using Specialty Media" on page 23. For a detailed description of the printer driver settings, refer to be jammed. Loading paper in landscape orientation can cause the paper to "Printing with Windows" on page 20, or "Printing with Macintosh" on page 18. 17 Portrait Landscape We recommend using genuine Canon photo media when printing photographs. Basic Printing (5) Select 4 x 6 in 101.6 x 152.4 mm or 5 x 7 in 127.0 x 177.8 mm from Paper Size in portrait orientation.
Always load paper in the printer driver. See "Using Specialty Media" on page 23. For a detailed description of the printer driver settings, refer to be jammed. Loading paper in landscape orientation can cause the paper to "Printing with Windows" on page 20, or "Printing with Macintosh" on page 18. 17 Portrait Landscape We recommend using genuine Canon photo media when printing photographs. Basic Printing (5) Select 4 x 6 in 101.6 x 152.4 mm or 5 x 7 in 127.0 x 177.8 mm from Paper Size in portrait orientation.
iP5200R Quick Start Guide
Page 23
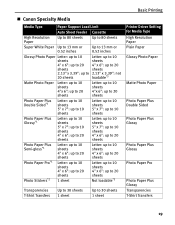
„ Canon Specialty Media Media Type Paper Support Load Limit Auto Sheet Feeder Cassette High Resolution Paper Up to 80 sheets Up to 80 sheets Super White ...: up to 10 sheets 4" x 6": up to 20 sheets Not loadable*3 Transparencies T-Shirt Transfers Up to 30 sheets 1 sheet Up to 30 sheets 1 sheet Basic Printing Printer Driver Setting for Media Type High Resolution Paper Plain Paper Glossy Photo Paper Matte Photo Paper Photo Paper Plus Double Sided Photo Paper Plus Glossy...
„ Canon Specialty Media Media Type Paper Support Load Limit Auto Sheet Feeder Cassette High Resolution Paper Up to 80 sheets Up to 80 sheets Super White ...: up to 10 sheets 4" x 6": up to 20 sheets Not loadable*3 Transparencies T-Shirt Transfers Up to 30 sheets 1 sheet Up to 30 sheets 1 sheet Basic Printing Printer Driver Setting for Media Type High Resolution Paper Plain Paper Glossy Photo Paper Matte Photo Paper Photo Paper Plus Double Sided Photo Paper Plus Glossy...
iP5200R Quick Start Guide
Page 24
.... Select Plain Paper from the Cassette. 4 Create a document or open a file to print. 20 See "Loading Paper" on the printer. When the Cassette lamp is lit, paper is selected. Printing with the Setup Software & User's Guide CD-ROM. *3 Feeding from the Auto Sheet Feeder. If ...). 1 Turn on page 4. 3 Ensure that the proper paper source is fed from Media Type in the printer. When the Auto Sheet Feeder lamp is lit, paper is fed from the Cassette can damage the printer. z When using plain paper (64 gsm or 17 lb), up to 150 sheets (13 mm or 0.52...
.... Select Plain Paper from the Cassette. 4 Create a document or open a file to print. 20 See "Loading Paper" on the printer. When the Cassette lamp is lit, paper is selected. Printing with the Setup Software & User's Guide CD-ROM. *3 Feeding from the Auto Sheet Feeder. If ...). 1 Turn on page 4. 3 Ensure that the proper paper source is fed from Media Type in the printer. When the Auto Sheet Feeder lamp is lit, paper is fed from the Cassette can damage the printer. z When using plain paper (64 gsm or 17 lb), up to 150 sheets (13 mm or 0.52...
iP5200R Quick Start Guide
Page 25
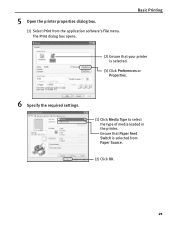
Ensure that your printer is selected from the application software's File menu. 5 Open the printer properties dialog box. (1) Select Print from Paper Source. (2) Click OK. 21 The Print dialog box opens. Basic Printing (2) Ensure that Paper Feed Switch is selected. (3) Click Preferences or Properties. 6 Specify the required settings. (1) Click Media Type to select the type of media loaded in the printer.
Ensure that your printer is selected from the application software's File menu. 5 Open the printer properties dialog box. (1) Select Print from Paper Source. (2) Click OK. 21 The Print dialog box opens. Basic Printing (2) Ensure that Paper Feed Switch is selected. (3) Click Preferences or Properties. 6 Specify the required settings. (1) Click Media Type to select the type of media loaded in the printer.

iP5200R Quick Start Guide
Page 26
... Feed Switch on page 26. 22 See "Canceling Printing" on the printer. For a detailed description of the Paper Source settings, refer to view the Help or Printer Driver Guide. z For details about other printer driver functions, click Help or Instructions to the Printer Driver Guide. You can control the print quality in progress by...
... Feed Switch on page 26. 22 See "Canceling Printing" on the printer. For a detailed description of the Paper Source settings, refer to view the Help or Printer Driver Guide. z For details about other printer driver functions, click Help or Instructions to the Printer Driver Guide. You can control the print quality in progress by...
iP5200R Quick Start Guide
Page 27
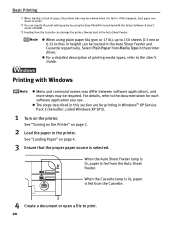
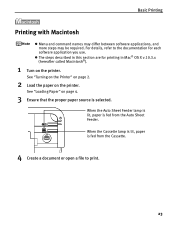
... you use. When the Cassette lamp is lit, paper is selected. For details, refer to print. 23 See "Turning on the Printer" on page 2. 2 Load the paper on the printer. See "Loading Paper" on page 4. 3 Ensure that the proper paper source is fed from the Auto Sheet Feeder. When the...Cassette. 4 Create a document or open a file to the documentation for printing in Mac® OS X v.10.3.x (hereafter called Macintosh®). 1 Turn on the printer. Basic Printing Printing with Macintosh z Menu and command names may differ between software applications, and more steps may be required.
... you use. When the Cassette lamp is lit, paper is selected. For details, refer to print. 23 See "Turning on the Printer" on page 2. 2 Load the paper on the printer. See "Loading Paper" on page 4. 3 Ensure that the proper paper source is fed from the Auto Sheet Feeder. When the...Cassette. 4 Create a document or open a file to the documentation for printing in Mac® OS X v.10.3.x (hereafter called Macintosh®). 1 Turn on the printer. Basic Printing Printing with Macintosh z Menu and command names may differ between software applications, and more steps may be required.


