Service Manual
Page 6
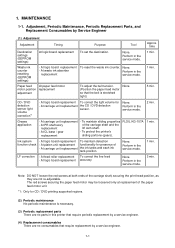
...- The red screws securing the paper feed motor may be loosened only at both ends of - 1. At logic board replacement To reset the waste ink counter. At carriage unit replacement the CD / DVD detection Perform in the service mode. 1 min. service mode....correction - Adjustment, Periodic Maintenance, Periodic Replacement Parts, and Replacement Consumables by a service engineer. 1-1 Perform in the sensor. Waste ink counter resetting (EEPROM settings) - Paper feed At paper feed motor motor position replacement adjustment To adjust the belt tension. (Position the paper feed motor...
...- The red screws securing the paper feed motor may be loosened only at both ends of - 1. At logic board replacement To reset the waste ink counter. At carriage unit replacement the CD / DVD detection Perform in the service mode. 1 min. service mode....correction - Adjustment, Periodic Maintenance, Periodic Replacement Parts, and Replacement Consumables by a service engineer. 1-1 Perform in the sensor. Waste ink counter resetting (EEPROM settings) - Paper feed At paper feed motor motor position replacement adjustment To adjust the belt tension. (Position the paper feed motor...
Service Manual
Page 17
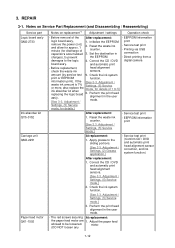
...and automatic print head alignment sensor correction, and ink system function.) After replacement: 1. Adjustment / Settings, (5) Service mode.] 3. Initialize the EEPROM. 2. Reset the waste ink counter. [See 3.3. Correct the CD / DVD and automatic print head alignment sensors. [See 3.3. Adjustment / Settings, (5) Service mode.]...Operation check Logic board ass'y QM2-2733 Ink absorber kit QY5-0152 Carriage unit QM2-2251 Paper feed motor QK1-1502 - Reset the waste ink counter. 3. Service test print - and automatic print - Check the ink system print or EEPROM function....
...and automatic print head alignment sensor correction, and ink system function.) After replacement: 1. Adjustment / Settings, (5) Service mode.] 3. Initialize the EEPROM. 2. Reset the waste ink counter. [See 3.3. Correct the CD / DVD and automatic print head alignment sensors. [See 3.3. Adjustment / Settings, (5) Service mode.]...Operation check Logic board ass'y QM2-2733 Ink absorber kit QY5-0152 Carriage unit QM2-2251 Paper feed motor QK1-1502 - Reset the waste ink counter. 3. Service test print - and automatic print - Check the ink system print or EEPROM function....

Service Manual
Page 29
... color: Perform from the printer driver Maintenance tab. Perform from the printer driver Maintenance tab. The standard amount for waste ink absorber replacement is replaced, reset the waste ink counter. Remarks Print head alignment Bottom plate cleaning - (3) Waste ink counter setting When the logic board ass'y is given in the table...
... color: Perform from the printer driver Maintenance tab. Perform from the printer driver Maintenance tab. The standard amount for waste ink absorber replacement is replaced, reset the waste ink counter. Remarks Print head alignment Bottom plate cleaning - (3) Waste ink counter setting When the logic board ass'y is given in the table...
Service Manual
Page 30
... listed in the table below . Destination - CD / DVD sensor correction value - Ink system function check result - For print sample, see 3-4. Destination settings - Waste ink counter reset See "Service mode operation procedures" below . The operation starts. CD / DVD sensor correction result Procedures See "Service mode operation procedures" below . Verification Items, (1) Service test...
... listed in the table below . Destination - CD / DVD sensor correction value - Ink system function check result - For print sample, see 3-4. Destination settings - Waste ink counter reset See "Service mode operation procedures" below . The operation starts. CD / DVD sensor correction result Procedures See "Service mode operation procedures" below . Verification Items, (1) Service test...
Service Manual
Page 31
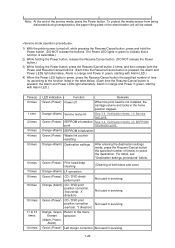
..., press and hold the Power button. (DO NOT release the buttons. Green (Power) EEPROM information See 3-4. Orange (Alarm) EEPROM initialization Green (Power) Waste ink counter resetting Orange (Alarm) Destination settings After entering the destination settings mode, press the Resume/Cancel button the specified number of time(s) to the function listed in...
..., press and hold the Power button. (DO NOT release the buttons. Green (Power) EEPROM information See 3-4. Orange (Alarm) EEPROM initialization Green (Power) Waste ink counter resetting Orange (Alarm) Destination settings After entering the destination settings mode, press the Resume/Cancel button the specified number of time(s) to the function listed in...
Service Manual
Page 59
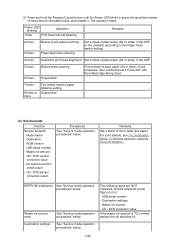
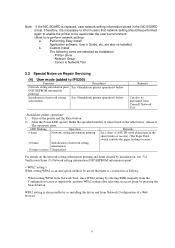
... screen is impossible, perform WPA2 setting after selecting an access point by re-installing the driver and from Canon IJ Network Tool 1) Turn on the printer and the Reset button. 2) After the Power LED (green) blinks the specified number of times listed in the table ...Remarks Can also be aware that there is necessary to inform users that network setting should be performed again to enable the printer to iP5200) Function Procedures Network setting information print See below. (NIC EEPROM information printing) Initialization of network setting See below , release it is...
... screen is impossible, perform WPA2 setting after selecting an access point by re-installing the driver and from Canon IJ Network Tool 1) Turn on the printer and the Reset button. 2) After the Power LED (green) blinks the specified number of times listed in the table ...Remarks Can also be aware that there is necessary to inform users that network setting should be performed again to enable the printer to iP5200) Function Procedures Network setting information print See below. (NIC EEPROM information printing) Initialization of network setting See below , release it is...


