iP5000 Quick Start Guide
Page 5
...Using Specialty Media 13 Printing with Windows 15 Printing with Macintosh 18 Canceling Printing 21 Advanced Printing Printing Photographs Directly from a Digital Camera 22 Accessing the Printer Driver 28 Adjusting the Print Quality for Photographs 29 Using the Bundled Software 37 Printing Borderless Photographs 38 Printing Maintenance Replacing an ... Not Feed Properly 71 Paper Jams 72 Handling Error Messages 75 An Error Message Appears on the Screen 77 Cannot Print Properly from the Digital Camera 80 Appendix Installing the Printer Driver When Using Mac OS 9 82 User's Guide Table...
...Using Specialty Media 13 Printing with Windows 15 Printing with Macintosh 18 Canceling Printing 21 Advanced Printing Printing Photographs Directly from a Digital Camera 22 Accessing the Printer Driver 28 Adjusting the Print Quality for Photographs 29 Using the Bundled Software 37 Printing Borderless Photographs 38 Printing Maintenance Replacing an ... Not Feed Properly 71 Paper Jams 72 Handling Error Messages 75 An Error Message Appears on the Screen 77 Cannot Print Properly from the Digital Camera 80 Appendix Installing the Printer Driver When Using Mac OS 9 82 User's Guide Table...
iP5000 Quick Start Guide
Page 6
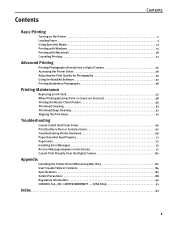
Clicking ? For more about each setting. While in the upper right corner. in the Page Setup dialog box or Print dialog box, click ? When the Help window appears, select your printer driver interface: While in the printer's properties window, press the F1 key, or click ?... use them. The POWER lamp flashes while the printer warms up and changes to know more information, view the iP5000 User's Guide on the Printer 1 Press the POWER button. Basic Printing Basic Printing This Quick Start Guide describes some of the features of your printer and how to use the online help within...
Clicking ? For more about each setting. While in the upper right corner. in the Page Setup dialog box or Print dialog box, click ? When the Help window appears, select your printer driver interface: While in the printer's properties window, press the F1 key, or click ?... use them. The POWER lamp flashes while the printer warms up and changes to know more information, view the iP5000 User's Guide on the Printer 1 Press the POWER button. Basic Printing Basic Printing This Quick Start Guide describes some of the features of your printer and how to use the online help within...
iP5000 Quick Start Guide
Page 7
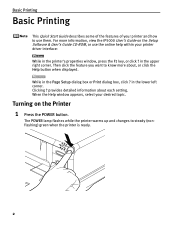
... gone out. Loading Paper This section describes how to "Handling Error Messages" on page 75. it is an exception; Sheet Feeder Cassette „ Print Media to jam or malfunction. • Folded, curled or wrinkled paper • Damp paper • Excessively thin paper (less than 64 gsm ...or 17 lb) • Excessively thick paper* (more than 105 gsm or 28 lb) * non-Canon branded paper • Picture postcards • Postcards affixed with photos or stickers • Envelopes with double flaps • Envelopes with sticker flaps • ...
... gone out. Loading Paper This section describes how to "Handling Error Messages" on page 75. it is an exception; Sheet Feeder Cassette „ Print Media to jam or malfunction. • Folded, curled or wrinkled paper • Damp paper • Excessively thin paper (less than 64 gsm ...or 17 lb) • Excessively thick paper* (more than 105 gsm or 28 lb) * non-Canon branded paper • Picture postcards • Postcards affixed with photos or stickers • Envelopes with double flaps • Envelopes with sticker flaps • ...
iP5000 Quick Start Guide
Page 8
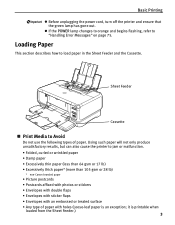
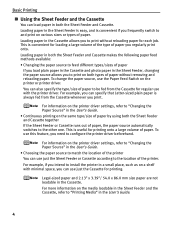
...the printer driver. For example, you can specify that Letter-sized plain paper is convenient for printing. To change the paper source, use just the Sheet Feeder or Cassette according to the location...You can also specify the type/size of paper to be fed from the Cassette whenever you to print on the printer or printer driver. For information on the printer driver settings, refer to "Changing ...in the Cassette and photo paper in the Sheet Feeder, changing the paper source allows you print. Basic Printing „ Using the Sheet Feeder and the Cassette You can load paper in both the...
...the printer driver. For example, you can specify that Letter-sized plain paper is convenient for printing. To change the paper source, use just the Sheet Feeder or Cassette according to the location...You can also specify the type/size of paper to be fed from the Cassette whenever you to print on the printer or printer driver. For information on the printer driver settings, refer to "Changing ...in the Cassette and photo paper in the Sheet Feeder, changing the paper source allows you print. Basic Printing „ Using the Sheet Feeder and the Cassette You can load paper in both the...
iP5000 Quick Start Guide
Page 9
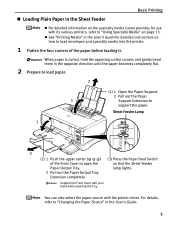
z See "Printing Media" in the User's Guide. 5 For details, refer to "Changing the Paper Source" in the User's Guide for...Output Tray. 2 Pull out the Paper Output Tray Extension completely. (3) Press the Paper Feed Switch so that the Sheet Feeder lamp lights. Basic Printing „ Loading Plain Paper in the opposite direction until the paper becomes completely flat. 2 Prepare to load paper. 2 (1) 1 Open the ...opposing curled corners and gently bend them in the Sheet Feeder z For detailed information on the specialty media Canon provides for detailed instructions on page 13.
z See "Printing Media" in the User's Guide. 5 For details, refer to "Changing the Paper Source" in the User's Guide for...Output Tray. 2 Pull out the Paper Output Tray Extension completely. (3) Press the Paper Feed Switch so that the Sheet Feeder lamp lights. Basic Printing „ Loading Plain Paper in the opposite direction until the paper becomes completely flat. 2 Prepare to load paper. 2 (1) 1 Open the ...opposing curled corners and gently bend them in the Sheet Feeder z For detailed information on the specialty media Canon provides for detailed instructions on page 13.

iP5000 Quick Start Guide
Page 10
Load Limit Mark Do not load beyond this Load Limit Mark. (3) Slide the paper guide against the left side of the paper stack. (1) Load the paper into the Sheet Feeder with the print side facing UP. (2) Align the paper stack against the right side of plain paper (64 gsm or 17 lb, 13 mm or 0.52 inches in height) in the Paper Output Tray. 6 However, do not stack more than 50 sheets in the Sheet Feeder. z You can load up to 150 sheets of the Sheet Feeder. z You can use general copy paper or Canon's Super White Paper SW-201. Basic Printing 3 Load the paper.
Load Limit Mark Do not load beyond this Load Limit Mark. (3) Slide the paper guide against the left side of the paper stack. (1) Load the paper into the Sheet Feeder with the print side facing UP. (2) Align the paper stack against the right side of plain paper (64 gsm or 17 lb, 13 mm or 0.52 inches in height) in the Paper Output Tray. 6 However, do not stack more than 50 sheets in the Sheet Feeder. z You can load up to 150 sheets of the Sheet Feeder. z You can use general copy paper or Canon's Super White Paper SW-201. Basic Printing 3 Load the paper.

iP5000 Quick Start Guide
Page 11
For a detailed description of the printer driver settings, refer to "Printing with Windows" on page 15, or "Printing with the print side facing UP and align the paper stack against the right side of the Sheet Feeder. • Load the paper lengthways regardless of the direction ... Sheet Feeder lamp lights. (2) Slide the paper guide against the left side of the paper stack. (4) Select 4" x 6" from Paper Size in the Sheet Feeder Basic Printing (1) Load the paper into the Sheet Feeder with Macintosh" on page 18. 7 „ Loading 4" x 6"-Sized Paper in the printer driver.
For a detailed description of the printer driver settings, refer to "Printing with Windows" on page 15, or "Printing with the print side facing UP and align the paper stack against the right side of the Sheet Feeder. • Load the paper lengthways regardless of the direction ... Sheet Feeder lamp lights. (2) Slide the paper guide against the left side of the paper stack. (4) Select 4" x 6" from Paper Size in the Sheet Feeder Basic Printing (1) Load the paper into the Sheet Feeder with Macintosh" on page 18. 7 „ Loading 4" x 6"-Sized Paper in the printer driver.
iP5000 Quick Start Guide
Page 12
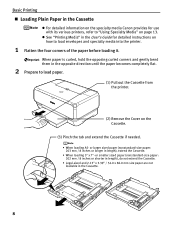
...), extend the Cassette. • When loading 5" x 7"- or larger sized paper (nonstandard-size paper: 203 mm / 8 inches or longer in the Cassette. 8 z See "Printing Media" in the User's Guide for use with its various printers, refer to "Using Specialty Media" on the Cassette. (3) Pinch the tab and extend the... paper is curled, hold the opposing curled corners and gently bend them in the Cassette z For detailed information on the specialty media Canon provides for detailed instructions on how to load paper. (1) Pull out the Cassette from the printer. (2) Remove the Cover on page 13. Basic...
...), extend the Cassette. • When loading 5" x 7"- or larger sized paper (nonstandard-size paper: 203 mm / 8 inches or longer in the Cassette. 8 z See "Printing Media" in the User's Guide for use with its various printers, refer to "Using Specialty Media" on the Cassette. (3) Pinch the tab and extend the... paper is curled, hold the opposing curled corners and gently bend them in the Cassette z For detailed information on the specialty media Canon provides for detailed instructions on how to load paper. (1) Pull out the Cassette from the printer. (2) Remove the Cover on page 13. Basic...

iP5000 Quick Start Guide
Page 13
z You can use general copy paper or Canon's Super White Paper SW-201. z You can load up to fit the loaded paper stack. Basic Printing Load Limit Mark Do not load beyond this Load Limit Mark. (1) Load the paper into the Cassette with the print side facing DOWN. (2) Align the paper stack against the right side of the Cassette. (3) Slide the paper guides to 150 sheets of plain paper (64 gsm or 17 lb, 13 mm or 0.52 inches in height) in the Paper Output Tray. 9 However, do not stack more than 50 sheets in the Cassette. 3 Load the paper.
z You can use general copy paper or Canon's Super White Paper SW-201. z You can load up to fit the loaded paper stack. Basic Printing Load Limit Mark Do not load beyond this Load Limit Mark. (1) Load the paper into the Cassette with the print side facing DOWN. (2) Align the paper stack against the right side of the Cassette. (3) Slide the paper guides to 150 sheets of plain paper (64 gsm or 17 lb, 13 mm or 0.52 inches in height) in the Paper Output Tray. 9 However, do not stack more than 50 sheets in the Cassette. 3 Load the paper.
iP5000 Quick Start Guide
Page 14
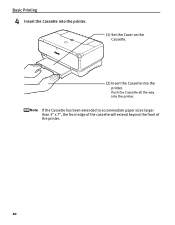
If the Cassette has been extended to accommodate paper sizes larger than 5" x 7", the front edge of the cassette will extend beyond the front of the printer. 10 Push the Cassette all the way into the printer. Basic Printing 4 Insert the Cassette into the printer. (1) Set the Cover on the Cassette. (2) Insert the Cassette into the printer.
If the Cassette has been extended to accommodate paper sizes larger than 5" x 7", the front edge of the cassette will extend beyond the front of the printer. 10 Push the Cassette all the way into the printer. Basic Printing 4 Insert the Cassette into the printer. (1) Set the Cover on the Cassette. (2) Insert the Cassette into the printer.
iP5000 Quick Start Guide
Page 15
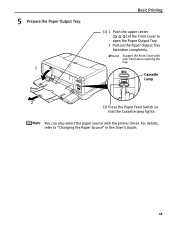
Support the Front Cover with the printer driver. You can also select the paper source with your hand when opening the tray. For details, refer to open the Paper Output Tray. 2 Pull out the Paper Output Tray Extension completely. Cassette Lamp 2 (2) Press the Paper Feed Switch so that the Cassette lamp lights. 5 Prepare the Paper Output Tray. 1 Basic Printing (1) 1 Push the upper center ( ) of the Front Cover to "Changing the Paper Source" in the User's Guide. 11
Support the Front Cover with the printer driver. You can also select the paper source with your hand when opening the tray. For details, refer to open the Paper Output Tray. 2 Pull out the Paper Output Tray Extension completely. Cassette Lamp 2 (2) Press the Paper Feed Switch so that the Cassette lamp lights. 5 Prepare the Paper Output Tray. 1 Basic Printing (1) 1 Push the upper center ( ) of the Front Cover to "Changing the Paper Source" in the User's Guide. 11

iP5000 Quick Start Guide
Page 16
.... (1) Load the paper into the Cassette with Macintosh" on page 18. 12 sized paper. (3) Slide the paper guides to "Printing with Windows" on page 15, or "Printing with the print side facing DOWN. (2) Align the paper stack against the right side of the Cassette. • Do not extend the Cassette. ... Switch so that the Cassette lamp lights. (5) Select 4" x 6" from Paper Size in the Cassette for a long time. For a detailed description of 4" x 6"- Basic Printing „ Loading 4" x 6"-Sized Paper in the Cassette Do not leave photo paper, such as Photo Paper Pro, in the printer driver.
.... (1) Load the paper into the Cassette with Macintosh" on page 18. 12 sized paper. (3) Slide the paper guides to "Printing with Windows" on page 15, or "Printing with the print side facing DOWN. (2) Align the paper stack against the right side of the Cassette. • Do not extend the Cassette. ... Switch so that the Cassette lamp lights. (5) Select 4" x 6" from Paper Size in the Cassette for a long time. For a detailed description of 4" x 6"- Basic Printing „ Loading 4" x 6"-Sized Paper in the Cassette Do not leave photo paper, such as Photo Paper Pro, in the printer driver.

iP5000 Quick Start Guide
Page 17
Basic Printing Using Specialty Media Canon recommends that you use genuine Canon media to ensure optimal print quality. „ Photo Quality Media • Photo Paper Pro • Photo Paper Plus Glossy • Photo Paper Plus Double Sided • Photo Paper Plus Semi-gloss • Matte Photo Paper • Glossy Photo Paper • High Resolution Paper „ Media Suited for Business Documents • High Resolution Paper • Transparencies 13
Basic Printing Using Specialty Media Canon recommends that you use genuine Canon media to ensure optimal print quality. „ Photo Quality Media • Photo Paper Pro • Photo Paper Plus Glossy • Photo Paper Plus Double Sided • Photo Paper Plus Semi-gloss • Matte Photo Paper • Glossy Photo Paper • High Resolution Paper „ Media Suited for Business Documents • High Resolution Paper • Transparencies 13
iP5000 Quick Start Guide
Page 18
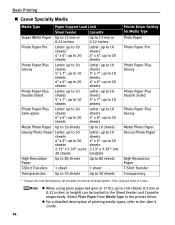
... types, refer to prevent sticking together. Basic Printing „ Canon Specialty Media Media Type Paper Support Load Limit Sheet Feeder Cassette Super White Paper Up to 13 mm or 0.52 inches Up to 13 mm ...
... types, refer to prevent sticking together. Basic Printing „ Canon Specialty Media Media Type Paper Support Load Limit Sheet Feeder Cassette Super White Paper Up to 13 mm or 0.52 inches Up to 13 mm ...
iP5000 Quick Start Guide
Page 19
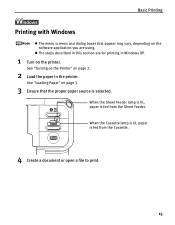
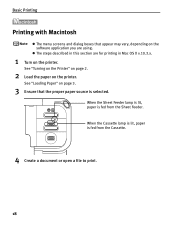
See "Loading Paper" on page 3. 3 Ensure that appear may vary, depending on the software application you are for printing in Windows XP. 1 Turn on page 2. 2 Load the paper in this section are using. See "Turning on the Printer" on the printer. When the Cassette lamp is lit, paper is fed from the Sheet Feeder. z The steps described in the printer. Basic Printing Printing with Windows z The menu screens and dialog boxes that the proper paper source is selected. When the Sheet Feeder lamp is lit, paper is fed from the Cassette. 4 Create a document or open a file to print. 15
See "Loading Paper" on page 3. 3 Ensure that appear may vary, depending on the software application you are for printing in Windows XP. 1 Turn on page 2. 2 Load the paper in this section are using. See "Turning on the Printer" on the printer. When the Cassette lamp is lit, paper is fed from the Sheet Feeder. z The steps described in the printer. Basic Printing Printing with Windows z The menu screens and dialog boxes that the proper paper source is selected. When the Sheet Feeder lamp is lit, paper is fed from the Cassette. 4 Create a document or open a file to print. 15

iP5000 Quick Start Guide
Page 20
The Print dialog box opens. (2) Ensure that Paper Feed Switch is selected. (3) Click Preferences or Properties. 6 Specify the required settings. (1) Click Media Type to select the type of media loaded in the printer. Ensure that your printer is selected from the application software's File menu. Basic Printing 5 Open the printer properties dialog box. (1) Select Print from Paper Source. (2) Click OK. 16
The Print dialog box opens. (2) Ensure that Paper Feed Switch is selected. (3) Click Preferences or Properties. 6 Specify the required settings. (1) Click Media Type to select the type of media loaded in the printer. Ensure that your printer is selected from the application software's File menu. Basic Printing 5 Open the printer properties dialog box. (1) Select Print from Paper Source. (2) Click OK. 16
iP5000 Quick Start Guide
Page 21
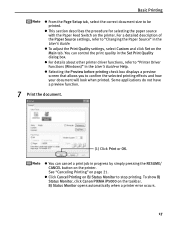
... the Paper Source settings, refer to confirm the selected printing effects and how your document will look when printed. Some applications do not have a preview function. 7 Print the document. (1) Click Print or OK. To show BJ Status Monitor, click Canon PIXMA iP5000 on the printer. z To adjust the Print Quality settings, select Custom and click Set on the...
... the Paper Source settings, refer to confirm the selected printing effects and how your document will look when printed. Some applications do not have a preview function. 7 Print the document. (1) Click Print or OK. To show BJ Status Monitor, click Canon PIXMA iP5000 on the printer. z To adjust the Print Quality settings, select Custom and click Set on the...
iP5000 Quick Start Guide
Page 22
... Cassette lamp is lit, paper is selected. See "Loading Paper" on page 3. 3 Ensure that appear may vary, depending on the software application you are for printing in this section are using. When the Sheet Feeder lamp is lit, paper is fed from the Cassette. 4 Create a document or open a file to...
... Cassette lamp is lit, paper is selected. See "Loading Paper" on page 3. 3 Ensure that appear may vary, depending on the software application you are for printing in this section are using. When the Sheet Feeder lamp is lit, paper is fed from the Cassette. 4 Create a document or open a file to...
iP5000 Quick Start Guide
Page 23
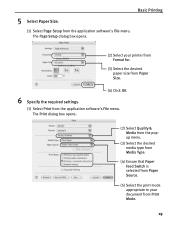
...Select the desired media type from Media Type. (4) Ensure that Paper Feed Switch is selected from Paper Source. (5) Select the print mode appropriate to your printer from Format for. (3) Select the desired paper size from Paper Size. (4) Click OK. 6 Specify the required settings.... (1) Select Print from the application software's File menu. Basic Printing (1) Select Page Setup from Print Mode. 19 5 Select Paper Size. The Page Setup dialog box opens. (2) Select your document from the application...
...Select the desired media type from Media Type. (4) Ensure that Paper Feed Switch is selected from Paper Source. (5) Select the print mode appropriate to your printer from Format for. (3) Select the desired paper size from Paper Size. (4) Click OK. 6 Specify the required settings.... (1) Select Print from the application software's File menu. Basic Printing (1) Select Page Setup from Print Mode. 19 5 Select Paper Size. The Page Setup dialog box opens. (2) Select your document from the application...
iP5000 Quick Start Guide
Page 24
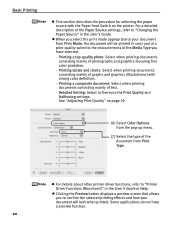
... displays a preview screen that allows you to "Changing the Paper Source" in the User's Guide or Help. Printing a top-quality photo: Select when printing documents consisting mainly of text. - Printing tables and charts: Select when printing documents consisting mainly of graphs and graphics (illustrations) with the Paper Feed Switch on page 29. (6) Select Color...
... displays a preview screen that allows you to "Changing the Paper Source" in the User's Guide or Help. Printing a top-quality photo: Select when printing documents consisting mainly of text. - Printing tables and charts: Select when printing documents consisting mainly of graphs and graphics (illustrations) with the Paper Feed Switch on page 29. (6) Select Color...


