iP5000 Quick Start Guide
Page 46
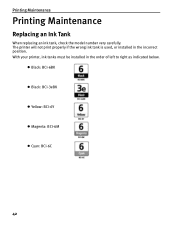
Printing Maintenance Printing Maintenance Replacing an Ink Tank When replacing an ink tank, check the model number very carefully. With your printer, ink tanks must be installed in the incorrect position. The printer will not print properly if the wrong ink tank is used, or installed in the order of left to right as indicated below. z Black: BCI-6BK z Black: BCI-3eBK z Yellow: BCI-6Y z Magenta: BCI-6M z Cyan: BCI-6C 42
Printing Maintenance Printing Maintenance Replacing an Ink Tank When replacing an ink tank, check the model number very carefully. With your printer, ink tanks must be installed in the incorrect position. The printer will not print properly if the wrong ink tank is used, or installed in the order of left to right as indicated below. z Black: BCI-6BK z Black: BCI-3eBK z Yellow: BCI-6Y z Magenta: BCI-6M z Cyan: BCI-6C 42
iP5000 Quick Start Guide
Page 58
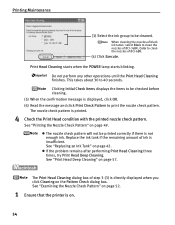
... Cleaning starts when the POWER lamp starts blinking. See "Printing the Nozzle Check Pattern" on page 42. When cleaning the nozzles of black ink tanks: select Black to clean the nozzles of BCI-3eBK, Color to clean the nozzles of step 3-(3) is on page 57. Do not perform any other ...operations until the Print Head Cleaning finishes. See "Replacing an Ink Tank" on page 49. Clicking Initial Check Items...
... Cleaning starts when the POWER lamp starts blinking. See "Printing the Nozzle Check Pattern" on page 42. When cleaning the nozzles of black ink tanks: select Black to clean the nozzles of BCI-3eBK, Color to clean the nozzles of step 3-(3) is on page 57. Do not perform any other ...operations until the Print Head Cleaning finishes. See "Replacing an Ink Tank" on page 49. Clicking Initial Check Items...
iP5000 Quick Start Guide
Page 59
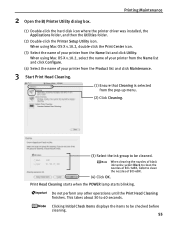
When cleaning the nozzles of black ink tanks: select Black to clean the nozzles of BCI-3eBK, Color to be cleaned. Print Head Cleaning starts when the POWER lamp starts blinking. Clicking Initial Check Items displays the items to clean the nozzles of your printer ... from the pop-up menu. (2) Click Cleaning. (3) Select the ink group to 40 seconds. Do not perform any other operations until the Print Head Cleaning finishes. Printing Maintenance (1) Double-click the hard disk icon where the printer driver was installed, the Applications folder, and then the Utilities folder. (2) Double-...
When cleaning the nozzles of black ink tanks: select Black to clean the nozzles of BCI-3eBK, Color to be cleaned. Print Head Cleaning starts when the POWER lamp starts blinking. Clicking Initial Check Items displays the items to clean the nozzles of your printer ... from the pop-up menu. (2) Click Cleaning. (3) Select the ink group to 40 seconds. Do not perform any other operations until the Print Head Cleaning finishes. Printing Maintenance (1) Double-click the hard disk icon where the printer driver was installed, the Applications folder, and then the Utilities folder. (2) Double-...
iP5000 Quick Start Guide
Page 61
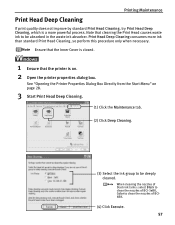
Ensure that the Inner Cover is closed. 1 Ensure that cleaning the Print Head causes waste ink to be deeply cleaned. When cleaning the nozzles of black ink tanks: select Black to clean the nozzles of BCI-3eBK, Color to clean the nozzles of BCI6BK. (4) Click Execute. 57 Note that the ...printer is a more ink than standard Print Head Cleaning, so perform this procedure only when necessary. See "Opening the Printer Properties...
Ensure that the Inner Cover is closed. 1 Ensure that cleaning the Print Head causes waste ink to be deeply cleaned. When cleaning the nozzles of black ink tanks: select Black to clean the nozzles of BCI-3eBK, Color to clean the nozzles of BCI6BK. (4) Click Execute. 57 Note that the ...printer is a more ink than standard Print Head Cleaning, so perform this procedure only when necessary. See "Opening the Printer Properties...
iP5000 Quick Start Guide
Page 63
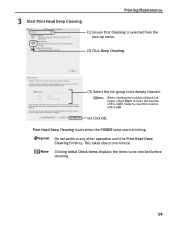
... Deep Cleaning. When cleaning the nozzles of black ink tanks: select Black to clean the nozzles of BCI-6BK. (4) Click OK. Printing Maintenance (1) Ensure that Cleaning is selected from the pop-up menu. (2) Click Deep Cleaning. (3) Select the ink group to be checked before cleaning. 59 Clicking... Initial Check Items displays the items to clean the nozzles of BCI-3eBK, Color to be deeply cleaned. This takes about one minute. Print Head Deep Cleaning starts when the POWER lamp starts blinking.
... Deep Cleaning. When cleaning the nozzles of black ink tanks: select Black to clean the nozzles of BCI-6BK. (4) Click OK. Printing Maintenance (1) Ensure that Cleaning is selected from the pop-up menu. (2) Click Deep Cleaning. (3) Select the ink group to be checked before cleaning. 59 Clicking... Initial Check Items displays the items to clean the nozzles of BCI-3eBK, Color to be deeply cleaned. This takes about one minute. Print Head Deep Cleaning starts when the POWER lamp starts blinking.
iP5000 Quick Start Guide
Page 89
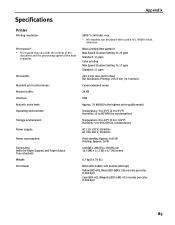
... Speed (Custom Setting 5): 17 ppm Standard: 11 ppm 203.2 mm max. (8.0 inches) (for Borderless Printing: 215.9 mm / 8.5 inches) Canon extended mode 34 KB USB Approx. 35 dB (A) (in the highest print quality mode) Temperature: 5 to 35°C (41 to 95°F) Humidity: 10 to 90%RH (no condensation) ...no condensation) AC 110-120 V, 50/60 Hz AC 220-240 V, 50/60 Hz Print standby: Approx. 0.65 W Printing: Approx. 16 W 418 (W) x 286 (D) x 170 (H) mm 16.5 (W) x 11.2 (D) x 6.7 (H) inches 6.7 kg (14.74 lb.) Black (BCI-3eBK): 320 nozzles (600 dpi) Yellow (BCI-6Y), Black (BCI-6BK): 256 nozzles per ...
... Speed (Custom Setting 5): 17 ppm Standard: 11 ppm 203.2 mm max. (8.0 inches) (for Borderless Printing: 215.9 mm / 8.5 inches) Canon extended mode 34 KB USB Approx. 35 dB (A) (in the highest print quality mode) Temperature: 5 to 35°C (41 to 95°F) Humidity: 10 to 90%RH (no condensation) ...no condensation) AC 110-120 V, 50/60 Hz AC 220-240 V, 50/60 Hz Print standby: Approx. 0.65 W Printing: Approx. 16 W 418 (W) x 286 (D) x 170 (H) mm 16.5 (W) x 11.2 (D) x 6.7 (H) inches 6.7 kg (14.74 lb.) Black (BCI-3eBK): 320 nozzles (600 dpi) Yellow (BCI-6Y), Black (BCI-6BK): 256 nozzles per ...
iP5000 Quick Start Guide
Page 90
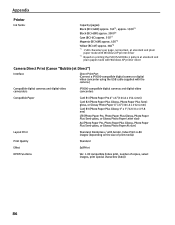
...-3eBK) approx. 740*1, approx. 1500*2 Black (BCI-6BK) approx. 2000*2 Cyan (BCI-6C) approx. 550*2 Magenta (BCI-6M) approx. 430*2 Yellow (BCI-6Y) approx. 360*2 *1 1500 characters per page, normal text, at standard and plain paper mode with Windows XP printer driver *2 Based on printing the... ISO JIS-SCID No.5 pattern at standard and plain paper mode with Windows XP printer driver Camera Direct Print (Canon "Bubble Jet Direct") Interface Direct Print Port (Connect a iP5000-compatible digital camera or digital video camcorder using the...
...-3eBK) approx. 740*1, approx. 1500*2 Black (BCI-6BK) approx. 2000*2 Cyan (BCI-6C) approx. 550*2 Magenta (BCI-6M) approx. 430*2 Yellow (BCI-6Y) approx. 360*2 *1 1500 characters per page, normal text, at standard and plain paper mode with Windows XP printer driver *2 Based on printing the... ISO JIS-SCID No.5 pattern at standard and plain paper mode with Windows XP printer driver Camera Direct Print (Canon "Bubble Jet Direct") Interface Direct Print Port (Connect a iP5000-compatible digital camera or digital video camcorder using the...
iP5000 Quick Start Guide
Page 97
...Media Type 14, 16, 19 Media Types Suitable for Photographs 29 Advanced Printing 22 Aligning the Print Head 61 An Error Message Appears on the Screen 77 Automatic Duplex Printing 78 B BCI-3eBK Black 42 BCI-6BK Black 42 BCI-6C Cyan 42 BCI-6M ...Print Head Cleaning 53 93 Index A Accessing the Printer Driver 28 Adjusting the Print Quality for Borderless Printing 38 N Nozzle Check 50, 51 Nozzle Check Pattern examining 52 printing 49 O Opening the Printer Properties Dialog Box Directly from the Start Menu 28 Opening the Printer Properties Dialog Box from the Digital Camera 80 CANON...
...Media Type 14, 16, 19 Media Types Suitable for Photographs 29 Advanced Printing 22 Aligning the Print Head 61 An Error Message Appears on the Screen 77 Automatic Duplex Printing 78 B BCI-3eBK Black 42 BCI-6BK Black 42 BCI-6C Cyan 42 BCI-6M ...Print Head Cleaning 53 93 Index A Accessing the Printer Driver 28 Adjusting the Print Quality for Borderless Printing 38 N Nozzle Check 50, 51 Nozzle Check Pattern examining 52 printing 49 O Opening the Printer Properties Dialog Box Directly from the Start Menu 28 Opening the Printer Properties Dialog Box from the Digital Camera 80 CANON...
iP5000 Easy Setup Instructions
Page 1
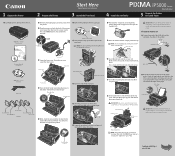
... ink tank into the correct slot. (Refer to the color guide on the print head lock lever.) Press down the serial number located to the right of the printer and connect the other to a power outlet. PIXMA iP5000 Series Photo Printer Photo Printer Series Quick Start Guide 1 Remove all items from ...tray. NOTE: To avoid spilling ink, never press on side two. USB Cable USB Port Documentation and Software Kit PIXMA iP5000 Series Print Head Power Cord BCI-6Y Yellow BCI-6BK Black BCI-3eBK Black Ink Tanks BCI-6M Magenta BCI-6C Cyan 3 Lower the front cover. Lower the inner cover. Remove the...
... ink tank into the correct slot. (Refer to the color guide on the print head lock lever.) Press down the serial number located to the right of the printer and connect the other to a power outlet. PIXMA iP5000 Series Photo Printer Photo Printer Series Quick Start Guide 1 Remove all items from ...tray. NOTE: To avoid spilling ink, never press on side two. USB Cable USB Port Documentation and Software Kit PIXMA iP5000 Series Print Head Power Cord BCI-6Y Yellow BCI-6BK Black BCI-3eBK Black Ink Tanks BCI-6M Magenta BCI-6C Cyan 3 Lower the front cover. Lower the inner cover. Remove the...


