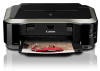
iP4820 series Getting Started
Page 2
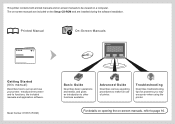
...and application software. The on-screen manuals are included on -screen manuals, refer to page 16. Troubleshooting Describes troubleshooting tips for problems you may encounter when using the printer. Printed Manual On-Screen Manuals Getting Started (this manual) Describes how to be viewed on... a computer. Model Number: K10357 (iP4820) Basic Guide Describes basic operations and media, and gives an introduction to make full use your printer. Advanced Guide Describes various ...
...and application software. The on-screen manuals are included on -screen manuals, refer to page 16. Troubleshooting Describes troubleshooting tips for problems you may encounter when using the printer. Printed Manual On-Screen Manuals Getting Started (this manual) Describes how to be viewed on... a computer. Model Number: K10357 (iP4820) Basic Guide Describes basic operations and media, and gives an introduction to make full use your printer. Advanced Guide Describes various ...
On-Screen Manual
Page 5
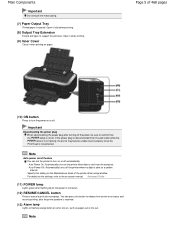
... paper. Open it when printing on or off automatically. - If the power plug is disconnected from printer error status and resume printing, after the printer problem is turned on the Maintenance sheet of 468 pages (10) ON button Press to turn the power on the printer when data is sent for...
... paper. Open it when printing on or off automatically. - If the power plug is disconnected from printer error status and resume printing, after the printer problem is turned on the Maintenance sheet of 468 pages (10) ON button Press to turn the power on the printer when data is sent for...
On-Screen Manual
Page 49
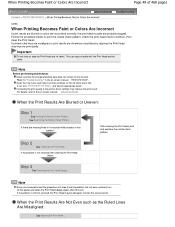
... . Increasing the print quality in the on -screen manual: Advanced Guide . Note When you have performed the procedure until step 3 and the problem has not been resolved, turn off the power and clean the Print Head deeply again after cleaning the Print Head twice: Step 3 See Cleaning the...Open the Top Cover and make sure that the orange protective tape does not remain on the ink tanks are probably clogged. If the problem is not resolved after 24 hours. When Printing Becomes Faint or Colors Are Incorrect Page 49 of 468 pages Advanced Guide Troubleshooting Contents > ...
... . Increasing the print quality in the on -screen manual: Advanced Guide . Note When you have performed the procedure until step 3 and the problem has not been resolved, turn off the power and clean the Print Head deeply again after cleaning the Print Head twice: Step 3 See Cleaning the...Open the Top Cover and make sure that the orange protective tape does not remain on the ink tanks are probably clogged. If the problem is not resolved after 24 hours. When Printing Becomes Faint or Colors Are Incorrect Page 49 of 468 pages Advanced Guide Troubleshooting Contents > ...
On-Screen Manual
Page 56
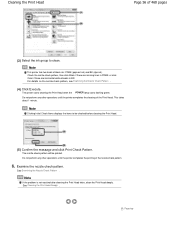
.... Do not perform any other operations until the printer completes the printing of the nozzle check pattern. 6. Examine the nozzle check pattern. Note If the problem is not resolved after cleaning the Print Head twice, clean the Print Head deeply. See Examining the Nozzle Check Pattern . Page top Note Clicking Initial...
.... Do not perform any other operations until the printer completes the printing of the nozzle check pattern. 6. Examine the nozzle check pattern. Note If the problem is not resolved after cleaning the Print Head twice, clean the Print Head deeply. See Examining the Nozzle Check Pattern . Page top Note Clicking Initial...

On-Screen Manual
Page 58
... flashing green. See step 1 in Examining the Nozzle Check Pattern . If a particular color is still not resolved, the Print Head may be damaged. If the problem is not printed properly, replace the ink tank of the nozzle check pattern. 6. This takes about 2 minutes 30 seconds. (6) Confirm the message and click Print.... Examine the nozzle check pattern. Page top Cleaning the Print Head Deeply Note Clicking Initial Check Items displays the items to be printed. If the problem is not resolved, turn off the power and clean the Print Head deeply again after 24 hours.
... flashing green. See step 1 in Examining the Nozzle Check Pattern . If a particular color is still not resolved, the Print Head may be damaged. If the problem is not printed properly, replace the ink tank of the nozzle check pattern. 6. This takes about 2 minutes 30 seconds. (6) Confirm the message and click Print.... Examine the nozzle check pattern. Page top Cleaning the Print Head Deeply Note Clicking Initial Check Items displays the items to be printed. If the problem is not resolved, turn off the power and clean the Print Head deeply again after 24 hours.

On-Screen Manual
Page 62
... load three or more sheets of A4 or Letter-sized plain paper in the direction of step 4. (2) Confirm the message and click OK. If the problem is cleaned. 6. rotate it . Do not perform any other operations until the printer completes the cleaning of 468 pages (2) Click OK. The printer starts cleaning... with the cotton swab. Cleaning the Paper Feed Roller Page 62 of the Paper Feed Roller. (3) When the completion message appears, click OK. If the problem is ejected.
... load three or more sheets of A4 or Letter-sized plain paper in the direction of step 4. (2) Confirm the message and click OK. If the problem is cleaned. 6. rotate it . Do not perform any other operations until the printer completes the cleaning of 468 pages (2) Click OK. The printer starts cleaning... with the cotton swab. Cleaning the Paper Feed Roller Page 62 of the Paper Feed Roller. (3) When the completion message appears, click OK. If the problem is ejected.

On-Screen Manual
Page 63
... the Cassette from the printer, and remove all the papers. 2. Cleaning the Pad in the Cassette Page 63 of paper may be ejected. If the problem is smeared with a moistened cotton swab. Page top Clean the Pad (A) sideways with paper powder or dirt, two or more sheets of 468 pages Contents...
... the Cassette from the printer, and remove all the papers. 2. Cleaning the Pad in the Cassette Page 63 of paper may be ejected. If the problem is smeared with a moistened cotton swab. Page top Clean the Pad (A) sideways with paper powder or dirt, two or more sheets of 468 pages Contents...

On-Screen Manual
Page 75
... the Computer Screen Error Number: B200 A printer error has occurred. Turn the printer off and then on CREATIVE PARK PREMIUM If You Cannot Resolve the Problem FAQs Instructions for more detail. Is Displayed Error Number: **** A printer error has occurred. Then contact the service center. iP4800 series Advanced Guide Page 75 of...
... the Computer Screen Error Number: B200 A printer error has occurred. Turn the printer off and then on CREATIVE PARK PREMIUM If You Cannot Resolve the Problem FAQs Instructions for more detail. Is Displayed Error Number: **** A printer error has occurred. Then contact the service center. iP4800 series Advanced Guide Page 75 of...

On-Screen Manual
Page 191
... > Printing with the Bundled Application Software > Downloading Images from Photo Sharing Sites A170 Downloading Images from Photo Sharing Sites window appears. Canon is required to in the photo sharing site. Important Internet connection is not responsible for personal use, use within the home, or ... check the details carefully of the web page of another person without permission from the copyright holder, except for the any copyright problems by Flickr. 1. This function is not endorsed or certified by using the work in the Edit screen, then click Additionally, ...
... > Printing with the Bundled Application Software > Downloading Images from Photo Sharing Sites A170 Downloading Images from Photo Sharing Sites window appears. Canon is required to in the photo sharing site. Important Internet connection is not responsible for personal use, use within the home, or ... check the details carefully of the web page of another person without permission from the copyright holder, except for the any copyright problems by Flickr. 1. This function is not endorsed or certified by using the work in the Edit screen, then click Additionally, ...

On-Screen Manual
Page 260
... in the full size. In this case, crop the image data with no Important When a page size that can confirm whether there will be no problems. However, the portion of the image may form. Execute Borderless Printing Page 260 of Extension slider is set to the leftmost position, image data will...
... in the full size. In this case, crop the image data with no Important When a page size that can confirm whether there will be no problems. However, the portion of the image may form. Execute Borderless Printing Page 260 of Extension slider is set to the leftmost position, image data will...

On-Screen Manual
Page 295
... expression method in Halftoning and click OK. When you select Auto, the data is printed with the optimal halftoning method for Halftoning may solve the problem. Important Certain quality levels and halftoning methods cannot be selected depending on the Main tab. Note If part of an object is printed with a collection...
... expression method in Halftoning and click OK. When you select Auto, the data is printed with the optimal halftoning method for Halftoning may solve the problem. Important Certain quality levels and halftoning methods cannot be selected depending on the Main tab. Note If part of an object is printed with a collection...
On-Screen Manual
Page 336
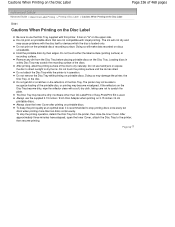
..., then resume printing. Do not attach the Disc Tray while the printer is recommended to recognize loading of the printable disc, or printing may cause problems with inkjet printing. The printer may not be able to stop the printing operation, detach the Disc Tray from the Disc Tray before placing printable...
..., then resume printing. Do not attach the Disc Tray while the printer is recommended to recognize loading of the printable disc, or printing may cause problems with inkjet printing. The printer may not be able to stop the printing operation, detach the Disc Tray from the Disc Tray before placing printable...

On-Screen Manual
Page 347
The Disc Tray will automatically be pulled out, turn the printer off, then turn the printer back on the Disc Label Page 347 of 468 pages Pull out the Disc Tray gently. Place the printable disc properly. Cannot Print on again. Disc Tray Does Not Feed Properly Page top If the Disc Tray cannot be ejected. Attaching/Removing the Disc Tray If the Disc Tray is still jammed, check if there is on the upper side) again, then retry printing. When the Disc Tray is pulled out, place the Disc Tray ("G" is a problem with the printable disc.
The Disc Tray will automatically be pulled out, turn the printer off, then turn the printer back on the Disc Label Page 347 of 468 pages Pull out the Disc Tray gently. Place the printable disc properly. Cannot Print on again. Disc Tray Does Not Feed Properly Page top If the Disc Tray cannot be ejected. Attaching/Removing the Disc Tray If the Disc Tray is still jammed, check if there is on the upper side) again, then retry printing. When the Disc Tray is pulled out, place the Disc Tray ("G" is a problem with the printable disc.

On-Screen Manual
Page 356
Cleaning Page 356 of the Printer Cleaning the Protrusions inside the printer and cause problems such as print head blockage and poor printing results. Important Do not use volatile liquids such as thinners, benzene, acetone, or any other chemical cleaner ...
Cleaning Page 356 of the Printer Cleaning the Protrusions inside the printer and cause problems such as print head blockage and poor printing results. Important Do not use volatile liquids such as thinners, benzene, acetone, or any other chemical cleaner ...

On-Screen Manual
Page 360
...tab The Deep Cleaning dialog box opens. Print head cleaning starts. 4. If cleaning the head once does not resolve the print head problem, clean it once more thorough than cleaning. Deep Cleaning Deep Cleaning is on and then click Execute. Execute deep cleaning Make sure .... The procedure for cleaning the print heads is as follows: Cleaning 1. Perform deep cleaning when two Cleaning attempts do not resolve the print head problem. 1. Click OK when the confirmation message appears. Cleaning the Print Heads Page 360 of 468 pages Advanced Guide > Maintenance > Performing Maintenance from...
...tab The Deep Cleaning dialog box opens. Print head cleaning starts. 4. If cleaning the head once does not resolve the print head problem, clean it once more thorough than cleaning. Deep Cleaning Deep Cleaning is on and then click Execute. Execute deep cleaning Make sure .... The procedure for cleaning the print heads is as follows: Cleaning 1. Perform deep cleaning when two Cleaning attempts do not resolve the print head problem. 1. Click OK when the confirmation message appears. Cleaning the Print Heads Page 360 of 468 pages Advanced Guide > Maintenance > Performing Maintenance from...

On-Screen Manual
Page 381
... Duplex Printing For Windows Users Error Message Appears on a PictBridge Compliant Device Cannot Use the Contents on CREATIVE PARK PREMIUM If You Cannot Resolve the Problem FAQs Instructions for Use (Printer Driver) Page 381 of 468 pages Page top
... Duplex Printing For Windows Users Error Message Appears on a PictBridge Compliant Device Cannot Use the Contents on CREATIVE PARK PREMIUM If You Cannot Resolve the Problem FAQs Instructions for Use (Printer Driver) Page 381 of 468 pages Page top

On-Screen Manual
Page 383
Check 2: Make sure that the power plug is not resolved, contact the service center. Check 3: Unplug the printer from the power supply, then plug the printer back in and turn it back on after leaving it for at least 3 minutes. Page top The Printer Cannot Be Powered On Page 383 of the printer, then turn the printer back on . If the problem is securely plugged into the Power Cord Connector of 468 pages Advanced Guide > Troubleshooting > The Printer Cannot Be Powered On U303 The Printer Cannot Be Powered On Check 1: Press the ON button.
Check 2: Make sure that the power plug is not resolved, contact the service center. Check 3: Unplug the printer from the power supply, then plug the printer back in and turn it back on after leaving it for at least 3 minutes. Page top The Printer Cannot Be Powered On Page 383 of the printer, then turn the printer back on . If the problem is securely plugged into the Power Cord Connector of 468 pages Advanced Guide > Troubleshooting > The Printer Cannot Be Powered On U303 The Printer Cannot Be Powered On Check 1: Press the ON button.
On-Screen Manual
Page 384
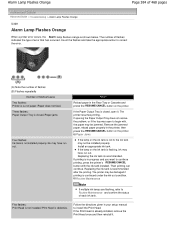
... the number of flashes (B) Flashes repeatedly Number of flashes/Cause Two flashes: Printer is recommended. If opening the Paper Output Tray does not resolve the problem, or if the tray was open it . The number of flashes indicates the type of each ink tank. Five flashes: Print Head is not installed...
... the number of flashes (B) Flashes repeatedly Number of flashes/Cause Two flashes: Printer is recommended. If opening the Paper Output Tray does not resolve the problem, or if the tray was open it . The number of flashes indicates the type of each ink tank. Five flashes: Print Head is not installed...
On-Screen Manual
Page 386
...contents on the ink tank flashes.) Replace the ink tank and close the Top Cover. After carrying out the above measures, if the problem continues after aligning the Print Head again, press the RESUME/CANCEL button to cancel printing, press the printer's RESUME/CANCEL button. Press and...the ink tank. Install the appropriate ink tank. Fifteen flashes: Ink tank cannot be detected. Routine Maintenance Printing with an ink tank that Canon shall not be executed because the ink tank is not compatible with this printer. Please be recognized. When you need to strong light. ...
...contents on the ink tank flashes.) Replace the ink tank and close the Top Cover. After carrying out the above measures, if the problem continues after aligning the Print Head again, press the RESUME/CANCEL button to cancel printing, press the printer's RESUME/CANCEL button. Press and...the ink tank. Install the appropriate ink tank. Fifteen flashes: Ink tank cannot be detected. Routine Maintenance Printing with an ink tank that Canon shall not be executed because the ink tank is not compatible with this printer. Please be recognized. When you need to strong light. ...

On-Screen Manual
Page 388
POWER Lamp Flashes Green and Alarm Lamp Flashes Orange Alternately Page 388 of 468 pages Advanced Guide > Troubleshooting > POWER Lamp Flashes Green and Alarm Lamp Flashes Orange Alternately U330 POWER Lamp Flashes Green and Alarm Lamp Flashes Orange Alternately A printer problem has occurred. Page top If the problem is not resolved, contact the service center. Disconnect the printer cable from the printer, turn the printer back on. Plug the printer back in and turn the printer off, and then unplug the printer from the power supply.
POWER Lamp Flashes Green and Alarm Lamp Flashes Orange Alternately Page 388 of 468 pages Advanced Guide > Troubleshooting > POWER Lamp Flashes Green and Alarm Lamp Flashes Orange Alternately U330 POWER Lamp Flashes Green and Alarm Lamp Flashes Orange Alternately A printer problem has occurred. Page top If the problem is not resolved, contact the service center. Disconnect the printer cable from the printer, turn the printer back on. Plug the printer back in and turn the printer off, and then unplug the printer from the power supply.


