iP4200 Easy Setup Instructions
Page 1
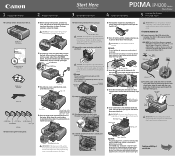
...touch the print head nozzles and the electrical contacts. · Do not attempt to the left. Lower the inner cover. PIXMA iP4200 Photo Printer Documentation and Software Kit PIXMA iP4200 Print Head Power Cord CLI-8BK Black CLI-8Y Yellow PGI-5BK Black CLI-8M Magenta CLI-8C Cyan Ink Tanks 1... Before turning on the label. Auto Sheet Feeder Print Side Refer to remove the protective material before proceeding. · If the ALARM lamp still flashes ...
...touch the print head nozzles and the electrical contacts. · Do not attempt to the left. Lower the inner cover. PIXMA iP4200 Photo Printer Documentation and Software Kit PIXMA iP4200 Print Head Power Cord CLI-8BK Black CLI-8Y Yellow PGI-5BK Black CLI-8M Magenta CLI-8C Cyan Ink Tanks 1... Before turning on the label. Auto Sheet Feeder Print Side Refer to remove the protective material before proceeding. · If the ALARM lamp still flashes ...
iP4200 Quick Start Guide
Page 6
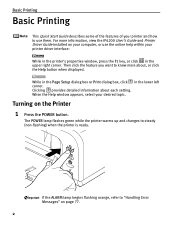
... the printer's properties window, press the F1 key, or click in the lower left corner. If the ALARM lamp begins flashing orange, refer to steady (non-flashing) when the printer is ready. Basic Printing Basic Printing This Quick Start Guide describes some of the features of your printer ...and how to know more information, view the iP4200 User's Guide and Printer Driver Guide installed on the Printer 1 Press the POWER button...
... the printer's properties window, press the F1 key, or click in the lower left corner. If the ALARM lamp begins flashing orange, refer to steady (non-flashing) when the printer is ready. Basic Printing Basic Printing This Quick Start Guide describes some of the features of your printer ...and how to know more information, view the iP4200 User's Guide and Printer Driver Guide installed on the Printer 1 Press the POWER button...

iP4200 Quick Start Guide
Page 35
... differ depending on the brand or model. When the connection between the device and printer has been established, the POWER lamp on the printer flashes twice. * The power-on sequence may be set up the device for direct printing. Let's take a look at the paper size,...setting explained above is correctly connected. For details, refer to follow the instructions given in the description given below cannot be made depending on Canon PictBridge compliant device are used . print ...Off (No printing) Additional settings The settings explained below . Advanced Printing (3) Turn on the ...
... differ depending on the brand or model. When the connection between the device and printer has been established, the POWER lamp on the printer flashes twice. * The power-on sequence may be set up the device for direct printing. Let's take a look at the paper size,...setting explained above is correctly connected. For details, refer to follow the instructions given in the description given below cannot be made depending on Canon PictBridge compliant device are used . print ...Off (No printing) Additional settings The settings explained below . Advanced Printing (3) Turn on the ...

iP4200 Quick Start Guide
Page 40
...hand side being cropped. z To install applications, refer to the Windows documentation. Canon PIXMA Printers support ExifPrint and use the application(s) suitable for specific camera settings and functions such as whether the flash was on how to set each function, refer to the Internet Explorer toolbar. ... the printer properties dialog box from Printing Preferences or applications. Also it has tools to edit the photographs taken by the camera's flash or smooth and beautify the facial skin. Using the Bundled Software The Setup Software & User's Guide CD-ROM includes photo applications...
...hand side being cropped. z To install applications, refer to the Windows documentation. Canon PIXMA Printers support ExifPrint and use the application(s) suitable for specific camera settings and functions such as whether the flash was on how to set each function, refer to the Internet Explorer toolbar. ... the printer properties dialog box from Printing Preferences or applications. Also it has tools to edit the photographs taken by the camera's flash or smooth and beautify the facial skin. Using the Bundled Software The Setup Software & User's Guide CD-ROM includes photo applications...
iP4200 Quick Start Guide
Page 42
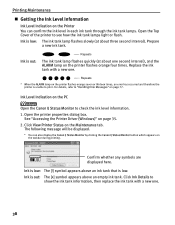
... Ink Level Information Ink Level Indication on the Printer You can also display the Canon IJ Status Monitor by clicking the Canon IJ Status Monitor button which appears on the taskbar during printing. Ink Level Indication on the printer flashes orange seven or thirteen times, an error has occurred and therefore the printer...
... Ink Level Information Ink Level Indication on the Printer You can also display the Canon IJ Status Monitor by clicking the Canon IJ Status Monitor button which appears on the taskbar during printing. Ink Level Indication on the printer flashes orange seven or thirteen times, an error has occurred and therefore the printer...
iP4200 Quick Start Guide
Page 44
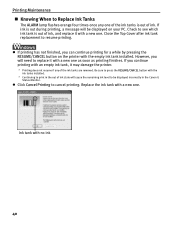
... your PC. Ink tank with the empty ink tank installed. Close the Top Cover after ink tank replacement to Replace Ink Tanks The ALARM lamp flashes orange four times once any of the ink tanks are removed. However, you continue printing with a new one as soon as printing finishes. Check to... on the printer with no ink 40 Be sure to press the RESUME/CANCEL button with the ink tanks installed. * Continuing to print in the Canon IJ Status Monitor. If you will cause the remaining ink level to see which ink tank is out during printing, a message will be displayed incorrectly...
... your PC. Ink tank with the empty ink tank installed. Close the Top Cover after ink tank replacement to Replace Ink Tanks The ALARM lamp flashes orange four times once any of the ink tanks are removed. However, you continue printing with a new one as soon as printing finishes. Check to... on the printer with no ink 40 Be sure to press the RESUME/CANCEL button with the ink tanks installed. * Continuing to print in the Canon IJ Status Monitor. If you will cause the remaining ink level to see which ink tank is out during printing, a message will be displayed incorrectly...

iP4200 Quick Start Guide
Page 46
If the Top Cover is flashing fast. Close and reopen the Top Cover to return the holder to the local laws and regulations regarding disposal of consumables. Be sure to replace ...
If the Top Cover is flashing fast. Close and reopen the Top Cover to return the holder to the local laws and regulations regarding disposal of consumables. Be sure to replace ...
iP4200 Quick Start Guide
Page 49
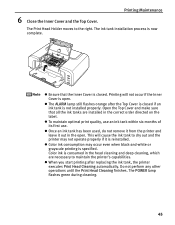
... not remove it from the printer and leave it is closed . The Print Head Holder moves to maintain the printer's capabilities. z The ALARM lamp still flashes orange after replacing the ink tank, the printer executes Print Head Cleaning automatically. The ink tank installation process is open . This will not occur if... Inner Cover and the Top Cover. z To maintain optimal print quality, use an ink tank within six months of its first use. The POWER lamp flashes green during cleaning. 45
... not remove it from the printer and leave it is closed . The Print Head Holder moves to maintain the printer's capabilities. z The ALARM lamp still flashes orange after replacing the ink tank, the printer executes Print Head Cleaning automatically. The ink tank installation process is open . This will not occur if... Inner Cover and the Top Cover. z To maintain optimal print quality, use an ink tank within six months of its first use. The POWER lamp flashes green during cleaning. 45
iP4200 Quick Start Guide
Page 50
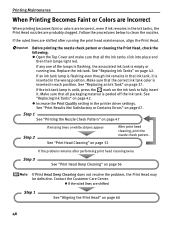
... Tanks" on page 67. See "Print Results Not Satisfactory or Contains Errors" on page 42. If any one of the lamps is flashing, the associated ink tank is flashing even though ink remains in each position. z Increase the Print Quality setting in the wrong position. If an ink tank lamp is empty...
... Tanks" on page 67. See "Print Results Not Satisfactory or Contains Errors" on page 42. If any one of the lamps is flashing, the associated ink tank is flashing even though ink remains in each position. z Increase the Print Quality setting in the wrong position. If an ink tank lamp is empty...
iP4200 Quick Start Guide
Page 51
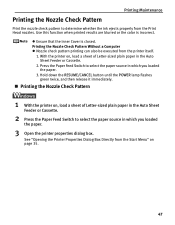
... check pattern printing can also be executed from the Start Menu" on page 35. 47 Hold down the RESUME/CANCEL button until the POWER lamp flashes green twice, and then release it immediately. „ Printing the Nozzle Check Pattern 1 With the printer on , load a sheet of Letter-sized plain paper in...
... check pattern printing can also be executed from the Start Menu" on page 35. 47 Hold down the RESUME/CANCEL button until the POWER lamp flashes green twice, and then release it immediately. „ Printing the Nozzle Check Pattern 1 With the printer on , load a sheet of Letter-sized plain paper in...

iP4200 Quick Start Guide
Page 56
... cleaning the Print Head causes waste ink to be cleaned from the Start Menu" on , hold down the RESUME/CANCEL button until the POWER lamp flashes green once, and then release it immediately.
... cleaning the Print Head causes waste ink to be cleaned from the Start Menu" on , hold down the RESUME/CANCEL button until the POWER lamp flashes green once, and then release it immediately.
iP4200 Quick Start Guide
Page 64
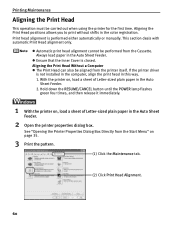
... from the Start Menu" on , load a sheet of Letter-sized plain paper in this way. 1. Hold down the RESUME/CANCEL button until the POWER lamp flashes green four times, and then release it immediately. 1 With the printer on page 35. 3 Print the pattern. (1) Click the Maintenance tab. (2) Click Print Head Alignment...
... from the Start Menu" on , load a sheet of Letter-sized plain paper in this way. 1. Hold down the RESUME/CANCEL button until the POWER lamp flashes green four times, and then release it immediately. 1 With the printer on page 35. 3 Print the pattern. (1) Click the Maintenance tab. (2) Click Print Head Alignment...
iP4200 Quick Start Guide
Page 65
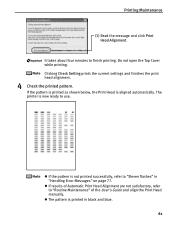
.... z The pattern is not printed successfully, refer to use. If the pattern is printed as shown below, the Print Head is now ready to "Eleven flashes" in black and blue. 61 Printing Maintenance (3) Read the message and click Print Head Alignment.
.... z The pattern is not printed successfully, refer to use. If the pattern is printed as shown below, the Print Head is now ready to "Eleven flashes" in black and blue. 61 Printing Maintenance (3) Read the message and click Print Head Alignment.

iP4200 Quick Start Guide
Page 67
z If results of the User's Guide and align the Print Head manually. The printer is not printed successfully, refer to "Eleven flashes" in black and blue. 63 z If the pattern is now ready to "Routine Maintenance" of Automatic Print Head Alignment are not satisfactory, refer to use. z The pattern is aligned automatically. If the pattern is printed as shown below, the Print Head is printed in "Handling Error Messages" on page 77. Printing Maintenance 4 Check the printed pattern.
z If results of the User's Guide and align the Print Head manually. The printer is not printed successfully, refer to "Eleven flashes" in black and blue. 63 z If the pattern is now ready to "Routine Maintenance" of Automatic Print Head Alignment are not satisfactory, refer to use. z The pattern is aligned automatically. If the pattern is printed as shown below, the Print Head is printed in "Handling Error Messages" on page 77. Printing Maintenance 4 Check the printed pattern.

iP4200 Quick Start Guide
Page 73
Paper abrasion can be prevented by pressing the RESUME/ CANCEL button on , hold down the RESUME/CANCEL button until the POWER lamp flashes green seven times, and then release the button. To cancel the setting, turn off the printer. For further information on as shown in... 2 to 5 mm / 0.08 to widen the clearance between the Print Head and the loaded paper. Select Custom Settings from Custom Settings in the Canon IJ Printer Utility dialog box (Macintosh), the setting is selected in the printer properties dialog box (Windows) or selected from the pop-up , then ...
Paper abrasion can be prevented by pressing the RESUME/ CANCEL button on , hold down the RESUME/CANCEL button until the POWER lamp flashes green seven times, and then release the button. To cancel the setting, turn off the printer. For further information on as shown in... 2 to 5 mm / 0.08 to widen the clearance between the Print Head and the loaded paper. Select Custom Settings from Custom Settings in the Canon IJ Printer Utility dialog box (Macintosh), the setting is selected in the printer properties dialog box (Windows) or selected from the pop-up , then ...
iP4200 Quick Start Guide
Page 74
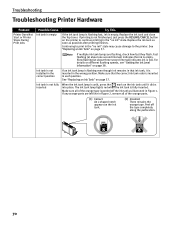
... like in Figure 2, remove all of the orange parts. (1) Correct An L-shaped notch appears on the ink tank until it is empty. Fast flashing (at about one second interval) indicates the ink is unlit, press the mark on the ink tank. (2) Incorrect There remains the orange tape. ... the orange tape is low. Continuing to the printer. Ink tank is not fully inserted When the ink tank lamp is empty. Slow flashing (at about three second interval) indicates ink is peeled off the tape completely along the perforation. 70 Troubleshooting Troubleshooting Printer Hardware Problem Printer ...
... like in Figure 2, remove all of the orange parts. (1) Correct An L-shaped notch appears on the ink tank until it is empty. Fast flashing (at about one second interval) indicates the ink is unlit, press the mark on the ink tank. (2) Incorrect There remains the orange tape. ... the orange tape is low. Continuing to the printer. Ink tank is not fully inserted When the ink tank lamp is empty. Slow flashing (at about three second interval) indicates ink is peeled off the tape completely along the perforation. 70 Troubleshooting Troubleshooting Printer Hardware Problem Printer ...
iP4200 Quick Start Guide
Page 76
... below to Avoid" on page 4. Hold down the RESUME/CANCEL button and release after the POWER lamp flashes green three times. Hold down the RESUME/CANCEL button and release after the POWER lamp flashes green three times. Load three or more does not solve the problem, contact the Customer Care Center. See...
... below to Avoid" on page 4. Hold down the RESUME/CANCEL button and release after the POWER lamp flashes green three times. Hold down the RESUME/CANCEL button and release after the POWER lamp flashes green three times. Load three or more does not solve the problem, contact the Customer Care Center. See...
iP4200 Quick Start Guide
Page 81
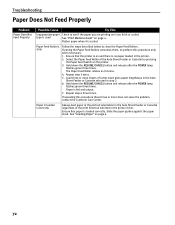
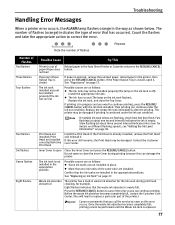
...Reload paper in the way as follows: z Some ink tanks are flashing, check how fast they flash. If the Paper Output Tray is closed If paper is out of Flashes Two flashes Three flashes Four flashes Five flashes Six flashes Seven flashes Eight flashes Possible Cause Try This Printer is jammed, remove the jammed paper,... installed properly/The ink has run out (The lamp on page 73. Install the appropriate ink tank. Fast flashing (at about one ink tanks of the printer.) Canon recommends that the ink tanks are installed. If the Print Head is closed , open Close the Inner Cover ...
...Reload paper in the way as follows: z Some ink tanks are flashing, check how fast they flash. If the Paper Output Tray is closed If paper is out of Flashes Two flashes Three flashes Four flashes Five flashes Six flashes Seven flashes Eight flashes Possible Cause Try This Printer is jammed, remove the jammed paper,... installed properly/The ink has run out (The lamp on page 73. Install the appropriate ink tank. Fast flashing (at about one ink tanks of the printer.) Canon recommends that the ink tanks are installed. If the Print Head is closed , open Close the Inner Cover ...
iP4200 Quick Start Guide
Page 82
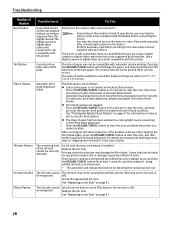
... it . The sizes of the ink tank cannot be liable for information on page 37. 78 Thirteen Flashes The remaining level of media suitable for automatic duplex printing are clogged. Canon shall not be correctly detected An ink tank that you may have occurred (The lamp on page 37.... Fifteen flashes The ink tank cannot Ink tank errors have to turn on the ink tank is installed. z ...
... it . The sizes of the ink tank cannot be liable for information on page 37. 78 Thirteen Flashes The remaining level of media suitable for automatic duplex printing are clogged. Canon shall not be correctly detected An ink tank that you may have occurred (The lamp on page 37.... Fifteen flashes The ink tank cannot Ink tank errors have to turn on the ink tank is installed. z ...
iP4200 Quick Start Guide
Page 83
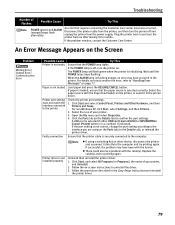
...Follow the on after leaving it in the Easy Setup Instructions and reinstall the printer driver. 79 Wait until the POWER lamp stops flashing. Open the File menu and select Properties. 4. Click Start and select Control Panel, Printers and Other Hardware, and then Printers and... Faxes. If successful, the problem may have been with the cable(s). A USB port is selected if either USBnnn (Canon iP4200) or MPUSBPRNnn (Canon iP4200) (where n is a number) is not installed properly Uninstall then reinstall the printer driver. 1. Disconnect the printer cable from the ...
...Follow the on after leaving it in the Easy Setup Instructions and reinstall the printer driver. 79 Wait until the POWER lamp stops flashing. Open the File menu and select Properties. 4. Click Start and select Control Panel, Printers and Other Hardware, and then Printers and... Faxes. If successful, the problem may have been with the cable(s). A USB port is selected if either USBnnn (Canon iP4200) or MPUSBPRNnn (Canon iP4200) (where n is a number) is not installed properly Uninstall then reinstall the printer driver. 1. Disconnect the printer cable from the ...


