Guide for Quick Menu
Page 16
...You can download My Image Garden from the Canon website. Internet connection is required for products supporting Quick Menu. • Available functions and settings vary depending on your printer or scanner does not appear in the Select Model list, see Printer/Scanner Does Not Appear in Select Model of.... Internet connection fees apply. • When using AirPrint with macOS Sierra v10.12. 16 Internet connection is subject to the Canon website for downloading. Note • If your printer or scanner. Keep these points in mind. • Refer to the following restrictions.
...You can download My Image Garden from the Canon website. Internet connection is required for products supporting Quick Menu. • Available functions and settings vary depending on your printer or scanner does not appear in the Select Model list, see Printer/Scanner Does Not Appear in Select Model of.... Internet connection fees apply. • When using AirPrint with macOS Sierra v10.12. 16 Internet connection is subject to the Canon website for downloading. Note • If your printer or scanner. Keep these points in mind. • Refer to the following restrictions.
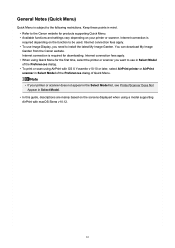
Guide for Quick Menu
Page 19
... 1. Click an icon to use in the started from Quick Menu appear in Select Model of the Preferences dialog. • If you selected AirPrint printer or AirPrint scanner in the Main Menu. In Shortcut Menu, click (Open Main Menu). 19 Starting from Main Menu Note • When using Quick... Menu for the first time, select the default printer or scanner in Select Model of the Preferences dialog, select the model you want to start an application or function. Note • Applications or functions...
... 1. Click an icon to use in the started from Quick Menu appear in Select Model of the Preferences dialog. • If you selected AirPrint printer or AirPrint scanner in the Main Menu. In Shortcut Menu, click (Open Main Menu). 19 Starting from Main Menu Note • When using Quick... Menu for the first time, select the default printer or scanner in Select Model of the Preferences dialog, select the model you want to start an application or function. Note • Applications or functions...
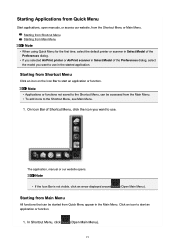
Guide for Quick Menu
Page 24
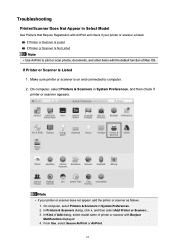
.... 4. In Kind of Add dialog, select model name of printer or scanner with the default function of Mac OS. Make sure printer or scanner is listed. In Printers & Scanners dialog, click +, and then select Add Printer or Scanner.... 3. If Printer or Scanner Is Listed If Printer or Scanner Is Not Listed Note • Use AirPrint to...
.... 4. In Kind of Add dialog, select model name of printer or scanner with the default function of Mac OS. Make sure printer or scanner is listed. In Printers & Scanners dialog, click +, and then select Add Printer or Scanner.... 3. If Printer or Scanner Is Listed If Printer or Scanner Is Not Listed Note • Use AirPrint to...
Guide for Quick Menu
Page 25
...Model, use IJ Scan Utility Lite. Select printer or scanner, and then make sure Kind is Canon XXX series-AirPrint (where XXX is on and connected to computer. 2. Make sure printer or scanner is model name). 4. Note • If your printer or scanner. In Select Model of Preferences ...dialog of Quick Menu, select AirPrint printer or AirPrint scanner. Note &#...
...Model, use IJ Scan Utility Lite. Select printer or scanner, and then make sure Kind is Canon XXX series-AirPrint (where XXX is on and connected to computer. 2. Make sure printer or scanner is model name). 4. Note • If your printer or scanner. In Select Model of Preferences ...dialog of Quick Menu, select AirPrint printer or AirPrint scanner. Note &#...
Guide for Quick Menu
Page 26
Note • To scan by selecting your model name in Select Model, use IJ Scan Utility. 26 Select printer or scanner, and then make sure Kind is Canon XXX series (where XXX is model name). 4. In Select Model of Preferences dialog of Quick Menu, select model name. 3.
Note • To scan by selecting your model name in Select Model, use IJ Scan Utility. 26 Select printer or scanner, and then make sure Kind is Canon XXX series (where XXX is model name). 4. In Select Model of Preferences dialog of Quick Menu, select model name. 3.

TS5100 series User Manual
Page 2
... Photos from a Computer 24 Printing Photos from a Smartphone/Tablet 29 Copying 32 Network 36 Restrictions 38 Network Connection Tips 40 Default Network Settings 41 Another Printer Found with Same Name 43 Connecting to Another Computer via LAN/Changing from USB to LAN Connection 44 Printing Network Settings 45 Changing Wireless LAN...
... Photos from a Computer 24 Printing Photos from a Smartphone/Tablet 29 Copying 32 Network 36 Restrictions 38 Network Connection Tips 40 Default Network Settings 41 Another Printer Found with Same Name 43 Connecting to Another Computer via LAN/Changing from USB to LAN Connection 44 Printing Network Settings 45 Changing Wireless LAN...
TS5100 series User Manual
Page 3
... Print Head Position 104 Checking Ink Status from Your Computer 105 Cleaning 106 Cleaning Paper Feed Rollers 107 Cleaning Inside the Printer (Bottom Plate Cleaning 109 Overview 112 Safety 113 Safety Precautions 114 Regulatory Information 115 WEEE (EU&EEA 118 Handling Precautions ...128 Legal Restrictions on Scanning/Copying 129 Printer Handling Precautions 130 Transporting Your Printer 131 When repairing, lending, or disposing of the printer 132 Keeping Print Quality High 133 Main Components and Their Use 134 Main Components 135...
... Print Head Position 104 Checking Ink Status from Your Computer 105 Cleaning 106 Cleaning Paper Feed Rollers 107 Cleaning Inside the Printer (Bottom Plate Cleaning 109 Overview 112 Safety 113 Safety Precautions 114 Regulatory Information 115 WEEE (EU&EEA 118 Handling Precautions ...128 Legal Restrictions on Scanning/Copying 129 Printer Handling Precautions 130 Transporting Your Printer 131 When repairing, lending, or disposing of the printer 132 Keeping Print Quality High 133 Main Components and Their Use 134 Main Components 135...

TS5100 series User Manual
Page 4
... and Off 143 Checking the Power Plug/Power Cord 145 Unplugging the Printer 146 LCD and Operation Panel 147 Changing Settings 149 Changing Printer Settings from Your Computer (Mac OS 150 Managing the Printer Power 151 Changing the Printer Operation Mode 152 Changing Settings from Operation Panel 153 Changing Settings from Operation Panel 154...
... and Off 143 Checking the Power Plug/Power Cord 145 Unplugging the Printer 146 LCD and Operation Panel 147 Changing Settings 149 Changing Printer Settings from Your Computer (Mac OS 150 Managing the Printer Power 151 Changing the Printer Operation Mode 152 Changing Settings from Operation Panel 153 Changing Settings from Operation Panel 154...
TS5100 series User Manual
Page 5
... Screen 192 Display the Printing Status Screen 193 Deleting the Undesired Print Job 194 Removing AirPrint Printer That Is No Longer Required from List of Printers 195 Printing from Smartphone/Tablet 196 Printing from iOS Device (AirPrint 197 Printing/Scanning with Wireless... Problems 238 Cannot Find Printer on Network 239 Cannot Find Printer on Check Printer Settings Screen During Setup (Windows 240 Cannot Find Printer on Check Printer Settings Screen During Wireless LAN Setup (Windows)Checking Power Status 241 Cannot Find Printer on Check Printer Settings Screen During Wireless LAN...
... Screen 192 Display the Printing Status Screen 193 Deleting the Undesired Print Job 194 Removing AirPrint Printer That Is No Longer Required from List of Printers 195 Printing from Smartphone/Tablet 196 Printing from iOS Device (AirPrint 197 Printing/Scanning with Wireless... Problems 238 Cannot Find Printer on Network 239 Cannot Find Printer on Check Printer Settings Screen During Setup (Windows 240 Cannot Find Printer on Check Printer Settings Screen During Wireless LAN Setup (Windows)Checking Power Status 241 Cannot Find Printer on Check Printer Settings Screen During Wireless LAN...

TS5100 series User Manual
Page 6
... Setup (Windows)Checking Wireless LAN Environment 244 Cannot Find Printer on Check Printer Settings Screen During Wireless LAN Setup (Windows)Checking Printer's IP Address 246 Cannot Find Printer on Check Printer Settings Screen During Wireless LAN Setup (Windows)Checking Security Software Settings 247 Cannot Find Printer on Check Printer Settings Screen During Wireless LAN Setup (Windows)Checking...
... Setup (Windows)Checking Wireless LAN Environment 244 Cannot Find Printer on Check Printer Settings Screen During Wireless LAN Setup (Windows)Checking Printer's IP Address 246 Cannot Find Printer on Check Printer Settings Screen During Wireless LAN Setup (Windows)Checking Security Software Settings 247 Cannot Find Printer on Check Printer Settings Screen During Wireless LAN Setup (Windows)Checking...

TS5100 series User Manual
Page 7
USB Connection Problems 295 Cannot Communicate with Printer via USB 296 Installation and Download Problems 297 Cannot Install MP Drivers (Windows 298 Updating MP Drivers in Network Environment (Windows 300 Errors and Messages ... Code for Error 310 List of Support Code for Error (Paper Jams 312 1300 313 1303 315 1304 316 1313 317 Paper Is Jammed inside Printer 318 Removing Jammed Paper from Rear Side 321 1000 325 1003 326 1200 327 1401 328 1430 329 1485 330 1682 331 1686 332 1687...
USB Connection Problems 295 Cannot Communicate with Printer via USB 296 Installation and Download Problems 297 Cannot Install MP Drivers (Windows 298 Updating MP Drivers in Network Environment (Windows 300 Errors and Messages ... Code for Error 310 List of Support Code for Error (Paper Jams 312 1300 313 1303 315 1304 316 1313 317 Paper Is Jammed inside Printer 318 Removing Jammed Paper from Rear Side 321 1000 325 1003 326 1200 327 1401 328 1430 329 1485 330 1682 331 1686 332 1687...

TS5100 series User Manual
Page 26
7. If the operation panel is displayed. Click the Photo Print icon (K). 26 Be sure to open the output tray extension (I). The Guide Menu screen is close, the printer does not start printing. 8. Click the My Image Garden icon (J) in Quick Menu. Note • The number and types of icons displayed vary depending on your region, the registered printer/ scanner and the installed applications. 9. Open the operation panel (F), pull out the paper output tray (G) and paper output support (H), and open the operation panel before printing.
7. If the operation panel is displayed. Click the Photo Print icon (K). 26 Be sure to open the output tray extension (I). The Guide Menu screen is close, the printer does not start printing. 8. Click the My Image Garden icon (J) in Quick Menu. Note • The number and types of icons displayed vary depending on your region, the registered printer/ scanner and the installed applications. 9. Open the operation panel (F), pull out the paper output tray (G) and paper output support (H), and open the operation panel before printing.
TS5100 series User Manual
Page 27
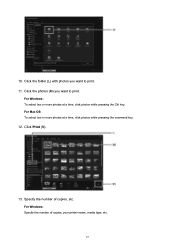
Click the folder (L) with photos you want to print. For Mac OS: To select two or more photos at a time, click photos while pressing the command key. 12. Click Print (N). 13. Click the photos (M) you want to print. 11. For Windows: To select two or more photos at a time, click photos while pressing the Ctrl key. For Windows: Specify the number of copies, etc. 10. Specify the number of copies, your printer name, media type, etc. 27
Click the folder (L) with photos you want to print. For Mac OS: To select two or more photos at a time, click photos while pressing the command key. 12. Click Print (N). 13. Click the photos (M) you want to print. 11. For Windows: To select two or more photos at a time, click photos while pressing the Ctrl key. For Windows: Specify the number of copies, etc. 10. Specify the number of copies, your printer name, media type, etc. 27
TS5100 series User Manual
Page 28
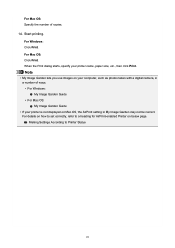
...: My Image Garden Guide • For Mac OS: My Image Garden Guide • If your printer name, paper size, etc., then click Print. Making Settings According to a heading for AirPrint-enabled Printer on Mac OS, the AirPrint setting in a number of copies. 14. For details on how to... set correctly, refer to Printer Status 28 When the Print dialog starts, specify your printer is not displayed on below page. For Windows: Click ...
...: My Image Garden Guide • For Mac OS: My Image Garden Guide • If your printer name, paper size, etc., then click Print. Making Settings According to a heading for AirPrint-enabled Printer on Mac OS, the AirPrint setting in a number of copies. 14. For details on how to... set correctly, refer to Printer Status 28 When the Print dialog starts, specify your printer is not displayed on below page. For Windows: Click ...

TS5100 series User Manual
Page 31
Specify the number of photos saved on Canon PRINT Inkjet/SELPHY. Select a photo. If the operation panel is displayed. 10. The list of copies, paper size, etc. 12. Select Photo Print on your ... can also select multiple photos at once. 11. Select Print. 31 Be sure to open the output tray extension (I). Start (Canon PRINT Inkjet/SELPHY) from your smartphone/tablet is close, the printer does not start printing. 8. Open the operation panel (F), pull out the paper output tray (G) and paper output support (H), and open...
Specify the number of photos saved on Canon PRINT Inkjet/SELPHY. Select a photo. If the operation panel is displayed. 10. The list of copies, paper size, etc. 12. Select Photo Print on your ... can also select multiple photos at once. 11. Select Print. 31 Be sure to open the output tray extension (I). Start (Canon PRINT Inkjet/SELPHY) from your smartphone/tablet is close, the printer does not start printing. 8. Open the operation panel (F), pull out the paper output tray (G) and paper output support (H), and open...
TS5100 series User Manual
Page 32
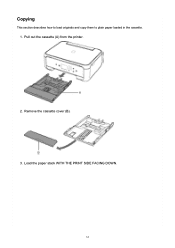
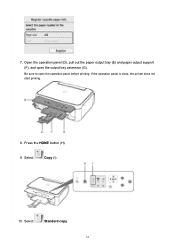
Load the paper stack WITH THE PRINT SIDE FACING DOWN. 32 Copying This section describes how to load originals and copy them to plain paper loaded in the cassette. 1. Pull out the cassette (A) from the printer. 2. Remove the cassette cover (B). 3.
Load the paper stack WITH THE PRINT SIDE FACING DOWN. 32 Copying This section describes how to load originals and copy them to plain paper loaded in the cassette. 1. Pull out the cassette (A) from the printer. 2. Remove the cassette cover (B). 3.
TS5100 series User Manual
Page 33
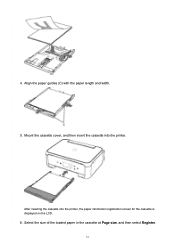
Align the paper guides (C) with the paper length and width. 5. 4. Select the size of the loaded paper in the cassette at Page size, and then select Register. 33 Mount the cassette cover, and then insert the cassette into the printer, the paper information registration screen for the cassette is displayed on the LCD. 6. After inserting the cassette into the printer.
Align the paper guides (C) with the paper length and width. 5. 4. Select the size of the loaded paper in the cassette at Page size, and then select Register. 33 Mount the cassette cover, and then insert the cassette into the printer, the paper information registration screen for the cassette is displayed on the LCD. 6. After inserting the cassette into the printer.
TS5100 series User Manual
Page 34
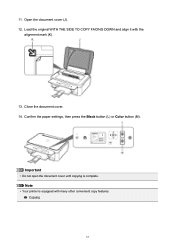
Open the operation panel (D), pull out the paper output tray (E) and paper output support (F), and open the operation panel before printing. Select Standard copy. 34 If the operation panel is close, the printer does not start printing. 8. Be sure to open the output tray extension (G). Press the HOME button (H). 9. 7. Select Copy (I). 10.
Open the operation panel (D), pull out the paper output tray (E) and paper output support (F), and open the operation panel before printing. Select Standard copy. 34 If the operation panel is close, the printer does not start printing. 8. Be sure to open the output tray extension (G). Press the HOME button (H). 9. 7. Select Copy (I). 10.
TS5100 series User Manual
Page 35
Confirm the paper settings, then press the Black button (L) or Color button (M). 11. Open the document cover (J). 12. Note • Your printer is complete. Close the document cover. 14. Important • Do not open the document cover until copying is equipped with the alignment mark (K). 13. Copying 35 Load the original WITH THE SIDE TO COPY FACING DOWN and align it with many other convenient copy features.
Confirm the paper settings, then press the Black button (L) or Color button (M). 11. Open the document cover (J). 12. Note • Your printer is complete. Close the document cover. 14. Important • Do not open the document cover until copying is equipped with the alignment mark (K). 13. Copying 35 Load the original WITH THE SIDE TO COPY FACING DOWN and align it with many other convenient copy features.

TS5100 series User Manual
Page 36
..., the connection between the device and wireless router will appear. For details, see Connecting to Another Computer via a wireless router to the printer that case, the connection of the device may switch to a mobile data connection automatically depending on your device. Note • You can...as the SSID and security protocol on the wireless router type. ◦ You can connect the device to the printer using the wireless router. • Wireless Direct Connect the printer and devices (e.g. If you have a wireless router, we recommend you try to connect a sixth device while ...
..., the connection between the device and wireless router will appear. For details, see Connecting to Another Computer via a wireless router to the printer that case, the connection of the device may switch to a mobile data connection automatically depending on your device. Note • You can...as the SSID and security protocol on the wireless router type. ◦ You can connect the device to the printer using the wireless router. • Wireless Direct Connect the printer and devices (e.g. If you have a wireless router, we recommend you try to connect a sixth device while ...


