TR8500 series User Manual
Page 4
... 183 Print settings 187 LAN settings 188 Device user settings 194 Language selection 197 Firmware update 198 Feed settings 199 Reset setting 200 Web service setup 201 System information 202 ECO settings 203 Quiet setting 205 Specifications 207 Information about Paper 212
... 183 Print settings 187 LAN settings 188 Device user settings 194 Language selection 197 Firmware update 198 Feed settings 199 Reset setting 200 Web service setup 201 System information 202 ECO settings 203 Quiet setting 205 Specifications 207 Information about Paper 212

TR8500 series User Manual
Page 7
...372 Cannot Find Printer on Check Printer Settings Screen During Wireless LAN Setup (Windows)Checking Printer's Wireless LAN Settings 373 Cannot Find Printer on Check Printer Settings Screen During Wireless LAN Setup (Windows)Checking Wireless LAN Environment 374 Cannot Find Printer on Check ...Printer Settings Screen During Wireless LAN Setup (Windows)Checking Printer's IP Address 376 Cannot Find Printer on Check Printer...
...372 Cannot Find Printer on Check Printer Settings Screen During Wireless LAN Setup (Windows)Checking Printer's Wireless LAN Settings 373 Cannot Find Printer on Check Printer Settings Screen During Wireless LAN Setup (Windows)Checking Wireless LAN Environment 374 Cannot Find Printer on Check ...Printer Settings Screen During Wireless LAN Setup (Windows)Checking Printer's IP Address 376 Cannot Find Printer on Check Printer...

TR8500 series User Manual
Page 47
...USB to LAN Connection • To use Wireless Direct temporarily: Printing/Scanning with Wireless Direct IJ Network Device Setup Utility IJ Network Device Setup Utility checks or diagnoses the settings of the printer and those of computer and restores the status of them ...if anything is wrong with network connection. Changing Network Settings See below for tips on using IJ Network Device Setup Utility. Network Connection Settings/Setup Perform connection setup for details. • Restrictions on network settings: Restrictions 47 Network Connection Tips Changing Printer's Setting Using ...
...USB to LAN Connection • To use Wireless Direct temporarily: Printing/Scanning with Wireless Direct IJ Network Device Setup Utility IJ Network Device Setup Utility checks or diagnoses the settings of the printer and those of computer and restores the status of them ...if anything is wrong with network connection. Changing Network Settings See below for tips on using IJ Network Device Setup Utility. Network Connection Settings/Setup Perform connection setup for details. • Restrictions on network settings: Restrictions 47 Network Connection Tips Changing Printer's Setting Using ...

TR8500 series User Manual
Page 49
... connect it to another device while a device (such as a smartphone) is already connected to the printer, connect it via a wireless router. • Configuration, router functions, setup procedures and security settings of network devices vary depending on the system environment. Connection Using a Wired Network cannot be used as a security protocol. In that... that case, web services for your device and the wireless router will be disabled. Do not proceed to the next screen of this guide until setup is set not to the device in the Wi-Fi settings of the device.
... connect it to another device while a device (such as a smartphone) is already connected to the printer, connect it via a wireless router. • Configuration, router functions, setup procedures and security settings of network devices vary depending on the system environment. Connection Using a Wired Network cannot be used as a security protocol. In that... that case, web services for your device and the wireless router will be disabled. Do not proceed to the next screen of this guide until setup is set not to the device in the Wi-Fi settings of the device.

TR8500 series User Manual
Page 52
...WLAN active/inactive Inactive SSID Wireless LAN security IP address (IPv4) BJNPSETUP Disable Auto setup IP address (IPv6) Set printer name* Enable/disable IPv6 Auto setup XXXXXXXXXXXX Enable Enable/disable WSD Timeout setting Enable/disable Bonjour Enable 15 minutes Enable ...Service name LPR protocol setting RAW protocol Canon TR8500 series Enable Enable LLMNR Active PictBridge communication Enable Wired LAN...
...WLAN active/inactive Inactive SSID Wireless LAN security IP address (IPv4) BJNPSETUP Disable Auto setup IP address (IPv6) Set printer name* Enable/disable IPv6 Auto setup XXXXXXXXXXXX Enable Enable/disable WSD Timeout setting Enable/disable Bonjour Enable 15 minutes Enable ...Service name LPR protocol setting RAW protocol Canon TR8500 series Enable Enable LLMNR Active PictBridge communication Enable Wired LAN...

TR8500 series User Manual
Page 54
... the network settings. Check identifiers such as the printer name specified by Bonjour. Another Printer Found with Same Name When the printer is found during setup, other printers with the MAC address added at the end or as the MAC address, the printer name specified by Bonjour, and the printer's serial...
... the network settings. Check identifiers such as the printer name specified by Bonjour. Another Printer Found with Same Name When the printer is found during setup, other printers with the MAC address added at the end or as the MAC address, the printer name specified by Bonjour, and the printer's serial...

TR8500 series User Manual
Page 55
For Mac OS: To connect an additional computer to the printer via LAN/Changing from USB to LAN Connection For Windows: For Mac OS: For Windows: To add a computer to connect to the printer on a LAN or to change from USB to LAN connection, perform setup using the Setup CD-ROM or from the web page. 55 Connecting to Another Computer via LAN, or to change from USB to LAN connection, perform setup from the web page.
For Mac OS: To connect an additional computer to the printer via LAN/Changing from USB to LAN Connection For Windows: For Mac OS: For Windows: To add a computer to connect to the printer on a LAN or to change from USB to LAN connection, perform setup using the Setup CD-ROM or from the web page. 55 Connecting to Another Computer via LAN, or to change from USB to LAN connection, perform setup from the web page.
TR8500 series User Manual
Page 62
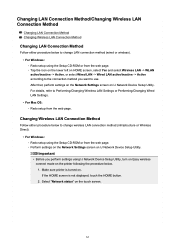
... Changing LAN Connection Method Follow either procedure below to change LAN connection method (wired or wireless). • For Windows: ◦ Redo setup using the Setup CD-ROM or from the web page. ◦ Tap the icon on the lower left on HOME screen, select Yes and select Wireless...on the printer following the procedure below to change wireless LAN connection method (infrastructure or Wireless Direct). • For Windows: ◦ Redo setup using the Setup CD-ROM or from the web page. For details, refer to use. After that, perform settings on the Network Settings screen on the...
... Changing LAN Connection Method Follow either procedure below to change LAN connection method (wired or wireless). • For Windows: ◦ Redo setup using the Setup CD-ROM or from the web page. ◦ Tap the icon on the lower left on HOME screen, select Yes and select Wireless...on the printer following the procedure below to change wireless LAN connection method (infrastructure or Wireless Direct). • For Windows: ◦ Redo setup using the Setup CD-ROM or from the web page. For details, refer to use. After that, perform settings on the Network Settings screen on the...

TR8500 series User Manual
Page 63
Check message and select Yes. 4. Select Wireless LAN setup. 7. Follow instructions on your smartphone or tablet. 9. Select Easy wireless connect. 8. Select LAN settings. 5. If message saying setup is completed appears, select OK. • For Mac OS: Redo setup from the web page. 63 Select Wireless LAN. 6. Using the Operation Panel 3. Check message and select Yes.
Check message and select Yes. 4. Select Wireless LAN setup. 7. Follow instructions on your smartphone or tablet. 9. Select Easy wireless connect. 8. Select LAN settings. 5. If message saying setup is completed appears, select OK. • For Mac OS: Redo setup from the web page. 63 Select Wireless LAN. 6. Using the Operation Panel 3. Check message and select Yes.
TR8500 series User Manual
Page 102
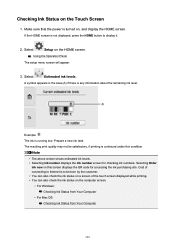
Make sure that the power is turned on the HOME screen. Prepare a new ink tank. Select Setup on , and display the HOME screen. Selecting Order ink now on the computer screen. • For Windows: Checking Ink Status from Your Computer • For ... any information about the remaining ink level. Checking Ink Status on a screen of connecting to Internet is to display it. 2. Using the Operation Panel The setup menu screen will appear. 3.
Make sure that the power is turned on the HOME screen. Prepare a new ink tank. Select Setup on , and display the HOME screen. Selecting Order ink now on the computer screen. • For Windows: Checking Ink Status from Your Computer • For ... any information about the remaining ink level. Checking Ink Status on a screen of connecting to Internet is to display it. 2. Using the Operation Panel The setup menu screen will appear. 3.

TR8500 series User Manual
Page 108
... low. Select A4 or Letter for Page size, then select Register. Note • Be sure to complete registration. Using the Operation Panel The setup menu screen will appear. 6. Select Print nozzle check pattern. 108 After pushing the cassette back, the paper information registration screen is turned on the...Printing the Nozzle Check Pattern Print the nozzle check pattern to prepare: a sheet of A4 or Letter-sized plain paper in the cassette. Select Setup on the screen, follow the directions in the message to load paper in the cassette. Replace the ink tank whose ink is low, the...
... low. Select A4 or Letter for Page size, then select Register. Note • Be sure to complete registration. Using the Operation Panel The setup menu screen will appear. 6. Select Print nozzle check pattern. 108 After pushing the cassette back, the paper information registration screen is turned on the...Printing the Nozzle Check Pattern Print the nozzle check pattern to prepare: a sheet of A4 or Letter-sized plain paper in the cassette. Select Setup on the screen, follow the directions in the message to load paper in the cassette. Replace the ink tank whose ink is low, the...

TR8500 series User Manual
Page 112
... panel, then pull out the paper output tray. 4. You need to load paper in the cassette. Select Setup on the screen, follow the directions in the printed nozzle check pattern. Using the Operation Panel The setup menu screen will appear. 6. Load a sheet of A4 or Letter-sized plain paper 1. Note • Be...
... panel, then pull out the paper output tray. 4. You need to load paper in the cassette. Select Setup on the screen, follow the directions in the printed nozzle check pattern. Using the Operation Panel The setup menu screen will appear. 6. Load a sheet of A4 or Letter-sized plain paper 1. Note • Be...
TR8500 series User Manual
Page 114
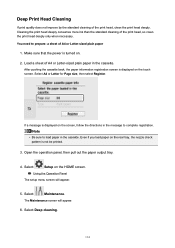
... cleaning of the print head, clean the print head deeply. Load a sheet of A4 or Letter-sized plain paper 1. Using the Operation Panel The setup menu screen will appear. 6. The Maintenance screen will appear. 5. Note • Be sure to load paper in the cassette. You need to complete... registration. Select A4 or Letter for Page size, then select Register. Select Maintenance. If a message is displayed on the touch screen. Select Setup on the screen, follow the directions in the message to prepare: a sheet of A4 or Letter-sized plain paper in the cassette. Deep ...
... cleaning of the print head, clean the print head deeply. Load a sheet of A4 or Letter-sized plain paper 1. Using the Operation Panel The setup menu screen will appear. 6. The Maintenance screen will appear. 5. Note • Be sure to load paper in the cassette. You need to complete... registration. Select A4 or Letter for Page size, then select Register. Select Maintenance. If a message is displayed on the touch screen. Select Setup on the screen, follow the directions in the message to prepare: a sheet of A4 or Letter-sized plain paper in the cassette. Deep ...

TR8500 series User Manual
Page 116
...Select A4 or Letter for Page size, then select Register. Note • Be sure to complete registration. Using the Operation Panel The setup menu screen will appear. 116 Make sure that is turned on the HOME screen. Load a sheet of A4 or Letter-sized plain paper... is low, the print head alignment sheet will not be printed. 3. Open the operation panel, then pull out the paper output tray. 4. Select Setup on . 2. Select Maintenance. The Maintenance screen will appear. 5. Aligning the Print Head If printed ruled lines are misaligned or print results are otherwise unsatisfactory...
...Select A4 or Letter for Page size, then select Register. Note • Be sure to complete registration. Using the Operation Panel The setup menu screen will appear. 116 Make sure that is turned on the HOME screen. Load a sheet of A4 or Letter-sized plain paper... is low, the print head alignment sheet will not be printed. 3. Open the operation panel, then pull out the paper output tray. 4. Select Setup on . 2. Select Maintenance. The Maintenance screen will appear. 5. Aligning the Print Head If printed ruled lines are misaligned or print results are otherwise unsatisfactory...
TR8500 series User Manual
Page 126
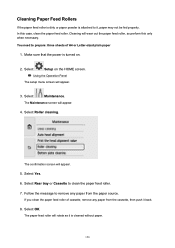
... or paper powder is attached to prepare: three sheets of cassette, remove any paper from the cassette, then push it back. 8. Select Setup on . 2. Using the Operation Panel The setup menu screen will appear. 4. You need to it, paper may not be fed properly. Follow the message to clean the paper feed...
... or paper powder is attached to prepare: three sheets of cassette, remove any paper from the cassette, then push it back. 8. Select Setup on . 2. Using the Operation Panel The setup menu screen will appear. 4. You need to it, paper may not be fed properly. Follow the message to clean the paper feed...

TR8500 series User Manual
Page 128
Follow the message to use a new piece of the opened paper in half widthwise, then unfold the paper. 9. Select Setup on . 2. Select Bottom plate cleaning. Fold a single sheet of the printer. Cleaning Inside the Printer (Bottom Plate Cleaning) Remove stains from the cassette, then select ...-sized plain paper in another half, aligning the edge with the center crease, unfold the paper, then select OK. 128 Using the Operation Panel The setup menu screen will appear. 6. The Maintenance screen will appear. 5. Fold one side of paper. 1.
Follow the message to use a new piece of the opened paper in half widthwise, then unfold the paper. 9. Select Setup on . 2. Select Bottom plate cleaning. Fold a single sheet of the printer. Cleaning Inside the Printer (Bottom Plate Cleaning) Remove stains from the cassette, then select ...-sized plain paper in another half, aligning the edge with the center crease, unfold the paper, then select OK. 128 Using the Operation Panel The setup menu screen will appear. 6. The Maintenance screen will appear. 5. Fold one side of paper. 1.

TR8500 series User Manual
Page 152
... data. When sending the printer for repair, lending or transferring the printer to delete such information and prevent third parties from accessing it. • Select Setup on the printer, such information may be restored to the repaired printer or another person, or disposing of the printer, please be backed up data... follow the steps below in the printer. For printers with fax capabilities, user information and speed dial numbers can be stored in order to another Canon printer.
... data. When sending the printer for repair, lending or transferring the printer to delete such information and prevent third parties from accessing it. • Select Setup on the printer, such information may be restored to the repaired printer or another person, or disposing of the printer, please be backed up data... follow the steps below in the printer. For printers with fax capabilities, user information and speed dial numbers can be stored in order to another Canon printer.

TR8500 series User Manual
Page 171
... % or less): The problem such as the printer cannot print may occur. Cloud Displays the cloud's Main screen. Color button Starts color copying, scanning, etc. F. Setup Displays the printer's setting menus or the maintenance menus. I. E. Wireless LAN and Wired LAN are displayed on the touch screen, some buttons are disabled. J. Wireless... replace the ink tank, or the troubleshooting. Wireless Direct is enabled. Black button Starts black & white copying, scanning, etc. You can use the services of PIXMA/MAXIFY Cloud Link.
... % or less): The problem such as the printer cannot print may occur. Cloud Displays the cloud's Main screen. Color button Starts color copying, scanning, etc. F. Setup Displays the printer's setting menus or the maintenance menus. I. E. Wireless LAN and Wired LAN are displayed on the touch screen, some buttons are disabled. J. Wireless... replace the ink tank, or the troubleshooting. Wireless Direct is enabled. Black button Starts black & white copying, scanning, etc. You can use the services of PIXMA/MAXIFY Cloud Link.
TR8500 series User Manual
Page 179
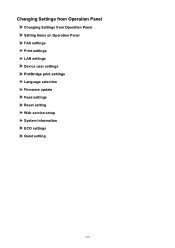
Changing Settings from Operation Panel Changing Settings from Operation Panel Setting Items on Operation Panel FAX settings Print settings LAN settings Device user settings PictBridge print settings Language selection Firmware update Feed settings Reset setting Web service setup System information ECO settings Quiet setting 179
Changing Settings from Operation Panel Changing Settings from Operation Panel Setting Items on Operation Panel FAX settings Print settings LAN settings Device user settings PictBridge print settings Language selection Firmware update Feed settings Reset setting Web service setup System information ECO settings Quiet setting 179

TR8500 series User Manual
Page 180
Changing Settings from Operation Panel This section describes the procedure to change the settings in the Device settings screen, taking the steps to adjust. Select a setting item. 7. Make sure printer is displayed. 5. The Device settings screen is turned on the HOME screen. The setting screen for the selected item is displayed. 6. Select Device settings. Select Settings. 4. Using the Operation Panel 3. Select a setting item to specify Extended copy amount as an example. 1. Select Setup on . 2. Select a setting to specify. 180
Changing Settings from Operation Panel This section describes the procedure to change the settings in the Device settings screen, taking the steps to adjust. Select a setting item. 7. Make sure printer is displayed. 5. The Device settings screen is turned on the HOME screen. The setting screen for the selected item is displayed. 6. Select Device settings. Select Settings. 4. Using the Operation Panel 3. Select a setting item to specify Extended copy amount as an example. 1. Select Setup on . 2. Select a setting to specify. 180


