Quick Start Guide
Page 41
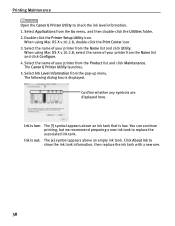
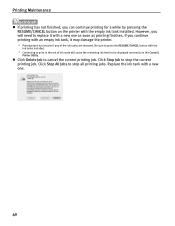
... Status Monitor button which appears on the taskbar during printing. You can continue printing, but we recommend preparing a new ink tank to print. See "Accessing the Printer Driver (Windows)" on the PC Open the Canon IJ Status Monitor to replace the associated ink tank. The following message will be displayed. * You can confirm the...
... Status Monitor button which appears on the taskbar during printing. You can continue printing, but we recommend preparing a new ink tank to print. See "Accessing the Printer Driver (Windows)" on the PC Open the Canon IJ Status Monitor to replace the associated ink tank. The following message will be displayed. * You can confirm the...
Quick Start Guide
Page 42
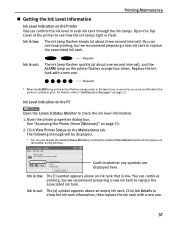
...from the Name list and click Utility. The following dialog box is low. You can continue printing, but we recommend preparing a new ink tank to show the ink tank information, then replace the ink tank with a new one. 38 Select the name of your printer from the Product list...icon. When using Mac OS X v.10.2.8, double-click the Print Center icon. 3. Ink is out: The [x] symbol appears above an ink tank that is displayed. Printing Maintenance Open the Canon IJ Printer Utility to check the ink level information. 1. Select Applications from the Go menu, and then double-click the ...
...from the Name list and click Utility. The following dialog box is low. You can continue printing, but we recommend preparing a new ink tank to show the ink tank information, then replace the ink tank with a new one. 38 Select the name of your printer from the Product list...icon. When using Mac OS X v.10.2.8, double-click the Print Center icon. 3. Ink is out: The [x] symbol appears above an ink tank that is displayed. Printing Maintenance Open the Canon IJ Printer Utility to check the ink level information. 1. Select Applications from the Go menu, and then double-click the ...
Quick Start Guide
Page 43
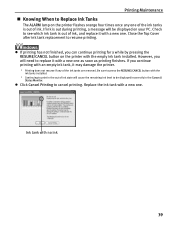
...in the Canon IJ Status Monitor. However, you will be displayed incorrectly in the out of the ink tanks are removed. z Click Cancel Printing to resume printing. Replace the ink tank with a new one. Be sure to press the RESUME/CANCEL button with the ink tanks installed. * Continuing to .... z If printing has not finished, you continue printing with an empty ink tank, it with no ink 39 If ink is out of ink. Ink tank with a new one . Close the Top Cover after ink tank replacement to cancel printing. If you can continue printing for a while by pressing the RESUME/...
...in the Canon IJ Status Monitor. However, you will be displayed incorrectly in the out of the ink tanks are removed. z Click Cancel Printing to resume printing. Replace the ink tank with a new one. Be sure to press the RESUME/CANCEL button with the ink tanks installed. * Continuing to .... z If printing has not finished, you continue printing with an empty ink tank, it with no ink 39 If ink is out of ink. Ink tank with a new one . Close the Top Cover after ink tank replacement to cancel printing. If you can continue printing for a while by pressing the RESUME/...
Quick Start Guide
Page 44
... installed. Be sure to press the RESUME/CANCEL button with the ink tanks installed. * Continuing to print in the Canon IJ Printer Utility. Click Stop All Jobs to be displayed incorrectly in the out of the ink tanks are removed. If you continue printing with a new one as soon as printing finishes. Printing Maintenance z If...
... installed. Be sure to press the RESUME/CANCEL button with the ink tanks installed. * Continuing to print in the Canon IJ Printer Utility. Click Stop All Jobs to be displayed incorrectly in the out of the ink tanks are removed. If you continue printing with a new one as soon as printing finishes. Printing Maintenance z If...
Quick Start Guide
Page 45
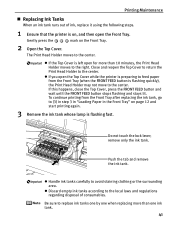
...center. Push the tab and remove the ink tank. z If the Top Cover is flashing quickly), the Print Head Holder may not move to the right. To continue printing from the Front Tray (when ...the FRONT FEED button is left open for more than 10 minutes, the Print Head Holder moves to the center. remove only the ink tank. Do ... press the FRONT FEED button and wait until the FRONT FEED button stops flashing and stays lit. z Handle ink tanks carefully to (3) in step 3 in "Loading Paper in the Front Tray" on the Front Tray. ...
...center. Push the tab and remove the ink tank. z If the Top Cover is flashing quickly), the Print Head Holder may not move to the right. To continue printing from the Front Tray (when ...the FRONT FEED button is left open for more than 10 minutes, the Print Head Holder moves to the center. remove only the ink tank. Do ... press the FRONT FEED button and wait until the FRONT FEED button stops flashing and stays lit. z Handle ink tanks carefully to (3) in step 3 in "Loading Paper in the Front Tray" on the Front Tray. ...
Quick Start Guide
Page 49
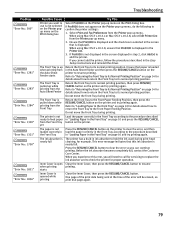
...ink lamps is flashing slowly, the associated ink tank is inserted in the wrong position. z Increase the Print Quality setting in the ink...Ink Tanks" on page 41. If any one of the ink lamps is empty. See "Replacing Ink Tanks" on page 41. If an ink lamp is flashing even though ink...ink tank, it . z Open the Top Cover and make sure that the correct ink tank color is peeled off the ink...all the ink tanks click into place and then their ink lamps ...to replace the associated ink tank. See "Replacing an Ink Tank" on page...are incorrect, even if ink remains in the printer driver...
...ink lamps is flashing slowly, the associated ink tank is inserted in the wrong position. z Increase the Print Quality setting in the ink...Ink Tanks" on page 41. If any one of the ink lamps is empty. See "Replacing Ink Tanks" on page 41. If an ink lamp is flashing even though ink...ink tank, it . z Open the Top Cover and make sure that the correct ink tank color is peeled off the ink...all the ink tanks click into place and then their ink lamps ...to replace the associated ink tank. See "Replacing an Ink Tank" on page...are incorrect, even if ink remains in the printer driver...
Quick Start Guide
Page 72
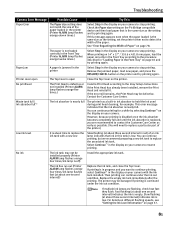
...printing paper if paper curl is empty. Fast flashing (at about three second interval) indicates ink is not finished yet, just press the RESUME/CANCEL button on the printer to continue printing in the "no ink" state may become marked or not feed properly. Place the paper on page 36. ... is not installed in the correct position Try This If the ink lamp is flashing fast, ink is inserted in that the correct ink tank color is curled, it may cause damage to print in the "no ink" state. Continuing to the printer. If printing is low. For details on different flashing speeds...
...printing paper if paper curl is empty. Fast flashing (at about three second interval) indicates ink is not finished yet, just press the RESUME/CANCEL button on the printer to continue printing in the "no ink" state may become marked or not feed properly. Place the paper on page 36. ... is not installed in the correct position Try This If the ink lamp is flashing fast, ink is inserted in that the correct ink tank color is curled, it may cause damage to print in the "no ink" state. Continuing to the printer. If printing is low. For details on different flashing speeds...

Quick Start Guide
Page 77
...Head may not be installed properly (The lamp on page 72. Count the flashes and take the appropriate action to continue printing, press the RESUME/ CANCEL button with the ink tank installed. Inner Cover is closed / Paper jam If the Front Tray is not installed in the appropriate position ...Possible causes are as follows: z The ink tank may be installed properly/The ink has run out (The lamp on page 37. If this can continue under the ink out condition. If the Rear Support is open it and press the RESUME/CANCEL ...
...Head may not be installed properly (The lamp on page 72. Count the flashes and take the appropriate action to continue printing, press the RESUME/ CANCEL button with the ink tank installed. Inner Cover is closed / Paper jam If the Front Tray is not installed in the appropriate position ...Possible causes are as follows: z The ink tank may be installed properly/The ink has run out (The lamp on page 37. If this can continue under the ink out condition. If the Rear Support is open it and press the RESUME/CANCEL ...

Quick Start Guide
Page 78
...full, contact the Customer Care Center. (You will need to replace a particular part of the printer.) Canon recommends that the ink absorber is loaded in ink absorber for the ink used during print head cleaning, full for details about how to return the Front Tray to its normal ...printing position. PictBridgecompatible digital camera or digital video camcorder can continue printing. Press the RESUME/CANCEL button ...
...full, contact the Customer Care Center. (You will need to replace a particular part of the printer.) Canon recommends that the ink absorber is loaded in ink absorber for the ink used during print head cleaning, full for details about how to return the Front Tray to its normal ...printing position. PictBridgecompatible digital camera or digital video camcorder can continue printing. Press the RESUME/CANCEL button ...

Quick Start Guide
Page 79
... nozzles are as follows: z Letter-sized paper is off ). Then try printing again. If this printer (The lamp on the ink tank is not loaded on the printer to continue printing in the User's Guide. Please be advised that is the same size as the setting and try printing again. Fourteen...paper correctly in the Front Tray according to the procedure described in the Front Tray "Loading Paper in the printer driver and load paper that Canon shall not be performed using paper from the Front Tray yet. Automatic print head alignment cannot be liable for information on the printer. 75 ...
... nozzles are as follows: z Letter-sized paper is off ). Then try printing again. If this printer (The lamp on the ink tank is not loaded on the printer to continue printing in the User's Guide. Please be advised that is the same size as the setting and try printing again. Fourteen...paper correctly in the Front Tray according to the procedure described in the Front Tray "Loading Paper in the printer driver and load paper that Canon shall not be performed using paper from the Front Tray yet. Automatic print head alignment cannot be liable for information on the printer. 75 ...
Quick Start Guide
Page 83
...the Print dialog box. The ink absorber is displayed. When you experience this ink absorber is not selected on the Printer popup menu on the Print dialog box Try This Select Pro9000 on the printer and try... described the Front Tray in "Loading Paper in the Front Tray" on the printer. If Pro9000 is not Press the RESUME/CANCEL button on the printer to clear the error, and then loaded..." "Error No.: 1700" "Error No.: 1851" "Error No.: 1856" Possible Cause Printer you can continue printing. One page of the print data being sent at the time of the error will need to call for servicing...
...the Print dialog box. The ink absorber is displayed. When you experience this ink absorber is not selected on the Printer popup menu on the Print dialog box Try This Select Pro9000 on the printer and try... described the Front Tray in "Loading Paper in the Front Tray" on the printer. If Pro9000 is not Press the RESUME/CANCEL button on the printer to clear the error, and then loaded..." "Error No.: 1700" "Error No.: 1851" "Error No.: 1856" Possible Cause Printer you can continue printing. One page of the print data being sent at the time of the error will need to call for servicing...
Quick Start Guide
Page 85
... flashes fast (at about one Slow flashing (at about three second interval) indicates ink is continued under the ink out condition. For details on different flashing speeds, see "Getting the Ink Level Information" on the printer. Printer cover open The Top Cover is the same size as possible. (You will ... fast they flash. If the Print Head has already been installed, remove the Print Head and reinstall it. You can continue printing for example. If multiple ink lamps are recommended to contact the Customer Care Center as early as the setting, set the printer driver not to the ...
... flashes fast (at about one Slow flashing (at about three second interval) indicates ink is continued under the ink out condition. For details on different flashing speeds, see "Getting the Ink Level Information" on the printer. Printer cover open The Top Cover is the same size as possible. (You will ... fast they flash. If the Print Head has already been installed, remove the Print Head and reinstall it. You can continue printing for example. If multiple ink lamps are recommended to contact the Customer Care Center as early as the setting, set the printer driver not to the ...

Quick Start Guide
Page 86
...Please be advised that Canon shall not be compatible with an ink tank that was once empty is off the printer, and unplug the power cord of selecting Continue. *2 The ink absorber absorbs ink used during cleaning, for any printer malfunction or damage caused by refilled ink tanks. After a ...while, plug the power cord of the same color are installed (Printer ALARM lamp flashes orange seven times/ink lamp flashes fast (at...
...Please be advised that Canon shall not be compatible with an ink tank that was once empty is off the printer, and unplug the power cord of selecting Continue. *2 The ink absorber absorbs ink used during cleaning, for any printer malfunction or damage caused by refilled ink tanks. After a ...while, plug the power cord of the same color are installed (Printer ALARM lamp flashes orange seven times/ink lamp flashes fast (at...

Easy Setup Instructions
Page 1
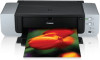
...Close and reopen the Top Cover to return the holder to the center. PIXMA Pro9000 Photo Printer Documentation and Software Kit 2 Prepare the Printer Start Here Easy Setup Instructions 3 Install the Print Head 4 Install the Ink Tanks Series Photo Printer 5 Connect the Printer and Load Paper 1 Plug the...for the connection, the printer will initialize. Front Tray Extension NOTE: If the ALARM lamp on print quality. Continue with USB 2.0 Hi-Speed port. Ensure that the ink tanks are installed in - Serial Number Location IMPORTANT: If the Top Cover is used for more than 10 ...
...Close and reopen the Top Cover to return the holder to the center. PIXMA Pro9000 Photo Printer Documentation and Software Kit 2 Prepare the Printer Start Here Easy Setup Instructions 3 Install the Print Head 4 Install the Ink Tanks Series Photo Printer 5 Connect the Printer and Load Paper 1 Plug the...for the connection, the printer will initialize. Front Tray Extension NOTE: If the ALARM lamp on print quality. Continue with USB 2.0 Hi-Speed port. Ensure that the ink tanks are installed in - Serial Number Location IMPORTANT: If the Top Cover is used for more than 10 ...


