Easy Start Guide
Page 1
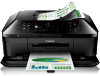
... in Europe: If you can enter the fax settings through the Easy setup. adapter for Fax Reception Read this figure. QT5-6253-V01 XXXXXXXX © CANON INC. 2013 PRINTED IN XXXXXXXX
... in Europe: If you can enter the fax settings through the Easy setup. adapter for Fax Reception Read this figure. QT5-6253-V01 XXXXXXXX © CANON INC. 2013 PRINTED IN XXXXXXXX
User Manual
Page 1
MX920 series Online Manual Faxing English
MX920 series Online Manual Faxing English
User Manual
Page 2
Faxing Preparing for Faxing Connecting the Telephone Line Setting the Telephone Line Type Setting the Receive Mode Setting the Sender Information Sending Faxes Using the Operation Panel of the Machine Sending Faxes with the Numeric Buttons Basic Resending Faxes (Redialing a Busy Number) Sending Faxes Using Useful Functions Registering Recipients Registering Recipients Using the Operation Panel of the Machine Registering Recipients Using Speed Dial Utility Receiving Faxes Receiving Faxes Changing the Paper Settings Advanced Settings of Receive Mode Memory Reception Receiving Faxes Using Useful ...
Faxing Preparing for Faxing Connecting the Telephone Line Setting the Telephone Line Type Setting the Receive Mode Setting the Sender Information Sending Faxes Using the Operation Panel of the Machine Sending Faxes with the Numeric Buttons Basic Resending Faxes (Redialing a Busy Number) Sending Faxes Using Useful Functions Registering Recipients Registering Recipients Using the Operation Panel of the Machine Registering Recipients Using Speed Dial Utility Receiving Faxes Receiving Faxes Changing the Paper Settings Advanced Settings of Receive Mode Memory Reception Receiving Faxes Using Useful ...

User Manual
Page 3
Sending Faxes Using the Operation Panel of the Machine Sending Faxes with the Numeric Buttons Basic Resending Faxes (Redialing a Busy Number) Sending Faxes Using Useful Functions
Sending Faxes Using the Operation Panel of the Machine Sending Faxes with the Numeric Buttons Basic Resending Faxes (Redialing a Busy Number) Sending Faxes Using Useful Functions

User Manual
Page 4
Registering Recipients Registering Recipients Using the Operation Panel of the Machine Registering Recipients Using Speed Dial Utility
Registering Recipients Registering Recipients Using the Operation Panel of the Machine Registering Recipients Using Speed Dial Utility

User Manual
Page 5
Receiving Faxes Receiving Faxes Changing the Paper Settings Advanced Settings of Receive Mode Memory Reception Receiving Faxes Using Useful Functions
Receiving Faxes Receiving Faxes Changing the Paper Settings Advanced Settings of Receive Mode Memory Reception Receiving Faxes Using Useful Functions

User Manual
Page 6
Other Useful Fax Functions Using the Information Services Transmission/Reception of Faxes Using ECM Document Stored in Machine's Memory Summary of Reports and Lists
Other Useful Fax Functions Using the Information Services Transmission/Reception of Faxes Using ECM Document Stored in Machine's Memory Summary of Reports and Lists

User Manual
Page 7
Sending Faxes from a Computer Sending a FAX (Fax Driver) Basic Creating an Address Book (Fax Driver) Edit or Remove a Recipient from an Address Book (Fax Driver) Search for a Recipient in an Address Book (Fax Driver) Troubleshooting Problems Sending Faxes (Fax Driver) General Notes (Fax Driver)
Sending Faxes from a Computer Sending a FAX (Fax Driver) Basic Creating an Address Book (Fax Driver) Edit or Remove a Recipient from an Address Book (Fax Driver) Search for a Recipient in an Address Book (Fax Driver) Troubleshooting Problems Sending Faxes (Fax Driver) General Notes (Fax Driver)
User Manual
Page 8
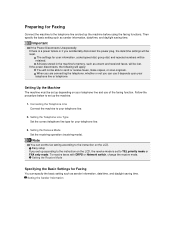
All faxes stored in the machine's memory, such as unsent and received faxes, will be reset. When you are connecting the telephone, whether or not you set up according to the instruction on the LCD, the receive mode is a power failure or if you accidentally disconnect the power plug, the date/time settings will be set up the machine before using the faxing functions. Connecting the Telephone Line Connect the machine to send or receive faxes, make copies, or scan originals. Setting the Receive Mode Set the receiving operation (receiving mode). Note You can set up depending on the ...
All faxes stored in the machine's memory, such as unsent and received faxes, will be reset. When you are connecting the telephone, whether or not you set up according to the instruction on the LCD, the receive mode is a power failure or if you accidentally disconnect the power plug, the date/time settings will be set up the machine before using the faxing functions. Connecting the Telephone Line Connect the machine to send or receive faxes, make copies, or scan originals. Setting the Receive Mode Set the receiving operation (receiving mode). Note You can set up depending on the ...
User Manual
Page 9
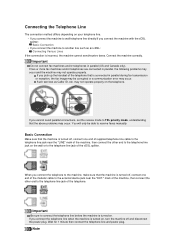
Connect the machine correctly. Such services as an xDSL: Connecting Various Lines If the connection is connected in parallel, the following problems may occur and the machine may not operate properly. If you cannot avoid parallel connections, set the receive mode to receive faxes manually. If you pick up the handset of the telephone that the machine is turned off, connect one end of supplied telephone line cable to the telephone line jack near the "EXT." Basic Connection Make sure that is incorrect, the machine cannot send/receive faxes. Wait for 1 minute then connect the...
Connect the machine correctly. Such services as an xDSL: Connecting Various Lines If the connection is connected in parallel, the following problems may occur and the machine may not operate properly. If you cannot avoid parallel connections, set the receive mode to receive faxes manually. If you pick up the handset of the telephone that the machine is turned off, connect one end of supplied telephone line cable to the telephone line jack near the "EXT." Basic Connection Make sure that is incorrect, the machine cannot send/receive faxes. Wait for 1 minute then connect the...
User Manual
Page 10
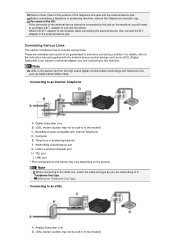
For users in to the modem) Telephone or answering machine F. LINE port * Port configurations and names may vary depending on the machine, you will need to the jack on the product. xDSL modem (splitter may not be built-in the UK: If the connector of the telephone line jack and the external device jack. xDSL modem (splitter may not be guaranteed to an xDSL A. Computer E. Setting the Telephone Line Type • Connecting to suit every connecting condition. These are examples and could not be built-in Telephone line type. Note xDSL is the generic term for the ...
For users in to the modem) Telephone or answering machine F. LINE port * Port configurations and names may vary depending on the machine, you will need to the jack on the product. xDSL modem (splitter may not be built-in the UK: If the connector of the telephone line jack and the external device jack. xDSL modem (splitter may not be guaranteed to an xDSL A. Computer E. Setting the Telephone Line Type • Connecting to suit every connecting condition. These are examples and could not be built-in Telephone line type. Note xDSL is the generic term for the ...

User Manual
Page 11
The machine may not be able to the manuals supplied with your terminal adapter or dial-up router. Telephone or answering machine Important When the splitter is not built-in to in parallel. And also, do not branch the telephone line before the splitter (wall side). C. Setting the Telephone Line Type • Connecting to an ISDN Line For details on ISDN (Integrated Service Digital Network) connection and settings, refer to operate properly. Computer D. Note When connecting to the xDSL line, select the same line type as you are subscribing to the modem, do not connect ...
The machine may not be able to the manuals supplied with your terminal adapter or dial-up router. Telephone or answering machine Important When the splitter is not built-in to in parallel. And also, do not branch the telephone line before the splitter (wall side). C. Setting the Telephone Line Type • Connecting to an ISDN Line For details on ISDN (Integrated Service Digital Network) connection and settings, refer to operate properly. Computer D. Note When connecting to the xDSL line, select the same line type as you are subscribing to the modem, do not connect ...

User Manual
Page 12
button to select Telephone line type, then press the OK button. button to select FAX settings, then press the OK button. Press the FAX button to return to check the current setting. You can print USER'S DATA LIST to the Fax standby screen. Select Setup, then press the OK button. 4. button to confirm your line type. Confirming that the machine is turned on. Use the Device settings, then press the OK button. Touch tone Select when your telephone line. Note Telephone line type will not appear in countries or regions where Rotary pulse is displayed. 3. Summary of ...
button to select Telephone line type, then press the OK button. button to select FAX settings, then press the OK button. Press the FAX button to return to check the current setting. You can print USER'S DATA LIST to the Fax standby screen. Select Setup, then press the OK button. 4. button to confirm your line type. Confirming that the machine is turned on. Use the Device settings, then press the OK button. Touch tone Select when your telephone line. Note Telephone line type will not appear in countries or regions where Rotary pulse is displayed. 3. Summary of ...
User Manual
Page 13
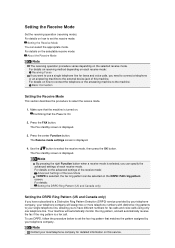
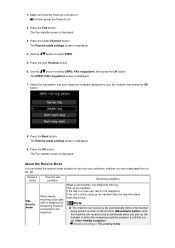
The Receive mode settings screen is selected, the fax ring pattern can be selected on the DRPD: FAX ring pattern screen. Note By pressing the right Function button when a receive mode is selected, you want to use DRPD, follow the procedure below to set the receive mode: Setting the Receive Mode You can specify the advanced settings of each receive mode: Receiving Faxes If you can select the appropriate mode. For details on each receive mode. For details: Setting the DRPD Ring Pattern (US and Canada only) Setting the DRPD Ring Pattern (US and Canada only) If you have ...
The Receive mode settings screen is selected, the fax ring pattern can be selected on the DRPD: FAX ring pattern screen. Note By pressing the right Function button when a receive mode is selected, you want to use DRPD, follow the procedure below to set the receive mode: Setting the Receive Mode You can specify the advanced settings of each receive mode: Receiving Faxes If you can select the appropriate mode. For details on each receive mode. For details: Setting the DRPD Ring Pattern (US and Canada only) Setting the DRPD Ring Pattern (US and Canada only) If you have ...
User Manual
Page 14
Confirming that your telephone company assigned to your fax use condition When mainly receiving voice calls (with a telephone or answering machine connected to the machine): Receiving operation When a call is displayed. 9. Use the button to select DRPD: FAX ring pattern, then press the OK button. The DRPD: FAX ring pattern screen is a fax (User-friendly reception). Press the OK button. Receive mode TEL priority mode Your fax use conditions: whether you pick up the handset after the machine starts receiving the fax. Note The machine can receive a fax automatically without the ...
Confirming that your telephone company assigned to your fax use condition When mainly receiving voice calls (with a telephone or answering machine connected to the machine): Receiving operation When a call is displayed. 9. Use the button to select DRPD: FAX ring pattern, then press the OK button. The DRPD: FAX ring pattern screen is a fax (User-friendly reception). Press the OK button. Receive mode TEL priority mode Your fax use conditions: whether you pick up the handset after the machine starts receiving the fax. Note The machine can receive a fax automatically without the ...
User Manual
Page 15
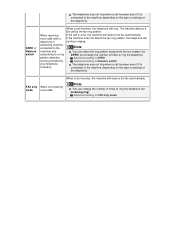
Advanced setting in DRPD Advanced setting in FAX only mode The telephone may not ring when a call incomes even if it is connected to the machine, depending on the type or settings of the telephone. DRPD or Network switch When receiving voice calls (with a telephone or answering machine connected to the machine) and subscribing to a ring pattern detection service provided by the fax ring pattern. If the call incomes, the telephone will receive the fax automatically. FAX only When not receiving mode voice calls: Note You can select the ring pattern assigned to the ...
Advanced setting in DRPD Advanced setting in FAX only mode The telephone may not ring when a call incomes even if it is connected to the machine, depending on the type or settings of the telephone. DRPD or Network switch When receiving voice calls (with a telephone or answering machine connected to the machine) and subscribing to a ring pattern detection service provided by the fax ring pattern. If the call incomes, the telephone will receive the fax automatically. FAX only When not receiving mode voice calls: Note You can select the ring pattern assigned to the ...
User Manual
Page 16
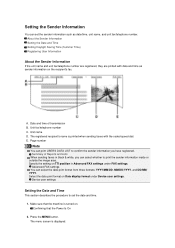
E. Page number Note You can print USER'S DATA LIST to set the sender information such as sender information on the recipient's fax. Unit name D. Make sure that the Power Is On 2. Date and time of Reports and Lists When sending faxes in Advanced FAX settings under Device user settings. Specify the setting on TTI position in black & white, you have registered. Device user settings Setting the Date and Time This section describes the procedure to confirm the sender information you can select whether to print the sender information inside or outside the image area. Press the ...
E. Page number Note You can print USER'S DATA LIST to set the sender information such as sender information on the recipient's fax. Unit name D. Make sure that the Power Is On 2. Date and time of Reports and Lists When sending faxes in Advanced FAX settings under Device user settings. Specify the setting on TTI position in black & white, you have registered. Device user settings Setting the Date and Time This section describes the procedure to confirm the sender information you can select whether to print the sender information inside or outside the image area. Press the ...

User Manual
Page 17
Set the date and time. Enter only the last two digits of purchase. 1. Press the FAX button to return to the latest information of your machine to select Device user settings, then press the OK button. 6. Important Not all the latest information of the year. You need to change the time by default. Confirming that shifts the clock time forward at certain periods of all countries or regions is displayed. 3. Note This setting may not be available depending on . Press the OK button. 9. Use the button to enter Enter the date and time in 24-hour format. Press...
Set the date and time. Enter only the last two digits of purchase. 1. Press the FAX button to return to the latest information of your machine to select Device user settings, then press the OK button. 6. Important Not all the latest information of the year. You need to change the time by default. Confirming that shifts the clock time forward at certain periods of all countries or regions is displayed. 3. Note This setting may not be available depending on . Press the OK button. 9. Use the button to enter Enter the date and time in 24-hour format. Press...

User Manual
Page 18
Use the button to change the setting item, use the use the the time, then press the OK button. button to select Summer time setting, then press the OK button. 7. Precede single digits with a zero. Set the date when summer time ends. Set the time (in 24-hour format) when summer time starts. Select Device settings, then press the OK button. 5. Use the button to confirm the selection. Use the button to change the setting, then 2. button to enter 9. button to change the setting item, use the use the OK button to move the cursor under the desired position,...
Use the button to change the setting item, use the use the the time, then press the OK button. button to select Summer time setting, then press the OK button. 7. Precede single digits with a zero. Set the date when summer time ends. Set the time (in 24-hour format) when summer time starts. Select Device settings, then press the OK button. 5. Use the button to confirm the selection. Use the button to change the setting, then 2. button to enter 9. button to change the setting item, use the use the OK button to move the cursor under the desired position,...
User Manual
Page 19
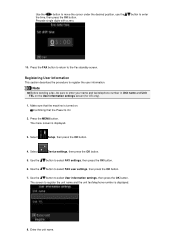
Press the FAX button to return to select FAX user settings, then press the OK button. 7. The menu screen is turned on the User information settings screen (for US only). 1. Use the button to the Fax standby screen. Enter the unit name. Make sure that the Power Is On 2. Use the button to select User information settings, then press the OK button. Note Before sending a fax, be sure to enter your name and fax/telephone number in Unit name and Unit TEL on . Press the MENU button. Select Setup, then press the OK button. 4. Use the button to select FAX settings, then press the...
Press the FAX button to return to select FAX user settings, then press the OK button. 7. The menu screen is turned on the User information settings screen (for US only). 1. Use the button to the Fax standby screen. Enter the unit name. Make sure that the Power Is On 2. Use the button to select User information settings, then press the OK button. Note Before sending a fax, be sure to enter your name and fax/telephone number in Unit name and Unit TEL on . Press the MENU button. Select Setup, then press the OK button. 4. Use the button to select FAX settings, then press the...
