
Setup Guide
Page 2
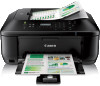
Setup Guide This guide provides information for setting up a network connection for Connection Printer Setup Setup Procedure Selection Push Button Method WPS Troubleshooting Wireless Connection Preparation for the printer.
Setup Guide This guide provides information for setting up a network connection for Connection Printer Setup Setup Procedure Selection Push Button Method WPS Troubleshooting Wireless Connection Preparation for the printer.
Setup Guide
Page 3
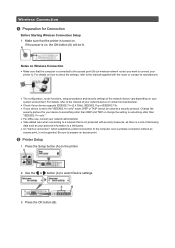
...its manufacturer. • Check if your device supports IEEE802.11n (2.4 GHz), IEEE802.11g or IEEE802.11b. • If your printer to a network that the printer is turned on your personal information to a third party. • An "Ad-hoc connection," which establishes a direct connection ....11n only." • For office use, consult your network administrator. • Take added care when connecting to . Notes on the printer. 2. Change the security protocol for Connection Before Starting Wireless Connection Setup 1. Make sure that is a risk of the network device vary depending...
...its manufacturer. • Check if your device supports IEEE802.11n (2.4 GHz), IEEE802.11g or IEEE802.11b. • If your printer to a network that the printer is turned on your personal information to a third party. • An "Ad-hoc connection," which establishes a direct connection ....11n only." • For office use, consult your network administrator. • Take added care when connecting to . Notes on the printer. 2. Change the security protocol for Connection Before Starting Wireless Connection Setup 1. Make sure that is a risk of the network device vary depending...
Setup Guide
Page 4
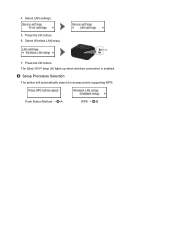
Select Wireless LAN setup. 7. Press the OK button. Push Button Method → d-A WPS → d-B Press the OK button. 6. c Setup Procedure Selection The printer will automatically search for access points supporting WPS. The (blue) Wi-Fi lamp (A) lights up when wireless connection is enabled. Select LAN settings. 5. 4.
Select Wireless LAN setup. 7. Press the OK button. Push Button Method → d-A WPS → d-B Press the OK button. 6. c Setup Procedure Selection The printer will automatically search for access points supporting WPS. The (blue) Wi-Fi lamp (A) lights up when wireless connection is enabled. Select LAN settings. 5. 4.

Setup Guide
Page 5
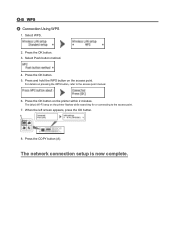
For details on the printer within 2 minutes. Press the COPY button (A). The network connection setup is now complete. Press the OK button on pressing the WPS button, refer to the access point. 3. Press and hold the WPS button on the printer flashes while searching for or connecting to the access point manual. 2. When the left screen appears, press the OK button. 4. The (blue) Wi-Fi lamp on the access point. d-A Push Button Method d Connection Using WPS 1.
For details on the printer within 2 minutes. Press the COPY button (A). The network connection setup is now complete. Press the OK button on pressing the WPS button, refer to the access point. 3. Press and hold the WPS button on the printer flashes while searching for or connecting to the access point manual. 2. When the left screen appears, press the OK button. 4. The (blue) Wi-Fi lamp on the access point. d-A Push Button Method d Connection Using WPS 1.
Setup Guide
Page 6
Press the OK button. 5. Press the OK button on the access point. Press the COPY button (A). Select Push button method. 4. The network connection setup is now complete. d-B WPS d Connection Using WPS 1. Press the OK button. 3. For details on the printer flashes while searching for or connecting to the access point manual. 6. When the left screen appears, press the OK button. 8. Press and hold the WPS button on the printer within 2 minutes. Select WPS. 2. The (blue) Wi-Fi lamp on pressing the WPS button, refer to the access point. 7.
Press the OK button. 5. Press the OK button on the access point. Press the COPY button (A). Select Push button method. 4. The network connection setup is now complete. d-B WPS d Connection Using WPS 1. Press the OK button. 3. For details on the printer flashes while searching for or connecting to the access point manual. 6. When the left screen appears, press the OK button. 8. Press and hold the WPS button on the printer within 2 minutes. Select WPS. 2. The (blue) Wi-Fi lamp on pressing the WPS button, refer to the access point. 7.
User Manual
Page 15
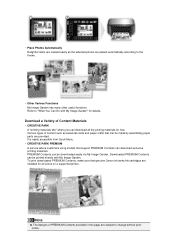
...My Image Garden. It is easily accessible from Quick Menu. • CREATIVE PARK PREMIUM A service where customers using models that genuine Canon ink tanks/ink cartridges are installed for all the printing materials for details. To print downloaded PREMIUM Contents, make sure that support .... Note The designs of Content Materials • CREATIVE PARK A "printing materials site" where you can download all colors on a supported printer. • Place Photos Automatically Delightful items are created easily as seasonal cards and paper crafts that can be made by assembling paper parts ...
...My Image Garden. It is easily accessible from Quick Menu. • CREATIVE PARK PREMIUM A service where customers using models that genuine Canon ink tanks/ink cartridges are installed for all the printing materials for details. To print downloaded PREMIUM Contents, make sure that support .... Note The designs of Content Materials • CREATIVE PARK A "printing materials site" where you can download all colors on a supported printer. • Place Photos Automatically Delightful items are created easily as seasonal cards and paper crafts that can be made by assembling paper parts ...
User Manual
Page 19
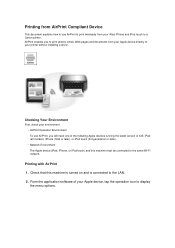
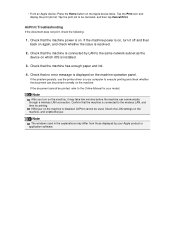
... The Apple device (iPad, iPhone, or iPod touch) and this machine is turned on and is connected to your iPad, iPhone and iPod touch to a Canon printer. Printing from AirPrint Compliant Device This document explains how to use AirPrint, you to print photos, email, Web pages and documents from your...
... The Apple device (iPad, iPhone, or iPod touch) and this machine is turned on and is connected to your iPad, iPhone and iPod touch to a Canon printer. Printing from AirPrint Compliant Device This document explains how to use AirPrint, you to print photos, email, Web pages and documents from your...
User Manual
Page 20
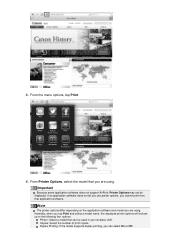
... Print and select a model name, the displayed printer options will include up to the following four options: Printer: Select a model that application software. From the menu options, tap Print. 4. If an application software does not let you use printer options, you cannot print from that can select On... or Off. From Printer Options, select the model that you are using . Note The printer options differ depending on the application software and model you are using . ...
... Print and select a model name, the displayed printer options will include up to the following four options: Printer: Select a model that application software. From the menu options, tap Print. 4. If an application software does not let you use printer options, you cannot print from that can select On... or Off. From Printer Options, select the model that you are using . Note The printer options differ depending on the application software and model you are using . ...
User Manual
Page 21
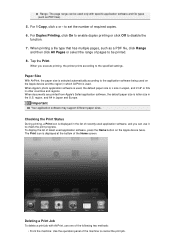
.... The Print icon is letter size in the U.S. Checking the Print Status During printing, a Print icon is used application software, and you execute printing, the printer prints according to check the print progress. When documents are printed from Apple's Safari application software, the default paper size is displayed at the bottom...
.... The Print icon is letter size in the U.S. Checking the Print Status During printing, a Print icon is used application software, and you execute printing, the printer prints according to check the print progress. When documents are printed from Apple's Safari application software, the default paper size is displayed at the bottom...
User Manual
Page 22
... the machine, it off and then back on again, and check whether the issue is displayed on the machine. If the problem persists, use the printer driver on your computer to be printed normally on the machine operation panel. Confirm that the machine power is connected to the Online Manual for...
... the machine, it off and then back on again, and check whether the issue is displayed on the machine. If the problem persists, use the printer driver on your computer to be printed normally on the machine operation panel. Confirm that the machine power is connected to the Online Manual for...
User Manual
Page 45
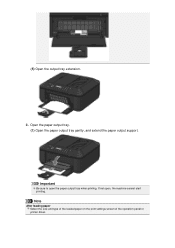
If not open the paper output tray when printing. (5) Open the output tray extension. 3. Important Be sure to open , the machine cannot start printing. Note After loading paper Select the size and type of the loaded paper on the print settings screen of the operation panel or printer driver. Open the paper output tray. (1) Open the paper output tray gently, and extend the paper output support.
If not open the paper output tray when printing. (5) Open the output tray extension. 3. Important Be sure to open , the machine cannot start printing. Note After loading paper Select the size and type of the loaded paper on the print settings screen of the operation panel or printer driver. Open the paper output tray. (1) Open the paper output tray gently, and extend the paper output support.
User Manual
Page 46
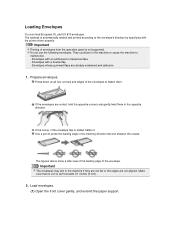
... envelopes may jam in the machine or cause the machine to flatten them in the inserting direction flat and sharpen the crease. Envelopes with the printer driver properly. If the corner of envelopes from the operation panel is not supported. Load envelopes. (1) Open the front cover gently, and extend the paper...
... envelopes may jam in the machine or cause the machine to flatten them in the inserting direction flat and sharpen the crease. Envelopes with the printer driver properly. If the corner of envelopes from the operation panel is not supported. Load envelopes. (1) Open the front cover gently, and extend the paper...
User Manual
Page 48
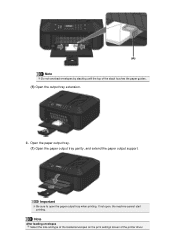
Open the paper output tray. (1) Open the paper output tray gently, and extend the paper output support. If not open the paper output tray when printing. Note After loading envelopes Select the size and type of the loaded envelopes on the print settings screen of the stack touches the paper guides. (5) Open the output tray extension. 3. Important Be sure to open , the machine cannot start printing. Note Do not overload envelopes by stacking until the top of the printer driver.
Open the paper output tray. (1) Open the paper output tray gently, and extend the paper output support. If not open the paper output tray when printing. Note After loading envelopes Select the size and type of the loaded envelopes on the print settings screen of the stack touches the paper guides. (5) Open the output tray extension. 3. Important Be sure to open , the machine cannot start printing. Note Do not overload envelopes by stacking until the top of the printer driver.
User Manual
Page 49
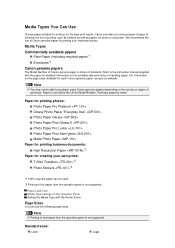
...is not supported. Media Types Commercially available papers Plain Paper (including recycled paper)*1 Envelopes*2 Canon genuine papers The Model Number of purchase. Refer to the instruction manual supplied with the Printer Driver Page Sizes You can be able to this paper from the operation panel is shown... in the US by name. Note Printing of Canon genuine paper for creating your important photos. We recommend the ...
...is not supported. Media Types Commercially available papers Plain Paper (including recycled paper)*1 Envelopes*2 Canon genuine papers The Model Number of purchase. Refer to the instruction manual supplied with the Printer Driver Page Sizes You can be able to this paper from the operation panel is shown... in the US by name. Note Printing of Canon genuine paper for creating your important photos. We recommend the ...
User Manual
Page 82
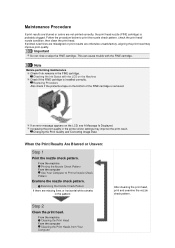
... in the pattern: After cleaning the print head, print and examine the nozzle check pattern. Note Before performing maintenance Check if ink remains in the printer driver settings may improve print quality. Replacing Procedure Also check if the protective tape on the LCD, see A Message Is Displayed. Changing the Print Quality...
... in the pattern: After cleaning the print head, print and examine the nozzle check pattern. Note Before performing maintenance Check if ink remains in the printer driver settings may improve print quality. Replacing Procedure Also check if the protective tape on the LCD, see A Message Is Displayed. Changing the Print Quality...

User Manual
Page 92
Open the printer driver setup window 2. Click Cleaning on and then click Execute. Complete cleaning The Nozzle Check dialog box opens after the confirmation message. 5. Perform deep cleaning ... has improved, click Print Check Pattern. Click Deep Cleaning on and then click Execute. Cleaning the print head frequently will rapidly deplete your printer's ink supply. Open the printer driver setup window 2. Click Initial Check Items to display the items you need to be performed. To cancel the check process, click Cancel...
Open the printer driver setup window 2. Click Cleaning on and then click Execute. Complete cleaning The Nozzle Check dialog box opens after the confirmation message. 5. Perform deep cleaning ... has improved, click Print Check Pattern. Click Deep Cleaning on and then click Execute. Cleaning the print head frequently will rapidly deplete your printer's ink supply. Open the printer driver setup window 2. Click Initial Check Items to display the items you need to be performed. To cancel the check process, click Cancel...

User Manual
Page 93
... still no sign of improvement after the confirmation message. 5. To cancel the check process, click Cancel. Cleaning the print head frequently will rapidly deplete your printer's ink supply. If there is no sign of ink than Cleaning. Complete deep cleaning The Nozzle Check dialog box opens after Deep Cleaning, switch off...
... still no sign of improvement after the confirmation message. 5. To cancel the check process, click Cancel. Cleaning the print head frequently will rapidly deplete your printer's ink supply. If there is no sign of ink than Cleaning. Complete deep cleaning The Nozzle Check dialog box opens after Deep Cleaning, switch off...

User Manual
Page 94
... will be completed. Click Roller Cleaning on and then click OK. The procedure for performing the feed roller cleaning is not fed properly. Open the printer driver setup window 3. Prepare the machine Remove all sheets of plain paper into the front tray, and click OK. Cleaning the Paper Feed Rollers from...
... will be completed. Click Roller Cleaning on and then click OK. The procedure for performing the feed roller cleaning is not fed properly. Open the printer driver setup window 3. Prepare the machine Remove all sheets of plain paper into the front tray, and click OK. Cleaning the Paper Feed Rollers from...

User Manual
Page 96
Open the printer driver setup window 2. Click Custom Settings on the Maintenance tab The Start Print Head Alignment dialog box opens. 6. Load paper in the message. 8. To perform ...
Open the printer driver setup window 2. Click Custom Settings on the Maintenance tab The Start Print Head Alignment dialog box opens. 6. Load paper in the message. 8. To perform ...

User Manual
Page 100
... the Maintenance tab The Nozzle Check dialog box opens. Load paper in the machine Load one sheet of the nozzle check pattern begins. Open the printer driver setup window 2. Click OK when the confirmation message appears. Print the pattern if printing becomes faint, or if a specific color fails to check whether...
... the Maintenance tab The Nozzle Check dialog box opens. Load paper in the machine Load one sheet of the nozzle check pattern begins. Open the printer driver setup window 2. Click OK when the confirmation message appears. Print the pattern if printing becomes faint, or if a specific color fails to check whether...


