
Setup Guide
Page 2
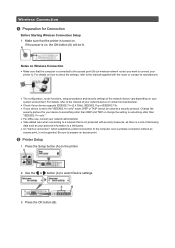
Wireless Connection Preparation for the printer. Setup Guide This guide provides information for setting up a network connection for Connection Printer Setup Setup Procedure Selection Push Button Method WPS Troubleshooting
Wireless Connection Preparation for the printer. Setup Guide This guide provides information for setting up a network connection for Connection Printer Setup Setup Procedure Selection Push Button Method WPS Troubleshooting
Setup Guide
Page 3
...(A) on . For details, refer to the manual of your network device or contact its manufacturer. • The configuration, router functions, setup procedures and security settings of disclosing data such as your personal information to a third party. • An "Ad-hoc connection," which ... security protocol. If the power is connected to the access point (A) (or wireless network router) you want to connect your system environment. b Printer Setup 1. Use the or button (A) to prepare an access point. Make sure that the computer is on how to check the settings, refer to . ...
...(A) on . For details, refer to the manual of your network device or contact its manufacturer. • The configuration, router functions, setup procedures and security settings of disclosing data such as your personal information to a third party. • An "Ad-hoc connection," which ... security protocol. If the power is connected to the access point (A) (or wireless network router) you want to connect your system environment. b Printer Setup 1. Use the or button (A) to prepare an access point. Make sure that the computer is on how to check the settings, refer to . ...
Setup Guide
Page 4
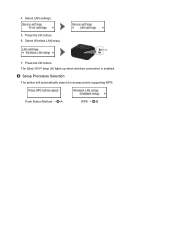
Select LAN settings. 5. Press the OK button. 6. c Setup Procedure Selection The printer will automatically search for access points supporting WPS. 4. Select Wireless LAN setup. 7. The (blue) Wi-Fi lamp (A) lights up when wireless connection is enabled. Push Button Method → d-A WPS → d-B Press the OK button.
Select LAN settings. 5. Press the OK button. 6. c Setup Procedure Selection The printer will automatically search for access points supporting WPS. 4. Select Wireless LAN setup. 7. The (blue) Wi-Fi lamp (A) lights up when wireless connection is enabled. Push Button Method → d-A WPS → d-B Press the OK button.

Setup Guide
Page 5
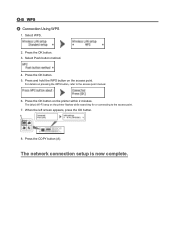
The network connection setup is now complete. When the left screen appears, press the OK button. 4. Press and hold the WPS button on the printer within 2 minutes. Press the COPY button (A). The (blue) Wi-Fi lamp on pressing the WPS button, refer to the access point. 3. For details on the printer flashes while searching for or connecting to the access point manual. 2. d-A Push Button Method d Connection Using WPS 1. Press the OK button on the access point.
The network connection setup is now complete. When the left screen appears, press the OK button. 4. Press and hold the WPS button on the printer within 2 minutes. Press the COPY button (A). The (blue) Wi-Fi lamp on pressing the WPS button, refer to the access point. 3. For details on the printer flashes while searching for or connecting to the access point manual. 2. d-A Push Button Method d Connection Using WPS 1. Press the OK button on the access point.
Setup Guide
Page 6
Press and hold the WPS button on the printer flashes while searching for or connecting to the access point manual. 6. Press the OK button. 5. The (blue) Wi-Fi lamp on the access point. The network connection setup is now complete. Press the OK button. 3. For details on the printer within 2 minutes. When the left screen appears, press the OK button. 8. d-B WPS d Connection Using WPS 1. Select WPS. 2. Press the OK button on pressing the WPS button, refer to the access point. 7. Select Push button method. 4. Press the COPY button (A).
Press and hold the WPS button on the printer flashes while searching for or connecting to the access point manual. 6. Press the OK button. 5. The (blue) Wi-Fi lamp on the access point. The network connection setup is now complete. Press the OK button. 3. For details on the printer within 2 minutes. When the left screen appears, press the OK button. 8. d-B WPS d Connection Using WPS 1. Select WPS. 2. Press the OK button on pressing the WPS button, refer to the access point. 7. Select Push button method. 4. Press the COPY button (A).

Setup Guide
Page 7
... one access point. Failed to the manual supplied with the access point or contact its manufacturer. Timeout error The screen appears when WPS setup was not completed within a specified time. • Is the network device (router, etc.) turned on .
... one access point. Failed to the manual supplied with the access point or contact its manufacturer. Timeout error The screen appears when WPS setup was not completed within a specified time. • Is the network device (router, etc.) turned on .

User Manual
Page 2
..., then select the Print Background Colors and Images checkbox. • In Internet Explorer 9 or 10 Select (Tools) > Print > Page setup.... • In Internet Explorer 8 1. Select Page Setup... Canon shall not be liable for the use of this guide. • Recommended Operating System Windows 8, Windows 7, Windows 7 SP1, Windows Vista ...of all the products sold by customers as "this guide"), in whole or in part, is prohibited. • In principle, Canon shall change or delete the contents of this guide without prior notice to customers. Press the Alt key to display the menus. 2.
..., then select the Print Background Colors and Images checkbox. • In Internet Explorer 9 or 10 Select (Tools) > Print > Page setup.... • In Internet Explorer 8 1. Select Page Setup... Canon shall not be liable for the use of this guide. • Recommended Operating System Windows 8, Windows 7, Windows 7 SP1, Windows Vista ...of all the products sold by customers as "this guide"), in whole or in part, is prohibited. • In principle, Canon shall change or delete the contents of this guide without prior notice to customers. Press the Alt key to display the menus. 2.
User Manual
Page 26
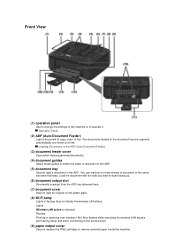
... flashes blue to indicate the wireless LAN status. Flashes: Printing or scanning over wireless LAN. Also flashes while searching for wireless LAN access point during setup and when connecting to the access point. (9) paper output cover Open to copy, scan, or fax. Operation Panel (2) ADF (Auto Document Feeder) Load a document to...
... flashes blue to indicate the wireless LAN status. Flashes: Printing or scanning over wireless LAN. Also flashes while searching for wireless LAN access point during setup and when connecting to the access point. (9) paper output cover Open to copy, scan, or fax. Operation Panel (2) ADF (Auto Document Feeder) Load a document to...
User Manual
Page 31
... a name for saving the scanned data or select the document type to select various copy functions or change the location for registration. (14) Setup button Displays the Setup menu screen. user settings When Printing Becomes Faint or Colors Are Incorrect Changing the Machine Settings on the operation panel. LAN settings (15) SCAN...
... a name for saving the scanned data or select the document type to select various copy functions or change the location for registration. (14) Setup button Displays the Setup menu screen. user settings When Printing Becomes Faint or Colors Are Incorrect Changing the Machine Settings on the operation panel. LAN settings (15) SCAN...
User Manual
Page 38
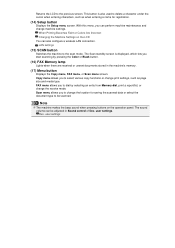
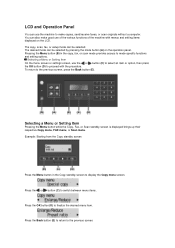
... functions of the machine with the procedure. You can also make copies, send/receive faxes, or scan originals without a computer. The copy, scan, fax, or setup mode can be selected by pressing the mode button (A) on the LCD. LCD and Operation Panel You can use the machine to make good use...
... functions of the machine with the procedure. You can also make copies, send/receive faxes, or scan originals without a computer. The copy, scan, fax, or setup mode can be selected by pressing the mode button (A) on the LCD. LCD and Operation Panel You can use the machine to make good use...
User Manual
Page 79
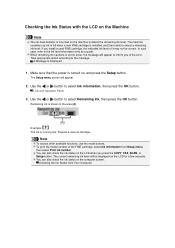
... LCD for a few seconds. If you install a used FINE cartridge, the indicated ink level of the error. The Setup menu screen will appear to inform you press the COPY, FAX, SCAN, or Setup button. Use the or button to select Ink information, then press the OK button. Prepare a new ink cartridge. The... the machine to detect a remaining ink level. In such case, refer to the message. You can also check the ink status on , and press the Setup button. Example: The ink is shown in the area (A). The machine considers as a guide. Checking the Ink Status from...
... LCD for a few seconds. If you install a used FINE cartridge, the indicated ink level of the error. The Setup menu screen will appear to inform you press the COPY, FAX, SCAN, or Setup button. Use the or button to select Ink information, then press the OK button. Prepare a new ink cartridge. The... the machine to detect a remaining ink level. In such case, refer to the message. You can also check the ink status on , and press the Setup button. Example: The ink is shown in the area (A). The machine considers as a guide. Checking the Ink Status from...
User Manual
Page 84
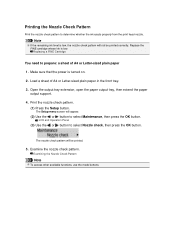
... prepare: a sheet of A4 or Letter-sized plain paper in the front tray. 3. Note If the remaining ink level is turned on. 2. The Setup menu screen will be printed correctly. LCD and Operation Panel (3) Use the or button to select Maintenance, then press the OK button. Make sure that... the power is low, the nozzle check pattern will not be printed. 5. Print the nozzle check pattern. (1) Press the Setup button. The nozzle check pattern will appear. (2) Use the or button to select Nozzle check, then press the OK button. Examine the nozzle check pattern...
... prepare: a sheet of A4 or Letter-sized plain paper in the front tray. 3. Note If the remaining ink level is turned on. 2. The Setup menu screen will be printed correctly. LCD and Operation Panel (3) Use the or button to select Maintenance, then press the OK button. Make sure that... the power is low, the nozzle check pattern will not be printed. 5. Print the nozzle check pattern. (1) Press the Setup button. The nozzle check pattern will appear. (2) Use the or button to select Nozzle check, then press the OK button. Examine the nozzle check pattern...

User Manual
Page 86
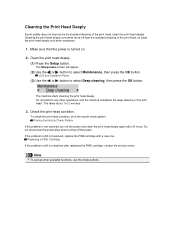
Make sure that the power is not resolved after cleaning the print head twice, clean the print head deeply. The Setup menu screen will appear. (2) Use the or button to select Cleaning, then press the OK button. The machine starts cleaning the print head. Cleaning the... Print Head Deeply Clean the print head. (1) Press the Setup button. Check the print head condition. Printing the Nozzle Check Pattern Note To access other operations until the machine completes the cleaning of the print...
Make sure that the power is not resolved after cleaning the print head twice, clean the print head deeply. The Setup menu screen will appear. (2) Use the or button to select Cleaning, then press the OK button. The machine starts cleaning the print head. Cleaning the... Print Head Deeply Clean the print head. (1) Press the Setup button. Check the print head condition. Printing the Nozzle Check Pattern Note To access other operations until the machine completes the cleaning of the print...
User Manual
Page 87
The Setup menu screen will appear. (2) Use the or button to 2 minutes. 3. This takes about 1 to select Maintenance, then press the OK button. Note To access other ... improve by the standard cleaning of the print head, so clean the print head deeply only when necessary. 1. Clean the print head deeply. (1) Press the Setup button. Do not disconnect the power plug when turning off the power and clean the print head deeply again after replacing the FINE cartridge, contact...
The Setup menu screen will appear. (2) Use the or button to 2 minutes. 3. This takes about 1 to select Maintenance, then press the OK button. Note To access other ... improve by the standard cleaning of the print head, so clean the print head deeply only when necessary. 1. Clean the print head deeply. (1) Press the Setup button. Do not disconnect the power plug when turning off the power and clean the print head deeply again after replacing the FINE cartridge, contact...
User Manual
Page 88
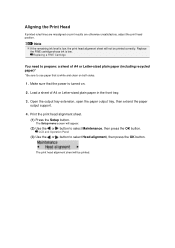
Make sure that is low, the print head alignment sheet will be printed correctly. The Setup menu screen will appear. (2) Use the or button to select Head alignment, then press the OK button. LCD and Operation Panel (3) Use the or button ...to select Maintenance, then press the OK button. Print the print head alignment sheet. (1) Press the Setup button. The print head alignment sheet will not be printed. Load a sheet of A4 or Letter-sized plain paper (including recycled paper)* * Be sure to...
Make sure that is low, the print head alignment sheet will be printed correctly. The Setup menu screen will appear. (2) Use the or button to select Head alignment, then press the OK button. LCD and Operation Panel (3) Use the or button ...to select Maintenance, then press the OK button. Print the print head alignment sheet. (1) Press the Setup button. The print head alignment sheet will not be printed. Load a sheet of A4 or Letter-sized plain paper (including recycled paper)* * Be sure to...

User Manual
Page 92
The procedure for which cleaning is to check before performing cleaning. 3. Open the printer driver setup window 2. Click Deep Cleaning on and then click Execute. Print head cleaning starts. 4. Cleaning the print head frequently will rapidly deplete your printer's ... a small amount of ink. Check the results To check whether the print quality has improved, click Print Check Pattern. Open the printer driver setup window 2. Click OK when the confirmation message appears. Execute deep cleaning Make sure that the machine is on the Maintenance tab When the Deep ...
The procedure for which cleaning is to check before performing cleaning. 3. Open the printer driver setup window 2. Click Deep Cleaning on and then click Execute. Print head cleaning starts. 4. Cleaning the print head frequently will rapidly deplete your printer's ... a small amount of ink. Check the results To check whether the print quality has improved, click Print Check Pattern. Open the printer driver setup window 2. Click OK when the confirmation message appears. Execute deep cleaning Make sure that the machine is on the Maintenance tab When the Deep ...

User Manual
Page 94
Open the printer driver setup window 3. Paper will be ejected and feed roller cleaning will be completed. Execute paper feed roller cleaning Make sure that the machine is as follows: ...
Open the printer driver setup window 3. Paper will be ejected and feed roller cleaning will be completed. Execute paper feed roller cleaning Make sure that the machine is as follows: ...

User Manual
Page 96
... patterns with the least amount of streaks are clicked in the preview window, their numbers are automatically entered in the message. 8. Open the printer driver setup window 2. Aligning the Print Head Position from the operation panel of the machine. To perform automatic head alignment, refer to manual Check the Align heads...
... patterns with the least amount of streaks are clicked in the preview window, their numbers are automatically entered in the message. 8. Open the printer driver setup window 2. Aligning the Print Head Position from the operation panel of the machine. To perform automatic head alignment, refer to manual Check the Align heads...

User Manual
Page 100
... Check dialog box opens. 5. If the print result is normal, click Exit. Related Topic Cleaning the Print Heads from Your Computer Open the printer driver setup window 2. Printing of A4 size or Letter size plain paper into the front tray. 4. When the print result is smudged or if there are any...
... Check dialog box opens. 5. If the print result is normal, click Exit. Related Topic Cleaning the Print Heads from Your Computer Open the printer driver setup window 2. Printing of A4 size or Letter size plain paper into the front tray. 4. When the print result is smudged or if there are any...
User Manual
Page 101
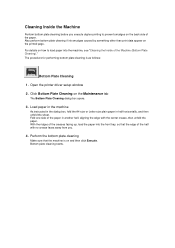
... you execute duplex printing to load paper into the front tray, so that the machine is as follows: Bottom Plate Cleaning 1. Open the printer driver setup window 2. Bottom plate cleaning starts. Fold one side of the Machine (Bottom Plate Cleaning)." Click Bottom Plate Cleaning on the printed page. Cleaning Inside the...
... you execute duplex printing to load paper into the front tray, so that the machine is as follows: Bottom Plate Cleaning 1. Open the printer driver setup window 2. Bottom plate cleaning starts. Fold one side of the Machine (Bottom Plate Cleaning)." Click Bottom Plate Cleaning on the printed page. Cleaning Inside the...


